Quick Start Guide
Page 1
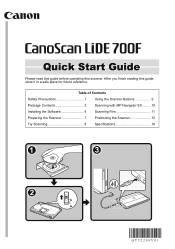
Table of Contents Safety Precautions 1 Using the Scanner Buttons 9 Package Contents 3 Scanning with MP Navigator EX......... 10 Installing the Software 4 Scanning Film 11 Preparing the Scanner 7 Positioning the Scanner 15 Try Scanning 8 Specifications 16 After you finish reading this scanner. Quick Start Guide Please read this guide before operating this guide, store it in a safe place for future reference.
Table of Contents Safety Precautions 1 Using the Scanner Buttons 9 Package Contents 3 Scanning with MP Navigator EX......... 10 Installing the Software 4 Scanning Film 11 Preparing the Scanner 7 Positioning the Scanner 15 Try Scanning 8 Specifications 16 After you finish reading this scanner. Quick Start Guide Please read this guide before operating this guide, store it in a safe place for future reference.
Quick Start Guide
Page 2
... the following legal issues: • Scanning of the FCC Rules. has determined that to which can radiate radio frequency energy and, if not installed and used in accordance with Class B limits in a particular installation. Warning When you use this product meets the ENERGY STAR guidelines for a Class B digital device, pursuant to radio communications. Use of a shielded cable is subject to...
... the following legal issues: • Scanning of the FCC Rules. has determined that to which can radiate radio frequency energy and, if not installed and used in accordance with Class B limits in a particular installation. Warning When you use this product meets the ENERGY STAR guidelines for a Class B digital device, pursuant to radio communications. Use of a shielded cable is subject to...
Quick Start Guide
Page 3
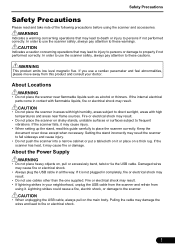
... the scanner falls, it . About the Power Supply WARNING • Do not place heavy objects on the main body. If it may lead to death or injury to property if not performed correctly. CAUTION Indicates a caution concerning operations that may cause fire or damage. Keep the document cover close except when necessary. If the internal electrical parts...
... the scanner falls, it . About the Power Supply WARNING • Do not place heavy objects on the main body. If it may lead to death or injury to property if not performed correctly. CAUTION Indicates a caution concerning operations that may cause fire or damage. Keep the document cover close except when necessary. If the internal electrical parts...
Quick Start Guide
Page 4
... players. If the document cover falls, it . It may lead to the scanner or decrease image quality. If anything unusual, immediately unplug the USB cable and contact your retailer or Canon Customer Support Help Desk. Objects may break and cause personal injury. • Do not bump the document glass or drop heavy books or objects on the document glass. The document glass may fall and cause...
... players. If the document cover falls, it . It may lead to the scanner or decrease image quality. If anything unusual, immediately unplug the USB cable and contact your retailer or Canon Customer Support Help Desk. Objects may break and cause personal injury. • Do not bump the document glass or drop heavy books or objects on the document glass. The document glass may fall and cause...
Quick Start Guide
Page 5
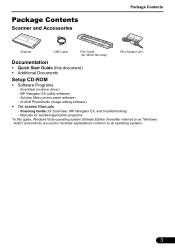
... EX (utility software) - ArcSoft PhotoStudio (image editing software) • On-screen Manuals - Manuals for bundled application programs *In this document) • Additional Documents Setup CD-ROM • Software Programs - Scanning Guide (for ScanGear, MP Navigator EX, and troubleshooting) - ScanGear (scanner driver) - Solution Menu (menu panel software) - Package Contents Scanner and Accessories Package Contents Scanner USB Cable Film Guide (for 35mm film strip) Film Adapter Unit Documentation • Quick Start Guide (this guide, Windows Vista operating system Ultimate...
... EX (utility software) - ArcSoft PhotoStudio (image editing software) • On-screen Manuals - Manuals for bundled application programs *In this document) • Additional Documents Setup CD-ROM • Software Programs - Scanning Guide (for ScanGear, MP Navigator EX, and troubleshooting) - ScanGear (scanner driver) - Solution Menu (menu panel software) - Package Contents Scanner and Accessories Package Contents Scanner USB Cable Film Guide (for 35mm film strip) Film Adapter Unit Documentation • Quick Start Guide (this guide, Windows Vista operating system Ultimate...

Quick Start Guide
Page 6
... administrator ID and password on the authentication dialog box. If you connect the scanner and the Found New Hardware screen appears, unplug the USB cable from Windows XP to Windows Vista, first uninstall software bundled with the Canon scanner. • Log in as an administrator to install the software. • Do not switch users during the installation process. 1 Place the Setup CD-ROM in the drive. For Windows 2000/XP...
... administrator ID and password on the authentication dialog box. If you connect the scanner and the Found New Hardware screen appears, unplug the USB cable from Windows XP to Windows Vista, first uninstall software bundled with the Canon scanner. • Log in as an administrator to install the software. • Do not switch users during the installation process. 1 Place the Setup CD-ROM in the drive. For Windows 2000/XP...

Quick Start Guide
Page 7
For Macintosh, skip step 9 and go to step 7. 6 For Windows, carefully read the License Agreement, and then click Yes to proceed. Carefully read the Please Allow All Install Wizard Processes screen, and then click Next. 7 Follow the on-screen instructions to perform the installation. 8 For users in the U.S.A., when the User Registration screen appears, follow the on the main menu. 4 Click Easy Install on -screen instructions to ensure product support. For Macintosh, skip step 6 and go to start installation. Installing the Software 5 Click Install to step 10. 5
For Macintosh, skip step 9 and go to step 7. 6 For Windows, carefully read the License Agreement, and then click Yes to proceed. Carefully read the Please Allow All Install Wizard Processes screen, and then click Next. 7 Follow the on-screen instructions to perform the installation. 8 For users in the U.S.A., when the User Registration screen appears, follow the on the main menu. 4 Click Easy Install on -screen instructions to ensure product support. For Macintosh, skip step 6 and go to start installation. Installing the Software 5 Click Install to step 10. 5
Quick Start Guide
Page 8
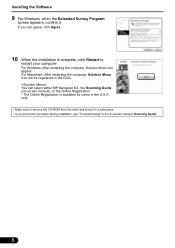
... When the installation is available for users in the Dock. only. • Make sure to remove the CD-ROM from the drive and store it . For Macintosh: After restarting the computer, Solution Menu icon will appear. For Windows: After restarting the computer, Solution Menu will be registered in the U.S.A. If you encounter a problem during installation, see "Troubleshooting" in the on -screen manual), or...
... When the installation is available for users in the Dock. only. • Make sure to remove the CD-ROM from the drive and store it . For Macintosh: After restarting the computer, Solution Menu icon will appear. For Windows: After restarting the computer, Solution Menu will be registered in the U.S.A. If you encounter a problem during installation, see "Troubleshooting" in the on -screen manual), or...
Quick Start Guide
Page 9
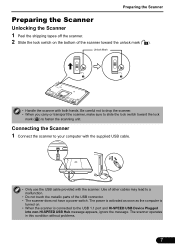
... metallic parts of the scanner toward the lock mark ( ) to fasten the scanning unit. The scanner operates in this condition without problems. 7 Connecting the Scanner 1 Connect the scanner to your computer with the supplied USB cable. • Only use the USB cable provided with both hands. Be careful not to drop the scanner. • When you carry or transport the scanner, make sure to slide the lock switch toward the unlock mark ( ). The power is...
... metallic parts of the scanner toward the lock mark ( ) to fasten the scanning unit. The scanner operates in this condition without problems. 7 Connecting the Scanner 1 Connect the scanner to your computer with the supplied USB cable. • Only use the USB cable provided with both hands. Be careful not to drop the scanner. • When you carry or transport the scanner, make sure to slide the lock switch toward the unlock mark ( ). The power is...
Quick Start Guide
Page 10
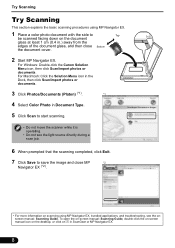
... Solution Menu icon in the Dock, then click Scan/import photos or documents. 3 Click Photos/Documents (Platen) (*1). *1 4 Select Color Photo in ScanGear or MP Navigator EX. 8 To open the on-screen manual: Scanning Guide, double-click the on-screen manual icon on the desktop, or click on in Document Type. 5 Click Scan to start scanning. • Do not move the scanner while it is operating. • Do not see the light source directly during a scan job...
... Solution Menu icon in the Dock, then click Scan/import photos or documents. 3 Click Photos/Documents (Platen) (*1). *1 4 Select Color Photo in ScanGear or MP Navigator EX. 8 To open the on-screen manual: Scanning Guide, double-click the on-screen manual icon on the desktop, or click on in Document Type. 5 Click Scan to start scanning. • Do not move the scanner while it is operating. • Do not see the light source directly during a scan job...

Quick Start Guide
Page 11
... the scanner buttons do not work properly, see the on page 3. Start Image Capture, and then click Options and select MP Navigator EX in Application to open MP Navigator EX automatically when a scanner button is pressed:. 9 SCAN Button Discriminates the document type automatically, then scans and saves it with a printer. E-MAIL Button Attaches the scanned image to copy, scan, e-mail, and save scanned images in PDF format with a press of a button. For more information, see "Troubleshooting" in the on-screen manual: Scanning Guide...
... the scanner buttons do not work properly, see the on page 3. Start Image Capture, and then click Options and select MP Navigator EX in Application to open MP Navigator EX automatically when a scanner button is pressed:. 9 SCAN Button Discriminates the document type automatically, then scans and saves it with a printer. E-MAIL Button Attaches the scanned image to copy, scan, e-mail, and save scanned images in PDF format with a press of a button. For more information, see "Troubleshooting" in the on-screen manual: Scanning Guide...
Quick Start Guide
Page 12
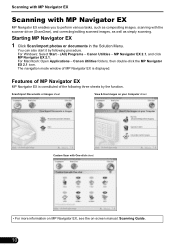
Canon Utilities - Scan/Import Documents or Images sheet View & Use Images on your Computer sheet Custom Scan with the scanner driver (ScanGear), and correcting/editing scanned images, as well as compositing images, scanning with One-click sheet • For more information on MP Navigator EX, see the on-screen manual: Scanning Guide. 10 Canon Utilities folders, then double-click the MP Navigator EX 2.1 icon. Starting MP Navigator EX 1 Click Scan/import photos or documents in the Solution Menu. You can also...
Canon Utilities - Scan/Import Documents or Images sheet View & Use Images on your Computer sheet Custom Scan with the scanner driver (ScanGear), and correcting/editing scanned images, as well as compositing images, scanning with One-click sheet • For more information on MP Navigator EX, see the on-screen manual: Scanning Guide. 10 Canon Utilities folders, then double-click the MP Navigator EX 2.1 icon. Starting MP Navigator EX 1 Click Scan/import photos or documents in the Solution Menu. You can also...
Quick Start Guide
Page 13
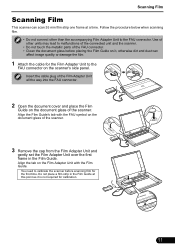
... need to the FAU connector on the scanner's side panel. Do not place a film strip in the Film Guide. Use of the scanner. Align the Film Guide's tab with the Film Guide. Align the tab on the document glass of other than the accompanying Film Adapter Unit to the FAU connector. Follow the procedure below when scanning film. • Do not connect other units may lead to malfunctions of the connected unit and the scanner...
... need to the FAU connector on the scanner's side panel. Do not place a film strip in the Film Guide. Use of the scanner. Align the Film Guide's tab with the Film Guide. Align the tab on the document glass of other than the accompanying Film Adapter Unit to the FAU connector. Follow the procedure below when scanning film. • Do not connect other units may lead to malfunctions of the connected unit and the scanner...

Quick Start Guide
Page 14
Follow the step 2 in "Try Scanning" on page 8. 6 Click Film. 7 Click Scan. 8 Click OK on the calibration message window. Scanning Film 4 Gently close the document cover. 5 Start MP Navigator EX. Do not move the scanner while it is operating. 9 When the scanning message window appears, open the document cover, remove the Film Adapter Unit, and then attach the cap to the unit. 12
Follow the step 2 in "Try Scanning" on page 8. 6 Click Film. 7 Click Scan. 8 Click OK on the calibration message window. Scanning Film 4 Gently close the document cover. 5 Start MP Navigator EX. Do not move the scanner while it is operating. 9 When the scanning message window appears, open the document cover, remove the Film Adapter Unit, and then attach the cap to the unit. 12
Quick Start Guide
Page 15
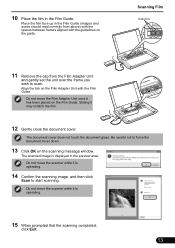
... to start scanning. Do not move the scanner while it has been placed on the scanning message window. The document cover does not touch the document glass. Sliding it is operating. 15 When prompted that the scanning completed, click Exit. 13 The scanned image is operating. 14 Confirm the scanning image, and then click Scan to force the document cover down. 13 Click OK on the Film Guide. Do not move the Film Adapter Unit once...
... to start scanning. Do not move the scanner while it has been placed on the scanning message window. The document cover does not touch the document glass. Sliding it is operating. 15 When prompted that the scanning completed, click Exit. 13 The scanned image is operating. 14 Confirm the scanning image, and then click Scan to force the document cover down. 13 Click OK on the Film Guide. Do not move the Film Adapter Unit once...

Quick Start Guide
Page 16
Remove the film and the Film Guide from the document glass. • Do not leave the film strip in the Film Guide for an extended period of time as heat from the unit may damage the film. • For more information on scanning film, see "Scanning Film" in the on-screen manual: Scanning Guide. 14 Scanning Film 16 Click Save to save the image and close MP Navigator EX. • After the scanning is finished, remove the Film Adapter Unit, and then attach the cap to the unit.
Remove the film and the Film Guide from the document glass. • Do not leave the film strip in the Film Guide for an extended period of time as heat from the unit may damage the film. • For more information on scanning film, see "Scanning Film" in the on-screen manual: Scanning Guide. 14 Scanning Film 16 Click Save to save the image and close MP Navigator EX. • After the scanning is finished, remove the Film Adapter Unit, and then attach the cap to the unit.
Quick Start Guide
Page 17
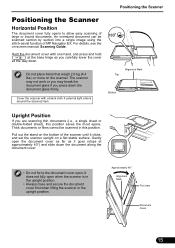
... Thin Item Document Cover 15 Positioning the Scanner Positioning the Scanner Horizontal Position The document cover fully opens to allow easy scanning of the scanner until it goes (stops at the base hinge as you are scanning thin documents (i.e., a single sheet or double-folded sheet), this position. An oversized document can be scanned in the upright position. Thick documents or films cannot be scanned section by section into a single image using the...
... Thin Item Document Cover 15 Positioning the Scanner Positioning the Scanner Horizontal Position The document cover fully opens to allow easy scanning of the scanner until it goes (stops at the base hinge as you are scanning thin documents (i.e., a single sheet or double-folded sheet), this position. An oversized document can be scanned in the upright position. Thick documents or films cannot be scanned section by section into a single image using the...
Quick Start Guide
Page 18
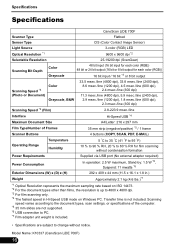
... *4 (Film) 2.8-223.9 msec./line Interface Hi-Speed USB *4 Maximum Document Size A4/Letter: 216 x 297 mm Film Type/Number of the computer. *5 35 mm slides are not supported. *6 USB connection to PC. *7 Film adapter unit weight is included. • Specifications are subject to 4800 x 4800 dpi. *3 For film scanning only. *4 The fastest speed in Hi-Speed USB mode on Windows PC. Transfer time is up to change without condensation formation Power Requirements Supplied...
... *4 (Film) 2.8-223.9 msec./line Interface Hi-Speed USB *4 Maximum Document Size A4/Letter: 216 x 297 mm Film Type/Number of the computer. *5 35 mm slides are not supported. *6 USB connection to PC. *7 Film adapter unit weight is included. • Specifications are subject to 4800 x 4800 dpi. *3 For film scanning only. *4 The fastest speed in Hi-Speed USB mode on Windows PC. Transfer time is up to change without condensation formation Power Requirements Supplied...

Quick Start Guide
Page 19
CANON U.S.A. INC. One Canon Plaza, Lake Success, NY 11042 U.S.A. CANON AUSTRALIA PTY LTD 1 Thomas Holt Drive, North Ryde, Sydney N.S.W. 2113, Australia CANON NEW ZEALAND LIMITED Akoranga Business Park, Akoranga Drive, Northcote, Auckland, New Zealand QT5-2200-V01 XXXXXXXX ©CANON INC. 2009 PRINTED IN VIETNAM
CANON U.S.A. INC. One Canon Plaza, Lake Success, NY 11042 U.S.A. CANON AUSTRALIA PTY LTD 1 Thomas Holt Drive, North Ryde, Sydney N.S.W. 2113, Australia CANON NEW ZEALAND LIMITED Akoranga Business Park, Akoranga Drive, Northcote, Auckland, New Zealand QT5-2200-V01 XXXXXXXX ©CANON INC. 2009 PRINTED IN VIETNAM


