User Manual
Page 1
Cover Contents Document Scanner User Manual ♦ Please read this manual before operating this scanner. ♦ After you finish reading this manual, store it in a safe place for future reference. 1 Back Next Page Introduction Contents Chapter 1 Before Using the Scanner Chapter 2 Setup Chapter 3 Basic Operation Chapter 4 ISIS/TWAIN Driver Settings Chapter 5 Job Registration Tool Settings Chapter 6 Maintenance Chapter 7 Troubleshooting Chapter 8 Appendix INDEX DR-2010C / DR-2510C
Cover Contents Document Scanner User Manual ♦ Please read this manual before operating this scanner. ♦ After you finish reading this manual, store it in a safe place for future reference. 1 Back Next Page Introduction Contents Chapter 1 Before Using the Scanner Chapter 2 Setup Chapter 3 Basic Operation Chapter 4 ISIS/TWAIN Driver Settings Chapter 5 Job Registration Tool Settings Chapter 6 Maintenance Chapter 7 Troubleshooting Chapter 8 Appendix INDEX DR-2010C / DR-2510C
User Manual
Page 4
... Red color for Black-and-White Scanning 31 Creating Smaller Files 32 Saving the Text Data of the Scanner 62 Cleaning the Sensor Glass and the Rollers 63 2. Before Using the Scanner 37 2. Uninstalling Software 75 Uninstalling the ISIS/TWAIN Driver and Job Registration Tool 75 Uninstalling CapturePerfect 3.0 76 Chapter 8 Appendix 77 Specifications 77 Replacement Parts 78 External Dimensions 79 INDEX 81 4 DR-2010C / DR-2510C ISIS/TWAIN Driver Properties Dialog Box 38 Scan Mode Settings 39 Auto Color Detection 40 Paper Size Settings 41 Scan...
... Red color for Black-and-White Scanning 31 Creating Smaller Files 32 Saving the Text Data of the Scanner 62 Cleaning the Sensor Glass and the Rollers 63 2. Before Using the Scanner 37 2. Uninstalling Software 75 Uninstalling the ISIS/TWAIN Driver and Job Registration Tool 75 Uninstalling CapturePerfect 3.0 76 Chapter 8 Appendix 77 Specifications 77 Replacement Parts 78 External Dimensions 79 INDEX 81 4 DR-2010C / DR-2510C ISIS/TWAIN Driver Properties Dialog Box 38 Scan Mode Settings 39 Auto Color Detection 40 Paper Size Settings 41 Scan...

User Manual
Page 9
... the text and background are light. These modes may not be automatically started when a document placed in color or black and white, and saves the image accordingly. „ Folio Scan You can be registered) on the scanned image. „ Auto Start The scanner is equipped with an auto start function, which enables scanning to be available depending on the software you to adjust the contrast and brightness of a prescanned...
... the text and background are light. These modes may not be automatically started when a document placed in color or black and white, and saves the image accordingly. „ Folio Scan You can be registered) on the scanned image. „ Auto Start The scanner is equipped with an auto start function, which enables scanning to be available depending on the software you to adjust the contrast and brightness of a prescanned...
User Manual
Page 10
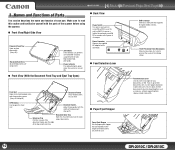
... the Document Feed Tray and Eject Tray Open) „ Back View Power Switch This switch is linked to turn the scanner ON and OFF. OPEN button Use to feed documents one at a time (page separation mode) (See p.21). Document Eject Tray Open this tray when you want to feed documents that are fed. Push it up to open the front unit. Power Connector Connect the supplied AC adapter to this connector. „ Feed Selection Lever Front Unit Open when clearing paper jams and cleaning the scanner. (See...
... the Document Feed Tray and Eject Tray Open) „ Back View Power Switch This switch is linked to turn the scanner ON and OFF. OPEN button Use to feed documents one at a time (page separation mode) (See p.21). Document Eject Tray Open this tray when you want to feed documents that are fed. Push it up to open the front unit. Power Connector Connect the supplied AC adapter to this connector. „ Feed Selection Lever Front Unit Open when clearing paper jams and cleaning the scanner. (See...

User Manual
Page 25
... section describes how to start CapturePerfect 3.0, select the scanner, and scan documents. The side of the ISIS/TWAIN driver → click [Folio] in the [Page Size] box → click [OK]. 44..SSccaannninnignMgeMtheotdhsods When scanning with the scanner, scanning using the Job function, and other special scanning. The Scan Batch to File function is on the right side. Contents Back Previous Page Next Page NOTE • When scanning folded documents, switch the feed selection lever to (Bypass...
... section describes how to start CapturePerfect 3.0, select the scanner, and scan documents. The side of the ISIS/TWAIN driver → click [Folio] in the [Page Size] box → click [OK]. 44..SSccaannninnignMgeMtheotdhsods When scanning with the scanner, scanning using the Job function, and other special scanning. The Scan Batch to File function is on the right side. Contents Back Previous Page Next Page NOTE • When scanning folded documents, switch the feed selection lever to (Bypass...

User Manual
Page 27
... a TWAIN-compliant application program that installs with the ISIS/TWAIN driver, and is used by applications. These functions can assign operations for performing scanning to specific job buttons (Job Function). The Job Function enables you to program the job buttons to scan documents without having to start the Job Registration Tool and how to scan with the Job Function This section describes how to start an application on the computer. For more pages of the document to scan, scanning stops...
... a TWAIN-compliant application program that installs with the ISIS/TWAIN driver, and is used by applications. These functions can assign operations for performing scanning to specific job buttons (Job Function). The Job Function enables you to program the job buttons to scan documents without having to start the Job Registration Tool and how to scan with the Job Function This section describes how to start an application on the computer. For more pages of the document to scan, scanning stops...

User Manual
Page 28
... following jobs are registered in the [Monitor for DR-2510C] or [Monitor for DR-2010C] dialog box is displayed, and scanning starts. Contents Back Previous Page Next Page 6 When scanning is complete, the image data is installed with the specified conditions. Using the Scan Panel The Scan Panel is an application that is sent with the ISIS/TWAIN driver. For information on p. 21.). 5 When you start scanning. 4 Place the document (See...
... following jobs are registered in the [Monitor for DR-2510C] or [Monitor for DR-2010C] dialog box is displayed, and scanning starts. Contents Back Previous Page Next Page 6 When scanning is complete, the image data is installed with the specified conditions. Using the Scan Panel The Scan Panel is an application that is sent with the ISIS/TWAIN driver. For information on p. 21.). 5 When you start scanning. 4 Place the document (See...

User Manual
Page 30
... correct size of the feed rollers. Contents Back Previous Page Next Page Scanning Different Sized Documents Together You can set the scanning conditions to determine whether a scanned image is a blank page, and skip saving the image if so. Scanning Side Settings." For more information on setting the scanning conditions, see "Placing Folded Documents" (p. 24) and Chapter 4, "ISIS/TWAIN Driver Settings - For more information on setting the scanning conditions, see Chapter 4, "ISIS/TWAIN Driver Settings - Click the [Basic] tab in the settings dialog box, and...
... correct size of the feed rollers. Contents Back Previous Page Next Page Scanning Different Sized Documents Together You can set the scanning conditions to determine whether a scanned image is a blank page, and skip saving the image if so. Scanning Side Settings." For more information on setting the scanning conditions, see "Placing Folded Documents" (p. 24) and Chapter 4, "ISIS/TWAIN Driver Settings - For more information on setting the scanning conditions, see Chapter 4, "ISIS/TWAIN Driver Settings - Click the [Basic] tab in the settings dialog box, and...

User Manual
Page 32
... Pages • To scan both sides of the document page You can specify the scanning area. The page size is useful if you want to straighten documents after you click [Panel Feeding] in [Mode]. Specifying Security Settings for scanning documents An irregular document size not already registered as a page size selection can be saved as they are scanned with a high compression rate, so that has too many pages to these examples when specifying ISIS/TWAIN driver settings...
... Pages • To scan both sides of the document page You can specify the scanning area. The page size is useful if you want to straighten documents after you click [Panel Feeding] in [Mode]. Specifying Security Settings for scanning documents An irregular document size not already registered as a page size selection can be saved as they are scanned with a high compression rate, so that has too many pages to these examples when specifying ISIS/TWAIN driver settings...

User Manual
Page 34
... a click. 3 Remove the jammed document from inside the scanner. 4 Close the front unit by pushing until clicks into place. Contents Back Previous Page Next Page NOTE If a paper jam occurs when [Rapid recovery system] is enabled in the [Others] tab of the ISIS/TWAIN driver settings dialog box, the image data of the document is fixed. Make sure that caused the paper jam after the paper jam is not saved and scanning stops. After removing the jammed paper, check to...
... a click. 3 Remove the jammed document from inside the scanner. 4 Close the front unit by pushing until clicks into place. Contents Back Previous Page Next Page NOTE If a paper jam occurs when [Rapid recovery system] is enabled in the [Others] tab of the ISIS/TWAIN driver settings dialog box, the image data of the document is fixed. Make sure that caused the paper jam after the paper jam is not saved and scanning stops. After removing the jammed paper, check to...

User Manual
Page 43
... SWITCH also may not work properly or cause part of the [Others] tab. y Adjust the [Content density] setting in the [Batch Separation] box of the image to detect slanted document pages and straighten the scanned images. 1 In the ISIS/TWAIN driver properties dialog box, click the [Basic] tab → select the [Deskew] check box. y You cannot click [Folio] if you click [Patchcode] in the [Blank Skip Setting] dialog box...
... SWITCH also may not work properly or cause part of the [Others] tab. y Adjust the [Content density] setting in the [Batch Separation] box of the image to detect slanted document pages and straighten the scanned images. 1 In the ISIS/TWAIN driver properties dialog box, click the [Basic] tab → select the [Deskew] check box. y You cannot click [Folio] if you click [Patchcode] in the [Blank Skip Setting] dialog box...

User Manual
Page 52
... document guide position. [Automatic Feeding] This feeding method is good for scanning batches of documents of different sizes: after loading the documents, press the Job button (assigned as a Start button on p. 28.) NOTE • Details of each feeding method are indicated below. [Standard Feeding] This feeding method is good for scanning small batches of same-size documents: scanning starts when the scanner detects loaded documents, and stops when you selected [Panel Feeding] or [Automatic Feeding] for the feeding method: [Auto] Document...
... document guide position. [Automatic Feeding] This feeding method is good for scanning batches of documents of different sizes: after loading the documents, press the Job button (assigned as a Start button on p. 28.) NOTE • Details of each feeding method are indicated below. [Standard Feeding] This feeding method is good for scanning small batches of same-size documents: scanning starts when the scanner detects loaded documents, and stops when you selected [Panel Feeding] or [Automatic Feeding] for the feeding method: [Auto] Document...

User Manual
Page 58
...-down list. NOTE Selecting [TIFF] or [PDF] enables the [Setting] button. „ [Setting] Button This button is enabled to E-mail] is selected. 58 DR-2010C / DR-2510C Settings to Save Image Files NOTE For more information on the scanner settings, see Chapter 4, "ISIS/TWAIN Driver Settings." „ [Save Image] Check Box This check box appears when [Attach to display the corresponding setting dialog box when the [TIFF] or [PDF] file format is selected in the [My Documents] folder. File names...
...-down list. NOTE Selecting [TIFF] or [PDF] enables the [Setting] button. „ [Setting] Button This button is enabled to E-mail] is selected. 58 DR-2010C / DR-2510C Settings to Save Image Files NOTE For more information on the scanner settings, see Chapter 4, "ISIS/TWAIN Driver Settings." „ [Save Image] Check Box This check box appears when [Attach to display the corresponding setting dialog box when the [TIFF] or [PDF] file format is selected in the [My Documents] folder. File names...
User Manual
Page 59
... devices) of the text within document images are recognized as text and saved as appended text data in the list box. „ [Multi-tiff setting] Select the method for saving image files when scanning multi-page documents. y Select [High Compression] to users with high compression. When this check box to compress images saved to [256-level Gray] or [24-bit Color] mode. NOTE • Access to shared network folders may be selected in PDF (*pdf) files. „ [Access setting] Button This button...
... devices) of the text within document images are recognized as text and saved as appended text data in the list box. „ [Multi-tiff setting] Select the method for saving image files when scanning multi-page documents. y Select [High Compression] to users with high compression. When this check box to compress images saved to [256-level Gray] or [24-bit Color] mode. NOTE • Access to shared network folders may be selected in PDF (*pdf) files. „ [Access setting] Button This button...

User Manual
Page 60
... set [Capacity Warning Settings], [Show Monitor Dialog Setting], [Maximum size of the folder in advance the folder for saving image files, and the space to be specified for printing images. y Select [Fit to paper] if the scanned documents are larger than the printer paper, to resize the images to the printer paper size. „ Buttons [OK] Button Click this button to accept the setting changes and return to the [Job Registration Tool] dialog box. [Cancel] Button Click this check box when...
... set [Capacity Warning Settings], [Show Monitor Dialog Setting], [Maximum size of the folder in advance the folder for saving image files, and the space to be specified for printing images. y Select [Fit to paper] if the scanned documents are larger than the printer paper, to resize the images to the printer paper size. „ Buttons [OK] Button Click this button to accept the setting changes and return to the [Job Registration Tool] dialog box. [Cancel] Button Click this check box when...

User Manual
Page 73
... USB interfaces. Solution Remove the USB hub. × Scanning Is Not Performed Check the following if the scanner does not scan an image even though the scanning operation is causing the pages of documents that you are using does not support Hi-Speed USB 2.0. Re-install the scanner driver or application software. • When system errors result in the scanner not functioning at least ten seconds before turning it ON again. Problem Solution Problem...
... USB interfaces. Solution Remove the USB hub. × Scanning Is Not Performed Check the following if the scanner does not scan an image even though the scanning operation is causing the pages of documents that you are using does not support Hi-Speed USB 2.0. Re-install the scanner driver or application software. • When system errors result in the scanner not functioning at least ten seconds before turning it ON again. Problem Solution Problem...
User Manual
Page 74
... be opened by other applications. Scanning documents with an application that was used to purchase a roller replacement kit. If the TIFF file saved in the scanned image. Solution Set [Scanning Side] to [Simplex]. The document has been fed at an angle (skew). The scanning glass or rollers inside the scanner are dirty or worn. Symptoms Problem Solution The scanned image is abnormal in use does not support ISIS/TWAIN driver functions. Contents Back Previous Page Next Page Problem Solution The rollers...
... be opened by other applications. Scanning documents with an application that was used to purchase a roller replacement kit. If the TIFF file saved in the scanned image. Solution Set [Scanning Side] to [Simplex]. The document has been fed at an angle (skew). The scanning glass or rollers inside the scanner are dirty or worn. Symptoms Problem Solution The scanned image is abnormal in use does not support ISIS/TWAIN driver functions. Contents Back Previous Page Next Page Problem Solution The rollers...
User Manual
Page 77
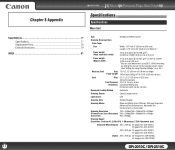
Document Feeding Method Automatic Scanning Sensor Contact image sensor Light Source LED Scanning Side Simplex/Duplex Scanning Modes Black and White, Error Diffusion, 256-level Grayscale, Advanced Text Enhancement, Advanced Text Enhancement II, 24-bit Color Scanning Resolution 100 x 100dpi/150 x 150dpi/200 x 200dpi/ (Primary Scan Lines x Secondary 240 x 240dpi/300 x 300dpi/400 x 400dpi/ Scan Lines) 600 x 600dpi Scanning Speed (Conditions: Pentium 4 3.2 GHz CPU, 1 GB memory, LTR/A4 document size) Black and White Simplex 200 x 200 dpi 25...
Document Feeding Method Automatic Scanning Sensor Contact image sensor Light Source LED Scanning Side Simplex/Duplex Scanning Modes Black and White, Error Diffusion, 256-level Grayscale, Advanced Text Enhancement, Advanced Text Enhancement II, 24-bit Color Scanning Resolution 100 x 100dpi/150 x 150dpi/200 x 200dpi/ (Primary Scan Lines x Secondary 240 x 240dpi/300 x 300dpi/400 x 400dpi/ Scan Lines) 600 x 600dpi Scanning Speed (Conditions: Pentium 4 3.2 GHz CPU, 1 GB memory, LTR/A4 document size) Black and White Simplex 200 x 200 dpi 25...

User Manual
Page 78
...) Model Number Input Output Power Consumption Weight MG1-3607 AC 100 to 240 V, 50/60 Hz, 65 VA to 82 VA DC 16 V, 1.8 A Under 0.5 W (AC adapter only) Approximately 0.3 kg (including power cord) Contents Back Previous Page Next Page Replacement Parts Exchange roller kit (product code: 2445B001) Kit to change without AC adapter) Approximately 5.3 lb (2.4 kg). Product specifications are subject to replace the rollers (retard roller, feeding roller) and document holding guide, see "Removing/Attaching the Feeding Roller...
...) Model Number Input Output Power Consumption Weight MG1-3607 AC 100 to 240 V, 50/60 Hz, 65 VA to 82 VA DC 16 V, 1.8 A Under 0.5 W (AC adapter only) Approximately 0.3 kg (including power cord) Contents Back Previous Page Next Page Replacement Parts Exchange roller kit (product code: 2445B001) Kit to change without AC adapter) Approximately 5.3 lb (2.4 kg). Product specifications are subject to replace the rollers (retard roller, feeding roller) and document holding guide, see "Removing/Attaching the Feeding Roller...
User Manual
Page 82
...10 O OPEN button ...10 Operating system 11 P Page Separation mode 21 Paper jam, clearing 33 Power connector 10 Power indicator 10 Power switch ...10 Practical examples 32 Preparing the scanner 20 Document eject tray 20 Document feed tray 20 Document stopper 20 R Recognizing the scanner by computer 16 Replacement parts 78 Retard roller Attaching 68 Removing 67 Roller, replacing Counter, resetting 70 Replacement cycle 65 S Scan Panel ...28 Scanning methods 25 Service ...72 Setup disc ...12 Custom Installation 12 Read Manuals 12 Typical Installation 12 Software Installing 12...
...10 O OPEN button ...10 Operating system 11 P Page Separation mode 21 Paper jam, clearing 33 Power connector 10 Power indicator 10 Power switch ...10 Practical examples 32 Preparing the scanner 20 Document eject tray 20 Document feed tray 20 Document stopper 20 R Recognizing the scanner by computer 16 Replacement parts 78 Retard roller Attaching 68 Removing 67 Roller, replacing Counter, resetting 70 Replacement cycle 65 S Scan Panel ...28 Scanning methods 25 Service ...72 Setup disc ...12 Custom Installation 12 Read Manuals 12 Typical Installation 12 Software Installing 12...


