
Users Manual - English
Page 151
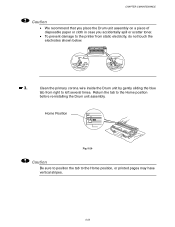
.... 5-8 ✒ Note We recommend that you return the tab to the home position (L) before you re-install the Drum unit assembly. See "Cleaning" in the printer; CHAPTER 5 MAINTENANCE Clean the primary corona wire inside the Drum unit by gently sliding the blue tab from right to the Home position (L) before you replace the Toner cartridge. Home Position...
.... 5-8 ✒ Note We recommend that you return the tab to the home position (L) before you re-install the Drum unit assembly. See "Cleaning" in the printer; CHAPTER 5 MAINTENANCE Clean the primary corona wire inside the Drum unit by gently sliding the blue tab from right to the Home position (L) before you replace the Toner cartridge. Home Position...

Users Manual - English
Page 152
... number of toner used only in the print quality. ™ Replacing the Drum unit This printer can print approximately 20,000 pages *1 with one before there is a noticeable deterioration in a clean, dust-free environment with a new one Drum unit. *1 At 5% coverage print (A4-Letter size). Because we cannot guarantee ...the many factors that will be printed by your drum will print may vary depending on paper. For best performance, use only genuine Brother toner. If the display shows the above message, it means the Drum unit is estimated at approximately 20,000 pages. The actual...
... number of toner used only in the print quality. ™ Replacing the Drum unit This printer can print approximately 20,000 pages *1 with one before there is a noticeable deterioration in a clean, dust-free environment with a new one Drum unit. *1 At 5% coverage print (A4-Letter size). Because we cannot guarantee ...the many factors that will be printed by your drum will print may vary depending on paper. For best performance, use only genuine Brother toner. If the display shows the above message, it means the Drum unit is estimated at approximately 20,000 pages. The actual...

Users Manual - English
Page 156
See "How to the instructions supplied with the new Drum unit. ✒ Note Do not reset the page counter when you replace the Drum unit. ☛ 7. Close the Front cover. ✒ Note We recommend that you clean the printer when you replace only the Toner cartridge. ☛ 8. Reset the page counter referring to clean the printer" in this chapter. 5-16
See "How to the instructions supplied with the new Drum unit. ✒ Note Do not reset the page counter when you replace the Drum unit. ☛ 7. Close the Front cover. ✒ Note We recommend that you clean the printer when you replace only the Toner cartridge. ☛ 8. Reset the page counter referring to clean the printer" in this chapter. 5-16
Users Manual - English
Page 157
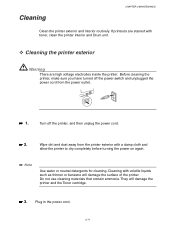
... before turning the power on again. ✒ Note Use water or neutral detergents for cleaning. Do not use cleaning materials that contain ammonia. Cleaning CHAPTER 5 MAINTENANCE Clean the printer exterior and interior routinely. Wipe dirt and dust away from the power outlet. ☛... damage the printer and the Toner cartridge. ☛ 3. Before cleaning the printer, make sure you have turned off the printer, and then unplug the power cord. ☛ 2. If printouts are stained with toner, clean the printer interior and Drum unit. ™ Cleaning the printer exterior Warning ...
... before turning the power on again. ✒ Note Use water or neutral detergents for cleaning. Do not use cleaning materials that contain ammonia. Cleaning CHAPTER 5 MAINTENANCE Clean the printer exterior and interior routinely. Wipe dirt and dust away from the power outlet. ☛... damage the printer and the Toner cartridge. ☛ 3. Before cleaning the printer, make sure you have turned off the printer, and then unplug the power cord. ☛ 2. If printouts are stained with toner, clean the printer interior and Drum unit. ™ Cleaning the printer exterior Warning ...
Users Manual - English
Page 162
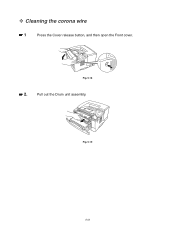
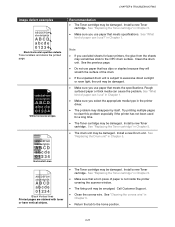
™ Cleaning the corona wire ☛1 Press the Cover release button, and then open the Front cover. Pull out the Drum unit assembly. Fig. 5-18 ☛ 2. Fig. 5-19 5-22
™ Cleaning the corona wire ☛1 Press the Cover release button, and then open the Front cover. Pull out the Drum unit assembly. Fig. 5-18 ☛ 2. Fig. 5-19 5-22
Users Manual - English
Page 163
... accidentally spill or scatter toner. • To prevent damage to the printer from right to left several times. Return the tab to the Home position, or printed pages may have vertical stripes. 5-23 Clean the primary corona wire inside the Drum unit by gently sliding the blue tab from static electricity, do not touch...
... accidentally spill or scatter toner. • To prevent damage to the printer from right to left several times. Return the tab to the Home position, or printed pages may have vertical stripes. 5-23 Clean the primary corona wire inside the Drum unit by gently sliding the blue tab from static electricity, do not touch...
Users Manual - English
Page 168
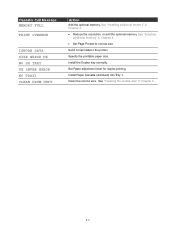
..." in Chapter 4. • Set Page Protect to the printer. Specify the printable paper size. Clean the corona wire. Install the Duplex tray correctly. OOppeerraattoorr CCaallll MMeessssaaggee MEMORY FULL PRINT OVERRUN IGNORE DATA SIZE ERROR DX NO DX TRAY DX LEVER ERROR NO TRAY1 CLEAN DRUM UNIT AAccttiioonn Add the optional memory. See "Installing additional memory...
..." in Chapter 4. • Set Page Protect to the printer. Specify the printable paper size. Clean the corona wire. Install the Duplex tray correctly. OOppeerraattoorr CCaallll MMeessssaaggee MEMORY FULL PRINT OVERRUN IGNORE DATA SIZE ERROR DX NO DX TRAY DX LEVER ERROR NO TRAY1 CLEAN DRUM UNIT AAccttiioonn Add the optional memory. See "Installing additional memory...

Users Manual - English
Page 193
... Printed pages have black spots at the surface of the OPC drum with a cotton swab until the dust or paper powder on the OPC drum surface. • Clean the drum unit as follows: 1. When you have located the mark on the drum that matches the print sample, wipe the surface of the OPC... drum. CHAPTER 6 TROUBLESHOOTING Image defect examples 94 mm (3.7 in.) 94 mm (3.7 in.) ...
... Printed pages have black spots at the surface of the OPC drum with a cotton swab until the dust or paper powder on the OPC drum surface. • Clean the drum unit as follows: 1. When you have located the mark on the drum that matches the print sample, wipe the surface of the OPC... drum. CHAPTER 6 TROUBLESHOOTING Image defect examples 94 mm (3.7 in.) 94 mm (3.7 in.) ...
Users Manual - English
Page 195
...damaged. • Make sure you use paper that a torn piece of the drum. • If the unpacked drum unit is not inside the printer covering the scanner window. • The fixing unit may be damaged. Clean the drum unit. See "Replacing the Drum unit" in Chapter 1. Install a new Toner cartridge. See "Replacing the Toner ..., the unit may be damaged. See the previous page. • Do not use paper that has clips or staples because they will scratch the surface of paper is subject to clear this problem especially if the printer has not been used for laser printers, the ...
...damaged. • Make sure you use paper that a torn piece of the drum. • If the unpacked drum unit is not inside the printer covering the scanner window. • The fixing unit may be damaged. Clean the drum unit. See "Replacing the Drum unit" in Chapter 1. Install a new Toner cartridge. See "Replacing the Toner ..., the unit may be damaged. See the previous page. • Do not use paper that has clips or staples because they will scratch the surface of paper is subject to clear this problem especially if the printer has not been used for laser printers, the ...


