
Product Information - English
Page 1
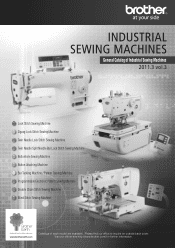
Visit our official site http://www.brother.com/ for further information. General Catalog of Industrial Sewing Machines 2011.3 vol.3 Lock Stitch Sewing Machine Zigzag Lock Stitch Sewing Machine Twin Needle Lock Stitch Sewing Machine Twin Needle Split Needle Bar Lock Stitch Sewing Machine Buttonhole Sewing Machine Button Attaching Machine Bar Tacking Machine / Pattern Tacking Machine Programmable Electronic Pattern Sewing Machine Double Chain Stitch Sewing Machine Blind Stitch Sewing Machine Catalogs of each model are available. Please find our office to inquire on outside back cover.
Visit our official site http://www.brother.com/ for further information. General Catalog of Industrial Sewing Machines 2011.3 vol.3 Lock Stitch Sewing Machine Zigzag Lock Stitch Sewing Machine Twin Needle Lock Stitch Sewing Machine Twin Needle Split Needle Bar Lock Stitch Sewing Machine Buttonhole Sewing Machine Button Attaching Machine Bar Tacking Machine / Pattern Tacking Machine Programmable Electronic Pattern Sewing Machine Double Chain Stitch Sewing Machine Blind Stitch Sewing Machine Catalogs of each model are available. Please find our office to inquire on outside back cover.
Product Information - English
Page 8
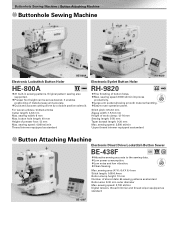
... Button Attaching Machine Electronic Direct Drive Lockstitch Button Sewer BE-438F Attractive sewing accurate to -use operation panel. sewing width: 6 mm Max. sewing speed: 2,500 sti/min Upper thread trimmer equipped as desired. sewing speed: 2,700 sti/min Digital tension, thread trimmer and thread wiper equipped as standard Button size: 8-30 mm outer diameter Max. Quick and accurate cutting driven by a double position solenoid. For woven articles / knitted articles Cutter length: 4-32 mm Max. Max. button hole length...
... Button Attaching Machine Electronic Direct Drive Lockstitch Button Sewer BE-438F Attractive sewing accurate to -use operation panel. sewing width: 6 mm Max. sewing speed: 2,500 sti/min Upper thread trimmer equipped as desired. sewing speed: 2,700 sti/min Digital tension, thread trimmer and thread wiper equipped as standard Button size: 8-30 mm outer diameter Max. Quick and accurate cutting driven by a double position solenoid. For woven articles / knitted articles Cutter length: 4-32 mm Max. Max. button hole length...
Instruction Manual - English
Page 5
... cleaning. When threading the needle When replacing the bobbin and needle When not using the machine and when leaving the machine unattended If using the machine. If the machine develops a problem, contact your nearest Brother dealer or a qualified technician. Use only the proper replacement parts as specified by the warranty. Turn off the power switch. When carrying out inspection, adjustment and maintenance When replacing consumable parts such as the rotary hook If the power...
... cleaning. When threading the needle When replacing the bobbin and needle When not using the machine and when leaving the machine unattended If using the machine. If the machine develops a problem, contact your nearest Brother dealer or a qualified technician. Use only the proper replacement parts as specified by the warranty. Turn off the power switch. When carrying out inspection, adjustment and maintenance When replacing consumable parts such as the rotary hook If the power...
Instruction Manual - English
Page 7
... Adjusting the needle and rotary hook timing 55 13-11. Sewing 57 14-2. Connecting the cords 9 3-4-1. Adjusting the stitch length 15 4-7. Sewing continuous backtack stitches 20 5-4. LOCK key 26 6-4. SEWING 35 9-1. Sewing condensed stitches 36 10. Adjusting the presser foot pressure 38 10-3. Daily cleaning procedures 39 11-2. Adjusting arm thread guide R 50 13-5. Adjusting the needle bar height 53 13-9. TROUBLESHOOTING 57 14-1. Table processing diagram 4 3-2. Removing the bobbin case 13 4-3. Installing the bobbin case 14 4-5. Using the lower thread counter...
... Adjusting the needle and rotary hook timing 55 13-11. Sewing 57 14-2. Connecting the cords 9 3-4-1. Adjusting the stitch length 15 4-7. Sewing continuous backtack stitches 20 5-4. LOCK key 26 6-4. SEWING 35 9-1. Sewing condensed stitches 36 10. Adjusting the presser foot pressure 38 10-3. Daily cleaning procedures 39 11-2. Adjusting arm thread guide R 50 13-5. Adjusting the needle bar height 53 13-9. TROUBLESHOOTING 57 14-1. Table processing diagram 4 3-2. Removing the bobbin case 13 4-3. Installing the bobbin case 14 4-5. Using the lower thread counter...
Instruction Manual - English
Page 9
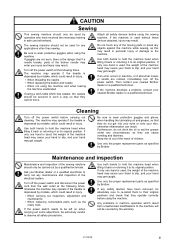
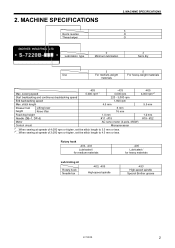
MACHINE SPECIFICATIONS 4 O O Lubrication type 0 Minimum lubrication 3 Semi dry 3 5 Use For medium-weight For heavy-weight materials materials Max. 2. stitch length 4.5 mm Presser foot Lifting lever 6 mm height Knee lifter 16 mm Feed dog height 1.0 mm Needle (DB×1, DP×5) #11 - #18 Motor AC servo motor (4-pole, 450W) Control circuit Microprocessor *1...When sewing at speeds of 4,000 rpm or higher, set the stitch length to 3.5 mm or less. *2...When sewing at speeds of...
MACHINE SPECIFICATIONS 4 O O Lubrication type 0 Minimum lubrication 3 Semi dry 3 5 Use For medium-weight For heavy-weight materials materials Max. 2. stitch length 4.5 mm Presser foot Lifting lever 6 mm height Knee lifter 16 mm Feed dog height 1.0 mm Needle (DB×1, DP×5) #11 - #18 Motor AC servo motor (4-pole, 450W) Control circuit Microprocessor *1...When sewing at speeds of 4,000 rpm or higher, set the stitch length to 3.5 mm or less. *2...When sewing at speeds of...
Instruction Manual - English
Page 10
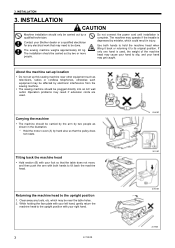
... hand. 2088M 2089M 3 S-7220B The sewing machine weighs approximately 46 kg. The sewing machine should be plugged directly into an AC wall outlet. The installation should be carried out by a qualified technician. Clear away any electrical work that the table does not move, and then push the arm with your foot so that may result if extension cords are used , the weight of the...
... hand. 2088M 2089M 3 S-7220B The sewing machine weighs approximately 46 kg. The sewing machine should be plugged directly into an AC wall outlet. The installation should be carried out by a qualified technician. Clear away any electrical work that the table does not move, and then push the arm with your foot so that may result if extension cords are used , the weight of the...
Instruction Manual - English
Page 19
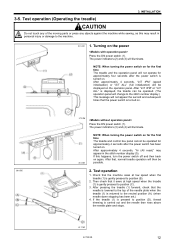
... it sews at low speed when the treadle (1) is turned on the power Press the ON power switch (1). If the treadle (1) is pressed to position (D), thread trimming is lowered to the neutral position (A). (when needle down stopping has been set.) 4. INSTALLATION 3-5. Turning on . After approximately 4 seconds, "iniT rPM" (speed initialization) or "iniT ALL" (full initialization) will be operated. (The operation panel will change to the stitch number...
... it sews at low speed when the treadle (1) is turned on the power Press the ON power switch (1). If the treadle (1) is pressed to position (D), thread trimming is lowered to the neutral position (A). (when needle down stopping has been set.) 4. INSTALLATION 3-5. Turning on . After approximately 4 seconds, "iniT rPM" (speed initialization) or "iniT ALL" (full initialization) will be operated. (The operation panel will change to the stitch number...
Instruction Manual - English
Page 20
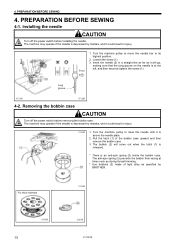
... before removing the bobbin case. Installing the needle CAUTION Turn off the power switch before installing the needle. The machine may operate if the treadle is depressed by BROTHER. Turn the machine pulley to move the needle bar to raise the needle until it will come out when the latch (1) is released. * There is at times such as during thread trimming. * Use bobbins (2) made of the bobbin case upward and then remove the bobbin case...
... before removing the bobbin case. Installing the needle CAUTION Turn off the power switch before installing the needle. The machine may operate if the treadle is depressed by BROTHER. Turn the machine pulley to move the needle bar to raise the needle until it will come out when the latch (1) is released. * There is at times such as during thread trimming. * Use bobbins (2) made of the bobbin case upward and then remove the bobbin case...
Instruction Manual - English
Page 25
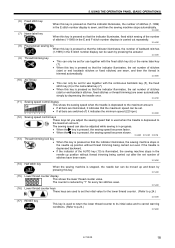
... 2151M (13) Thread trimming lock key • When this key is pressed so that the indicator illuminates, the sewing machine stops in the needle up position without thread trimming being carried out after the set number of stitches (start or end backtack stitches, fixed stitches or thread trimming) are sewn automatically simply by depressing the treadle once. 2147M (11) Sewing speed control display This shows the sewing speed when the treadle...
... 2151M (13) Thread trimming lock key • When this key is pressed so that the indicator illuminates, the sewing machine stops in the needle up position without thread trimming being carried out after the set number of stitches (start or end backtack stitches, fixed stitches or thread trimming) are sewn automatically simply by depressing the treadle once. 2147M (11) Sewing speed control display This shows the sewing speed when the treadle...
Instruction Manual - English
Page 29
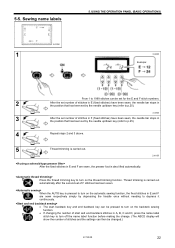
... be changed.) S-7220B 22 USING THE OPERATION PANEL (BASIC OPERATIONS) 2162M Example: From 1 to 1999 stitches can then be set for the E and F stitch numbers. 2 After the set number of stitches in E (fixed stitches) have been sewn, the needle bar stops in the position that has been set by the needle up /down key (refer to p.25). 4 Repeat steps 2 and 3 above. 5 Thread trimming is carried out automatically after the second set number of F stitches...
... be changed.) S-7220B 22 USING THE OPERATION PANEL (BASIC OPERATIONS) 2162M Example: From 1 to 1999 stitches can then be set for the E and F stitch numbers. 2 After the set number of stitches in E (fixed stitches) have been sewn, the needle bar stops in the position that has been set by the needle up /down key (refer to p.25). 4 Repeat steps 2 and 3 above. 5 Thread trimming is carried out automatically after the second set number of F stitches...
Instruction Manual - English
Page 31
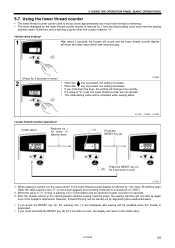
... accepted when sewing starts. 2166M (Initial value) Reduces by 1 from the initial setting value each time the sewing machine sews 10 stitches, and a warning is given when the counter reaches "-5". 1 After about 2 seconds, the buzzer will sound and the lower thread counter display will show the initial value which was set , the lower thread counter will be used to let you press the RESET key...
... accepted when sewing starts. 2166M (Initial value) Reduces by 1 from the initial setting value each time the sewing machine sews 10 stitches, and a warning is given when the counter reaches "-5". 1 After about 2 seconds, the buzzer will sound and the lower thread counter display will show the initial value which was set , the lower thread counter will be used to let you press the RESET key...
Instruction Manual - English
Page 40
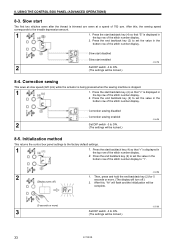
.... (5 seconds or more . (The display will be locked.) 3150M 33 S-7220B Press the end backtack key (2) to "1". 2 (Display turns off .) 2. After this , the sewing speed corresponds to the factory default settings. 1 1. USING THE CONTROL BOX PANEL (ADVANCED OPERATIONS) 8-3. Slow start backtack key (4) so that "r" is displayed in the top row of the stitch number display. 2. Press the end backtack key (2) to...
.... (5 seconds or more . (The display will be locked.) 3150M 33 S-7220B Press the end backtack key (2) to "1". 2 (Display turns off .) 2. After this , the sewing speed corresponds to the factory default settings. 1 1. USING THE CONTROL BOX PANEL (ADVANCED OPERATIONS) 8-3. Slow start backtack key (4) so that "r" is displayed in the top row of the stitch number display. 2. Press the end backtack key (2) to...
Instruction Manual - English
Page 42
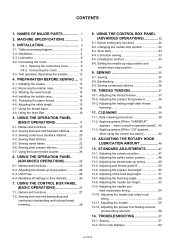
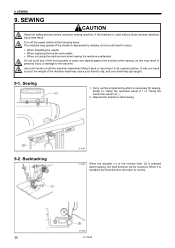
... hand to the machine. If only one hand is used without these devices attached, injury may get caught. 9-1. Sewing 1. Depress the treadle to its original position. Backtacking 3743M 3744M When the actuator (1) or the reverse lever (2) is released, the feed direction will be reversed. When it to start sewing. 9-2. 9. The machine may result in injury. When threading the needle When replacing the bobbin and needle When not using the sewing machine.
... hand to the machine. If only one hand is used without these devices attached, injury may get caught. 9-1. Sewing 1. Depress the treadle to its original position. Backtacking 3743M 3744M When the actuator (1) or the reverse lever (2) is released, the feed direction will be reversed. When it to start sewing. 9-2. 9. The machine may result in injury. When threading the needle When replacing the bobbin and needle When not using the sewing machine.

Instruction Manual - English
Page 53
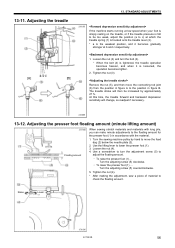
Use the following adjustment. Use the lifting lever to the rotary hook when replacing the rotary hook or when changing the sewing speed. Place the lubrication amount check sheet (1) underneath the rotary hook (2) and hold it back counterclockwise by 2 1/2 turns, and then carry out the following procedure to check the amount of oil being supplied to lift the presser foot. 3. Remove the thread from the thread take-up...
Use the following adjustment. Use the lifting lever to the rotary hook when replacing the rotary hook or when changing the sewing speed. Place the lubrication amount check sheet (1) underneath the rotary hook (2) and hold it back counterclockwise by 2 1/2 turns, and then carry out the following procedure to check the amount of oil being supplied to lift the presser foot. 3. Remove the thread from the thread take-up...

Instruction Manual - English
Page 62
... hook (8) and the bobbin case holder position bracket (10) is the same as follows. ... The clearance should be aligned with the center of the accessory timing gauge (2). 5. Stitch length dial 3 setting. 0 - 0.05 mm 0 - 0.05 mm 3776M 3. Set the stitch length dial as the height of surface C on the side of the needle (4). Stitch length dial 0 setting. ... Loosen two of the needle bar (1) is enough to allow the thread being used to pass through smoothly. Adjusting...
... hook (8) and the bobbin case holder position bracket (10) is the same as follows. ... The clearance should be aligned with the center of the accessory timing gauge (2). 5. Stitch length dial 3 setting. 0 - 0.05 mm 0 - 0.05 mm 3776M 3. Set the stitch length dial as the height of surface C on the side of the needle (4). Stitch length dial 0 setting. ... Loosen two of the needle bar (1) is enough to allow the thread being used to pass through smoothly. Adjusting...
Instruction Manual - English
Page 63
... the presser foot (1) ... Remove the nut (5), and then move the feed dog (2) below the needle plate (3). 2. Turn the sewing machine pulley by approximately 27 %. Loosen the nut (4). 4. Use a screwdriver to c) at which the treadle spring (1) is hooked onto the treadle lever (2). * a is the weakest position, and it is loosened, the operation becomes lighter. 2. Tighten the nut (4). * After making the adjustment, sew a piece of material to lower the presser foot (1). 3. Turn the adjusting screw...
... the presser foot (1) ... Remove the nut (5), and then move the feed dog (2) below the needle plate (3). 2. Turn the sewing machine pulley by approximately 27 %. Loosen the nut (4). 4. Use a screwdriver to c) at which the treadle spring (1) is hooked onto the treadle lever (2). * a is the weakest position, and it is loosened, the operation becomes lighter. 2. Tighten the nut (4). * After making the adjustment, sew a piece of material to lower the presser foot (1). 3. Turn the adjusting screw...
Instruction Manual - English
Page 64
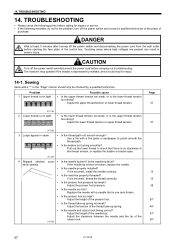
... power cord from the wall outlet before calling for repairs or service. Problem 1 Upper thread is the lower thread tension too strong? Use a file with a needle that there is depressed by a qualified technician. Is the needle tip bent? If the needle tip is incorrect, install the needle correctly. Is the needle properly installed? If it is one rank thicker. If it is bent or broken, replace the needle. Is the presser foot pressure...
... power cord from the wall outlet before calling for repairs or service. Problem 1 Upper thread is the lower thread tension too strong? Use a file with a needle that there is depressed by a qualified technician. Is the needle tip bent? If the needle tip is incorrect, install the needle correctly. Is the needle properly installed? If it is one rank thicker. If it is bent or broken, replace the needle. Is the presser foot pressure...
Instruction Manual - English
Page 66
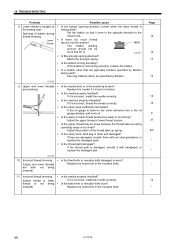
... the thread take -up spring. Is the anti-spin spring attached? Replace the fixed knife or the movable knife. TROUBLESHOOTING Problem 8 Lower thread is the needle tip broken? Is a bobbin other part damaged? Is the needle bent or is tangled at the sewing start. Is the machine properly threaded? Is the rotary hook sufficiently lubricated? Adjust the upper thread or lower thread tension. Adjust the position of bobbin during thread trimming Lower thread 0751M 9 Upper and lower threads are breaking. 0471M 10 Incorrect thread trimming (Upper and lower threads...
... the thread take -up spring. Is the anti-spin spring attached? Replace the fixed knife or the movable knife. TROUBLESHOOTING Problem 8 Lower thread is the needle tip broken? Is a bobbin other part damaged? Is the needle bent or is tangled at the sewing start. Is the machine properly threaded? Is the rotary hook sufficiently lubricated? Adjust the upper thread or lower thread tension. Adjust the position of bobbin during thread trimming Lower thread 0751M 9 Upper and lower threads are breaking. 0471M 10 Incorrect thread trimming (Upper and lower threads...

Instruction Manual - English
Page 67
... the power cord is normal.) S-7220B 60 Is the needle properly installed? Adjust the clearance between the needle and the tip of the needle bar. Insert the connector securely. 11 2196M 15 Machine does not operate Is the sewing speed setting or backtack speed setting incorrect? Is the needle and rotary hook timing correct? Is the oil tank empty? Is the needle bent, is the needle tip broken, or is incorrect, install the needle correctly. Adjust...
... the power cord is normal.) S-7220B 60 Is the needle properly installed? Adjust the clearance between the needle and the tip of the needle bar. Insert the connector securely. 11 2196M 15 Machine does not operate Is the sewing speed setting or backtack speed setting incorrect? Is the needle and rotary hook timing correct? Is the oil tank empty? Is the needle bent, is the needle tip broken, or is incorrect, install the needle correctly. Adjust...
HM Parts List - English
Page 1
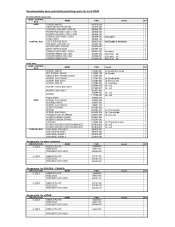
... NEEDLE BAR THREAD GUIDE SCREW, FLAT SM4.37 SCREW, SM3.57X10 SCREW, SM3.18 ROTARY HOOK BOX ASSY BOBBIN CASE ASSY BOBBIN HEAD CONTROL BOX FIXED KNIFE SCREW, FLAT SM3.57 MOVABLE KNIFE SCREW, FLAT SM4.37 LEVER STOPPER SPRING SCREW, BIND M4X5 THREAD TAKE-UP SPRING LOWER THREAD FINGER BOBBIN TENSION SPRING CUSHION B-CASE HOLDER POSITION BRACKET B-CASE HOLDER POSITION BRACKET G40 PANEL PCB ASSY G40 SUB PCB ASSY G40 PANEL SHEET 1 G40 PANEL SHEET 2 Guage parts for JAPAN SPECIFICATION NAME - [ ] [ ] 3 NEEDLE PLATE FEED DOG PRESSER FOOT ASSY - [ ] [ ] 5 NEEDLE PLATE FEED DOG PRESSER FOOT...
... NEEDLE BAR THREAD GUIDE SCREW, FLAT SM4.37 SCREW, SM3.57X10 SCREW, SM3.18 ROTARY HOOK BOX ASSY BOBBIN CASE ASSY BOBBIN HEAD CONTROL BOX FIXED KNIFE SCREW, FLAT SM3.57 MOVABLE KNIFE SCREW, FLAT SM4.37 LEVER STOPPER SPRING SCREW, BIND M4X5 THREAD TAKE-UP SPRING LOWER THREAD FINGER BOBBIN TENSION SPRING CUSHION B-CASE HOLDER POSITION BRACKET B-CASE HOLDER POSITION BRACKET G40 PANEL PCB ASSY G40 SUB PCB ASSY G40 PANEL SHEET 1 G40 PANEL SHEET 2 Guage parts for JAPAN SPECIFICATION NAME - [ ] [ ] 3 NEEDLE PLATE FEED DOG PRESSER FOOT ASSY - [ ] [ ] 5 NEEDLE PLATE FEED DOG PRESSER FOOT...


