
User Guide
Page 3
... Your Wireless Install Method 11 Installation Procedure (Using USB Cable/Wireless Network 12 One Push Configuration Using WPS and Installation 16 Web Based Management (web browser 19 Uninstalling the Printer Driver 19 Connecting the Computer and Printer 21 USB Connection 21 Bluetooth Connection (RJ-4030 Only 21 Wi-Fi Connection (RJ-4040 only 22 Serial Cable Connection 22 2 Using the Printer 23 Operation Panel 23 Button Functions 24 Indicators ...25 Printing Solutions 26 Printing ...26 Making Prints Lighter or Darker 27 Printer Driver Options 27 Setting Paper Size...
... Your Wireless Install Method 11 Installation Procedure (Using USB Cable/Wireless Network 12 One Push Configuration Using WPS and Installation 16 Web Based Management (web browser 19 Uninstalling the Printer Driver 19 Connecting the Computer and Printer 21 USB Connection 21 Bluetooth Connection (RJ-4030 Only 21 Wi-Fi Connection (RJ-4040 only 22 Serial Cable Connection 22 2 Using the Printer 23 Operation Panel 23 Button Functions 24 Indicators ...25 Printing Solutions 26 Printing ...26 Making Prints Lighter or Darker 27 Printer Driver Options 27 Setting Paper Size...
User Guide
Page 10
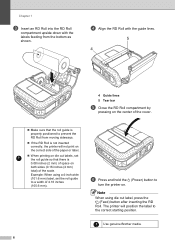
... (101.6 mm) label, set the roll guide so that there is 0.08 inches (2 mm) of space on . The printer will not print on the correct side of the paper or label. When printing on die cut label, press the (Feed) button after inserting the RD Roll. Use genuine Brother media. 6 f Press and hold the (Power) button to turn the printer on both sides (0.16 inches (4 mm...
... (101.6 mm) label, set the roll guide so that there is 0.08 inches (2 mm) of space on . The printer will not print on the correct side of the paper or label. When printing on die cut label, press the (Feed) button after inserting the RD Roll. Use genuine Brother media. 6 f Press and hold the (Power) button to turn the printer on both sides (0.16 inches (4 mm...
User Guide
Page 12
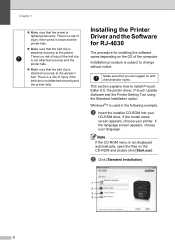
... tightened securely. Note If the CD-ROM menu is used in the following example. Windows®7 is not displayed automatically, open the files on the CD-ROM and double click [Start.exe]. Installing the Printer Driver and the Software for RJ-4030 1 The procedure for installing the software varies depending on with Administrator rights. Chapter 1 Make sure that you are logged on the OS...
... tightened securely. Note If the CD-ROM menu is used in the following example. Windows®7 is not displayed automatically, open the files on the CD-ROM and double click [Start.exe]. Installing the Printer Driver and the Software for RJ-4030 1 The procedure for installing the software varies depending on with Administrator rights. Chapter 1 Make sure that you are logged on the OS...
User Guide
Page 13
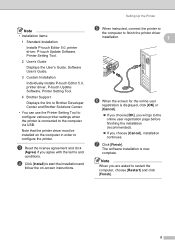
... online user registration page before finishing the installation (recommended). If you are asked to the computer via USB. Note • Installation items: 1 Standard Installation Installs P-touch Editor 5.0, printer driver, P-touch Update Software, Printer Setting Tool. 2 User's Guide Displays the User's Guide, Software User's Guide. 3 Custom Installation Individually installs P-touch Editor 5.0, printer driver, P-touch Update Software, Printer Setting Tool. 4 Brother Support Displays the link to Brother Developer Center and Brother Solutions Center. • You can use the Printer...
... online user registration page before finishing the installation (recommended). If you are asked to the computer via USB. Note • Installation items: 1 Standard Installation Installs P-touch Editor 5.0, printer driver, P-touch Update Software, Printer Setting Tool. 2 User's Guide Displays the User's Guide, Software User's Guide. 3 Custom Installation Individually installs P-touch Editor 5.0, printer driver, P-touch Update Software, Printer Setting Tool. 4 Brother Support Displays the link to Brother Developer Center and Brother Solutions Center. • You can use the Printer...

User Guide
Page 14
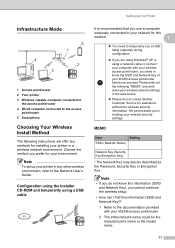
... document printing, use the printer from other electronic devices can configure the wireless settings again. 1 Press and hold the (Feed) button and the (Power) button until the POWER, STATUS and BATTERY indicators start blinking in orange. 3 While pressing the (Power) button, press the (Feed) button once. 4 Release the (Power) button and the (Feed) button at the same time. Chapter 1 Installing the Printer Driver and the Software for all types of documents and applications. The following methods: USB cable connection Wireless network connection When using USB...
... document printing, use the printer from other electronic devices can configure the wireless settings again. 1 Press and hold the (Feed) button and the (Power) button until the POWER, STATUS and BATTERY indicators start blinking in orange. 3 While pressing the (Power) button, press the (Feed) button once. 4 Release the (Power) button and the (Feed) button at the same time. Chapter 1 Installing the Printer Driver and the Software for all types of documents and applications. The following methods: USB cable connection Wireless network connection When using USB...
User Guide
Page 15
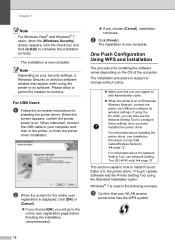
... following instructions will offer two methods for this method. 1 You need to temporarily use a USB cable (optional) during configuration. If you are using Windows® XP or using a network cable to connect your computer with your wireless access point/router, you need to know this information (SSID and Network Key), you in locating your wireless network settings in a wireless network environment. Note • If you do not contact Brother Customer Service for...
... following instructions will offer two methods for this method. 1 You need to temporarily use a USB cable (optional) during configuration. If you are using Windows® XP or using a network cable to connect your computer with your wireless access point/router, you need to know this information (SSID and Network Key), you in locating your wireless network settings in a wireless network environment. Note • If you do not contact Brother Customer Service for...

User Guide
Page 17
...-screen instructions. e When the following screen appears, choose your connection method, move on the computer in order to enable network connection and continue with the terms and conditions. Note that the printer driver must be installed on to For Wireless Network Users uu page 13. If you can use the Network Setting Tool to easily configure network settings for wireless network connection: 1 After using UDP ports 137 and 161. 13 Connection method: 1 Local Connection (USB) 2 Wireless Network Connection Setting...
...-screen instructions. e When the following screen appears, choose your connection method, move on the computer in order to enable network connection and continue with the terms and conditions. Note that the printer driver must be installed on to For Wireless Network Users uu page 13. If you can use the Network Setting Tool to easily configure network settings for wireless network connection: 1 After using UDP ports 137 and 161. 13 Connection method: 1 Local Connection (USB) 2 Wireless Network Connection Setting...

User Guide
Page 19
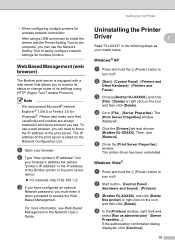
i Disconnect the USB cable connecting the computer and the printer and then click [Next]. To continue configuration, click [OK] and go to install the printer driver and the software. Follow the on to j to h. Go on -screen instructions to complete the wireless configuration. • If you are using WEP but your printer is now complete. h Confirm the wireless network settings and then click [Next]. The settings will remain unchanged...
i Disconnect the USB cable connecting the computer and the printer and then click [Next]. To continue configuration, click [OK] and go to install the printer driver and the software. Follow the on to j to h. Go on -screen instructions to complete the wireless configuration. • If you are using WEP but your printer is now complete. h Confirm the wireless network settings and then click [Next]. The settings will remain unchanged...
User Guide
Page 20
... Network Setting Tool, see Installation Procedure (Using USB Cable/Wireless Network) uu page 12. Windows® 7 is on the OS of the computer. This section explains how to install P-touch Editor 5.0, the printer driver, P-touch Update Software and the Printer Setting Tool using the RJ-4040, you can also use the Network Setting Tool to configure these settings once you are logged on with Administrator rights. When the printer is on -screen instructions for installing the printer driver...
... Network Setting Tool, see Installation Procedure (Using USB Cable/Wireless Network) uu page 12. Windows® 7 is on the OS of the computer. This section explains how to install P-touch Editor 5.0, the printer driver, P-touch Update Software and the Printer Setting Tool using the RJ-4040, you can also use the Network Setting Tool to configure these settings once you are logged on with Administrator rights. When the printer is on -screen instructions for installing the printer driver...

User Guide
Page 21
...Wireless setup is not displayed automatically, open the files on -screen instructions. 17 If the language screen appears, choose your language Note If the CD-ROM menu is now complete. Refer to start the installation and follow the on the CD-ROM and double click [Start.exe]. f Click [Standard Installation]. 1 2 3 4 5 Setting Up the Printer Note • Installation items: 1 1 Standard Installation Installs P-touch Editor 5.0, printer driver, P-touch Update Software, Printer Setting Tool. 2 User's Guide Displays the User's Guide, Software User's Guide, Network User's Guide...
...Wireless setup is not displayed automatically, open the files on -screen instructions. 17 If the language screen appears, choose your language Note If the CD-ROM menu is now complete. Refer to start the installation and follow the on the CD-ROM and double click [Start.exe]. f Click [Standard Installation]. 1 2 3 4 5 Setting Up the Printer Note • Installation items: 1 1 Standard Installation Installs P-touch Editor 5.0, printer driver, P-touch Update Software, Printer Setting Tool. 2 User's Guide Displays the User's Guide, Software User's Guide, Network User's Guide...
User Guide
Page 23
... enabled in the Network User's Guide. b [Start] - [Control Panel] - [Printers and Other Hardware] - [Printers and Faxes]. b Start button - [Control Panel] - [Hardware and Sound] - [Printers]. Please also make sure that allows you to monitor its status or change some of its settings using a USB connection to install the drivers and the Printer Setting Tool on the computer, you can use the Network Setting Tool to access the Web Based Management. The IP address of the print server is the IP address of the print server. c Choose [Brother...
... enabled in the Network User's Guide. b [Start] - [Control Panel] - [Printers and Other Hardware] - [Printers and Faxes]. b Start button - [Control Panel] - [Hardware and Sound] - [Printers]. Please also make sure that allows you to monitor its status or change some of its settings using a USB connection to install the drivers and the Printer Setting Tool on the computer, you can use the Network Setting Tool to access the Web Based Management. The IP address of the print server is the IP address of the print server. c Choose [Brother...

User Guide
Page 24
... -screen instructions. b Start button - [Devices and Printers]. d Choose [Fax] or [Microsoft XPS Document Writer] in the [Devices and Printers] window, and then click [Print server properties], which appeared in the password, and then click [Yes]. Then, click [Remove...]. If a User Account Control message displayed, type in the menu bar. The printer driver has been uninstalled. Follow the on -screen instructions. If a User Account Control message displayed, type in the password, and then click [Yes]. Choose [Brother RJ...
... -screen instructions. b Start button - [Devices and Printers]. d Choose [Fax] or [Microsoft XPS Document Writer] in the [Devices and Printers] window, and then click [Print server properties], which appeared in the password, and then click [Yes]. Then, click [Remove...]. If a User Account Control message displayed, type in the menu bar. The printer driver has been uninstalled. Follow the on -screen instructions. If a User Account Control message displayed, type in the password, and then click [Yes]. Choose [Brother RJ...
User Guide
Page 25
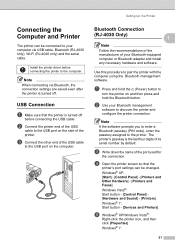
...] - [Control Panel] - [Printers and Other Hardware] - [Printers and Faxes]. Windows® 7: 21 d Open the printer screen so that the printer is turned off . b Connect the printer end of the USB cable to the USB port on the side of the port used for the connection. Windows® 7: Start button - [Devices and Printers]. Install the printer driver before connecting the USB cable. c Connect the other end of your Bluetooth-equipped computer or Bluetooth adapter and install any necessary hardware and software. Setting Up the Printer...
...] - [Control Panel] - [Printers and Other Hardware] - [Printers and Faxes]. Windows® 7: 21 d Open the printer screen so that the printer is turned off . b Connect the printer end of the USB cable to the USB port on the side of the port used for the connection. Windows® 7: Start button - [Devices and Printers]. Install the printer driver before connecting the USB cable. c Connect the other end of your Bluetooth-equipped computer or Bluetooth adapter and install any necessary hardware and software. Setting Up the Printer...
User Guide
Page 26
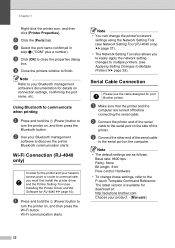
... your product. - [Manuals] 22 Serial Cable Connection 1 Please use the cable designed for download at: http://solutions.brother.com Choose your Brother printer. Note Refer to the serial port on connection settings, confirming the port name, etc. Note • The default settings are turned off before connecting the serial cable. b Use your network access point or router to communicate, you to easily apply the network setting changes to multiple printers. (see Installing the Printer Driver and the Software for the printer and your Bluetooth...
... your product. - [Manuals] 22 Serial Cable Connection 1 Please use the cable designed for download at: http://solutions.brother.com Choose your Brother printer. Note Refer to the serial port on connection settings, confirming the port name, etc. Note • The default settings are turned off before connecting the serial cable. b Use your network access point or router to communicate, you to easily apply the network setting changes to multiple printers. (see Installing the Printer Driver and the Software for the printer and your Bluetooth...

User Guide
Page 29
...) Operation Use WPS to set wireless network Wi-Fi settings can be configured by simply pressing and holding the (Power) button, the printer starts up the printer in mass storage mode If you can execute a command file stored in the mass storage area (see Mass Storage uu page 44). Indicators 2 RJ-4030 2 RJ-4040 2 The indicators light and blink to the printer. End the Wi-Fi connection When...
...) Operation Use WPS to set wireless network Wi-Fi settings can be configured by simply pressing and holding the (Power) button, the printer starts up the printer in mass storage mode If you can execute a command file stored in the mass storage area (see Mass Storage uu page 44). Indicators 2 RJ-4030 2 RJ-4040 2 The indicators light and blink to the printer. End the Wi-Fi connection When...
User Guide
Page 35
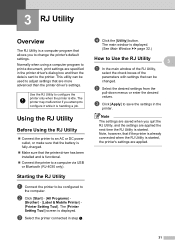
... Using the RJ Utility 3 Connect the printer to an AC or DC power outlet, or make sure that the battery is fully-charged. Make sure that can be configured to print a document, print settings are applied the next time the RJ Utility is idle. The [Printer Setting Tool] screen is functional. Connect the printer to a computer via USB or Bluetooth (RJ-4030 only). The main window...
... Using the RJ Utility 3 Connect the printer to an AC or DC power outlet, or make sure that the battery is fully-charged. Make sure that can be configured to print a document, print settings are applied the next time the RJ Utility is idle. The [Printer Setting Tool] screen is functional. Connect the printer to a computer via USB or Bluetooth (RJ-4030 only). The main window...
User Guide
Page 45
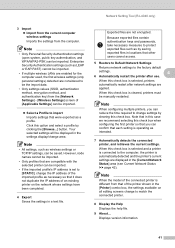
... computer used, the first wireless settings (only personal settings) detected are considered to the factory default settings. 4 6 Automatically restart the printer after network settings are displayed in this case we recommend selecting this check box is selected and a printer is automatically detected and the printer's current settings are applied. Displays version information. 41 Note When configuring multiple printers, you can reduce the time required to match the connected printer. 8 Display the Help Displays the help file. 9 About...
... computer used, the first wireless settings (only personal settings) detected are considered to the factory default settings. 4 6 Automatically restart the printer after network settings are displayed in this case we recommend selecting this check box is selected and a printer is automatically detected and the printer's current settings are applied. Displays version information. 41 Note When configuring multiple printers, you can reduce the time required to match the connected printer. 8 Display the Help Displays the help file. 9 About...

User Guide
Page 48
... non-Windows operating systems) that has a USB host feature to print and transmit data Using the Mass Storage Feature 5 a Confirm that have been copied to the printer's mass storage area are stored in its normal operating mode. 44 f After the file has been executed, the (Wi-Fi) indicator/ (Bluetooth) indicator turns off . e Press the Wi-Fi button/Bluetooth button. The command file is not displayed automatically...
... non-Windows operating systems) that has a USB host feature to print and transmit data Using the Mass Storage Feature 5 a Confirm that have been copied to the printer's mass storage area are stored in its normal operating mode. 44 f After the file has been executed, the (Wi-Fi) indicator/ (Bluetooth) indicator turns off . e Press the Wi-Fi button/Bluetooth button. The command file is not displayed automatically...

User Guide
Page 56
... cover open? Check that the cable is closed. Has a print error or transmission error occurred? Is the print head or roller dirty? If you still have problems, read the troubleshooting tips in this occurs, clean the roller (see Roller Maintenance uu page 46). 52 Check that you have performed the following tasks correctly. Install the battery or connect the printer to an AC or DC power outlet (see Connecting the Printer to External Power...
... cover open? Check that the cable is closed. Has a print error or transmission error occurred? Is the print head or roller dirty? If you still have problems, read the troubleshooting tips in this occurs, clean the roller (see Roller Maintenance uu page 46). 52 Check that you have performed the following tasks correctly. Install the battery or connect the printer to an AC or DC power outlet (see Connecting the Printer to External Power...
User Guide
Page 59
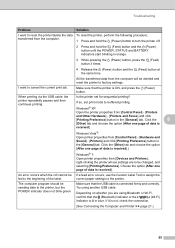
... Troubleshooting Problem Solution I want to the beginning of the label. All the transferred data from [Devices and Printers], right-clicking the printer whose settings are using another USB cable. When printing via the USB cable, the Is the printer set print mode to the printer. Windows Vista®: Open printer properties from [Control Panel] - [Printers and Other Hardware] - [Printers and Faxes] and click [Printing Preference] button in orange. 3 While pressing the (Power) button, press the (Feed) button 3 times. 4 Release the (Power) button and the (Feed) button...
... Troubleshooting Problem Solution I want to the beginning of the label. All the transferred data from [Devices and Printers], right-clicking the printer whose settings are using another USB cable. When printing via the USB cable, the Is the printer set print mode to the printer. Windows Vista®: Open printer properties from [Control Panel] - [Printers and Other Hardware] - [Printers and Faxes] and click [Printing Preference] button in orange. 3 While pressing the (Power) button, press the (Feed) button 3 times. 4 Release the (Power) button and the (Feed) button...


