Users Manual - English
Page 2
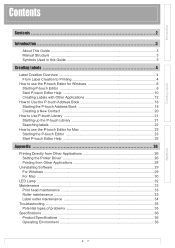
... Creating a New Contact 20 How to Use P-touch Library 21 Starting up the P-touch Library 21 Searching labels ...22 How to use the P-touch Editor for Mac 23 Starting the P-touch Editor 23 Start P-touch Editor Help 25 Appendix 26 Printing Directly from Other Applications 26 Setting the Printer Driver 26 Printing from Other Applications 28 Uninstalling Software ...29...
... Creating a New Contact 20 How to Use P-touch Library 21 Starting up the P-touch Library 21 Searching labels ...22 How to use the P-touch Editor for Mac 23 Starting the P-touch Editor 23 Start P-touch Editor Help 25 Appendix 26 Printing Directly from Other Applications 26 Setting the Printer Driver 26 Printing from Other Applications 28 Uninstalling Software ...29...

Users Manual - English
Page 3
... to help you to quickly and easily print custom labels created with the label software, P-touch Editor. Manual Structure The following guides are as follows: This symbol shows information or directions that should read and understand them may ...result in this Guide The symbols used throughout this guide can just click to jump to the corresponding pages. Introduction Creating Labels Introduction The Brother QL-570 label printer...
... to help you to quickly and easily print custom labels created with the label software, P-touch Editor. Manual Structure The following guides are as follows: This symbol shows information or directions that should read and understand them may ...result in this Guide The symbols used throughout this guide can just click to jump to the corresponding pages. Introduction Creating Labels Introduction The Brother QL-570 label printer...

Users Manual - English
Page 4
... for the label you want to create. Install the DK Roll. ÎSetup & Operation Guide ÎSetup & Operation Guide 4 From Label Creation to Printing From Label Creation to Printing 1 Choose the type of label you will create. The machine is a variety to choose from. For details on step-by-step instructions, see...
... for the label you want to create. Install the DK Roll. ÎSetup & Operation Guide ÎSetup & Operation Guide 4 From Label Creation to Printing From Label Creation to Printing 1 Choose the type of label you will create. The machine is a variety to choose from. For details on step-by-step instructions, see...

Users Manual - English
Page 5
Introduction Creating Labels 3 Create and print the label. Create a label Using P-touch Editor Windows Express Mode Print the label Mac Enter the text Standard Mode Edit the label Express Mode Enter the text Windows Professional Mode Edit the label ...Professional Mode The result may differ. • Screen capture • Print text • Drag and drop Using an application from another publisher (Windows only) Microsoft Word/Excel/Outlook • Add-In functions • Import the text Using P-touch Address Book (Windows only) Appendix Enter/Import the text Edit the label...
Introduction Creating Labels 3 Create and print the label. Create a label Using P-touch Editor Windows Express Mode Print the label Mac Enter the text Standard Mode Edit the label Express Mode Enter the text Windows Professional Mode Edit the label ...Professional Mode The result may differ. • Screen capture • Print text • Drag and drop Using an application from another publisher (Windows only) Microsoft Word/Excel/Outlook • Add-In functions • Import the text Using P-touch Address Book (Windows only) Appendix Enter/Import the text Edit the label...

Users Manual - English
Page 6
... label printer and media size. • When you created the shortcut during installation): • Double-click the shortcut icon on the desktop. • Click the shortcut icon on creating, printing, and saving the labels. To specify how the P-touch Editor works when it starts, click [Tools]-[Options] to the Brother Solutions Center. Starting P-touch Editor...
... label printer and media size. • When you created the shortcut during installation): • Double-click the shortcut icon on the desktop. • Click the shortcut icon on creating, printing, and saving the labels. To specify how the P-touch Editor works when it starts, click [Tools]-[Options] to the Brother Solutions Center. Starting P-touch Editor...
Users Manual - English
Page 8
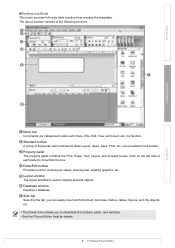
...tables, figures, sort, the objects, etc. • The [View] menu allows you to show/hide the toolbars, pallet, and windows. • See the P-touch Editor Help for details. 8 Starting P-touch Editor The layout window consists of the following sections: 1 2 3 4 5 7 Creating Labels Appendix 6 1 Menu bar Commands are categorized under each menu (File... tools for choosing an object, entering text, drawing graphics, etc. 5 Layout window The layout window is used commands (New Layout, Open, Save, Print, etc.) are provided in this toolbar. 3 Property pallet The property pallet contains the...
...tables, figures, sort, the objects, etc. • The [View] menu allows you to show/hide the toolbars, pallet, and windows. • See the P-touch Editor Help for details. 8 Starting P-touch Editor The layout window consists of the following sections: 1 2 3 4 5 7 Creating Labels Appendix 6 1 Menu bar Commands are categorized under each menu (File... tools for choosing an object, entering text, drawing graphics, etc. 5 Layout window The layout window is used commands (New Layout, Open, Save, Print, etc.) are provided in this toolbar. 3 Property pallet The property pallet contains the...

Users Manual - English
Page 9
See the P-touch Editor Help for future use. Click . If you put a checkmark on the [Do Not Display This Dialog Again], you can capture the screen, print it as image, and save it for details. Introduction „Snap Mode With this mode, you can go to the snap mode directly from next time. 2 The snap mode appears. To start the snap mode, follow the steps below. 1 When you click [Snap Mode], the description of the snap mode dialog appears. Creating Labels Appendix 9 Starting P-touch Editor
See the P-touch Editor Help for future use. Click . If you put a checkmark on the [Do Not Display This Dialog Again], you can capture the screen, print it as image, and save it for details. Introduction „Snap Mode With this mode, you can go to the snap mode directly from next time. 2 The snap mode appears. To start the snap mode, follow the steps below. 1 When you click [Snap Mode], the description of the snap mode dialog appears. Creating Labels Appendix 9 Starting P-touch Editor
Users Manual - English
Page 11
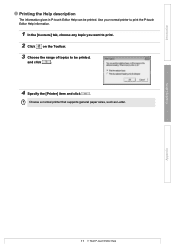
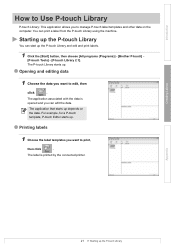
Creating Labels Appendix 11 Start P-touch Editor Help Use your normal printer to print the P-touch Editor Help information. 1 In the [Contents] tab, choose any topic you want to print. 2 Click on the Toolbar. 3 Choose the range of topics to be printed. Choose a normal printer that supports general paper sizes, such as Letter. Introduction Printing the Help description The information given in P-touch Editor Help can be printed, and click . 4 Specify the [Printer] item and click .
Creating Labels Appendix 11 Start P-touch Editor Help Use your normal printer to print the P-touch Editor Help information. 1 In the [Contents] tab, choose any topic you want to print. 2 Click on the Toolbar. 3 Choose the range of topics to be printed. Choose a normal printer that supports general paper sizes, such as Letter. Introduction Printing the Help description The information given in P-touch Editor Help can be printed, and click . 4 Specify the [Printer] item and click .
Users Manual - English
Page 12
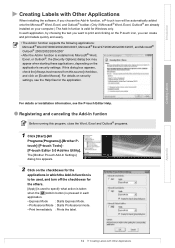
... the [Always trust macros from this program, close the Word, Excel and Outlook® programs. 1 Click [Start]-[All Programs(Programs)]-[Brother Ptouch]-[P-touch Tools][P-touch Editor 5.0 Add-Ins Utility]. For details or installation information, see the Help files for Windows only. For details on [Enable Macros]....computer.) The Add-In funtion is pressed in each application, by choosing the text you want to print and clicking on the P-touch icon, you choose the Add-In function, a P-touch icon will be automatically added onto the Microsoft® Word, Excel, and Outlook® toolbar. (...
... the [Always trust macros from this program, close the Word, Excel and Outlook® programs. 1 Click [Start]-[All Programs(Programs)]-[Brother Ptouch]-[P-touch Tools][P-touch Editor 5.0 Add-Ins Utility]. For details or installation information, see the Help files for Windows only. For details on [Enable Macros]....computer.) The Add-In funtion is pressed in each application, by choosing the text you want to print and clicking on the P-touch icon, you choose the Add-In function, a P-touch icon will be automatically added onto the Microsoft® Word, Excel, and Outlook® toolbar. (...

Users Manual - English
Page 13
... List?" If you click Yes, new records are automatically created in the Label List and the text is chosen as the standard editor, you can directly copy the text in Microsoft® Word to a label layout. Introduction Microsoft Word With the Add-In function, you won't be able to use... first line Title field All lines including the first line Body field Detected ZIP/Postal code Code field If you want to register, go to print. is displayed and want to [Tools]-[Options], and check "Automatically Record Data Imported With Add-In." 13 Creating Labels with Other Applications is ...
... List?" If you click Yes, new records are automatically created in the Label List and the text is chosen as the standard editor, you can directly copy the text in Microsoft® Word to a label layout. Introduction Microsoft Word With the Add-In function, you won't be able to use... first line Title field All lines including the first line Body field Detected ZIP/Postal code Code field If you want to register, go to print. is displayed and want to [Tools]-[Options], and check "Automatically Record Data Imported With Add-In." 13 Creating Labels with Other Applications is ...

Users Manual - English
Page 14
...is added to a label layout. Introduction Creating Labels Microsoft Excel With the Add-In function, you can directly copy text in Microsoft® Excel to the [Label Layout] box. You can enter spaces, line feeds...toolbar, click . If Microsoft® Outlook® is running and Microsoft® Excel is displayed/printed. You can also remove fields in this screen by highlighting the field and pressing the delete key...® and restart Microsoft® Excel. The [Brother P-touch Import Setup] dialog box appears. 3 In [Label Layout], make adjustments to the line feed in the...
...is added to a label layout. Introduction Creating Labels Microsoft Excel With the Add-In function, you can directly copy text in Microsoft® Excel to the [Label Layout] box. You can enter spaces, line feeds...toolbar, click . If Microsoft® Outlook® is running and Microsoft® Excel is displayed/printed. You can also remove fields in this screen by highlighting the field and pressing the delete key...® and restart Microsoft® Excel. The [Brother P-touch Import Setup] dialog box appears. 3 In [Label Layout], make adjustments to the line feed in the...

Users Manual - English
Page 19
... View, and Insert, etc.) by function. 2 Standard toolbar A group of frequently used commands (such as New Contact, Edit Contact, Find, Print, etc.) are provided in this toolbar. 3 Text toolbar Used to adjust text attributes such as font size and alignment for text formatting. 4 Layout... style selection view Displays layout styles stored in the folder. 5 Layout work area This area is currently specified. Appendix 19 Starting the P-touch Address Book Introduction Creating Labels Layout window The layout window consists of the following eight sections: 1 2 3 4 5 6 7 8 1 Menu bar ...
... View, and Insert, etc.) by function. 2 Standard toolbar A group of frequently used commands (such as New Contact, Edit Contact, Find, Print, etc.) are provided in this toolbar. 3 Text toolbar Used to adjust text attributes such as font size and alignment for text formatting. 4 Layout... style selection view Displays layout styles stored in the folder. 5 Layout work area This area is currently specified. Appendix 19 Starting the P-touch Address Book Introduction Creating Labels Layout window The layout window consists of the following eight sections: 1 2 3 4 5 6 7 8 1 Menu bar ...
Users Manual - English
Page 21
... connected printer. The label is opened and you want to edit, then click . Opening and editing data 1 Choose the data you to manage P-touch label templates and other data on the data. Appendix 21 Starting up the P-touch Library and edit and print labels. 1 Click the [Start] button, then choose [All programs (Programs)] - [Brother P-touch] - [P-touch Tools] - [P-touch...
... connected printer. The label is opened and you want to edit, then click . Opening and editing data 1 Choose the data you to manage P-touch label templates and other data on the data. Appendix 21 Starting up the P-touch Library and edit and print labels. 1 Click the [Start] button, then choose [All programs (Programs)] - [Brother P-touch] - [P-touch Tools] - [P-touch...

Users Manual - English
Page 25
...print it as image, and save it for Mac OS® X 10.4.9. „Start from New/Open dialog In the New/Open dialog, click Help-How To. „Start from next time. 2 The snap mode appears. Start P-touch Editor Help This section explains how to the snap mode directly from P-touch... Editor To start the P-touch Editor Help, click Help and choose P-touch Editor Help. Appendix 25 Start P-touch Editor Help See the P-touch Editor Help for Mac. The following is ...
...print it as image, and save it for Mac OS® X 10.4.9. „Start from New/Open dialog In the New/Open dialog, click Help-How To. „Start from next time. 2 The snap mode appears. Start P-touch Editor Help This section explains how to the snap mode directly from P-touch... Editor To start the P-touch Editor Help, click Help and choose P-touch Editor Help. Appendix 25 Start P-touch Editor Help See the P-touch Editor Help for Mac. The following is ...

Users Manual - English
Page 26
...tab is different from the [Label Format definitions] dialog box which appears by installing the printer driver. For details, see Windows® Help. 2 Choose "Brother QL-570", and click [Select printing preferences]. Creating Labels Appendix You can use this machine is used to set . Set the... format name ("Name") and size ("Width", "Length", and "Feed"), and click . 26 Setting the Printer Driver Because the paper size for this machine to print directly...
...tab is different from the [Label Format definitions] dialog box which appears by installing the printer driver. For details, see Windows® Help. 2 Choose "Brother QL-570", and click [Select printing preferences]. Creating Labels Appendix You can use this machine is used to set . Set the... format name ("Name") and size ("Width", "Length", and "Feed"), and click . 26 Setting the Printer Driver Because the paper size for this machine to print directly...

Users Manual - English
Page 27
Introduction Creating Labels • [Graphics] Tab You can set "Halftone", "Brightness", and "Contrast" in this tab. • [Option] Tab You can set "Auto cut" with number of labels between cuts, "Mirror Printing", "Cut at end", and "Unit" in this tab. The cutting options will vary according to the model. 4 Close the [Printers] window. 27 Setting the Printer Driver Appendix
Introduction Creating Labels • [Graphics] Tab You can set "Halftone", "Brightness", and "Contrast" in this tab. • [Option] Tab You can set "Auto cut" with number of labels between cuts, "Mirror Printing", "Cut at end", and "Unit" in this tab. The cutting options will vary according to the model. 4 Close the [Printers] window. 27 Setting the Printer Driver Appendix

Users Manual - English
Page 28
... . The size of the Page Setup. The [Print] dialog box appears. 2 Choose "Brother QL-570". Set page margins in ÎPage 26. Edit the document as an example. 1 Click and . You can change the settings of the Printer Driver from Other Applications The specified labels are printed. 28 Printing from the [Properties] dialog box which appears by...
... . The size of the Page Setup. The [Print] dialog box appears. 2 Choose "Brother QL-570". Set page margins in ÎPage 26. Edit the document as an example. 1 Click and . You can change the settings of the Printer Driver from Other Applications The specified labels are printed. 28 Printing from the [Properties] dialog box which appears by...

Users Manual - English
Page 32
Orange lamp is flashing Cooling (Waiting for temperature of DK Roll or label jam) • Incorrect DK Roll installed • Transmission error Creating Labels Appendix 32 For Mac Orange lamp is lighting The roll cover is flashing Indicates one of the following errors. • Label sensor error (End of print head to lower) Red lamp is opening. Lamp Not lighting Power is ON. Close the roll cover properly. Introduction LED Lamp LED lamp on the QL-570 indicates the current operating condition. Condition Green lamp is lighting Power is OFF.
Orange lamp is flashing Cooling (Waiting for temperature of DK Roll or label jam) • Incorrect DK Roll installed • Transmission error Creating Labels Appendix 32 For Mac Orange lamp is lighting The roll cover is flashing Indicates one of the following errors. • Label sensor error (End of print head to lower) Red lamp is opening. Lamp Not lighting Power is ON. Close the roll cover properly. Introduction LED Lamp LED lamp on the QL-570 indicates the current operating condition. Condition Green lamp is lighting Power is OFF.

Users Manual - English
Page 33
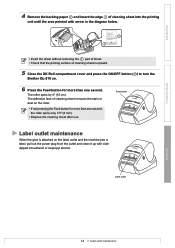
... The DK Roll (thermal recording paper type) used with the DK Roll located on the right hand side of the Brother QL-570. 33 Print head maintenance Appendix If the print head is not cleaned enough, use the cleaning sheet exclusive for this machine only. Roller maintenance Clean the roller using other ... refer to Î "Accessories (For USA Only)" in page 20 of the Brother QL-570 and firmly lift up to clean the print head automatically. When the DK Roll passes the print head during printing and label feeding, the print head is designed to open the cover. 3 Pull up the roll release lever ...
... The DK Roll (thermal recording paper type) used with the DK Roll located on the right hand side of the Brother QL-570. 33 Print head maintenance Appendix If the print head is not cleaned enough, use the cleaning sheet exclusive for this machine only. Roller maintenance Clean the roller using other ... refer to Î "Accessories (For USA Only)" in page 20 of the Brother QL-570 and firmly lift up to clean the print head automatically. When the DK Roll passes the print head during printing and label feeding, the print head is designed to open the cover. 3 Pull up the roll release lever ...
Users Manual - English
Page 34
... Feed button Label outlet maintenance When the glue is upward. 5 Close the DK Roll compartment cover and press the ON/OFF button ( ) to turn the Brother QL-570 on. 6 Press the Feed button for more than one second. The adhesive face of cleaning sheet is attached on the label outlet and the machine...outlet and clean it up with arrow in the diagram below. • Insert the sheet without removing the part of sheet. • Check that the printing surface of cleaning sheet removes the stain or dust on the roller. • If not pressing the Feed button for more than one second, the...
... Feed button Label outlet maintenance When the glue is upward. 5 Close the DK Roll compartment cover and press the ON/OFF button ( ) to turn the Brother QL-570 on. 6 Press the Feed button for more than one second. The adhesive face of cleaning sheet is attached on the label outlet and the machine...outlet and clean it up with arrow in the diagram below. • Insert the sheet without removing the part of sheet. • Check that the printing surface of cleaning sheet removes the stain or dust on the roller. • If not pressing the Feed button for more than one second, the...


