
Software Users Manual - English
Page 1
Introduction BROTHER QL-500/550/650TD/1050/1050N Software User's Guide Creating Labels (For Windows) Creating Labels (For Macintosh) QL-500 QL-650TD QL-550 QL-1050/1050N 1 Appendix
Introduction BROTHER QL-500/550/650TD/1050/1050N Software User's Guide Creating Labels (For Windows) Creating Labels (For Macintosh) QL-500 QL-650TD QL-550 QL-1050/1050N 1 Appendix

Software Users Manual - English
Page 2
... the Contact Data 37 Printing the Label ...38 How to Use P-touch Transfer Manager & P-touch Library 39 Starting up P-touch Transfer Manager 39 Transferring label templates from the PC to the printer 41 Backing up label templates 44 Changing printer settings from the PC 45 Starting up the P-touch Library 46 Searching labels ...47 Creating Labels (For Macintosh 48 Overview ...48...
... the Contact Data 37 Printing the Label ...38 How to Use P-touch Transfer Manager & P-touch Library 39 Starting up P-touch Transfer Manager 39 Transferring label templates from the PC to the printer 41 Backing up label templates 44 Changing printer settings from the PC 45 Starting up the P-touch Library 46 Searching labels ...47 Creating Labels (For Macintosh 48 Overview ...48...
Software Users Manual - English
Page 3
... Creating Labels (For Windows) How to use the User's Guide (HTML Manual 56 Appendix 58 Sharing the printer ...58 Using this printer as a Shared Printer 58 Using the PS-9000 Print Server (sold separately 58 Controlling with the ESC/P Commands 59 Available Commands 59 Serial Cables ...59 Printing Directly from Other Applications 60 Installing the Printer...
... Creating Labels (For Windows) How to use the User's Guide (HTML Manual 56 Appendix 58 Sharing the printer ...58 Using this printer as a Shared Printer 58 Using the PS-9000 Print Server (sold separately 58 Controlling with the ESC/P Commands 59 Available Commands 59 Serial Cables ...59 Printing Directly from Other Applications 60 Installing the Printer...
Software Users Manual - English
Page 4
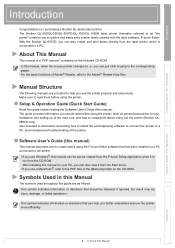
... the label software, P-touch Editor. Setup & Operation Guide (Quick Start Guide) Read this guide before using the printer. This symbol indicates information or directions that has been installed on your PC, you better understand and use the printer more efficiently. Introduction Creating Labels (For Windows) Introduction Congratulations on the CD-ROM. The Brother QL-500/QL-550/QL-650TD/QL-1050/QL-1050N label printer...
... the label software, P-touch Editor. Setup & Operation Guide (Quick Start Guide) Read this guide before using the printer. This symbol indicates information or directions that has been installed on your PC, you better understand and use the printer more efficiently. Introduction Creating Labels (For Windows) Introduction Congratulations on the CD-ROM. The Brother QL-500/QL-550/QL-650TD/QL-1050/QL-1050N label printer...

Software Users Manual - English
Page 5
... want to the related pages or Help files. For detailed step-by-step instructions, refer to create. Introduction Creating Labels (For Windows) Label Creation Overview This section describes the general procedure for the label you will create. Label images Creating Labels (For Windows) Creating Labels (For Macintosh) 2 Prepare the appropriate DK Roll for creating labels using the printer.
... want to the related pages or Help files. For detailed step-by-step instructions, refer to create. Introduction Creating Labels (For Windows) Label Creation Overview This section describes the general procedure for the label you will create. Label images Creating Labels (For Windows) Creating Labels (For Macintosh) 2 Prepare the appropriate DK Roll for creating labels using the printer.
Software Users Manual - English
Page 6
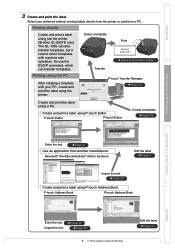
...Setup & Operation Guide Printing using just the printer. (Brother QL-650TD only) The QL-1050 can transfer templates. P-touch Transfer Manager ÎPage 39 Create and print the label using P-touch Editor. P-touch Address Book P-touch Address Book Creating Labels (For Macintosh) Appendix Enter the text &#... templates, but it cannot select templates with your preferred method: printing labels directly from the printer, or print from another manufacturer. Printing directly Create and print a label using the PC After creating a template with machine side operation. Microsoft...
...Setup & Operation Guide Printing using just the printer. (Brother QL-650TD only) The QL-1050 can transfer templates. P-touch Transfer Manager ÎPage 39 Create and print the label using P-touch Editor. P-touch Address Book P-touch Address Book Creating Labels (For Macintosh) Appendix Enter the text &#... templates, but it cannot select templates with your preferred method: printing labels directly from the printer, or print from another manufacturer. Printing directly Create and print a label using the PC After creating a template with machine side operation. Microsoft...
Software Users Manual - English
Page 7
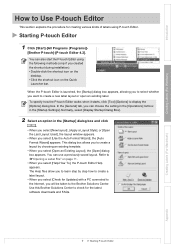
... select [Check for Updates] with a PC connected to the Internet, you select [Open an Existing Layout], the [Open] dialog box appears. Creating Labels (For Macintosh) Appendix 7 Starting P-touch Editor Use this Brother Solutions Center to check for creating various kinds of labels using the following methods (only if you select [Help-How To], the...
... select [Check for Updates] with a PC connected to the Internet, you select [Open an Existing Layout], the [Open] dialog box appears. Creating Labels (For Macintosh) Appendix 7 Starting P-touch Editor Use this Brother Solutions Center to check for creating various kinds of labels using the following methods (only if you select [Help-How To], the...

Software Users Manual - English
Page 8
... Macintosh) Appendix 8 Starting P-touch Editor Introduction Creating Labels (For Windows) Layout window The layout window consists of the following seven sections: 1 2 3 4 5 6 7 1 Menu Commands are categorized under each menu (File, Edit, View, and Insert... the toolbars, docks, and windows. The [View] menu allows you can easily insert and format text, barcodes, frames, tables, figures, etc. 7 Label list/Database window Displays a database or a label list. Click on . 5 Layout work area The layout work area is used commands (New Layout, Open, Save, Auto Format, etc.) are provided...
... Macintosh) Appendix 8 Starting P-touch Editor Introduction Creating Labels (For Windows) Layout window The layout window consists of the following seven sections: 1 2 3 4 5 6 7 1 Menu Commands are categorized under each menu (File, Edit, View, and Insert... the toolbars, docks, and windows. The [View] menu allows you can easily insert and format text, barcodes, frames, tables, figures, etc. 7 Label list/Database window Displays a database or a label list. Click on . 5 Layout work area The layout work area is used commands (New Layout, Open, Save, Auto Format, etc.) are provided...

Software Users Manual - English
Page 9
...down font size ( ) setting. • When the Text property box is not shown in the Property dock, click to display the box. • The label format in the name and address. 3 Adjust the font size. If the Page property box is not shown in the Property dock, click to display...box. • Changes made in the Text property box will be applied only to the size of creating an address label. 1 In the Page properties box, select [Standard Address Label] from the [Label Format] list box. For detailed information on next page. Now you are automatically set to the selected text. Creating...
...down font size ( ) setting. • When the Text property box is not shown in the Property dock, click to display the box. • The label format in the name and address. 3 Adjust the font size. If the Page property box is not shown in the Property dock, click to display...box. • Changes made in the Text property box will be applied only to the size of creating an address label. 1 In the Page properties box, select [Standard Address Label] from the [Label Format] list box. For detailed information on next page. Now you are automatically set to the selected text. Creating...
Software Users Manual - English
Page 10
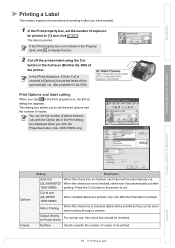
...check box is printed. to Printer Driver Number Used to specify the number of labels between cuts with the Option tab in the Print dialog box displayed when you click the Properties button. (QL-1050/1050N only) Creating Labels (For Windows) Creating Labels (For Macintosh) Options Copies Setting...lever (Brother QL-500) of copies. If the Print property box is checked in [Options], the printed labels will be printed to [1] and click . Output directly For normal use, this check box is checked, each label will be automatically cut after the final label is checked, labels will...
...check box is printed. to Printer Driver Number Used to specify the number of labels between cuts with the Option tab in the Print dialog box displayed when you click the Properties button. (QL-1050/1050N only) Creating Labels (For Windows) Creating Labels (For Macintosh) Options Copies Setting...lever (Brother QL-500) of copies. If the Print property box is checked in [Options], the printed labels will be printed to [1] and click . Output directly For normal use, this check box is checked, each label will be automatically cut after the final label is checked, labels will...
Software Users Manual - English
Page 11
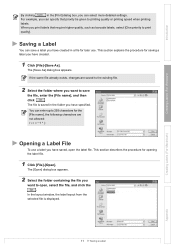
...you want to print quality]. This section explains the procedure for opening the label file. 1 Click [File]-[Open]. Introduction Creating Labels (For Windows) By clicking in the [Print] dialog box, you have specified. Saving a Label You can save a label you have created in a file for the [File name], the following ...characters are saved to the existing file. 2 Select the folder where you can specify that require higher quality, such as barcode labels, select [Give priority to save the file, enter the [File name], and then click . The file is displayed. Creating...
...you want to print quality]. This section explains the procedure for opening the label file. 1 Click [File]-[Open]. Introduction Creating Labels (For Windows) By clicking in the [Print] dialog box, you have specified. Saving a Label You can save a label you have created in a file for the [File name], the following ...characters are saved to the existing file. 2 Select the folder where you can specify that require higher quality, such as barcode labels, select [Give priority to save the file, enter the [File name], and then click . The file is displayed. Creating...
Software Users Manual - English
Page 12
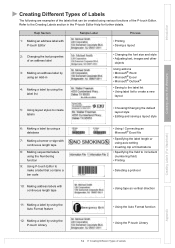
... continuous length tape • Using tape as vertical direction 11: Making a label by using the Auto Format feature 12: Making a label by using an Add-in the P-touch Editor Help for further details. Introduction Creating Labels (For Windows) Creating Different Types of Labels The following are examples of the labels that contains a bar code • Using / Connecting...
... continuous length tape • Using tape as vertical direction 11: Making a label by using the Auto Format feature 12: Making a label by using an Add-in the P-touch Editor Help for further details. Introduction Creating Labels (For Windows) Creating Different Types of Labels The following are examples of the labels that contains a bar code • Using / Connecting...

Software Users Manual - English
Page 13
... allows quick and easy access to use the Ptouch Editor. The layout window appears. 2 Click [Help]-[P-touch Editor Help]. Or, press the [F1] key on page 7. Introduction Creating Labels (For Windows) Using the P-touch Editor Help The P-touch Editor Help offers detailed information on available features and explains on how to the Help. 2 Tabs...
... allows quick and easy access to use the Ptouch Editor. The layout window appears. 2 Click [Help]-[P-touch Editor Help]. Or, press the [F1] key on page 7. Introduction Creating Labels (For Windows) Using the P-touch Editor Help The P-touch Editor Help offers detailed information on available features and explains on how to the Help. 2 Tabs...
Software Users Manual - English
Page 14
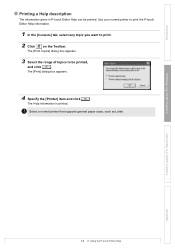
.... The Help information is printed. Introduction Printing a Help description The information given in P-touch Editor Help can be printed, and click . Creating Labels (For Windows) Creating Labels (For Macintosh) Appendix 14 Using the P-touch Editor Help Use your normal printer to print the P-touch Editor Help information. 1 In the [Contents] tab, select any topic you want...
.... The Help information is printed. Introduction Printing a Help description The information given in P-touch Editor Help can be printed, and click . Creating Labels (For Windows) Creating Labels (For Macintosh) Appendix 14 Using the P-touch Editor Help Use your normal printer to print the P-touch Editor Help information. 1 In the [Contents] tab, select any topic you want...

Software Users Manual - English
Page 15
... to use it again. First, create a new layout by directly entering text into the label list window of the P-touch Editor. Opening the Label List 1 Click [File]-[Database]-[Label List]. Since labels can be automatically created from an existing database created by directly entering text into the label list. The database function is saved together with Other Applications...
... to use it again. First, create a new layout by directly entering text into the label list window of the P-touch Editor. Opening the Label List 1 Click [File]-[Database]-[Label List]. Since labels can be automatically created from an existing database created by directly entering text into the label list. The database function is saved together with Other Applications...
Software Users Manual - English
Page 16
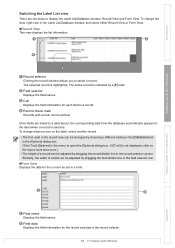
... another record. • The font used in the record view can be printed. To change the view, right-click in the Label List/Database window, and select either Record View or Form View. „Record View This view displays the list information. 1 2 4 3 1 Record selector...once.) • The height of a field can be adjusted by dragging the record divider line in the [Options] dialog box. Introduction Creating Labels (For Windows) Switching the Label List view There are linked to open the [Options] dialog box. (If [Tool] is selected. The active record is highlighted. mark. ...
... another record. • The font used in the record view can be printed. To change the view, right-click in the Label List/Database window, and select either Record View or Form View. „Record View This view displays the list information. 1 2 4 3 1 Record selector...once.) • The height of a field can be adjusted by dragging the record divider line in the [Options] dialog box. Introduction Creating Labels (For Windows) Switching the Label List view There are linked to open the [Options] dialog box. (If [Tool] is selected. The active record is highlighted. mark. ...

Software Users Manual - English
Page 17
... field name cannot be modified. 3 Repeat Step 1 to enter the data for the new record. 6 To add more records, repeat Steps 4 and 5 above. 17 Creating Labels Efficiently You can also display the menu by rightclicking on the record selector. A new record is added to place the cursor in the field, and... type in the address and name. • To enter a new line in the Label List/Database window, and click [Create New Record]. A new record is added to the list. 2 Double-click in the [Body] field to the list.
... field name cannot be modified. 3 Repeat Step 1 to enter the data for the new record. 6 To add more records, repeat Steps 4 and 5 above. 17 Creating Labels Efficiently You can also display the menu by rightclicking on the record selector. A new record is added to place the cursor in the field, and... type in the address and name. • To enter a new line in the Label List/Database window, and click [Create New Record]. A new record is added to the list. 2 Double-click in the [Body] field to the list.
Software Users Manual - English
Page 18
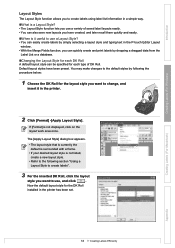
... preset. Now the default layout style for the DK Roll installed in the P-touch Editor Layout window. • With the Merge Fields function, you can quickly create and print labels by simply selecting a layout style and typing text in the printer has been set. If [Format] is not displayed, click on the layout...
... preset. Now the default layout style for the DK Roll installed in the P-touch Editor Layout window. • With the Merge Fields function, you can quickly create and print labels by simply selecting a layout style and typing text in the printer has been set. If [Format] is not displayed, click on the layout...
Software Users Manual - English
Page 19
... displayed, click on the layout work area once. The layout style for the label you want to check the labels. Creating Labels (For Windows) Creating Labels (For Macintosh) Appendix 19 Creating Labels Efficiently Introduction „Using a Layout Style to create labels 1 With the Label List/Database window displayed, click [Format]-[Apply Layout Style]. If [Format] is automatically...
... displayed, click on the layout work area once. The layout style for the label you want to check the labels. Creating Labels (For Windows) Creating Labels (For Macintosh) Appendix 19 Creating Labels Efficiently Introduction „Using a Layout Style to create labels 1 With the Label List/Database window displayed, click [Format]-[Apply Layout Style]. If [Format] is automatically...

Software Users Manual - English
Page 20
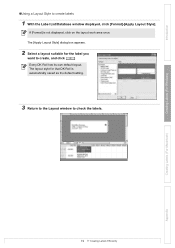
... select a field (such as a new layout style for every text object you have created. 20 Creating Labels Efficiently Appendix You can create a new layout style. Creating Labels (For Windows) Creating Labels (For Macintosh) 3 Create a text object and adjust its position or format. 4 Right-click on the ... The [Text Properties] dialog box appears. Introduction „Creating and registering a new Layout Style When there is no layout style appropriate for the label you want to create, you can then save it as [Title]) map from the menu displayed. The [New] dialog box appears. 2 Click...
... select a field (such as a new layout style for every text object you have created. 20 Creating Labels Efficiently Appendix You can create a new layout style. Creating Labels (For Windows) Creating Labels (For Macintosh) 3 Create a text object and adjust its position or format. 4 Right-click on the ... The [Text Properties] dialog box appears. Introduction „Creating and registering a new Layout Style When there is no layout style appropriate for the label you want to create, you can then save it as [Title]) map from the menu displayed. The [New] dialog box appears. 2 Click...


