
Quick Setup Guide - English
Page 4
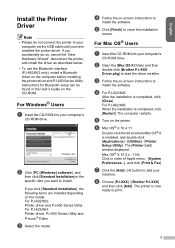
...-623/663: Printer driver, PJ-600 Series Utility and P-touch® Editor c Select the model. g Click the [Add] / [+] button to add your computer's CD-ROM drive. If you want to install. Instructions for Bluetooth setup can be found in order of Apple menu - [System Preferences...], and click [Print & Fax]. Mac OS® X 10.5.x - 10.6: Click in the User's Guide on -screen instructions to install the software. h Choose [PJ-XXX] / [Brother PJ-XXX...
...-623/663: Printer driver, PJ-600 Series Utility and P-touch® Editor c Select the model. g Click the [Add] / [+] button to add your computer's CD-ROM drive. If you want to install. Instructions for Bluetooth setup can be found in order of Apple menu - [System Preferences...], and click [Print & Fax]. Mac OS® X 10.5.x - 10.6: Click in the User's Guide on -screen instructions to install the software. h Choose [PJ-XXX] / [Brother PJ-XXX...
Quick Setup Guide - English
Page 5
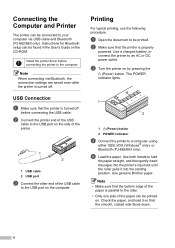
... computer. Check the paper, and load it into the starting position. Connecting the Computer and Printer The printer can be printed. c Turn the printer on the CD-ROM. Note When connecting via USB cable and Bluetooth (PJ-662/663 only). e Load the paper. Note • Make sure that the smooth, coated side faces down. 4 Install the printer driver before connecting the USB cable. Instructions for Bluetooth setup can be found in the User's Guide on by pressing the (Power) button.
... computer. Check the paper, and load it into the starting position. Connecting the Computer and Printer The printer can be printed. c Turn the printer on the CD-ROM. Note When connecting via USB cable and Bluetooth (PJ-662/663 only). e Load the paper. Note • Make sure that the smooth, coated side faces down. 4 Install the printer driver before connecting the USB cable. Instructions for Bluetooth setup can be found in the User's Guide on by pressing the (Power) button.
Users Manual - English
Page 3
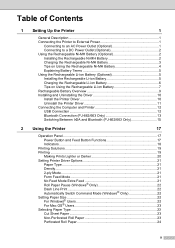
... 2 Using the Printer 17 Operation Panel 17 Power Button and Feed Button Functions 17 Indicators ...18 Printing Solutions 19 Printing ...19 Making Prints Lighter or Darker 20 Setting Printer Driver Options 21 Paper Type ...21 Density...21 2-ply Mode...21 Form Feed Mode 21 No Feed Mode Extra Feed 21 Roll Paper Pause (Windows® Only 22 Dash Line Print 22 Automatically Switch Command Mode (Windows® Only 22 Setting Paper Size 22 For Windows® Users 22 For Mac OS® Users 23 Selecting Paper Type 23 Cut Sheet Paper...
... 2 Using the Printer 17 Operation Panel 17 Power Button and Feed Button Functions 17 Indicators ...18 Printing Solutions 19 Printing ...19 Making Prints Lighter or Darker 20 Setting Printer Driver Options 21 Paper Type ...21 Density...21 2-ply Mode...21 Form Feed Mode 21 No Feed Mode Extra Feed 21 Roll Paper Pause (Windows® Only 22 Dash Line Print 22 Automatically Switch Command Mode (Windows® Only 22 Setting Paper Size 22 For Windows® Users 22 For Mac OS® Users 23 Selecting Paper Type 23 Cut Sheet Paper...
Users Manual - English
Page 4
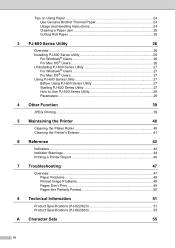
... PJ-600 Series Utility 27 How to Use PJ-600 Series Utility 28 Parameters ...29 4 Other Function 39 JPEG Printing ...39 5 Maintaining the Printer 40 Cleaning the Platen Roller 40 Cleaning the Printer's Exterior 41 6 Reference 42 Indicators ...42 Indicator Warnings 44 Printing a Printer Report 46 7 Troubleshooting 47 Overview ...47 Paper Problems 48 Printed Image Problems 48 Pages Don't Print 49 Pages Are Partially Printed 50 8 Technical Information 51 Product Specifications (PJ-622...
... PJ-600 Series Utility 27 How to Use PJ-600 Series Utility 28 Parameters ...29 4 Other Function 39 JPEG Printing ...39 5 Maintaining the Printer 40 Cleaning the Platen Roller 40 Cleaning the Printer's Exterior 41 6 Reference 42 Indicators ...42 Indicator Warnings 44 Printing a Printer Report 46 7 Troubleshooting 47 Overview ...47 Paper Problems 48 Printed Image Problems 48 Pages Don't Print 49 Pages Are Partially Printed 50 8 Technical Information 51 Product Specifications (PJ-622...
Users Manual - English
Page 14
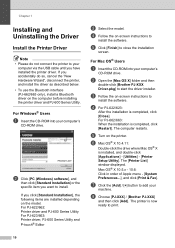
... drive. e Turn on the model. Mac OS® X 10.5.x - 10.6: Click in order of Apple menu - [System Preferences...], and click [Print & Fax]. f Mac OS® X 10.4.11: Double-click the drive where Mac OS® X is completed, click [Restart]. g Click the [Add] / [+] button to install the software. b Open the [Mac OS X] folder and then double-click [Brother PJ-XXX Driver.pkg] to close the installation screen. Chapter 1 Installing and Uninstalling the Driver 1 Install the Printer Driver...
... drive. e Turn on the model. Mac OS® X 10.5.x - 10.6: Click in order of Apple menu - [System Preferences...], and click [Print & Fax]. f Mac OS® X 10.4.11: Double-click the drive where Mac OS® X is completed, click [Restart]. g Click the [Add] / [+] button to install the software. b Open the [Mac OS X] folder and then double-click [Brother PJ-XXX Driver.pkg] to close the installation screen. Chapter 1 Installing and Uninstalling the Driver 1 Install the Printer Driver...

Users Manual - English
Page 15
... a User Account Control message displayed, type in the password, and then click [Yes]. If a User Account Control message displayed, type in the password, and then click [Yes]. Then, click [Remove...]. 1 f Choose [Remove driver and driver package] and click [OK]. d Choose [Fax] or [Microsoft XPS Document Writer] in the [Devices and Printers] window, and then click [Print server properties], which appeared in the menu bar. d Go to [File] - [Server Properties]. e Click the [Drivers] tab, and then click [Change Driver Settings...
... a User Account Control message displayed, type in the password, and then click [Yes]. If a User Account Control message displayed, type in the password, and then click [Yes]. Then, click [Remove...]. 1 f Choose [Remove driver and driver package] and click [OK]. d Choose [Fax] or [Microsoft XPS Document Writer] in the [Devices and Printers] window, and then click [Print server properties], which appeared in the menu bar. d Go to [File] - [Server Properties]. e Click the [Drivers] tab, and then click [Change Driver Settings...
Users Manual - English
Page 16
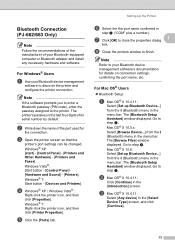
... connecting via USB cable and Bluetooth (PJ-662/663 only). Mac OS® X 10.5.x - 10.6: Choose [Brother PJ-XXX], and click [-]. Connecting the Computer and Printer 1 The printer can be connected to the USB port on the side of the printer. 1 2 1 USB cable 2 USB port c Connect the other end of Apple menu - [System Preferences...], and click [Print & Fax]. b Mac OS® X 10.4.11: Double-click the drive where Mac OS® X is turned off. USB Connection 1 a Make sure that the printer...
... connecting via USB cable and Bluetooth (PJ-662/663 only). Mac OS® X 10.5.x - 10.6: Choose [Brother PJ-XXX], and click [-]. Connecting the Computer and Printer 1 The printer can be connected to the USB port on the side of the printer. 1 2 1 USB cable 2 USB port c Connect the other end of Apple menu - [System Preferences...], and click [Print & Fax]. b Mac OS® X 10.4.11: Double-click the drive where Mac OS® X is turned off. USB Connection 1 a Make sure that the printer...
Users Manual - English
Page 17
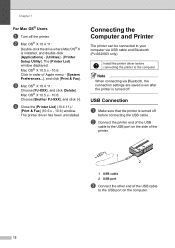
... code), enter the passkey assigned to step b. c Open the printer screen so that the printer's port settings can be changed. Windows® XP: [start] - [Control Panel] - [Printers and Other Hardware] - [Printers and Faxes]. Windows® 7: Right-click the printer icon, and then click [Printer Properties]. Go to the printer. The [Browse Files] window displayed. g Click [OK] to step i. Note Refer to your Bluetooth device management software to discover the printer and configure the printer connection. b Mac OS...
... code), enter the passkey assigned to step b. c Open the printer screen so that the printer's port settings can be changed. Windows® XP: [start] - [Control Panel] - [Printers and Other Hardware] - [Printers and Faxes]. Windows® 7: Right-click the printer icon, and then click [Printer Properties]. Go to the printer. The [Browse Files] window displayed. g Click [OK] to step i. Note Refer to your Bluetooth device management software to discover the printer and configure the printer connection. b Mac OS...
Users Manual - English
Page 19
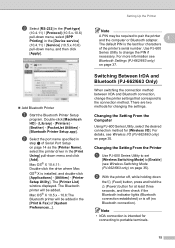
... menu and click [Add]. Mac OS® X 10.4.11: Double-click the drive where Mac OS® X is the last four characters of the printer's serial number. Changing the Setting From the Printer 1 a Use PJ-600 Series Utility to set [Wireless Switching Mode] to the connection method. Mac OS® X 10.5.x - 10.6:The Bluetooth printer will be added in the [Print & Fax] of Serial Port Setup on page 35. Note • IrDA connection is off , while holding down the (Feed) button...
... menu and click [Add]. Mac OS® X 10.4.11: Double-click the drive where Mac OS® X is the last four characters of the printer's serial number. Changing the Setting From the Printer 1 a Use PJ-600 Series Utility to set [Wireless Switching Mode] to the connection method. Mac OS® X 10.5.x - 10.6:The Bluetooth printer will be added in the [Print & Fax] of Serial Port Setup on page 35. Note • IrDA connection is off , while holding down the (Feed) button...
Users Manual - English
Page 24
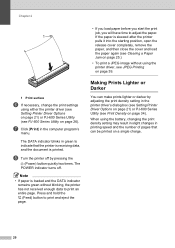
..., change the print settings using the printer driver, see JPEG Printing on page 39. The POWER indicator turns off by adjusting the print density setting in printing speed and the number of pages that the printer is receiving data, and the document is loaded and the DATA indicator remains green without using either the printer driver (see Setting Printer Driver Options on page 21) or PJ-600 Series Utility (see Print Density on page 26). Press and hold the (Feed) button to print and...
..., change the print settings using the printer driver, see JPEG Printing on page 39. The POWER indicator turns off by adjusting the print density setting in printing speed and the number of pages that the printer is receiving data, and the document is loaded and the DATA indicator remains green without using either the printer driver (see Setting Printer Driver Options on page 21) or PJ-600 Series Utility (see Print Density on page 26). Press and hold the (Feed) button to print and...
Users Manual - English
Page 25
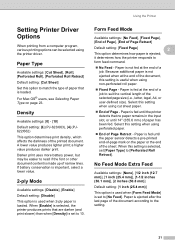
...Available settings: [Disable], [Enable] Default setting: [Disable] This option is used when [Form Feed Mode] is ejected; Select this setting when using perforated paper. End of the selected page size (i.e., letter, legal, A4, or user-defined size). a higher value produces darker print. Using the Printer Form Feed Mode 2 Available settings: [No Feed], [Fixed Page], [End of Page], [End of Page - When this setting when using cut sheet paper. End of Page Retract] Default setting: [Fixed Page] 2 This option determines how paper is set [Paper Type...
...Available settings: [Disable], [Enable] Default setting: [Disable] This option is used when [Form Feed Mode] is ejected; Select this setting when using perforated paper. End of the selected page size (i.e., letter, legal, A4, or user-defined size). a higher value produces darker print. Using the Printer Form Feed Mode 2 Available settings: [No Feed], [Fixed Page], [End of Page], [End of Page - When this setting when using cut sheet paper. End of Page Retract] Default setting: [Fixed Page] 2 This option determines how paper is set [Paper Type...
Users Manual - English
Page 26
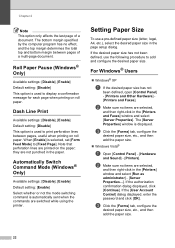
... bottom margin between pages, useful when printing on the paper; c Click the [Forms] tab, configure the desired paper size, etc., and then add the paper size. Windows Vista® a Open [Control Panel] - [Hardware and Sound] - [Printers]. they are selected, and then right-click in the [Printers and Faxes] window and select [Server Properties]. Automatically Switch Command Mode (Windows® Only) 2 Available settings: [Disable], [Enable] Default setting: [Enable] Select whether or not the mode switching command is used to [Fixed Page]. Chapter 2 Note...
... bottom margin between pages, useful when printing on the paper; c Click the [Forms] tab, configure the desired paper size, etc., and then add the paper size. Windows Vista® a Open [Control Panel] - [Hardware and Sound] - [Printers]. they are selected, and then right-click in the [Printers and Faxes] window and select [Server Properties]. Automatically Switch Command Mode (Windows® Only) 2 Available settings: [Disable], [Enable] Default setting: [Enable] Select whether or not the mode switching command is used to [Fixed Page]. Chapter 2 Note...
Users Manual - English
Page 27
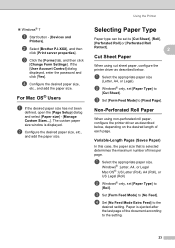
... Roll Paper 2 When using cut sheet paper, configure the printer driver as described below . Using the Printer Selecting Paper Type 2 Paper type can be set [Paper Type] to the setting. 23 c Click the [Forms] tab, and then click [Change Form Settings]. b Select [Brother PJ-XXX], and then click [Print server properties]. d Configure the desired paper size, etc., and add the paper size. For Mac OS® Users 2 a If the desired paper size has not been defined, open the [Page Setup] dialog and select [Paper size] - [Manage Custom Sizes...]. Windows...
... Roll Paper 2 When using cut sheet paper, configure the printer driver as described below . Using the Printer Selecting Paper Type 2 Paper type can be set [Paper Type] to the setting. 23 c Click the [Forms] tab, and then click [Change Form Settings]. b Select [Brother PJ-XXX], and then click [Print server properties]. d Configure the desired paper size, etc., and add the paper size. For Mac OS® Users 2 a If the desired paper size has not been defined, open the [Page Setup] dialog and select [Paper size] - [Manage Custom Sizes...]. Windows...

Users Manual - English
Page 28
... PocketJet printer family. c Set [Form Feed Mode] to [Roll]. c Set [Form Feed Mode] to [End of Page] or [End of the document according to loading it may darken the paper. 24 Tips on . If you use one with organic solvents, oils, and ammonia. When using perforated roll paper, configure the printer driver as many notebook or report covers. Avoid contact with a water-based ink. e Confirm that the smooth, coated side...
... PocketJet printer family. c Set [Form Feed Mode] to [Roll]. c Set [Form Feed Mode] to [End of Page] or [End of the document according to loading it may darken the paper. 24 Tips on . If you use one with organic solvents, oils, and ammonia. When using perforated roll paper, configure the printer driver as many notebook or report covers. Avoid contact with a water-based ink. e Confirm that the smooth, coated side...

Users Manual - English
Page 31
...; Users 3 To start button - [All Programs] - [Brother PocketJet] - [Brother PJ-600 Series Utility]. Uninstalling PJ-600 Series Utility 3 For Windows® Users 3 a Windows® XP: [start] - [Control Panel] - [Add or Remove Programs]. PJ-600 Series Utility Using PJ-600 Series Utility 3 Before Using PJ-600 Series Utility 3 Connect the printer to an AC or DC power 3 outlet, or make sure that the battery is fully-charged. Make sure that the printer driver has been installed...
...; Users 3 To start button - [All Programs] - [Brother PocketJet] - [Brother PJ-600 Series Utility]. Uninstalling PJ-600 Series Utility 3 For Windows® Users 3 a Windows® XP: [start] - [Control Panel] - [Add or Remove Programs]. PJ-600 Series Utility Using PJ-600 Series Utility 3 Before Using PJ-600 Series Utility 3 Connect the printer to an AC or DC power 3 outlet, or make sure that the battery is fully-charged. Make sure that the printer driver has been installed...
Users Manual - English
Page 36
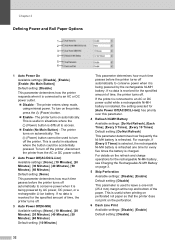
... not print on the printer, press the (Power) button. Enable - Chapter 3 Defining Power and Roll Paper Options 3 1 2 3 4 5 6 1 Auto Power On Available settings: [Disable], [Enable], [Enable (No Main Button)] Default setting: [Disable] This parameter determines how the printer responds when it is connected to access. Enable (No Main Button) - If the printer is connected to leave a one time for the specified amount of the paper. The printer enters sleep mode, using minimal power. To turn off . If no data is received for [Auto Power...
... not print on the printer, press the (Power) button. Enable - Chapter 3 Defining Power and Roll Paper Options 3 1 2 3 4 5 6 1 Auto Power On Available settings: [Disable], [Enable], [Enable (No Main Button)] Default setting: [Disable] This parameter determines how the printer responds when it is connected to access. Enable (No Main Button) - If the printer is connected to leave a one time for the specified amount of the paper. The printer enters sleep mode, using minimal power. To turn off . If no data is received for [Auto Power...
Users Manual - English
Page 38
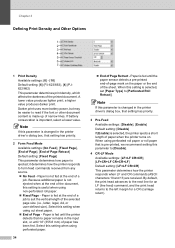
... the sheet. Note If this parameter is changed in the printer driver's dialog box, that setting has priority. 3 Pre-Feed Available settings: [Disable], [Enable] Default setting: [Disable] If [Enable] is ejected; A lower value produces lighter print; Note If this parameter is changed in the printer driver's dialog box, that setting has priority. 2 Form Feed Mode Available settings: [No Feed], [Fixed Page], [End of Page], [End of Page Retract] Default setting: [Fixed Page] This parameter determines how paper is selected, the printer ejects...
... the sheet. Note If this parameter is changed in the printer driver's dialog box, that setting has priority. 3 Pre-Feed Available settings: [Disable], [Enable] Default setting: [Disable] If [Enable] is ejected; A lower value produces lighter print; Note If this parameter is changed in the printer driver's dialog box, that setting has priority. 2 Form Feed Mode Available settings: [No Feed], [Fixed Page], [End of Page], [End of Page Retract] Default setting: [Fixed Page] This parameter determines how paper is selected, the printer ejects...
Users Manual - English
Page 43
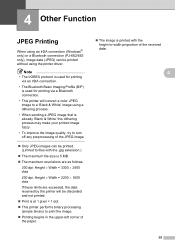
... make your printed image fuzzy. • To improve the image quality, try to turn off any preprocessing of the JPEG image. Only JPEG images can be printed without using an IrDA connection (Windows® only) or a Bluetooth connection (PJ-662/663 only), image data (JPEG) can be printed. (Limited to files with the height-to-width proportion of the received data. 4 39 4 Other Function 4 JPEG Printing 4 When using the printer driver...
... make your printed image fuzzy. • To improve the image quality, try to turn off any preprocessing of the JPEG image. Only JPEG images can be printed without using an IrDA connection (Windows® only) or a Bluetooth connection (PJ-662/663 only), image data (JPEG) can be printed. (Limited to files with the height-to-width proportion of the received data. 4 39 4 Other Function 4 JPEG Printing 4 When using the printer driver...
Users Manual - English
Page 52
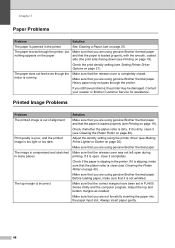
... are using genuine Brother thermal paper. Always insert paper gently. 48 If it completely. Make sure that the correct margins have problems, the printer may not pass through the printer, but nothing appears on page 40). If it is slipping, make sure that the platen roller is clean (see Setting Printer Driver Options on page 20). Before loading paper, make sure that it is running Solution See Clearing a Paper Jam on page 19). Check...
... are using genuine Brother thermal paper. Always insert paper gently. 48 If it completely. Make sure that the correct margins have problems, the printer may not pass through the printer, but nothing appears on page 40). If it is slipping, make sure that the platen roller is clean (see Setting Printer Driver Options on page 20). Before loading paper, make sure that it is running Solution See Clearing a Paper Jam on page 19). Check...
Users Manual - English
Page 53
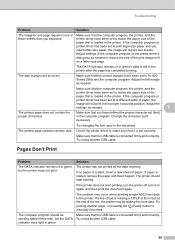
... USB cable. Make sure that the computer program, the printer, and the printer driver have been set to match the paper size of the paper that is loaded in the document. Make sure that the USB cable is connected firmly and correctly. Try using another page, or pressing the (Feed) button to manually form feed. If no paper is loaded, insert a new sheet of the line, the printer may occur when sending simple ASCII text data to the printer. Troubleshooting Problem Solution The image...
... USB cable. Make sure that the computer program, the printer, and the printer driver have been set to match the paper size of the paper that is loaded in the document. Make sure that the USB cable is connected firmly and correctly. Try using another page, or pressing the (Feed) button to manually form feed. If no paper is loaded, insert a new sheet of the line, the printer may occur when sending simple ASCII text data to the printer. Troubleshooting Problem Solution The image...


