Users Manual - English and Spanish
Page 3
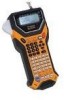
..., the user is no guarantee that the product Product Name : Brother P-touch Electronic Labeling System Model Number : PT-7600 This device complies with the limits for a Class B digital device, pursuant to correct the interference by Brother Industries, Ltd. This equipment generates, uses and can radiate radio frequency energy and, if not installed and used in accordance with the limits for help. However...
..., the user is no guarantee that the product Product Name : Brother P-touch Electronic Labeling System Model Number : PT-7600 This device complies with the limits for a Class B digital device, pursuant to correct the interference by Brother Industries, Ltd. This equipment generates, uses and can radiate radio frequency energy and, if not installed and used in accordance with the limits for help. However...
Users Manual - English and Spanish
Page 5
...; (2) Damage caused by improper installation, improper or abnormal use, misuse, neglect or accident (including but not limited to damage resulting from Brother and/or alteration/ removal of the serial number). You are not limited to the Authorized Service Center together with a rated life; Brother® Two-Year Limited Warranty and Replacement Service (USA Only) Who is covered: • This limited warranty...
...; (2) Damage caused by improper installation, improper or abnormal use, misuse, neglect or accident (including but not limited to damage resulting from Brother and/or alteration/ removal of the serial number). You are not limited to the Authorized Service Center together with a rated life; Brother® Two-Year Limited Warranty and Replacement Service (USA Only) Who is covered: • This limited warranty...
Users Manual - English and Spanish
Page 6
...) the proper packaging instructions are dealing directly with Brother, Brother will send to you a replacement Machine with the understanding that you will, after receipt of the replacement Machine, supply the required proof of two machines, Brother will repair or replace the Machine and/or accompanying Consumable and Accessory Items at a conveniently located Authorized Service Center. You will keep the replacement Machine that you provide a valid major credit card number. The foregoing...
...) the proper packaging instructions are dealing directly with Brother, Brother will send to you a replacement Machine with the understanding that you will, after receipt of the replacement Machine, supply the required proof of two machines, Brother will repair or replace the Machine and/or accompanying Consumable and Accessory Items at a conveniently located Authorized Service Center. You will keep the replacement Machine that you provide a valid major credit card number. The foregoing...
Users Manual - English and Spanish
Page 13
... another USB cable need to be used, ensure it nearby for an extended period of high quality construction (for PT-7600 only), etc. ● Do not touch the print head with your car), high humidity, or dusty locations. Doing so may be closed if the release lever is pressed down. ● Do not try to cut tape while printing or feeding since...
... another USB cable need to be used, ensure it nearby for an extended period of high quality construction (for PT-7600 only), etc. ● Do not touch the print head with your car), high humidity, or dusty locations. Doing so may be closed if the release lever is pressed down. ● Do not try to cut tape while printing or feeding since...
Users Manual - English and Spanish
Page 14
... Choosing the default setting 19 Confirming a choice 19 Cancelling a choice 19 vi Contents Before Using Your P-touch Labeler i Safety precautions i General Precautions v Contents vi 1. Getting Started 1 Unpacking Your P-touch Labeler 1 General Description 3 Top view & bottom view 3 Keyboard & LCD screen 4 Back light ...5 Power Supply 5 AC Adapter 5 Batteries ...6 Rechargeable battery pack (for PT-7600 only 7 Tape Cassettes 9 Installing a tape cassette 9 Turning the P-touch Labeler...
... Choosing the default setting 19 Confirming a choice 19 Cancelling a choice 19 vi Contents Before Using Your P-touch Labeler i Safety precautions i General Precautions v Contents vi 1. Getting Started 1 Unpacking Your P-touch Labeler 1 General Description 3 Top view & bottom view 3 Keyboard & LCD screen 4 Back light ...5 Power Supply 5 AC Adapter 5 Batteries ...6 Rechargeable battery pack (for PT-7600 only 7 Tape Cassettes 9 Installing a tape cassette 9 Turning the P-touch Labeler...
Users Manual - English and Spanish
Page 15
... (for PT-7600 only) .....47 Installing the Software & Printer Driver 47 Introduction 47 System requirements 48 Installing the P-touch Editor 5.0 and Printer driver 48 Uninstalling the P-touch Editor 5.0 53 vii Inputting Label Data 20 Entering and editing text 20 Entering an accented character 22 Entering a bar code 23 Entering a symbol 25 Formatting the Label 28 Specifying a label length 28 Specifying a margin size 28 Framing...
... (for PT-7600 only) .....47 Installing the Software & Printer Driver 47 Introduction 47 System requirements 48 Installing the P-touch Editor 5.0 and Printer driver 48 Uninstalling the P-touch Editor 5.0 53 vii Inputting Label Data 20 Entering and editing text 20 Entering an accented character 22 Entering a bar code 23 Entering a symbol 25 Formatting the Label 28 Specifying a label length 28 Specifying a margin size 28 Framing...

Users Manual - English and Spanish
Page 16
... use P-touch Transfer Manager & P-touch Library 62 Starting up P-touch Transfer Manager 62 Transferring label templates from the PC 64 Adding a user-defined character image to the text 66 Using template data 66 Using downloaded database data 68 Backing up label templates 70 Starting up the P-touch Library 72 Searching labels 72 6. Appendix 74 Resetting the P-touch Labeler 74 Troubleshooting 74 Error Message List 76 Machine Specifications 81 Main Unit ...81 Operating Environment: Windows® (for PT-7600...
... use P-touch Transfer Manager & P-touch Library 62 Starting up P-touch Transfer Manager 62 Transferring label templates from the PC 64 Adding a user-defined character image to the text 66 Using template data 66 Using downloaded database data 68 Backing up label templates 70 Starting up the P-touch Library 72 Searching labels 72 6. Appendix 74 Resetting the P-touch Labeler 74 Troubleshooting 74 Error Message List 76 Machine Specifications 81 Main Unit ...81 Operating Environment: Windows® (for PT-7600...
Users Manual - English and Spanish
Page 21
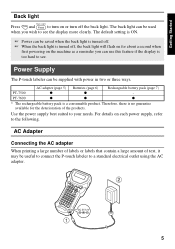
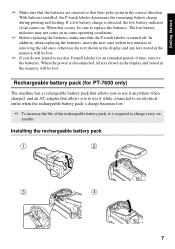
... your needs. PT-7500 PT-7600 AC adapter (page 5) ● ● Batteries (page 6) ● ● Rechargeable battery pack (page 7) ● * The rechargeable battery pack is a consumable product. Use the power supply best suited to the following. The default setting is ON. ☞ Power can be used when you can use this feature if the display is too hard to see the display more clearly. Getting Started Back light Press...
... your needs. PT-7500 PT-7600 AC adapter (page 5) ● ● Batteries (page 6) ● ● Rechargeable battery pack (page 7) ● * The rechargeable battery pack is a consumable product. Use the power supply best suited to the following. The default setting is ON. ☞ Power can be used when you can use this feature if the display is too hard to see the display more clearly. Getting Started Back light Press...
Users Manual - English and Spanish
Page 23
... printing and feeding. The low battery indicator may not come on . If a low battery charge is detected, the low battery indicator ()) comes on in some operating conditions. ☞ Before replacing the batteries, make sure that their poles point in the correct direction. When the power is disconnected, all text shown in the display and stored in the memory will be sure to use...
... printing and feeding. The low battery indicator may not come on . If a low battery charge is detected, the low battery indicator ()) comes on in some operating conditions. ☞ Before replacing the batteries, make sure that their poles point in the correct direction. When the power is disconnected, all text shown in the display and stored in the memory will be sure to use...
Users Manual - English and Spanish
Page 40
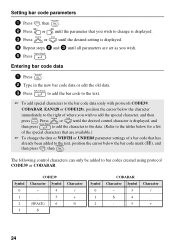
... Press u or d until the desired control character is displayed. 4 Repeat steps 2 and 3 until the desired setting is displayed, and then press n to add the character to the data. (Refer to the tables below for a list of the special characters that has already ...change the data or WIDTH or UNDER# parameter settings of a bar code that are set as you wish to add the special character, and then press s. Entering bar code data 1 Press c. 2 Type in the new bar code data or edit the old data. 3 Press n to add the bar code to the text. ☞ To add special characters to bar codes created using...
... Press u or d until the desired control character is displayed. 4 Repeat steps 2 and 3 until the desired setting is displayed, and then press n to add the character to the data. (Refer to the tables below for a list of the special characters that has already ...change the data or WIDTH or UNDER# parameter settings of a bar code that are set as you wish to add the special character, and then press s. Entering bar code data 1 Press c. 2 Type in the new bar code data or edit the old data. 3 Press n to add the bar code to the text. ☞ To add special characters to bar codes created using...

Users Manual - English and Spanish
Page 63
... is installed together with a USB port, allowing you to create a wide variety of custom labels in P-touch Editor cannot be printed directly from the application. ☞ If you transfer label designs and graphics to a USB hub), or try connecting the USB interface cable directly to your computer. 5 Using P-touch Labeler With a Computer (for PT-7600 only) This P-touch labeler is equipped with the printer driver and P-touch Transfer Manager. ● P-touch Editor...
... is installed together with a USB port, allowing you to create a wide variety of custom labels in P-touch Editor cannot be printed directly from the application. ☞ If you transfer label designs and graphics to a USB hub), or try connecting the USB interface cable directly to your computer. 5 Using P-touch Labeler With a Computer (for PT-7600 only) This P-touch labeler is equipped with the printer driver and P-touch Transfer Manager. ● P-touch Editor...
Users Manual - English and Spanish
Page 64
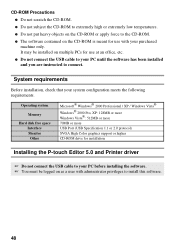
Operating system Memory Hard disk free space Interface Monitor Other Microsoft® Windows® 2000 Professional / XP / Windows Vista® Windows® 2000 Pro, XP: 128MB or more Windows Vista®: 512MB or more 70MB or more USB Port (USB Specification 1.1 or 2.0 protocol) SVGA High Color graphics support or higher CD-ROM drive for installation Installing the P-touch Editor 5.0 and Printer driver ☞ Do not connect the USB cable to your PC before installing the...
Operating system Memory Hard disk free space Interface Monitor Other Microsoft® Windows® 2000 Professional / XP / Windows Vista® Windows® 2000 Pro, XP: 128MB or more Windows Vista®: 512MB or more 70MB or more USB Port (USB Specification 1.1 or 2.0 protocol) SVGA High Color graphics support or higher CD-ROM drive for installation Installing the P-touch Editor 5.0 and Printer driver ☞ Do not connect the USB cable to your PC before installing the...
Users Manual - English and Spanish
Page 65
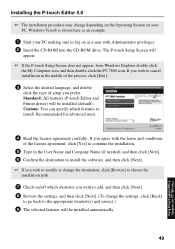
... may change depending on the Operating System on your PC making sure to log on /off which features to the appropriate window(s) and correct.) 9 The selected features will be installed (default). Standard: All features (P-touch Editor and Printer driver) will appear. ☞ If the P-touch Setup Screen does not appear, from Windows Explorer double-click the My Computer icon, and then double-click the PT-7600...
... may change depending on the Operating System on your PC making sure to log on /off which features to the appropriate window(s) and correct.) 9 The selected features will be installed (default). Standard: All features (P-touch Editor and Printer driver) will appear. ☞ If the P-touch Setup Screen does not appear, from Windows Explorer double-click the My Computer icon, and then double-click the PT-7600...

Users Manual - English and Spanish
Page 67
... the product your default internet browser will be launched in Transfer mode. Connect to register your PC if you have selected to complete the installation. If you are instructed to P-touch labeler USB port. 51 Using P-touch Labeler With a Computer (for PT-7600 only) Connect to do so. Restart your P-touch labeler online, click [Yes] and then click [Next]. 3 The printer is detected, and then a message appears again...
... the product your default internet browser will be launched in Transfer mode. Connect to register your PC if you have selected to complete the installation. If you are instructed to P-touch labeler USB port. 51 Using P-touch Labeler With a Computer (for PT-7600 only) Connect to do so. Restart your P-touch labeler online, click [Yes] and then click [Next]. 3 The printer is detected, and then a message appears again...
Users Manual - English and Spanish
Page 69
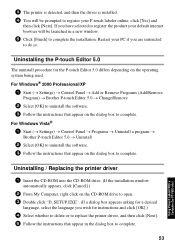
... a desired language, select the language you are instructed to complete the installation. For Windows® 2000 Professional/XP 1 Start (→ Settings) → Control Panel → Add or Remove Programs (Add/Remove Program) → Brother P-touch Editor 5.0 → Change/Remove 2 Select [OK] to uninstall the software. 3 Follow the instructions that appear on the CD-ROM drive to open. 3 Double click "D_SETUP.EXE". (If a dialog box appears asking for PT-7600 only) 3 The printer is detected...
... a desired language, select the language you are instructed to complete the installation. For Windows® 2000 Professional/XP 1 Start (→ Settings) → Control Panel → Add or Remove Programs (Add/Remove Program) → Brother P-touch Editor 5.0 → Change/Remove 2 Select [OK] to uninstall the software. 3 Follow the instructions that appear on the CD-ROM drive to open. 3 Double click "D_SETUP.EXE". (If a dialog box appears asking for PT-7600 only) 3 The printer is detected...
Users Manual - English and Spanish
Page 70
... settings not compatible with the P-touch labeler bar codes settings will not print correctly. ☞ A template created with P-touch Editor should have a fixed length with a maximum of 40" (1 m). ☞ The template and database should be created so that no more than one line of text, create the template and database with P-touch Editor will not transfer and is set to AUTO, the text size...
... settings not compatible with the P-touch labeler bar codes settings will not print correctly. ☞ A template created with P-touch Editor should have a fixed length with a maximum of 40" (1 m). ☞ The template and database should be created so that no more than one line of text, create the template and database with P-touch Editor will not transfer and is set to AUTO, the text size...
Users Manual - English and Spanish
Page 71
... transferred. ☞ The label length settings in P-touch Editor and the P-touch labeler machine, may differ slightly due to 8 sizes) like the resident font or any of fields in a database are changed and only the database (*.csv file) is combined into a single bitmap at the printer resolution (180 dpi) and only the TrueType font data can be edited from the PT-7600...
... transferred. ☞ The label length settings in P-touch Editor and the P-touch labeler machine, may differ slightly due to 8 sizes) like the resident font or any of fields in a database are changed and only the database (*.csv file) is combined into a single bitmap at the printer resolution (180 dpi) and only the TrueType font data can be edited from the PT-7600...
Users Manual - English and Spanish
Page 77
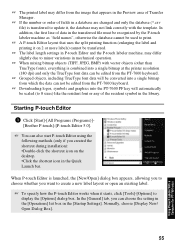
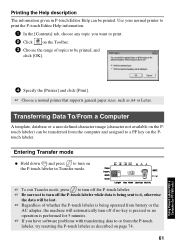
... [Print]. ☞ Choose a normal printer that supports general paper sizes, such as described on the Ptouch labeler. Entering Transfer mode ● Hold down g and press o to turn on the P-touch labeler in P-touch Editor Help can be printed. Printing the Help description The information given in Transfer mode. ☞ To exit Transfer mode, press o to turn off the P-touch labeler. ☞ Be sure not to turn off the P-touch labeler while data is...
... [Print]. ☞ Choose a normal printer that supports general paper sizes, such as described on the Ptouch labeler. Entering Transfer mode ● Hold down g and press o to turn on the P-touch labeler in P-touch Editor Help can be printed. Printing the Help description The information given in Transfer mode. ☞ To exit Transfer mode, press o to turn off the P-touch labeler. ☞ Be sure not to turn off the P-touch labeler while data is...
Users Manual - English and Spanish
Page 90
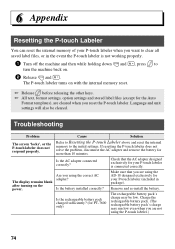
... machine back on. 2 Release g and R. Language and unit settings will also be low. Cause Solution Refer to Resetting the P-touch Labeler above and reset the internal memory to the initial settings. Check that you are cleared when you reset the P-touch labeler. Are you using the P-touch labeler.) 74 Troubleshooting Problem The screen 'locks', or the P-touch labeler does not respond properly. The P-touch labeler turns on the power. Is the AC adapter connected...
... machine back on. 2 Release g and R. Language and unit settings will also be low. Cause Solution Refer to Resetting the P-touch Labeler above and reset the internal memory to the initial settings. Check that you are cleared when you reset the P-touch labeler. Are you using the P-touch labeler.) 74 Troubleshooting Problem The screen 'locks', or the P-touch labeler does not respond properly. The P-touch labeler turns on the power. Is the AC adapter connected...
Users Manual - English and Spanish
Page 99
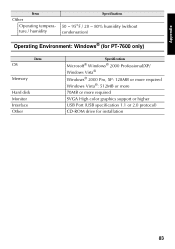
Appendix Item Other Operating temperature / humidity Specification 50 ~ 95°F / 20 ~ 80% humidity (without condensation) Operating Environment: Windows® (for PT-7600 only) Item OS Memory Hard disk Monitor Interface Other Specification Microsoft® Windows® 2000 Professional/XP/ Windows Vista® Windows® 2000 Pro, XP: 128MB or more required Windows Vista®: 512MB or more 70MB or more required SVGA High color graphics support or higher USB Port (USB specification 1.1 or 2.0 protocol) CD-ROM drive for installation 83
Appendix Item Other Operating temperature / humidity Specification 50 ~ 95°F / 20 ~ 80% humidity (without condensation) Operating Environment: Windows® (for PT-7600 only) Item OS Memory Hard disk Monitor Interface Other Specification Microsoft® Windows® 2000 Professional/XP/ Windows Vista® Windows® 2000 Pro, XP: 128MB or more required Windows Vista®: 512MB or more 70MB or more required SVGA High color graphics support or higher USB Port (USB specification 1.1 or 2.0 protocol) CD-ROM drive for installation 83


