

Users Manual - English
Page 4
Easily turn illustrations, photos and lettering into custom embroidery designs. ■ Layout ready-made designs ■ Large-sized patterns (☞p. 15) (☞p. 176 in the Instruction Manual (PDF format)) 2 Turn Any Design Into Original Embroidery With PE-DESIGN This software provides digitizing and editing capabilities, allowing you the creative freedom to design original embroidery.
Easily turn illustrations, photos and lettering into custom embroidery designs. ■ Layout ready-made designs ■ Large-sized patterns (☞p. 15) (☞p. 176 in the Instruction Manual (PDF format)) 2 Turn Any Design Into Original Embroidery With PE-DESIGN This software provides digitizing and editing capabilities, allowing you the creative freedom to design original embroidery.
Users Manual - English
Page 15
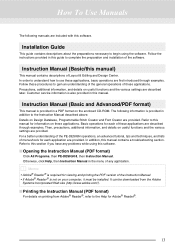
...the Help for information on printing from Adobe® Reader®, refer to begin using this software. ■ Opening the Instruction Manual (PDF format) Click All Programs, then PE-DESIGN 8, then Instruction Manual. Customer service information is not on your computer, it must be ...then Instruction Manual in the menu of any problems while using the software. Precautions, additional information, and details on the enclosed CD-ROM. Refer to use these applications. For a better understanding of the PE-DESIGN operations, an advanced tutorial, tips and techniques, and lists of ...
...the Help for information on printing from Adobe® Reader®, refer to begin using this software. ■ Opening the Instruction Manual (PDF format) Click All Programs, then PE-DESIGN 8, then Instruction Manual. Customer service information is not on your computer, it must be ...then Instruction Manual in the menu of any problems while using the software. Precautions, additional information, and details on the enclosed CD-ROM. Refer to use these applications. For a better understanding of the PE-DESIGN operations, an advanced tutorial, tips and techniques, and lists of ...
Users Manual - English
Page 40
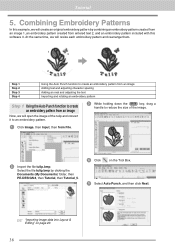
... file tulip.bmp. Tutorial 5. Combining Embroidery Patterns In this example, we will create an original embroidery pattern by clicking the Documents (My Documents) folder, then PE-DESIGN 8, then Tutorial, then Tutorial_5. 4 Click on page 20. 38 At the same time, we will resize each embroidery pattern and rearrange them. 1 3 2 Step... to reduce the size of the image. 1 Click Image, then Input, then from entered text 2, and an embroidery pattern included with this software 3. c "Importing image data into Layout & Editing" on the Tool Box. 5 Select Auto Punch, and then click Next.
... file tulip.bmp. Tutorial 5. Combining Embroidery Patterns In this example, we will create an original embroidery pattern by clicking the Documents (My Documents) folder, then PE-DESIGN 8, then Tutorial, then Tutorial_5. 4 Click on page 20. 38 At the same time, we will resize each embroidery pattern and rearrange them. 1 3 2 Step... to reduce the size of the image. 1 Click Image, then Input, then from entered text 2, and an embroidery pattern included with this software 3. c "Importing image data into Layout & Editing" on the Tool Box. 5 Select Auto Punch, and then click Next.
Users Manual - English
Page 44
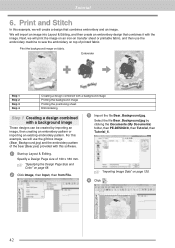
... be created by clicking the Documents (My Documents) folder, then PE-DESIGN 8, then Tutorial, then Tutorial_6. 1 Start up Layout & Editing. For this example, we will print the image on an iron-on transfer ... creating an embroidery pattern or importing an existing embroidery pattern. Embroider Step 1 Step 2 Step 3 Step 4 Creating a design combined with a background image Printing the background image Printing the positioning sheet Embroidering Step 1 Creating a design combined with the image. Tutorial 6. Print and Stitch In this software. 3 Import the file Bear_Background.jpg.
... be created by clicking the Documents (My Documents) folder, then PE-DESIGN 8, then Tutorial, then Tutorial_6. 1 Start up Layout & Editing. For this example, we will print the image on an iron-on transfer ... creating an embroidery pattern or importing an existing embroidery pattern. Embroider Step 1 Step 2 Step 3 Step 4 Creating a design combined with a background image Printing the background image Printing the positioning sheet Embroidering Step 1 Creating a design combined with the image. Tutorial 6. Print and Stitch In this software. 3 Import the file Bear_Background.jpg.
Users Manual - English
Page 122
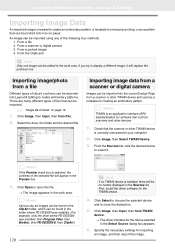
...images can be found in the ClipArt folder, which can be found in the folder where PE-DESIGN was installed. (For example, click the drive where PE-DESIGN was installed, then Program Files, then Brother, then PE-DESIGN 8, then ClipArt.) 120 a Note: If no names displayed in the Sources list. From... Input, then from File. 2. Check that can be imported into the current Design Page from a file Different types of the selected file will appear in the Preview box. 3. First, install the driver software for importing an image, and then import the image. Specify the necessary settings ...
...images can be found in the ClipArt folder, which can be found in the folder where PE-DESIGN was installed. (For example, click the drive where PE-DESIGN was installed, then Program Files, then Brother, then PE-DESIGN 8, then ClipArt.) 120 a Note: If no names displayed in the Sources list. From... Input, then from File. 2. Check that can be imported into the current Design Page from a file Different types of the selected file will appear in the Preview box. 3. First, install the driver software for importing an image, and then import the image. Specify the necessary settings ...

Users Manual - English
Page 140
...The data shown in the Design Page can be split into sections. 138 Click Save to save the data. → The new file name appears in the title bar of jump codes. b Memo: With the DST format, you select a file type of a previous software version, saved .pes files can be opened ...with that the file can be saved with a different file name in the Number of the same image or design. a Note: • Some patterns imported from embroidery cards cannot be exported. •...
...The data shown in the Design Page can be split into sections. 138 Click Save to save the data. → The new file name appears in the title bar of jump codes. b Memo: With the DST format, you select a file type of a previous software version, saved .pes files can be opened ...with that the file can be saved with a different file name in the Number of the same image or design. a Note: • Some patterns imported from embroidery cards cannot be exported. •...
Users Manual - English
Page 172
...PE-DESIGN operations, an advanced tutorial, tips and techniques, and lists of the Instruction Manual (PDF format) Tutorial (Advanced 171 Entering Monograms 171 Creating Appliqués 174 Creating Split Embroidery Designs 176 Creating Design for Multi-Position Hoops ........182 Managing Embroidery Design Files (Design.............. 238 Fonts Suitable for each application are provided in the Instruction Manual (PDF format). In addition, this software. Contents of menus/tools for Embroidering 239 Creating Outlined Characters (Using Text Converted to Outline Object 240 Converting ...
...PE-DESIGN operations, an advanced tutorial, tips and techniques, and lists of the Instruction Manual (PDF format) Tutorial (Advanced 171 Entering Monograms 171 Creating Appliqués 174 Creating Split Embroidery Designs 176 Creating Design for Multi-Position Hoops ........182 Managing Embroidery Design Files (Design.............. 238 Fonts Suitable for each application are provided in the Instruction Manual (PDF format). In addition, this software. Contents of menus/tools for Embroidering 239 Creating Outlined Characters (Using Text Converted to Outline Object 240 Converting ...
Users Manual - English
Page 179
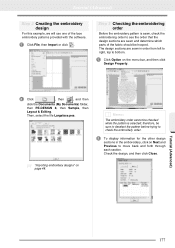
... , and then click the Documents (My Documents) folder, then PE-DESIGN 8, then Sample, then Layout & Editing. Tutorial (Advanced) 177 The design sections are sewn and determine which parts of the lace embroidery patterns provided with the software. 1 Click File, then Import or click . Check the design, and then click Close. Then, select the file Largelace...
... , and then click the Documents (My Documents) folder, then PE-DESIGN 8, then Sample, then Layout & Editing. Tutorial (Advanced) 177 The design sections are sewn and determine which parts of the lace embroidery patterns provided with the software. 1 Click File, then Import or click . Check the design, and then click Close. Then, select the file Largelace...


