
Users Manual - English
Page 15
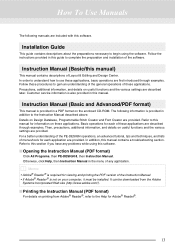
..., additional information, and details on useful functions and the various settings are provided. For a better understanding of the PE-DESIGN operations, an advanced tutorial, tips and techniques, and lists of menus/tools for each of these applications are first introduced through examples. It can...the general operations of these procedures to this software. ■ Opening the Instruction Manual (PDF format) Click All Programs, then PE-DESIGN 8, then Instruction Manual. b Memo: • Adobe® Reader® is required for each application are described later. Then, ...
..., additional information, and details on useful functions and the various settings are provided. For a better understanding of the PE-DESIGN operations, an advanced tutorial, tips and techniques, and lists of menus/tools for each of these applications are first introduced through examples. It can...the general operations of these procedures to this software. ■ Opening the Instruction Manual (PDF format) Click All Programs, then PE-DESIGN 8, then Instruction Manual. b Memo: • Adobe® Reader® is required for each application are described later. Then, ...
Users Manual - English
Page 18
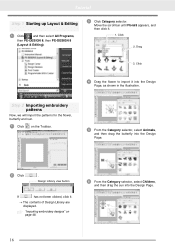
... selector, select Children, and then drag the sun into the Design Page, as shown in the illustration. Click 2. Design Library view button If has not been clicked, click it . 1. Tutorial Step 1 Starting up Layout & Editing 1 Click , and then select All Programs, then PE-DESIGN 8, then PE-DESIGN 8 (Layout & Editing). 3 Click Category selector. Move the scroll bar until...
... selector, select Children, and then drag the sun into the Design Page, as shown in the illustration. Click 2. Design Library view button If has not been clicked, click it . 1. Tutorial Step 1 Starting up Layout & Editing 1 Click , and then select All Programs, then PE-DESIGN 8, then PE-DESIGN 8 (Layout & Editing). 3 Click Category selector. Move the scroll bar until...
Users Manual - English
Page 22
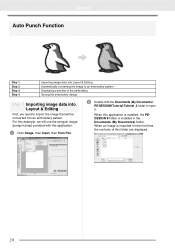
... Input, then from File. 2 Double-click the Documents (My Documents)\ PE-DESIGN8\Tutorial\Tutorial_2 folder to an embroidery pattern Displaying a preview of this application is installed, the PEDESIGN 8 folder is imported for the first time, the contents of the embroidery Saving the embroidery design Step 1 Importing image data into Layout & Editing First, we will...
... Input, then from File. 2 Double-click the Documents (My Documents)\ PE-DESIGN8\Tutorial\Tutorial_2 folder to an embroidery pattern Displaying a preview of this application is installed, the PEDESIGN 8 folder is imported for the first time, the contents of the embroidery Saving the embroidery design Step 1 Importing image data into Layout & Editing First, we will...
Users Manual - English
Page 25
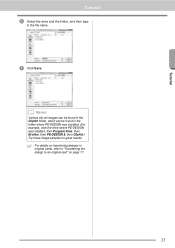
Tutorial Tutorial 2 Select the drive and the folder, and then type in the folder where PE-DESIGN was installed. (For example, click the drive where PE-DESIGN was installed, then Program Files, then Brother, then PE-DESIGN 8, then ClipArt.) Try these image samples for great results. b Memo: Various clip art images can be found in the ClipArt folder, which can be found in the file name. 3 Click Save. c For details on transferring designs to original cards, refer to "Transferring the design to an original card" on page 17. 23
Tutorial Tutorial 2 Select the drive and the folder, and then type in the folder where PE-DESIGN was installed. (For example, click the drive where PE-DESIGN was installed, then Program Files, then Brother, then PE-DESIGN 8, then ClipArt.) Try these image samples for great results. b Memo: Various clip art images can be found in the ClipArt folder, which can be found in the file name. 3 Click Save. c For details on transferring designs to original cards, refer to "Transferring the design to an original card" on page 17. 23
Users Manual - English
Page 40
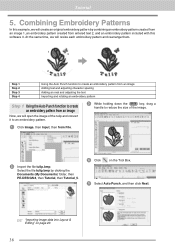
... the file tulip.bmp. Combining Embroidery Patterns In this example, we will create an original embroidery pattern by clicking the Documents (My Documents) folder, then PE-DESIGN 8, then Tutorial, then Tutorial_5. 4 Click on page 20. 38
... the file tulip.bmp. Combining Embroidery Patterns In this example, we will create an original embroidery pattern by clicking the Documents (My Documents) folder, then PE-DESIGN 8, then Tutorial, then Tutorial_5. 4 Click on page 20. 38
Users Manual - English
Page 44
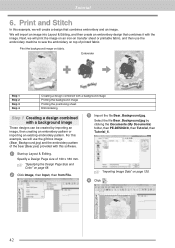
... box image (Bear_Background.jpg) and the embroidery pattern of the bear (Bear.pes) provided with the image. Print the background image on top of 130 x 180 mm. Tutorial 6. We will use the embroidery machine to sew the embroidery on fabric. Embroider...Step 3 Step 4 Creating a design combined with a background image Printing the background image Printing the positioning sheet Embroidering Step 1 Creating a design combined with a background image These designs can be created by clicking the Documents (My Documents) folder, then PE-DESIGN 8, then Tutorial, then Tutorial_6. 1 Start up ...
... box image (Bear_Background.jpg) and the embroidery pattern of the bear (Bear.pes) provided with the image. Print the background image on top of 130 x 180 mm. Tutorial 6. We will use the embroidery machine to sew the embroidery on fabric. Embroider...Step 3 Step 4 Creating a design combined with a background image Printing the background image Printing the positioning sheet Embroidering Step 1 Creating a design combined with a background image These designs can be created by clicking the Documents (My Documents) folder, then PE-DESIGN 8, then Tutorial, then Tutorial_6. 1 Start up ...
Users Manual - English
Page 45
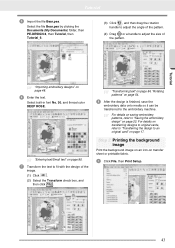
... to adjust the size of the image. (1) Click . (2) Select the Transform check box, and then click . Tutorial 5 Import the file Bear.pes. Select the file Bear.pes by clicking the Documents (My Documents) folder, then PE-DESIGN 8, then Tutorial, then Tutorial_6. (3) Click , and then drag the rotation handle to adjust the angle of the pattern. (4) Drag...
... to adjust the size of the image. (1) Click . (2) Select the Transform check box, and then click . Tutorial 5 Import the file Bear.pes. Select the file Bear.pes by clicking the Documents (My Documents) folder, then PE-DESIGN 8, then Tutorial, then Tutorial_6. (3) Click , and then drag the rotation handle to adjust the angle of the pattern. (4) Drag...
Users Manual - English
Page 48
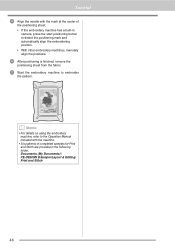
... finished, remove the positioning sheet from the fabric. 7 Start the embroidery machine to embroider the pattern. Tutorial 5 Align the needle with the machine. • Six patterns of the positioning sheet. • If the embroidery machine has a built-in the following folder. Documents (My Documents)\ PE-DESIGN 8\Sample\Layout & Editing\ Print and Stitch 46
... finished, remove the positioning sheet from the fabric. 7 Start the embroidery machine to embroider the pattern. Tutorial 5 Align the needle with the machine. • Six patterns of the positioning sheet. • If the embroidery machine has a built-in the following folder. Documents (My Documents)\ PE-DESIGN 8\Sample\Layout & Editing\ Print and Stitch 46
Users Manual - English
Page 172
... of the PE-DESIGN operations, an advanced tutorial, tips and techniques, and lists of the Instruction Manual (PDF format) Tutorial (Advanced 171 Entering Monograms 171 Creating Appliqués 174 Creating Split Embroidery Designs 176 Creating Design for Multi-Position Hoops ........182 Managing Embroidery Design Files (Design Database 187 Basic... Manual (PDF format). In addition, this software. About the Instruction Manual (PDF Format) For details on Design Database, Programmable Stitch Creator and Font Creator, refer to Embroidery Patterns 241 Menus/Tools 243 Layout & Editing 243...
... of the PE-DESIGN operations, an advanced tutorial, tips and techniques, and lists of the Instruction Manual (PDF format) Tutorial (Advanced 171 Entering Monograms 171 Creating Appliqués 174 Creating Split Embroidery Designs 176 Creating Design for Multi-Position Hoops ........182 Managing Embroidery Design Files (Design Database 187 Basic... Manual (PDF format). In addition, this software. About the Instruction Manual (PDF Format) For details on Design Database, Programmable Stitch Creator and Font Creator, refer to Embroidery Patterns 241 Menus/Tools 243 Layout & Editing 243...
Users Manual - English
Page 173
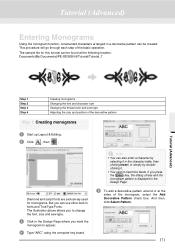
... a character by selecting it in the character table, then clicking Insert, or simply by doubleclicking it. • You cannot insert line feeds. Documents(My Documents)\PE-DESIGN 8\Tutorial\Tutorial_7 Tutorial (Advanced) Step 1 Step 2 Step 3 Step 4 Creating monograms Changing the font and character size Changing the thread color and sew type Adjusting the size and...
... a character by selecting it in the character table, then clicking Insert, or simply by doubleclicking it. • You cannot insert line feeds. Documents(My Documents)\PE-DESIGN 8\Tutorial\Tutorial_7 Tutorial (Advanced) Step 1 Step 2 Step 3 Step 4 Creating monograms Changing the font and character size Changing the thread color and sew type Adjusting the size and...

Users Manual - English
Page 176
...Under Applique Material, select whether (Yes) or not (No) the outline of the basic operation. In the following location. Documents(My Documents)\PE-DESIGN 8\Tutorial\Tutorial_8 Step 1 Step 2 Creating an appliqué pattern Using the Applique Wizard Step 1 Creating an appliqué pattern An appliqué...; is to be sewn onto the appliqué fabric as a guide for this tutorial can be specified in the Design Page to the Operation Manual included with the machine. Tutorial (Advanced) Creating Appliqués The Applique Wizard provides instructions for easily creating appliqué...
...Under Applique Material, select whether (Yes) or not (No) the outline of the basic operation. In the following location. Documents(My Documents)\PE-DESIGN 8\Tutorial\Tutorial_8 Step 1 Step 2 Creating an appliqué pattern Using the Applique Wizard Step 1 Creating an appliqué pattern An appliqué...; is to be sewn onto the appliqué fabric as a guide for this tutorial can be specified in the Design Page to the Operation Manual included with the machine. Tutorial (Advanced) Creating Appliqués The Applique Wizard provides instructions for easily creating appliqué...

Users Manual - English
Page 178
... 1000 mm (3.9 inch to provide space for fine positioning adjustments with adjustment sections. Documents(My Documents)\PE-DESIGN 8\Tutorial\Tutorial_9 Step 1 Step 2 Step 3 Step 4 Step 5 Step 6 Step 7 Specifying the Design Page size in Layout & Editing Creating the embroidery design Checking the embroidering order Attaching stabilizer to the fabric Marking the embroidering position Hooping the fabric...
... 1000 mm (3.9 inch to provide space for fine positioning adjustments with adjustment sections. Documents(My Documents)\PE-DESIGN 8\Tutorial\Tutorial_9 Step 1 Step 2 Step 3 Step 4 Step 5 Step 6 Step 7 Specifying the Design Page size in Layout & Editing Creating the embroidery design Checking the embroidering order Attaching stabilizer to the fabric Marking the embroidering position Hooping the fabric...
Users Manual - English
Page 179
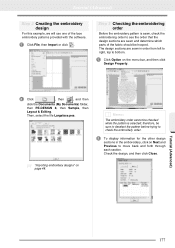
... then click the Documents (My Documents) folder, then PE-DESIGN 8, then Sample, then Layout & Editing. The design sections are sewn and determine which parts of the lace embroidery patterns provided with the software. 1 Click File, then Import or click . Tutorial (Advanced) Step 2 Creating the embroidery design For this example, we will use one of the...
... then click the Documents (My Documents) folder, then PE-DESIGN 8, then Sample, then Layout & Editing. The design sections are sewn and determine which parts of the lace embroidery patterns provided with the software. 1 Click File, then Import or click . Tutorial (Advanced) Step 2 Creating the embroidery design For this example, we will use one of the...
Users Manual - English
Page 183
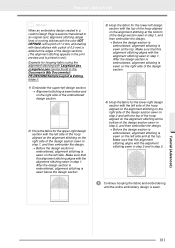
... with Largelace.pes (Largelace.pes can be found in the Documents (My Documents)\ PE-DESIGN8\Sample\Layout & Editing folder.): 1) Embroider the upper-left design section. → Alignment stitching is sewn below the design section. 3) Hoop the fabric for the lower-right design section with... hooping the fabric and embroidering until the entire embroidery design is sewn. After the design section is embroidered, alignment stitching is sewn on the alignment stitching at the bottom of the design section sewn in step 1. Tutorial (Advanced) 181 Make sure that this alignment stitching...
... with Largelace.pes (Largelace.pes can be found in the Documents (My Documents)\ PE-DESIGN8\Sample\Layout & Editing folder.): 1) Embroider the upper-left design section. → Alignment stitching is sewn below the design section. 3) Hoop the fabric for the lower-right design section with... hooping the fabric and embroidering until the entire embroidery design is sewn. After the design section is embroidered, alignment stitching is sewn on the alignment stitching at the bottom of the design section sewn in step 1. Tutorial (Advanced) 181 Make sure that this alignment stitching...
Users Manual - English
Page 184
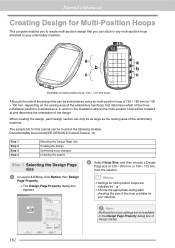
... Documents)\PE-DESIGN 8\Tutorial\Tutorial_10 Step 1 Step 2 Step 3 Step 4 Selecting the Design Page size Creating the design Optimizing hoop changes Checking the pattern Step 1 Selecting the Design Page size 1 In Layout & Editing, click Option, then Design Page Property. → The Design Page Property dialog box appears. 2 Select Hoop Size, and then choose a Design Page size of the design that you...
... Documents)\PE-DESIGN 8\Tutorial\Tutorial_10 Step 1 Step 2 Step 3 Step 4 Selecting the Design Page size Creating the design Optimizing hoop changes Checking the pattern Step 1 Selecting the Design Page size 1 In Layout & Editing, click Option, then Design Page Property. → The Design Page Property dialog box appears. 2 Select Hoop Size, and then choose a Design Page size of the design that you...
Users Manual - English
Page 187
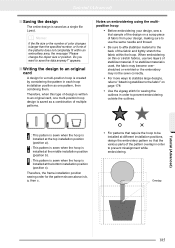
... of color changes is larger than the specified number, or if one multi-position hoop design is saved as a single file (.pes). appears. ■ Writing the design to save the data anyway?" Tutorial (Advanced) ■ Saving the design The entire design is saved as a combination of multiple patterns. If no stabilizer material is used, the fabric...
... of color changes is larger than the specified number, or if one multi-position hoop design is saved as a single file (.pes). appears. ■ Writing the design to save the data anyway?" Tutorial (Advanced) ■ Saving the design The entire design is saved as a combination of multiple patterns. If no stabilizer material is used, the fabric...


