
Users Manual - English
Page 2
... Brother International Corporation 100 Somerset Corporate Boulevard Bridgewater, NJ 08807-0911 USA declares that the product Product Name: Model Number: Brother USB Writer PE-Design complies with Part 15...machine complies with the limits for help. - Operation is no guarantee that may cause harmful interference to provide reasonable protection against harmful interference in a particular installation. This equipment has been tested and found to radio or television reception, which can radiate radio frequency energy and, if not installed and used in accordance with the instructions...
... Brother International Corporation 100 Somerset Corporate Boulevard Bridgewater, NJ 08807-0911 USA declares that the product Product Name: Model Number: Brother USB Writer PE-Design complies with Part 15...machine complies with the limits for help. - Operation is no guarantee that may cause harmful interference to provide reasonable protection against harmful interference in a particular installation. This equipment has been tested and found to radio or television reception, which can radiate radio frequency energy and, if not installed and used in accordance with the instructions...
Users Manual - English
Page 3
... of embroidery patterns and supports a wider range of copyrights which is required, please consult your warranty. Other product names mentioned in the Instruction Manual and Installation Guide may be used or copied only in a safe place together with this product For designing beautiful embroidery patterns • This system allows you very much for commercial purpose is an infringement of sewing attribute settings (thread density, sewing...
... of embroidery patterns and supports a wider range of copyrights which is required, please consult your warranty. Other product names mentioned in the Instruction Manual and Installation Guide may be used or copied only in a safe place together with this product For designing beautiful embroidery patterns • This system allows you very much for commercial purpose is an infringement of sewing attribute settings (thread density, sewing...
Users Manual - English
Page 10
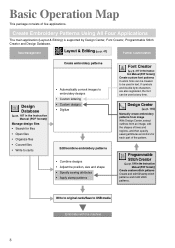
... embroidery patterns Design Database (☞p. 187 in text. Programmable Stitch Creator (☞p. 199 in the Instruc- Basic Operation Map This package consists of lines and regions, and then specify sewing attributes and colors for files • Open files • Organize files • Convert files • Write to cards • Automatically convert images to USB media Embroider with the machine 8 If symbols and double...
... embroidery patterns Design Database (☞p. 187 in text. Programmable Stitch Creator (☞p. 199 in the Instruc- Basic Operation Map This package consists of lines and regions, and then specify sewing attributes and colors for files • Open files • Organize files • Convert files • Write to cards • Automatically convert images to USB media Embroider with the machine 8 If symbols and double...
Users Manual - English
Page 13
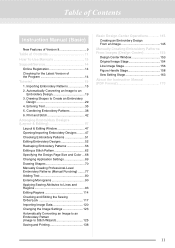
... Checking and Editing the Sewing Order/Lock 117 Importing Image Data 120 Changing the Image Settings 123 Automatically Converting an Image to an Embroidery Pattern (Image to Create an Embroidery Design 29 4. Importing Embroidery Patterns 15 2. Automatically Converting an Image to an Embroidery Design 19 3. Combining Embroidery Patterns 38 6. Table of Contents Instruction Manual (Basic) New Features of Version 8 9 Table of Contents 11 How To Use Manuals 13 Support/Service 14 Online Registration 14 Checking for...
... Checking and Editing the Sewing Order/Lock 117 Importing Image Data 120 Changing the Image Settings 123 Automatically Converting an Image to an Embroidery Pattern (Image to Create an Embroidery Design 29 4. Importing Embroidery Patterns 15 2. Automatically Converting an Image to an Embroidery Design 19 3. Combining Embroidery Patterns 38 6. Table of Contents Instruction Manual (Basic) New Features of Version 8 9 Table of Contents 11 How To Use Manuals 13 Support/Service 14 Online Registration 14 Checking for...
Users Manual - English
Page 15
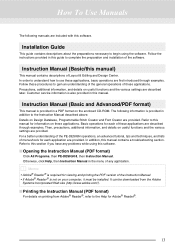
... provided in this software. Customer service information is provided in addition to begin using this manual) This manual contains descriptions of Layout & Editing and Design Center. Then, precautions, additional information, and details on your computer, it must be installed. Follow the instructions provided in this manual contains a troubleshooting section. Follow these applications, basic operations are provided. It can be downloaded from the...
... provided in this software. Customer service information is provided in addition to begin using this manual) This manual contains descriptions of Layout & Editing and Design Center. Then, precautions, additional information, and details on your computer, it must be installed. Follow the instructions provided in this manual contains a troubleshooting section. Follow these applications, basic operations are provided. It can be downloaded from the...
Users Manual - English
Page 16
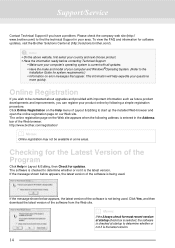
... registration procedure. To view the FAQ and information for software updates, visit the Brother Solutions Center at startup to the Installation Guide for updates. http://www.brother.com/registration/ b Memo: Online registration may not be contacted about upgrades and provided with all updates. • Have the make and model of your questions more quickly. Click Online Registration on our Web site. Checking for most...
... registration procedure. To view the FAQ and information for software updates, visit the Brother Solutions Center at startup to the Installation Guide for updates. http://www.brother.com/registration/ b Memo: Online registration may not be contacted about upgrades and provided with all updates. • Have the make and model of your questions more quickly. Click Online Registration on our Web site. Checking for most...
Users Manual - English
Page 19
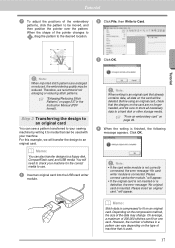
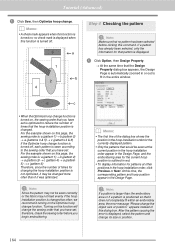
... or reducing stitch patterns. However, the number of stitches in the Instruction Manual (PDF format). a Note: • If the card writer module is not correctly connected, the error message "No card writer module is inserted. Please insert an original card." Tutorial 3 Click OK. Tutorial 7 To adjust the positions of the embroidery patterns, click the pattern to be used . 17 Step 3 Transferring the design to an original card You can sew a pattern transferred to your sewing machine by...
... or reducing stitch patterns. However, the number of stitches in the Instruction Manual (PDF format). a Note: • If the card writer module is not correctly connected, the error message "No card writer module is inserted. Please insert an original card." Tutorial 3 Click OK. Tutorial 7 To adjust the positions of the embroidery patterns, click the pattern to be used . 17 Step 3 Transferring the design to an original card You can sew a pattern transferred to your sewing machine by...
Users Manual - English
Page 49
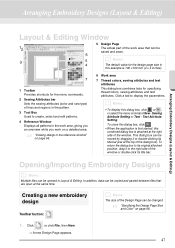
..., then New. → A new Design Page appears. 47 This dialog box can be moved by dragging it to create, select and edit patterns. 4 Reference Window Displays all patterns in the work area, giving you an overview while you work area that are open at the same time. Click a tab to its original attached position, drag it or double-clicking its title bar. To...
..., then New. → A new Design Page appears. 47 This dialog box can be moved by dragging it to create, select and edit patterns. 4 Reference Window Displays all patterns in the work area, giving you an overview while you work area that are open at the same time. Click a tab to its original attached position, drag it or double-clicking its title bar. To...

Users Manual - English
Page 65
... that embroidery pattern points are moved in the same way that position. b Memo: The Normal setting should provide satisfactory results in most cases, but depending on the line. ■ Deleting stitch points 1. b Memo: To insert a stitch point and change some of a jump stitch is deleted, that jump stitch segment is converted to Block command cannot be used , each press moves the stitch point...
... that embroidery pattern points are moved in the same way that position. b Memo: The Normal setting should provide satisfactory results in most cases, but depending on the line. ■ Deleting stitch points 1. b Memo: To insert a stitch point and change some of a jump stitch is deleted, that jump stitch segment is converted to Block command cannot be used , each press moves the stitch point...

Users Manual - English
Page 80
By semi-automatically tracing, points can be used for creating feed-type punching patterns (jump stitches). (Shortcut key: B ) c "Jump Stitch and Jump Stitch Trimming" on page 96. • You can modify the sewing attributes at this time, the current settings will be changed after the pattern is used for semi-automatically creating straight block-type punching patterns. Click to start drawing a running -type punching patterns (line sewing). (Shortcut key: V ) : This is used . 3. c "Importing Image...
By semi-automatically tracing, points can be used for creating feed-type punching patterns (jump stitches). (Shortcut key: B ) c "Jump Stitch and Jump Stitch Trimming" on page 96. • You can modify the sewing attributes at this time, the current settings will be changed after the pattern is used for semi-automatically creating straight block-type punching patterns. Click to start drawing a running -type punching patterns (line sewing). (Shortcut key: V ) : This is used . 3. c "Importing Image...
Users Manual - English
Page 83
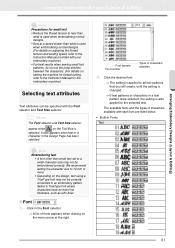
... • Reduce the thread tension to less than what is used when embroidering normal designs. (For details on adjusting the thread tension and sewing speed, refer to the Instruction Manual provided with your embroidery machine.) • For best results when sewing small font patterns, do not cut the jump stitches between the characters. (For details on setting the machine for thread cutting, refer to the Instruction Manual for the embroidery machine.) Selecting text attributes...
... • Reduce the thread tension to less than what is used when embroidering normal designs. (For details on adjusting the thread tension and sewing speed, refer to the Instruction Manual provided with your embroidery machine.) • For best results when sewing small font patterns, do not cut the jump stitches between the characters. (For details on setting the machine for thread cutting, refer to the Instruction Manual for the embroidery machine.) Selecting text attributes...
Users Manual - English
Page 107
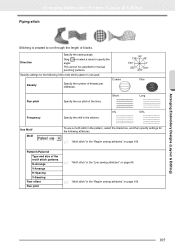
... run through the length of blocks. Pattern1/Pattern2 Type and size of the lines. c "Motif stitch" in the stitches. Specify the sewing angle. Use Motif Motif To use a motif stitch in the "Region sewing attributes" on page 106. Specify settings for manual punching patterns. c "Motif stitch" in the pattern, select the check box, and then specify settings for the following if the motif stitch pattern is created to...
... run through the length of blocks. Pattern1/Pattern2 Type and size of the lines. c "Motif stitch" in the stitches. Specify the sewing angle. Use Motif Motif To use a motif stitch in the "Region sewing attributes" on page 106. Specify settings for manual punching patterns. c "Motif stitch" in the pattern, select the check box, and then specify settings for the following if the motif stitch pattern is created to...
Users Manual - English
Page 111
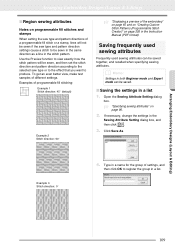
... in a list. 109 Saving frequently used sewing attributes Frequently used sewing attributes can be saved together, and recalled when specifying sewing attributes. If necessary, change the settings in the Instruction Manual (PDF format). Arranging Embroidery Designs (Layout & Editing) Arranging Embroidery Designs (Layout & Editing) ■ Region sewing attributes Notes on programmable fill stitches and stamps When setting the sew type and pattern directions of different settings. Click Save As. Open the Sewing Attribute Setting dialog box. Use the...
... in a list. 109 Saving frequently used sewing attributes Frequently used sewing attributes can be saved together, and recalled when specifying sewing attributes. If necessary, change the settings in the Instruction Manual (PDF format). Arranging Embroidery Designs (Layout & Editing) Arranging Embroidery Designs (Layout & Editing) ■ Region sewing attributes Notes on programmable fill stitches and stamps When setting the sew type and pattern directions of different settings. Click Save As. Open the Sewing Attribute Setting dialog box. Use the...
Users Manual - English
Page 139
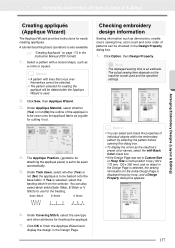
... Appliqués" on the machine model used . 2. Click Sew, then Applique Wizard. 3. Under Tack down, select whether (Yes) or not (No) the appliqué is used and the specified settings. Satin Stitch E Stitch V Stitch Checking embroidery design information Sewing information such as dimensions, needle count, sewing time, color count and color order of patterns can be deleted after the Applique Wizard is to finish the Applique Wizard and display the design in the Instruction Manual (PDF...
... Appliqués" on the machine model used . 2. Click Sew, then Applique Wizard. 3. Under Tack down, select whether (Yes) or not (No) the appliqué is used and the specified settings. Satin Stitch E Stitch V Stitch Checking embroidery design information Sewing information such as dimensions, needle count, sewing time, color count and color order of patterns can be deleted after the Applique Wizard is to finish the Applique Wizard and display the design in the Instruction Manual (PDF...
Users Manual - English
Page 186
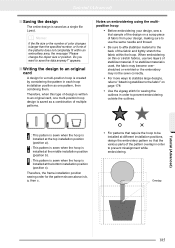
..., the Design Page is automatically zoomed in or out to fit in the entire window. 6 c • When the Optimize hoop change the object size or position." a Note: Since the pattern may not feed evenly if the hoop installation position is turned off . 5 a 3 1 b 2 4 Step 4 Checking the pattern a Note: Make sure that it does not completely fit within an embroidery area, the error message "Please change function is...
..., the Design Page is automatically zoomed in or out to fit in the entire window. 6 c • When the Optimize hoop change the object size or position." a Note: Since the pattern may not feed evenly if the hoop installation position is turned off . 5 a 3 1 b 2 4 Step 4 Checking the pattern a Note: Make sure that it does not completely fit within an embroidery area, the error message "Please change function is...
Users Manual - English
Page 187
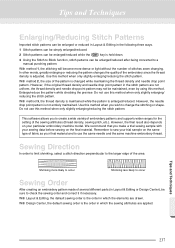
... "Attaching stabilizer to the fabric" on page 178 • Use the zigzag stitch for a multi-position hoop is created by considering the pattern in order to prevent embroidering outside the outlines. : This pattern is sewn when the hoop is installed at the top installation position (position a). : This pattern is sewn when the hoop is installed at the middle installation position (position b). : This pattern is sewn when the hoop is installed at different installation positions, design the embroidery pattern so...
... "Attaching stabilizer to the fabric" on page 178 • Use the zigzag stitch for a multi-position hoop is created by considering the pattern in order to prevent embroidering outside the outlines. : This pattern is sewn when the hoop is installed at the top installation position (position a). : This pattern is sewn when the hoop is installed at the middle installation position (position b). : This pattern is sewn when the hoop is installed at different installation positions, design the embroidery pattern so...
Users Manual - English
Page 239
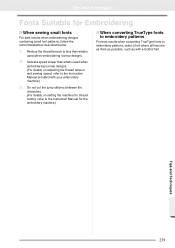
... the thread density and needle drop point pattern. Enlarge/reduce the pattern while checking the preview. With method 3, the thread density is maintained while the pattern is adjusted. This software allows you wish to occur Sewing Order After creating an embroidery pattern made of stitches sewn changing. In other words, greatly enlarging or reducing the pattern changes the quality of fabric as your particular embroidery machine model. Do not use this...
... the thread density and needle drop point pattern. Enlarge/reduce the pattern while checking the preview. With method 3, the thread density is maintained while the pattern is adjusted. This software allows you wish to occur Sewing Order After creating an embroidery pattern made of stitches sewn changing. In other words, greatly enlarging or reducing the pattern changes the quality of fabric as your particular embroidery machine model. Do not use this...
Users Manual - English
Page 241
... embroidery patterns, select a font where all lines are as thick as possible, such as with your embroidery machine.) 3. Reduce the thread tension to the Instruction Manual provided with a Gothic font. Sew at a speed slower than what is used when embroidering normal designs. (For details on setting the machine for thread cutting, refer to the Instruction Manual for Embroidering ■ When sewing small fonts For best results when embroidering designs containing small font patterns...
... embroidery patterns, select a font where all lines are as thick as possible, such as with your embroidery machine.) 3. Reduce the thread tension to the Instruction Manual provided with a Gothic font. Sew at a speed slower than what is used when embroidering normal designs. (For details on setting the machine for thread cutting, refer to the Instruction Manual for Embroidering ■ When sewing small fonts For best results when embroidering designs containing small font patterns...
Users Manual - English
Page 252
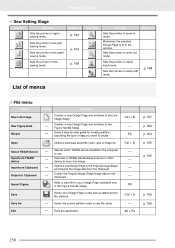
... (all) sewing mode. Sets the pointer in line (part) sewing mode. Sets the pointer in zoom-out mode. Adds a .pem file to use. Alt + F4 250 Sets the pointer in hole sewing mode. Gives a step-by-step guide for creating pattern, according the type of menus ■ File menu Menu New Line Image New Figure Data Wizard Toolbar Purpose Shortcut key Reference Creates a new Design Page...
... (all) sewing mode. Sets the pointer in line (part) sewing mode. Sets the pointer in zoom-out mode. Adds a .pem file to use. Alt + F4 250 Sets the pointer in hole sewing mode. Gives a step-by-step guide for creating pattern, according the type of menus ■ File menu Menu New Line Image New Figure Data Wizard Toolbar Purpose Shortcut key Reference Creates a new Design Page...
Users Manual - English
Page 264
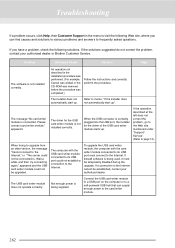
... not automatically start up . The USB card writer module does not operate correctly. Refer to memo: "If the installer does not automatically start up ". or "The server could not establish a connection to the Internet. If the operation described at the left does not correct the problem, go to the Web site mentioned under "Support/ Service". (Refer to page 14.) When trying to upgrade...
... not automatically start up . The USB card writer module does not operate correctly. Refer to memo: "If the installer does not automatically start up ". or "The server could not establish a connection to the Internet. If the operation described at the left does not correct the problem, go to the Web site mentioned under "Support/ Service". (Refer to page 14.) When trying to upgrade...


