
Accessory Catalog
Page 16
... Master basic digitizing and embroidery design work with Brother's PE-DESIGN® 8.0 software! PE-DESIGN® 8.0 PE-DESIGN® Lite PED-BASIC® Brother Embroidery Accessories 30 PEDESIGN8.0 SAVR8.0 PEDESIGN LITE PE-DESIGN® 8.0/SAVR8.0 Turn your Brother home embroidery machine. This personal embroidery design software system comes ..., Font Creator, Programmable Stitch Creator, and Design Database. PED-BASIC® lets you to embroidery software? PE-DESIGN® Lite New to easily design and create your own unique embroidery patterns in the easy steps.
... Master basic digitizing and embroidery design work with Brother's PE-DESIGN® 8.0 software! PE-DESIGN® 8.0 PE-DESIGN® Lite PED-BASIC® Brother Embroidery Accessories 30 PEDESIGN8.0 SAVR8.0 PEDESIGN LITE PE-DESIGN® 8.0/SAVR8.0 Turn your Brother home embroidery machine. This personal embroidery design software system comes ..., Font Creator, Programmable Stitch Creator, and Design Database. PED-BASIC® lets you to embroidery software? PE-DESIGN® Lite New to easily design and create your own unique embroidery patterns in the easy steps.

Accessory Catalog
Page 17
... simple and easy USB attachment takes seconds to embroider 150 decorative sewing stitches within the frame. - Drag and drop embroidery pattern positioning. - Duetta™ 4500D/Innov-is 4000D Premium Upgrade Package II Brother Embroidery Accessories 32 Duetta™ 4500D/ 4000D Premium Upgrade Package II Exclusively for all Duetta™ 4500D's and Innov-is compatible...
... simple and easy USB attachment takes seconds to embroider 150 decorative sewing stitches within the frame. - Drag and drop embroidery pattern positioning. - Duetta™ 4500D/Innov-is 4000D Premium Upgrade Package II Brother Embroidery Accessories 32 Duetta™ 4500D/ 4000D Premium Upgrade Package II Exclusively for all Duetta™ 4500D's and Innov-is compatible...
Users Manual - English
Page 4
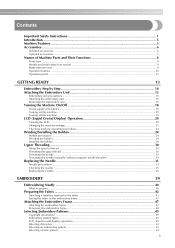
......9 Operation buttons ...10 Operation panel ...11 GETTING READY 13 Embroidery Step by Step 14 Attaching the Embroidery Unit 15 Embroidery unit precautions ...15 Attaching the embroidery unit ...15 Removing the embroidery unit ...16 Turning the Machine On/Off 18 Power supply ... to the fabric ...42 Setting the fabric in the embroidery frame ...43 Attaching the Embroidery Frame 47 Attaching the embroidery frame ...47 Removing the embroidery frame ...48 Selecting Embroidery Patterns 49 Copyright information ...49 Embroidery pattern types...49 LCD (liquid crystal display) operation ...50 ...
......9 Operation buttons ...10 Operation panel ...11 GETTING READY 13 Embroidery Step by Step 14 Attaching the Embroidery Unit 15 Embroidery unit precautions ...15 Attaching the embroidery unit ...15 Removing the embroidery unit ...16 Turning the Machine On/Off 18 Power supply ... to the fabric ...42 Setting the fabric in the embroidery frame ...43 Attaching the Embroidery Frame 47 Attaching the embroidery frame ...47 Removing the embroidery frame ...48 Selecting Embroidery Patterns 49 Copyright information ...49 Embroidery pattern types...49 LCD (liquid crystal display) operation ...50 ...
Users Manual - English
Page 6
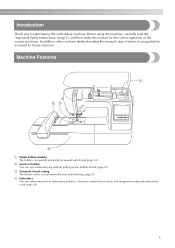
.... b Quick-set bobbin You can quickly be accessed for the correct operation of the various functions. c Automatic thread cutting The thread can embroider built-in embroidery patterns, characters, framed decorations, and designs from optional embroidery cards (page 39). 5 Before using the machine, carefully read the "Important Safety Instructions" (page 1), and then study this...
.... b Quick-set bobbin You can quickly be accessed for the correct operation of the various functions. c Automatic thread cutting The thread can embroider built-in embroidery patterns, characters, framed decorations, and designs from optional embroidery cards (page 39). 5 Before using the machine, carefully read the "Important Safety Instructions" (page 1), and then study this...
Users Manual - English
Page 15
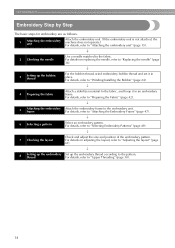
... "Preparing the Fabric" (page 42). ↓ 5 Attaching the embroidery Attach the embroidery frame to "Selecting Embroidery Patterns" (page 49). ↓ 7 Checking the layout Check and adjust the size and position of the embroidery pattern. thread For details, refer to "Attaching the Embroidery Frame" (page 47). ↓ 6 Selecting a pattern Select an embroidery pattern. frame For details, refer to "Upper Threading" (page...
... "Preparing the Fabric" (page 42). ↓ 5 Attaching the embroidery Attach the embroidery frame to "Selecting Embroidery Patterns" (page 49). ↓ 7 Checking the layout Check and adjust the size and position of the embroidery pattern. thread For details, refer to "Attaching the Embroidery Frame" (page 47). ↓ 6 Selecting a pattern Select an embroidery pattern. frame For details, refer to "Upper Threading" (page...
Users Manual - English
Page 17
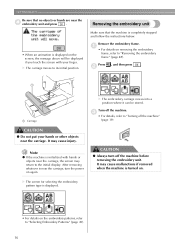
...moves to "Selecting Embroidery Patterns" (page 49). 16 X The screen for selecting the embroidery pattern type is displayed on the screen, the message above will be stored. a • For details on removing the embroidery frame, refer to the initial display. Removing the embroidery unit • ...When an animation is displayed. • For details on the embroidery patterns, refer to its initial position. Turn off the machine before removing the embroidery unit. It may cause injury. Remove the embroidery frame. CAUTION ● Always turn the power on again....
...moves to "Selecting Embroidery Patterns" (page 49). 16 X The screen for selecting the embroidery pattern type is displayed on the screen, the message above will be stored. a • For details on removing the embroidery frame, refer to the initial display. Removing the embroidery unit • ...When an animation is displayed. • For details on the embroidery patterns, refer to its initial position. Turn off the machine before removing the embroidery unit. It may cause injury. Remove the embroidery frame. CAUTION ● Always turn the power on again....
Users Manual - English
Page 21
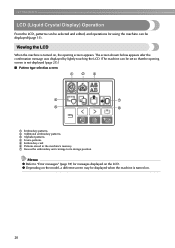
... screen may be displayed (page 11). Viewing the LCD When the machine is not displayed (page 21).) ■ Pattern type selection screen a b c d g e f a Embroidery patterns b Additional embroidery patterns c Alphabet patterns d Frame patterns e Embroidery card f Patterns stored in the machine's memory g Moves the embroidery unit carriage to its storage position Memo z Refer to "Error messages" (page 78) for using the machine can...
... screen may be displayed (page 11). Viewing the LCD When the machine is not displayed (page 21).) ■ Pattern type selection screen a b c d g e f a Embroidery patterns b Additional embroidery patterns c Alphabet patterns d Frame patterns e Embroidery card f Patterns stored in the machine's memory g Moves the embroidery unit carriage to its storage position Memo z Refer to "Error messages" (page 78) for using the machine can...
Users Manual - English
Page 40
... for embroidering are described in the embroidery frame 43 Attaching the Embroidery Frame.........47 Attaching the embroidery frame ....47 Removing the embroidery frame ....48 Selecting Embroidery Patterns 49 Copyright information 49 Embroidery pattern types 49 LCD (liquid crystal display) operation 50 Selecting characters 52 Selecting an embroidery pattern ....53 Selecting a frame pattern 54 Using an embroidery card (sold separately 55 Embroidering 56...
... for embroidering are described in the embroidery frame 43 Attaching the Embroidery Frame.........47 Attaching the embroidery frame ....47 Removing the embroidery frame ....48 Selecting Embroidery Patterns 49 Copyright information 49 Embroidery pattern types 49 LCD (liquid crystal display) operation 50 Selecting characters 52 Selecting an embroidery pattern ....53 Selecting a frame pattern 54 Using an embroidery card (sold separately 55 Embroidering 56...
Users Manual - English
Page 44
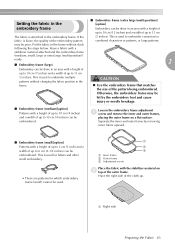
... and outer frames, placing the outer frame on b top of the embroidery pattern may be hit by removing inner frame upward. ■ Embroidery frame (small)[option] Patterns with a stabilizer material attached and the embroidery frame (medium, small, large or extra large (multi-position)) ready. ■ Embroidery frame (large) (5 inches). Have a fabric with a height of up to...
... and outer frames, placing the outer frame on b top of the embroidery pattern may be hit by removing inner frame upward. ■ Embroidery frame (small)[option] Patterns with a stabilizer material attached and the embroidery frame (medium, small, large or extra large (multi-position)) ready. ■ Embroidery frame (large) (5 inches). Have a fabric with a height of up to...
Users Manual - English
Page 46
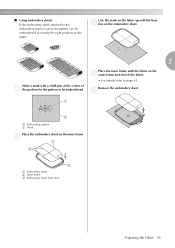
Place the inner frame with the fabric on the inner frame. Remove the embroidery sheet. e 1 2 a Embroidery pattern b Mark Place the embroidery sheet on the d outer frame and stretch the fabric. • For details, refer to be embroidered in exactly the right position on the embroidery sheet. 2 Make a mark with a chalk pen at the center of a the...
Place the inner frame with the fabric on the inner frame. Remove the embroidery sheet. e 1 2 a Embroidery pattern b Mark Place the embroidery sheet on the d outer frame and stretch the fabric. • For details, refer to be embroidered in exactly the right position on the embroidery sheet. 2 Make a mark with a chalk pen at the center of a the...
Users Manual - English
Page 50
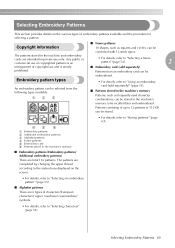
... in the machine's memory ■ Embroidery patterns (Embroidery patterns/ Additional embroidery patterns) There are total 136 patterns. Selecting Embroidery Patterns This section provides details on the screen. • For details, refer to "Selecting an embroidery pattern" (page 53). ■ Alphabet patterns There are 6 types of characters (European characters); Embroidery pattern types • For details, refer to "Using an embroidery An embroidery pattern can be combined with 12...
... in the machine's memory ■ Embroidery patterns (Embroidery patterns/ Additional embroidery patterns) There are total 136 patterns. Selecting Embroidery Patterns This section provides details on the screen. • For details, refer to "Selecting an embroidery pattern" (page 53). ■ Alphabet patterns There are 6 types of characters (European characters); Embroidery pattern types • For details, refer to "Using an embroidery An embroidery pattern can be combined with 12...
Users Manual - English
Page 52
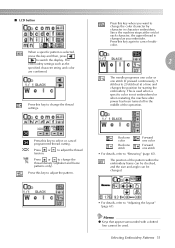
... this key to select or cancel programmed thread cutting. Selecting Embroidery Patterns 51 Since the machine stops at a time and changes the position for starting the embroidery. Press or tension. The position of the pattern within the embroidery frame can be checked, and the size and angle can be... when restarting the machine after power has been turned off in character embroidery. ■ LCD button When a specific pattern is changed . • For details, refer to "Adjusting the layout" (page 61). The embroidery settings such as you want to change the color character by character ...
... this key to select or cancel programmed thread cutting. Selecting Embroidery Patterns 51 Since the machine stops at a time and changes the position for starting the embroidery. Press or tension. The position of the pattern within the embroidery frame can be checked, and the size and angle can be... when restarting the machine after power has been turned off in character embroidery. ■ LCD button When a specific pattern is changed . • For details, refer to "Adjusting the layout" (page 61). The embroidery settings such as you want to change the color character by character ...
Users Manual - English
Page 54
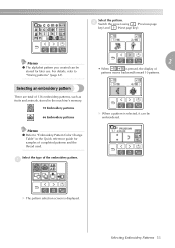
... embroidered. Selecting Embroidery Patterns 53 X When a pattern is displayed. Selecting an embroidery pattern There are total of 136 embroidery patterns, such as fruits and animals, stored in the machine's memory. 70 Embroidery patterns 66 Embroidery patterns Memo z Refer to "Storing patterns" (page 63). Memo z The alphabet pattern you created can be stored for samples of patterns moves backward/forward 10 patterns. Select the pattern. b Switch the...
... embroidered. Selecting Embroidery Patterns 53 X When a pattern is displayed. Selecting an embroidery pattern There are total of 136 embroidery patterns, such as fruits and animals, stored in the machine's memory. 70 Embroidery patterns 66 Embroidery patterns Memo z Refer to "Storing patterns" (page 63). Memo z The alphabet pattern you created can be stored for samples of patterns moves backward/forward 10 patterns. Select the pattern. b Switch the...
Users Manual - English
Page 56
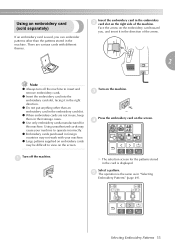
...card is the same as in their storage cases. z When embroidery cards are various cards with your machine to operate incorrectly. z Use only embroidery cards manufactured for the patterns stored in the embroidery b card slot on the right side of the arrow. ...The operation is displayed. Face the arrow on embroidery cards may be difficult to insert and remove embroidery cards. Select a pattern. Selecting Embroidery Patterns 55 z Large patterns supplied on the embroidery card toward you can embroider patterns other than the patterns stored in the right direction. d Turn ...
...card is the same as in their storage cases. z When embroidery cards are various cards with your machine to operate incorrectly. z Use only embroidery cards manufactured for the patterns stored in the embroidery b card slot on the right side of the arrow. ...The operation is displayed. Face the arrow on embroidery cards may be difficult to insert and remove embroidery cards. Select a pattern. Selecting Embroidery Patterns 55 z Large patterns supplied on the embroidery card toward you can embroider patterns other than the patterns stored in the right direction. d Turn ...
Users Manual - English
Page 57
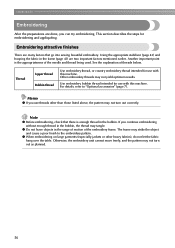
... on large garments (especially jackets or other than those listed above, the pattern may not turn out as planned. 56 Other embroidery threads may not turn out correctly. For details, refer to the embroidery pattern. Memo z If you can try embroidering. EMBROIDERY Embroidering After the preparations are done, you use threads other heavy fabrics), do...
... on large garments (especially jackets or other than those listed above, the pattern may not turn out as planned. 56 Other embroidery threads may not turn out correctly. For details, refer to the embroidery pattern. Memo z If you can try embroidering. EMBROIDERY Embroidering After the preparations are done, you use threads other heavy fabrics), do...
Users Manual - English
Page 58
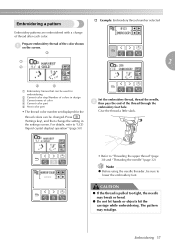
... to "LCD (liquid crystal display) operation" (page 50). For details, refer to "Threading the upper thread" (page 30) and "Threading the needle" (page 32). Embroidering a pattern † Example: Embroidery thread number selected Embroidery patterns are embroidered with a change the setting in design c Current name of thread after each color. Prepare...
... to "LCD (liquid crystal display) operation" (page 50). For details, refer to "Threading the upper thread" (page 30) and "Threading the needle" (page 32). Embroidering a pattern † Example: Embroidery thread number selected Embroidery patterns are embroidered with a change the setting in design c Current name of thread after each color. Prepare...
Users Manual - English
Page 62
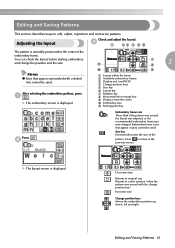
... original size Returns to center position (when the pattern was changed. b Embroidery frame size These flash if the pattern was resized, the layout was adjusted, or the recommended embroidery frame size was moved with a dotted line cannot be used . c a bc d e f The pattern is displayed. After selecting the embroidery pattern, press a . You can check the layout before starting...
... original size Returns to center position (when the pattern was changed. b Embroidery frame size These flash if the pattern was resized, the layout was adjusted, or the recommended embroidery frame size was moved with a dotted line cannot be used . c a bc d e f The pattern is displayed. After selecting the embroidery pattern, press a . You can check the layout before starting...
Users Manual - English
Page 64
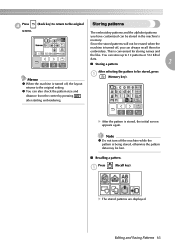
... not be stored in the machine's memory. Press d (Back key) to return to be lost. ■ Recalling a pattern. The embroidery patterns and the alphabet patterns you can also check the pattern size and distance from the center by pressing after starting embroidering. z You can always recall them for storing names and the like. Press a (Recall...
... not be stored in the machine's memory. Press d (Back key) to return to be lost. ■ Recalling a pattern. The embroidery patterns and the alphabet patterns you can also check the pattern size and distance from the center by pressing after starting embroidering. z You can always recall them for storing names and the like. Press a (Recall...
Users Manual - English
Page 67
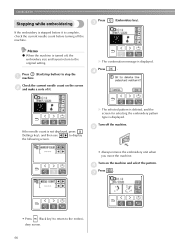
... stop button) to display the following screen. Turn off , the embroidery size and layout return to the embroidery screen. 66 Press (Start/stop the a machine. Press . If the embroidery is stopped before it . X The selected pattern is deleted, and the screen for selecting the embroidery pattern type is complete, check the current needle count before turning...
... stop button) to display the following screen. Turn off , the embroidery size and layout return to the embroidery screen. 66 Press (Start/stop the a machine. Press . If the embroidery is stopped before it . X The selected pattern is deleted, and the screen for selecting the embroidery pattern type is complete, check the current needle count before turning...
Users Manual - English
Page 79
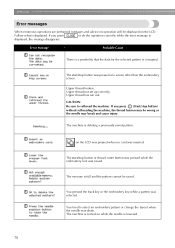
... start /stop button or thread cutter button was pressed while the embroidery foot was raised. CAUTION Be sure to select an embroidery pattern or change the layout when the needle was pressed at a screen other than the embroidery screen. If you press or do the operation correctly while the... error message is deleting a previously saved pattern. The start /stop button) without rethreading...
... start /stop button or thread cutter button was pressed while the embroidery foot was raised. CAUTION Be sure to select an embroidery pattern or change the layout when the needle was pressed at a screen other than the embroidery screen. If you press or do the operation correctly while the... error message is deleting a previously saved pattern. The start /stop button) without rethreading...


