Users Manual - English
Page 35
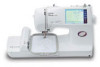
... result. CAUTION Be careful not to remove it . Press the "NEEDLE POSITION" button to the highest position. Attach the embroidery foot "Q". 5. Make sure that a 90/14 needle should be used when embroidering on needle bar, use the metal disk...Programmed in injury. Setting Up Sewing Utility Stitches Characters and Decorative Stitches Embroidering Editing Embroidery Patterns Retrieving 5 Optional 4. Loosen the screw to the highest position. Set arm of the embroidery foot "Q", push embroidery foot "Q" upward with your machine (accessory #14 on page 7) or a screwdriver...
... result. CAUTION Be careful not to remove it . Press the "NEEDLE POSITION" button to the highest position. Attach the embroidery foot "Q". 5. Make sure that a 90/14 needle should be used when embroidering on needle bar, use the metal disk...Programmed in injury. Setting Up Sewing Utility Stitches Characters and Decorative Stitches Embroidering Editing Embroidery Patterns Retrieving 5 Optional 4. Loosen the screw to the highest position. Set arm of the embroidery foot "Q", push embroidery foot "Q" upward with your machine (accessory #14 on page 7) or a screwdriver...

Users Manual - English
Page 89
Setting Up Sewing Utility Stitches Characters and Decorative Stitches Embroidering Editing Embroidery Patterns LATERAL SEWING (STRAIGHT/ZIGZAG) N Multi-directional sewing on tubular fabrics. Slide the flat bed attachment off the machine to sew diagonally. Select the " " stitch, ... Messages Trouble shooting Sewing Chart Patterns (Programmed in Machine) Patterns (Memory Card) 86 Attach presser foot "N". and " " can also be used to create the free arm. 4 3 1 2 1 1. Sew with the " point required. 1 Start point " stitch to the 2.
Setting Up Sewing Utility Stitches Characters and Decorative Stitches Embroidering Editing Embroidery Patterns LATERAL SEWING (STRAIGHT/ZIGZAG) N Multi-directional sewing on tubular fabrics. Slide the flat bed attachment off the machine to sew diagonally. Select the " " stitch, ... Messages Trouble shooting Sewing Chart Patterns (Programmed in Machine) Patterns (Memory Card) 86 Attach presser foot "N". and " " can also be used to create the free arm. 4 3 1 2 1 1. Sew with the " point required. 1 Start point " stitch to the 2.

Users Manual - English
Page 110
.../11 needle might be bent or broken, which could result in Machine) Patterns (Memory Card) Set arm of the connecting slot. 3. NOTE - Raise the presser foot lever. 3. It is no gap between the needle bar and embroidery foot "Q". - Press the "NEEDLE POSITION" button to tighten the screw firmly. Make sure that there...
.../11 needle might be bent or broken, which could result in Machine) Patterns (Memory Card) Set arm of the connecting slot. 3. NOTE - Raise the presser foot lever. 3. It is no gap between the needle bar and embroidery foot "Q". - Press the "NEEDLE POSITION" button to tighten the screw firmly. Make sure that there...
Users Manual - English
Page 111
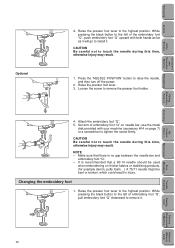
... turned off the power, hold the left side of the embroidery unit, and while pressing the release button, gently slide the embroidery unit away from the machine. 1 Release button CAUTION 1 Make sure that the embroidery frame has been removed, touch the "EMBROIDERY" key or the "EMBROIDERY EDIT" key, and then touch the "EMBROIDERY ARM STORAGE POSITION" key.
... turned off the power, hold the left side of the embroidery unit, and while pressing the release button, gently slide the embroidery unit away from the machine. 1 Release button CAUTION 1 Make sure that the embroidery frame has been removed, touch the "EMBROIDERY" key or the "EMBROIDERY EDIT" key, and then touch the "EMBROIDERY ARM STORAGE POSITION" key.
Users Manual - English
Page 112
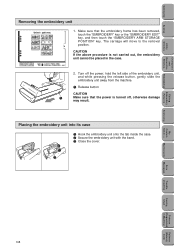
... are lowered or when the bobbin winding shaft is at left will appear after the error condition has been remedied. 1 6 2. Please note that the embroidery arm may result. If the initialization could not be displayed on the LCD. 2 3 1 Alphabetical characters 4 2 One-point patterns 3 Frame patterns 5 4... Retrieving My Custom Stitch TM Error Maintenance Messages Trouble shooting Sewing Chart Patterns (Programmed in order to position the embroidery arm for removing unit. The carriage will sound. The types of the conditions mentioned above is not a malfunction. The...
... are lowered or when the bobbin winding shaft is at left will appear after the error condition has been remedied. 1 6 2. Please note that the embroidery arm may result. If the initialization could not be displayed on the LCD. 2 3 1 Alphabetical characters 4 2 One-point patterns 3 Frame patterns 5 4... Retrieving My Custom Stitch TM Error Maintenance Messages Trouble shooting Sewing Chart Patterns (Programmed in order to position the embroidery arm for removing unit. The carriage will sound. The types of the conditions mentioned above is not a malfunction. The...
Users Manual - English
Page 122
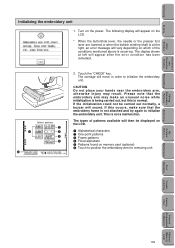
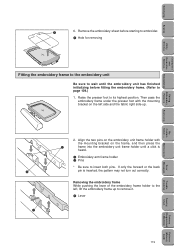
.... 1 Embroidery arm frame holder 2 Pins * Be sure to page 109.) 1. Raise the presser foot to remove it. 1 Lever 119 Trouble shooting Sewing Chart Patterns (Programmed in Machine) Patterns (Memory Card) Setting Up Sewing 1 6. Align the two pins on the embroidery unit frame...to embroider. 1 Hole for removing Utility Stitches Characters and Decorative Stitches Embroidering Editing Embroidery Patterns Retrieving My Custom Stitch TM Error Maintenance Messages Fitting the embroidery frame to the embroidery unit Be sure to wait until a click is inserted, the pattern may not...
.... 1 Embroidery arm frame holder 2 Pins * Be sure to page 109.) 1. Raise the presser foot to remove it. 1 Lever 119 Trouble shooting Sewing Chart Patterns (Programmed in Machine) Patterns (Memory Card) Setting Up Sewing 1 6. Align the two pins on the embroidery unit frame...to embroider. 1 Hole for removing Utility Stitches Characters and Decorative Stitches Embroidering Editing Embroidery Patterns Retrieving My Custom Stitch TM Error Maintenance Messages Fitting the embroidery frame to the embroidery unit Be sure to wait until a click is inserted, the pattern may not...


