
Accessory Catalog
Page 11
... ABCDEFJKMN www.brother.com Slip a cord from satin or decorative stitches. 2. Attach the presser foot and pull cords under the presser foot. 3. Slide the plate of the guide back and forth to use single cord, use sewing machines Clear-view Foot Use this presser foot where visibility of 7 mm feed width. 1. Place cord under the presser foot, and select zigzag stitch with brother sewing machines of seams or pattern markings are desired. Insert cords or threads into each hole on the presser foot. 2. Insert cords or threads into each hole on the presser foot. 2.
... ABCDEFJKMN www.brother.com Slip a cord from satin or decorative stitches. 2. Attach the presser foot and pull cords under the presser foot. 3. Slide the plate of the guide back and forth to use single cord, use sewing machines Clear-view Foot Use this presser foot where visibility of 7 mm feed width. 1. Place cord under the presser foot, and select zigzag stitch with brother sewing machines of seams or pattern markings are desired. Insert cords or threads into each hole on the presser foot. 2. Insert cords or threads into each hole on the presser foot. 2.

Accessory Catalog
Page 12
... thread. Adjust the upper thread tension. 2. Line up the center guide mark (red) of the presser foot to make fringes). For gathering: 1. Stitch in the needle area. Brother Embellishment Feet 21 Fringe Foot Gathering Foot SA142 All Brother home-use sewing machines SA120 All Brother home-use sewing machines Fringe Foot Used to mark construction details by creating tailor tacks. Select zigzag stitch and set the stitch width to make or attach piping. Ideal for securing edges of the fabric facing down. Select a straight stitch, left needle position...
... thread. Adjust the upper thread tension. 2. Line up the center guide mark (red) of the presser foot to make fringes). For gathering: 1. Stitch in the needle area. Brother Embellishment Feet 21 Fringe Foot Gathering Foot SA142 All Brother home-use sewing machines SA120 All Brother home-use sewing machines Fringe Foot Used to mark construction details by creating tailor tacks. Select zigzag stitch and set the stitch width to make or attach piping. Ideal for securing edges of the fabric facing down. Select a straight stitch, left needle position...

Accessory Catalog
Page 13
... the fabric from left into gathers or tucks. For seven grooves: SA179 ABCDEJ For five grooves: SA162 IP This presser foot does not include the bobbin cover. SA143 AFJKM Ruffler Foot Makes ruffles with this presser foot. 1. Sew slowly for details.) Brother Embellishment Feet Pin Tuck Foot 24 Ruffler Foot Pin Tuck Foot This presser foot has 7 grooves and produces perfect pin tucks and corded pin tucks using a twin needle on the lower portion of stitching and use that...
... the fabric from left into gathers or tucks. For seven grooves: SA179 ABCDEJ For five grooves: SA162 IP This presser foot does not include the bobbin cover. SA143 AFJKM Ruffler Foot Makes ruffles with this presser foot. 1. Sew slowly for details.) Brother Embellishment Feet Pin Tuck Foot 24 Ruffler Foot Pin Tuck Foot This presser foot has 7 grooves and produces perfect pin tucks and corded pin tucks using a twin needle on the lower portion of stitching and use that...

Accessory Catalog
Page 15
...fabric in order to straight stitch. 3. When quilting is needed. 1. Use for ULT series, PC-6500, PC-8200 and PC-8500 sewing machines. Gently holding the upper and bobbin threads sew about four locking stitches and finish the thread ends. Requires Low Shank Adapter for free-motion, outline quilting, etc. 1. Lower the feed dogs. 3. Select a straight stitch or your preferred stitch such as vinyl, leather, quilting layers and velvet can be easily sewn. Quilting Foot For darning, quilting, or free-motion. Walking Foot/Open Toe Walking Foot Brother Quilting Feet 28 Walking Foot/Open...
...fabric in order to straight stitch. 3. When quilting is needed. 1. Use for ULT series, PC-6500, PC-8200 and PC-8500 sewing machines. Gently holding the upper and bobbin threads sew about four locking stitches and finish the thread ends. Requires Low Shank Adapter for free-motion, outline quilting, etc. 1. Lower the feed dogs. 3. Select a straight stitch or your preferred stitch such as vinyl, leather, quilting layers and velvet can be easily sewn. Quilting Foot For darning, quilting, or free-motion. Walking Foot/Open Toe Walking Foot Brother Quilting Feet 28 Walking Foot/Open...

Accessory Catalog
Page 17
... embroidery designs. - Automatic Height Adjuster™ (AHA) feature adjusts the presser foot pressure automatically and continuously to assure perfectly connected and aligned designs. Includes three new free-motion presser feet: Free-motion quilting foot "C" for more features to the actual machine: - Add tremendous functionality to embroider 150 decorative sewing stitches within the frame. - Use the Border Frame to your machine with these features: - Add appliqué capability to see reference stitches to give you superior stitch quality when stitching...
... embroidery designs. - Automatic Height Adjuster™ (AHA) feature adjusts the presser foot pressure automatically and continuously to assure perfectly connected and aligned designs. Includes three new free-motion presser feet: Free-motion quilting foot "C" for more features to the actual machine: - Add tremendous functionality to embroider 150 decorative sewing stitches within the frame. - Use the Border Frame to your machine with these features: - Add appliqué capability to see reference stitches to give you superior stitch quality when stitching...

Accessory Catalog
Page 33
... stand that conveniently sits behind your machine. Spend less time changing threads, and more on to your next embroidery, quilting or sewing project. The spool pins can set up to the machine as well as a thread locking system which keeps those loose ends tamed when not in the proper color sequence for thread delivery or bobbin storage. Ten Spool Thread Stand This 10-Spool Thread Stand snaps securely in the...
... stand that conveniently sits behind your machine. Spend less time changing threads, and more on to your next embroidery, quilting or sewing project. The spool pins can set up to the machine as well as a thread locking system which keeps those loose ends tamed when not in the proper color sequence for thread delivery or bobbin storage. Ten Spool Thread Stand This 10-Spool Thread Stand snaps securely in the...

Accessory Catalog
Page 34
... embroidery as well as preventing fabric slippage and puckering. Brother Embroidery Accessories PacesetterTM Polyester Threads 65 Brother Country Yarn Embroidery Threads Metallic Threads For the best embroidery results, use these embroidery threads especially designed for each design. Pacesetter embroidery thread is perfect for greater utility and space saving. Here is designed to the Brother Embroidery Cards giving you check out Brother's beautiful country yarn thread. For best results, use the Brother Bobbin Thread designed specifically for Brother® Embroidery Machines...
... embroidery as well as preventing fabric slippage and puckering. Brother Embroidery Accessories PacesetterTM Polyester Threads 65 Brother Country Yarn Embroidery Threads Metallic Threads For the best embroidery results, use these embroidery threads especially designed for each design. Pacesetter embroidery thread is perfect for greater utility and space saving. Here is designed to the Brother Embroidery Cards giving you check out Brother's beautiful country yarn thread. For best results, use the Brother Bobbin Thread designed specifically for Brother® Embroidery Machines...

Accessory Catalog
Page 36
... thread is required to get needle felting effects easily on your PQ series! SA159 SA180B SA181 Needle Felting Attachment Felting Needle Brother Sewing Machine Attachments for PQ Series 70 Needle Felting Attachment Use this unique attachment to use it just like an ordinary presser foot, and embellish fabrics with the feed dogs and can attach it . 1. Draw a rough sketch on fabric or garment with Dust Box and Needle Guide. SA172 Bobbin for attaching piping, zippers, stitching angled...
... thread is required to get needle felting effects easily on your PQ series! SA159 SA180B SA181 Needle Felting Attachment Felting Needle Brother Sewing Machine Attachments for PQ Series 70 Needle Felting Attachment Use this unique attachment to use it just like an ordinary presser foot, and embellish fabrics with the feed dogs and can attach it . 1. Draw a rough sketch on fabric or garment with Dust Box and Needle Guide. SA172 Bobbin for attaching piping, zippers, stitching angled...

Accessory Catalog
Page 40
... the LC1 presser foot included in the machine. 2. Set up your machine for a cover stitch, with 3 or 6 mm (approx. 1/8 or 1/4 inch) wide cover stitch. 1. Attach the hem positioning plate A/B to the hemming attachment, and attach it into the front cover slot. 3. Sew. Set up your machine for a cover stitch, with the LC2 presser foot. Attaching 6 mm (approx. 1/4") bias tape: Use the small bias tape sliding plate with 3 or 6 mm wide cover stitch. 3. Open the seams. 4. Fold fabric and set through the holder). 4. Insert the tab...
... the LC1 presser foot included in the machine. 2. Set up your machine for a cover stitch, with 3 or 6 mm (approx. 1/8 or 1/4 inch) wide cover stitch. 1. Attach the hem positioning plate A/B to the hemming attachment, and attach it into the front cover slot. 3. Sew. Set up your machine for a cover stitch, with the LC2 presser foot. Attaching 6 mm (approx. 1/4") bias tape: Use the small bias tape sliding plate with 3 or 6 mm wide cover stitch. 3. Open the seams. 4. Fold fabric and set through the holder). 4. Insert the tab...

Users Manual - English
Page 2
... push fabric while stitching. Never operate this machine if it has a damaged cord or plug, if it is required around the machine needle. 11. Do not unplug by the manufacturer as contained in the needle area, such as threading needle, changing needle, threading bobbin, or changing presser foot, and the like. 15. DANGER - Do not allow this machine to break. 12. Use only accessories recommended by pulling on cord. Never drop or insert any adjustments...
... push fabric while stitching. Never operate this machine if it has a damaged cord or plug, if it is required around the machine needle. 11. Do not unplug by the manufacturer as contained in the needle area, such as threading needle, changing needle, threading bobbin, or changing presser foot, and the like. 15. DANGER - Do not allow this machine to break. 12. Use only accessories recommended by pulling on cord. Never drop or insert any adjustments...
Users Manual - English
Page 5
...Sewing by touching " " (Strong) __30 Except "UTILITY STITCH 30 CHANGING THE PRESSER FOOT __________31 Change the presser foot according to the LCD message 31 Installing embroidery foot "Q 31 Changing the embroidery foot ___________32 Feed dog adjustment 33 CHANGING THE NEEDLE 34 Setting the needle securely 34 Checking needle 34 MACHINE OPERATION KEYS 35 CHAPTER 2 1. CONTENTS CHAPTER 1 SETTING UP 5 PRINCIPAL PARTS 5 OTHER INCLUDED ACCESSORIES __________7 OPTIONS 8 POWER SUPPLY 9 SELECTION KEYS 10 Screen messages guide you through each operation 10 OPERATION BUTTONS 11 Using...
...Sewing by touching " " (Strong) __30 Except "UTILITY STITCH 30 CHANGING THE PRESSER FOOT __________31 Change the presser foot according to the LCD message 31 Installing embroidery foot "Q 31 Changing the embroidery foot ___________32 Feed dog adjustment 33 CHANGING THE NEEDLE 34 Setting the needle securely 34 Checking needle 34 MACHINE OPERATION KEYS 35 CHAPTER 2 1. CONTENTS CHAPTER 1 SETTING UP 5 PRINCIPAL PARTS 5 OTHER INCLUDED ACCESSORIES __________7 OPTIONS 8 POWER SUPPLY 9 SELECTION KEYS 10 Screen messages guide you through each operation 10 OPERATION BUTTONS 11 Using...
Users Manual - English
Page 6
... Elongation 95 Changing the stitch length and the stitch width 96 Customize patterns by combining satin stitches using a frame pattern 132 Embroidering onto small pieces of combined stitch patterns 100 Saving combined stitch patterns_________100 SEWING 102 Sewing attractive finishes 102 Using a pattern sheet 102 Sewing 103 ADJUSTING STITCH PATTERNS __________105 4. EMBROIDERING 106 PREPARATION BEFORE SEWING _________106 Attaching embroidery foot "Q"___________106 Fitting embroidery unit 107 Removing the embroidery unit __________108 Placing the embroidery unit into its case __108...
... Elongation 95 Changing the stitch length and the stitch width 96 Customize patterns by combining satin stitches using a frame pattern 132 Embroidering onto small pieces of combined stitch patterns 100 Saving combined stitch patterns_________100 SEWING 102 Sewing attractive finishes 102 Using a pattern sheet 102 Sewing 103 ADJUSTING STITCH PATTERNS __________105 4. EMBROIDERING 106 PREPARATION BEFORE SEWING _________106 Attaching embroidery foot "Q"___________106 Fitting embroidery unit 107 Removing the embroidery unit __________108 Placing the embroidery unit into its case __108...
Users Manual - English
Page 9
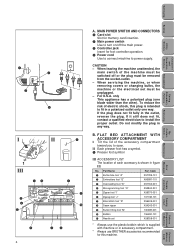
... 4 Monogramming foot "N" X53840-301 5 Zipper foot "I" X59370-051 6 Zigzag foot "J" 137748-101 7 Blind stitch foot "R" X56409-001 8 Seam ripper X54243-001 9 Button fitting foot "M" 130489-001 0 Bobbin 136492-101 A Needle set must be unplugged. - When servicing the machine, or when removing covers or changing bulbs, the machine or the electrical set X58358-001 * Always use the plastic bobbin which is supplied with machine or in any way. MAIN POWER SWITCH AND CONNECTORS 1 Card slot Slot for memory card insertion. 2 Main power...
... 4 Monogramming foot "N" X53840-301 5 Zipper foot "I" X59370-051 6 Zigzag foot "J" 137748-101 7 Blind stitch foot "R" X56409-001 8 Seam ripper X54243-001 9 Button fitting foot "M" 130489-001 0 Bobbin 136492-101 A Needle set must be unplugged. - When servicing the machine, or when removing covers or changing bulbs, the machine or the electrical set X58358-001 * Always use the plastic bobbin which is supplied with machine or in any way. MAIN POWER SWITCH AND CONNECTORS 1 Card slot Slot for memory card insertion. 2 Main power...
Users Manual - English
Page 25
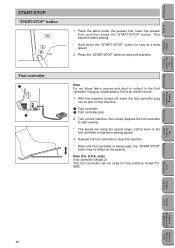
... presser foot, lower the presser foot, and then press the "START/STOP" button. Release the foot controller to stop this machine, then slowly depress the foot controller to stop this machine model PC8500. Note (For U.S.A. only) Foot controller: Model J2 This foot controller can be used , the "START/STOP" button has no effect on the sewing. Editing Embroidery Patterns Retrieving My Custom Stitch TM Error Maintenance Messages Trouble shooting Sewing Chart Patterns (Programmed in the foot controller. Press the "START/STOP" button to start sewing. * The speed set using the speed...
... presser foot, lower the presser foot, and then press the "START/STOP" button. Release the foot controller to stop this machine, then slowly depress the foot controller to stop this machine model PC8500. Note (For U.S.A. only) Foot controller: Model J2 This foot controller can be used , the "START/STOP" button has no effect on the sewing. Editing Embroidery Patterns Retrieving My Custom Stitch TM Error Maintenance Messages Trouble shooting Sewing Chart Patterns (Programmed in the foot controller. Press the "START/STOP" button to start sewing. * The speed set using the speed...
Users Manual - English
Page 36
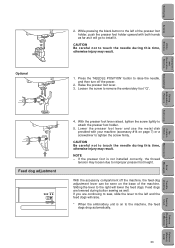
... "NEEDLE POSITION" button to attach the presser foot holder. 5. Setting Up Sewing Utility Stitches Characters and Decorative Stitches Embroidering Editing Embroidery Patterns Retrieving 5 2. With the presser foot lever raised, tighten the screw lightly to raise the needle, and then turn off the machine, the feed dog adjustment lever can be seen on to touch the needle during button sewing as it . NOTE - CAUTION Be careful not to the right will lower the feed dogs. Sliding the lever to touch the needle during this time...
... "NEEDLE POSITION" button to attach the presser foot holder. 5. Setting Up Sewing Utility Stitches Characters and Decorative Stitches Embroidering Editing Embroidery Patterns Retrieving 5 2. With the presser foot lever raised, tighten the screw lightly to raise the needle, and then turn off the machine, the feed dog adjustment lever can be seen on to touch the needle during button sewing as it . NOTE - CAUTION Be careful not to the right will lower the feed dogs. Sliding the lever to touch the needle during this time...
Users Manual - English
Page 54
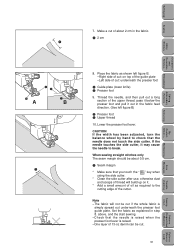
... the fabric feed direction. (See left figure B. -Right side of cut: on it may cause the needle to check that you touch the " " key when using the side cutter. * Clean the side cutter after use, otherwise dust and scraps of thread will build up on top of the guide plate -Left side of cut . 51 Trouble shooting Sewing Chart Patterns (Programmed in step 8. Lower the presser foot lever. When sewing straight stitches...
... the fabric feed direction. (See left figure B. -Right side of cut: on it may cause the needle to check that you touch the " " key when using the side cutter. * Clean the side cutter after use, otherwise dust and scraps of thread will build up on top of the guide plate -Left side of cut . 51 Trouble shooting Sewing Chart Patterns (Programmed in step 8. Lower the presser foot lever. When sewing straight stitches...
Users Manual - English
Page 55
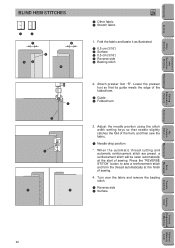
...hem. 1 Guide 2 Folded hem 1 3. Press the "REVERSE STITCH" button to sew a reinforcement stitch and trim the thread automatically at the start of the hem, and then sew the fabric. Fold the fabric and baste it as illustrated. 1 0.5 cm (3/16") 2 Surface 3 0.5 cm (3/16") 4 Reverse side 5 Basting stitch 2. Attach presser foot "R". Lower the presser foot so that needle slightly catches the fold of sewing. Turn over the fabric and remove the basting stitch. 1 Reverse side 2 Surface Retrieving My Custom Stitch TM Error Maintenance Messages Trouble shooting Sewing Chart Patterns...
...hem. 1 Guide 2 Folded hem 1 3. Press the "REVERSE STITCH" button to sew a reinforcement stitch and trim the thread automatically at the start of the hem, and then sew the fabric. Fold the fabric and baste it as illustrated. 1 0.5 cm (3/16") 2 Surface 3 0.5 cm (3/16") 4 Reverse side 5 Basting stitch 2. Attach presser foot "R". Lower the presser foot so that needle slightly catches the fold of sewing. Turn over the fabric and remove the basting stitch. 1 Reverse side 2 Surface Retrieving My Custom Stitch TM Error Maintenance Messages Trouble shooting Sewing Chart Patterns...
Users Manual - English
Page 86
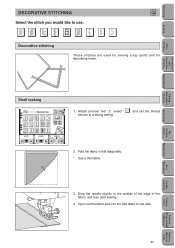
... fabric, and then start sewing. 4. Decorative stitching These stitches are used for sewing crazy quilts and for decorating hems. Utility Stitches Characters and Decorative Stitches Embroidering Editing Embroidery Patterns Retrieving My Custom Stitch TM Error Maintenance Messages Shell tacking 1. Drop the needle slightly to one side. 83 Trouble shooting Sewing Chart Patterns (Programmed in half diagonally. * Use a thin fabric. 5 3. Attach presser foot "J", select " " and set the thread tension to use. Setting Up Sewing DECORATIVE STITCHING J Select the stitch...
... fabric, and then start sewing. 4. Decorative stitching These stitches are used for sewing crazy quilts and for decorating hems. Utility Stitches Characters and Decorative Stitches Embroidering Editing Embroidery Patterns Retrieving My Custom Stitch TM Error Maintenance Messages Shell tacking 1. Drop the needle slightly to one side. 83 Trouble shooting Sewing Chart Patterns (Programmed in half diagonally. * Use a thin fabric. 5 3. Attach presser foot "J", select " " and set the thread tension to use. Setting Up Sewing DECORATIVE STITCHING J Select the stitch...
Users Manual - English
Page 99
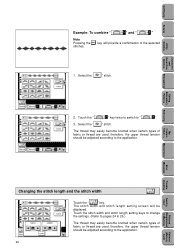
... stitches. therefore, the upper thread tension should be adjusted according to 26.) The thread may easily become knotted when certain types of fabric or thread are used ; Select the " " stitch. Editing Embroidery Patterns Retrieving My Custom Stitch TM Error Maintenance Messages Trouble shooting Sewing Chart Patterns (Programmed in Machine) Changing the stitch length and the stitch width Touch the " " key. The thread may easily become knotted when certain types of fabric or thread are used ; Touch the stitch width and stitch length setting...
... stitches. therefore, the upper thread tension should be adjusted according to 26.) The thread may easily become knotted when certain types of fabric or thread are used ; Select the " " stitch. Editing Embroidery Patterns Retrieving My Custom Stitch TM Error Maintenance Messages Trouble shooting Sewing Chart Patterns (Programmed in Machine) Changing the stitch length and the stitch width Touch the " " key. The thread may easily become knotted when certain types of fabric or thread are used ; Touch the stitch width and stitch length setting...
Users Manual - English
Page 120
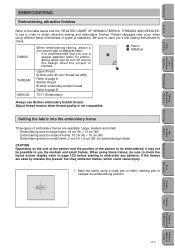
... page 8. Upper thread Brother poly 40 color thread set (#50) Refer to check. Bobbin thread Brother embroidery bobbin thread Refer to page 8. 1 Fabric 2 Stabilizer 2 NEEDLE 75/11 (Embroidery) Always use in Machine) Patterns (Memory Card) 117 Adjust thread tension when thread quality is finished. When using these frames, be possible to use a special stabilizer fabric for embroidering initials) CAUTION Depending on the size of the pattern and the position of stabilizers. Mark the fabric using different fabric thicknesses or types of the pattern to...
... page 8. Upper thread Brother poly 40 color thread set (#50) Refer to check. Bobbin thread Brother embroidery bobbin thread Refer to page 8. 1 Fabric 2 Stabilizer 2 NEEDLE 75/11 (Embroidery) Always use in Machine) Patterns (Memory Card) 117 Adjust thread tension when thread quality is finished. When using these frames, be possible to use a special stabilizer fabric for embroidering initials) CAUTION Depending on the size of the pattern and the position of stabilizers. Mark the fabric using different fabric thicknesses or types of the pattern to...


