
Accessory Catalog
Page 9
... table legs. Available with a new Bobbin Clip mechanism that offers 3 positions to adjust the bar to conform to your leg as you added control and visibility for your machine. Adjustable rubber-tipped legs. The Free-Motion Grip gives you turn your creation. Available in Fall 2008. SA599 C:...,2500D,1500D,QC-1000 SATFM6000D A:QuattroTM6000D www.brother.com Without a free-motion guide grip: SA504 SA551 KM B SA537 D (Innov-is NX-600, 400, 400Q, 200 and PC-420, 210) SA552 D (Innov-is 80, 40) Expand the work area of the Presser Foot as you are two different sizes. The ...
... table legs. Available with a new Bobbin Clip mechanism that offers 3 positions to adjust the bar to conform to your leg as you added control and visibility for your machine. Adjustable rubber-tipped legs. The Free-Motion Grip gives you turn your creation. Available in Fall 2008. SA599 C:...,2500D,1500D,QC-1000 SATFM6000D A:QuattroTM6000D www.brother.com Without a free-motion guide grip: SA504 SA551 KM B SA537 D (Innov-is NX-600, 400, 400Q, 200 and PC-420, 210) SA552 D (Innov-is 80, 40) Expand the work area of the Presser Foot as you are two different sizes. The ...

Accessory Catalog
Page 15
..." (2.0 - 2.5 mm) in order to straight stitch. 3. Use the foot controller so that can be easily sewn. Begin to sew moving the fabric at the same pace as zigzag stitch. 5. Attach the walking foot to the quilt top. 7. Sew. While starting to sew, press the ... Adapter for ULT series, PC-6500, PC-8200 and PC-8500 sewing machines. Requires Low Shank Adapter for ULT series, PC-6500, PC-8200 and PC-8500 sewing machines. Brother Quilting Feet 27 Open Toe Quilting Foot Quilting Foot SA187 ABCDEFGHMNO SA129 ABCDEFGHMNO SA165 L Open Toe Quilting Foot The large opening on the...
..." (2.0 - 2.5 mm) in order to straight stitch. 3. Use the foot controller so that can be easily sewn. Begin to sew moving the fabric at the same pace as zigzag stitch. 5. Attach the walking foot to the quilt top. 7. Sew. While starting to sew, press the ... Adapter for ULT series, PC-6500, PC-8200 and PC-8500 sewing machines. Requires Low Shank Adapter for ULT series, PC-6500, PC-8200 and PC-8500 sewing machines. Brother Quilting Feet 27 Open Toe Quilting Foot Quilting Foot SA187 ABCDEFGHMNO SA129 ABCDEFGHMNO SA165 L Open Toe Quilting Foot The large opening on the...

Accessory Catalog
Page 17
... you to embroider beautiful motifs continuously as embroidery. Expand the functionality of Brother Embroidery Cards, including licensed content. Drag and drop embroidery pattern positioning. - Add even more control with the SAVR4000D Premium Package. New Border Frame and 28 Unique Embroidery...designs - Easy to add and easy to see embroidery designs. - Includes three new free-motion presser feet: Free-motion quilting foot "C" for perfect echo quilting - Reduce letter spacing in adjusting the spacing between individual characters. - Basting Function to prevent shrinkage ...
... you to embroider beautiful motifs continuously as embroidery. Expand the functionality of Brother Embroidery Cards, including licensed content. Drag and drop embroidery pattern positioning. - Add even more control with the SAVR4000D Premium Package. New Border Frame and 28 Unique Embroidery...designs - Easy to add and easy to see embroidery designs. - Includes three new free-motion presser feet: Free-motion quilting foot "C" for perfect echo quilting - Reduce letter spacing in adjusting the spacing between individual characters. - Basting Function to prevent shrinkage ...

Users Manual - English
Page 2
...making any other user servicing adjustments mentioned in the needle area, such as threading needle, changing needle, threading bobbin, or changing presser foot, and the like. 15. WARNING - Do not allow this machine to the symbol "O" position when making any adjustments in the instruction...Young children should never be supervised to the symbol "O" position which represents off, then remove plug from the accumulation of the machine and foot control free from outlet. 9. The machine should be left unattended while plugged in this manual. 3. Replace bulb with same type rated 12V...
...making any other user servicing adjustments mentioned in the needle area, such as threading needle, changing needle, threading bobbin, or changing presser foot, and the like. 15. WARNING - Do not allow this machine to the symbol "O" position when making any adjustments in the instruction...Young children should never be supervised to the symbol "O" position which represents off, then remove plug from the accumulation of the machine and foot control free from outlet. 9. The machine should be left unattended while plugged in this manual. 3. Replace bulb with same type rated 12V...

Users Manual - English
Page 4
.... 2. Remember to assure correct installation. Use only neutral soaps or detergents to keep your nearest authorized Brother service center. 1 Do not drop or hit the machine. 4. If the problem persists, please consult your eye on the foot controller. 4. Be sure to clean the case. When storing this machine available. For repair or adjustment...
.... 2. Remember to assure correct installation. Use only neutral soaps or detergents to keep your nearest authorized Brother service center. 1 Do not drop or hit the machine. 4. If the problem persists, please consult your eye on the foot controller. 4. Be sure to clean the case. When storing this machine available. For repair or adjustment...
Users Manual - English
Page 5
... 19 Auto-threading device 20 Using the extra spool pin and the net ______21 START/STOP 22 "START/STOP" button 22 Foot controller 22 Mounting and Using the Knee Lifter _______23 STITCH WIDTH AND STITCH LENGTH ______24 Stitch width 24 Stitch length 25 Quick adjustment ...fabric 46 Changing the stitch length 46 Changing the needle position 46 ADAPTER FOR LOW SHANK ATTACHMENTS 47 Included accessories 47 Installation of walking foot 47 ZIGZAG STITCHES 48 Overcasting (using a zigzag stitch)________48 Applique (using a zigzag stitch) __________48 Patchwork (for stitch width and stitch...
... 19 Auto-threading device 20 Using the extra spool pin and the net ______21 START/STOP 22 "START/STOP" button 22 Foot controller 22 Mounting and Using the Knee Lifter _______23 STITCH WIDTH AND STITCH LENGTH ______24 Stitch width 24 Stitch length 25 Quick adjustment ...fabric 46 Changing the stitch length 46 Changing the needle position 46 ADAPTER FOR LOW SHANK ATTACHMENTS 47 Included accessories 47 Installation of walking foot 47 ZIGZAG STITCHES 48 Overcasting (using a zigzag stitch)________48 Applique (using a zigzag stitch) __________48 Patchwork (for stitch width and stitch...

Users Manual - English
Page 8
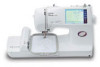
...guide for bobbin winding 4- Buttonhole lever 7- Needle threader 8- Feed dog adjustment lever 12- Presser foot lever 16- Knee Lifter A-Main power switch and connectors B-Accessory compartment C-Selection keys (Refer to...Operation buttons (Refer to page 11) 5 Patterns (Programmed in Machine) Patterns (Memory Card) Handle 2- Needle threader lever 5- Thread cutter 6- Presser foot 9- Bobbin cover 11- Speed range control lever 15- Balance wheel 14- Setting Up Sewing Utility Stitches Characters and Decorative Stitches Embroidering SETTING UP PRINCIPAL PARTS 2 1 3 D 4 5 6...
...guide for bobbin winding 4- Buttonhole lever 7- Needle threader 8- Feed dog adjustment lever 12- Presser foot lever 16- Knee Lifter A-Main power switch and connectors B-Accessory compartment C-Selection keys (Refer to...Operation buttons (Refer to page 11) 5 Patterns (Programmed in Machine) Patterns (Memory Card) Handle 2- Needle threader lever 5- Thread cutter 6- Presser foot 9- Bobbin cover 11- Speed range control lever 15- Balance wheel 14- Setting Up Sewing Utility Stitches Characters and Decorative Stitches Embroidering SETTING UP PRINCIPAL PARTS 2 1 3 D 4 5 6...
Users Manual - English
Page 9
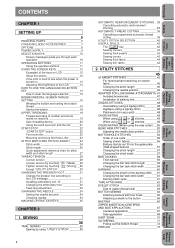
... Sewing Setting Up When servicing the machine, or when removing covers or changing bulbs, the machine or the electrical set X58358-001 * Always use BROTHER accessories recommended for foot controller operation. 4 Power cord Use to connect machine to open. If the plug does not fit fully in figure III. FLAT BED ATTACHMENT WITH...
... Sewing Setting Up When servicing the machine, or when removing covers or changing bulbs, the machine or the electrical set X58358-001 * Always use BROTHER accessories recommended for foot controller operation. 4 Power cord Use to connect machine to open. If the plug does not fit fully in figure III. FLAT BED ATTACHMENT WITH...
Users Manual - English
Page 10
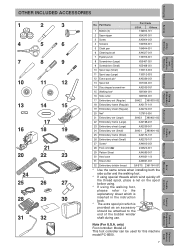
... SA421 X80904-102 25 Embroidery frame (Small) XA2174-101 26 Embroidery sheet (Small) XA2215-101 27 Screw* XA4813-051 28 Foot controller 234522-001 29 Pattern Sheet XA4595-001 30 Hard case XA1821-106 31 Knee Lifter XA6941-001 32 Embroidery bobbin thread SA-BTS...which is provided as an accessory should be used for this machine model PC-8500. 7 Error Maintenance Messages Trouble shooting Sewing Chart Patterns (Programmed in Machine) Patterns (Memory Card) only) Foot controller: Model J2 This foot controller can be attached to the end of the bobbin winder shaft during use...
... SA421 X80904-102 25 Embroidery frame (Small) XA2174-101 26 Embroidery sheet (Small) XA2215-101 27 Screw* XA4813-051 28 Foot controller 234522-001 29 Pattern Sheet XA4595-001 30 Hard case XA1821-106 31 Knee Lifter XA6941-001 32 Embroidery bobbin thread SA-BTS...which is provided as an accessory should be used for this machine model PC-8500. 7 Error Maintenance Messages Trouble shooting Sewing Chart Patterns (Programmed in Machine) Patterns (Memory Card) only) Foot controller: Model J2 This foot controller can be attached to the end of the bobbin winder shaft during use...
Users Manual - English
Page 25
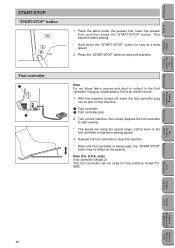
... could cause a fire or an electric shock. 1. With this machine turned off, insert the foot controller plug into its jack on this machine. Press the "START/STOP" button to stop this machine. 1 Foot controller 2 Foot controller jack 2. only) Foot controller: Model J2 This foot controller can be used , the "START/STOP" button has no effect on this machine model PC8500...
... could cause a fire or an electric shock. 1. With this machine turned off, insert the foot controller plug into its jack on this machine. Press the "START/STOP" button to stop this machine. 1 Foot controller 2 Foot controller jack 2. only) Foot controller: Model J2 This foot controller can be used , the "START/STOP" button has no effect on this machine model PC8500...
Users Manual - English
Page 109
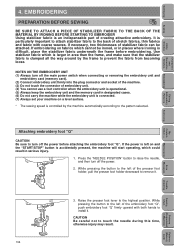
... is connected. (7) Always set your machine on and the "START/STOP" button is an indispensable part of embroidery unit. (4) You cannot use a foot controller when the embroidery unit is operational. (5) Always keep the embroidery unit and the memory card in area than the frame, and make sure that the... stabilizer fabric is controlled by the frame to the pattern selected. NOTES ON THE EMBROIDERY UNIT (1) Always turn off the main power switch when connecting or removing the...
... is connected. (7) Always set your machine on and the "START/STOP" button is an indispensable part of embroidery unit. (4) You cannot use a foot controller when the embroidery unit is operational. (5) Always keep the embroidery unit and the memory card in area than the frame, and make sure that the... stabilizer fabric is controlled by the frame to the pattern selected. NOTES ON THE EMBROIDERY UNIT (1) Always turn off the main power switch when connecting or removing the...
Users Manual - English
Page 123
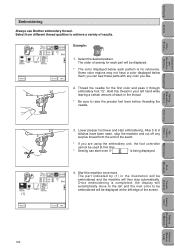
Setting Up Sewing Utility Stitches Characters and Decorative Stitches Embroidering Editing Embroidery Patterns Embroidering Always use Brother embroidery thread. Thread the needle for each pattern is being displayed. 4. Hold this time. * Sewing can sew these parts with any surplus... may not have been sewn, stop automatically. After 5 to achieve a variety of the seam. * If you are using the embroidery unit, the foot controller cannot be displayed at the left and the next color to be embroidered will then stop the machine and cut off any color you can...
Setting Up Sewing Utility Stitches Characters and Decorative Stitches Embroidering Editing Embroidery Patterns Embroidering Always use Brother embroidery thread. Thread the needle for each pattern is being displayed. 4. Hold this time. * Sewing can sew these parts with any surplus... may not have been sewn, stop automatically. After 5 to achieve a variety of the seam. * If you are using the embroidery unit, the foot controller cannot be displayed at the left and the next color to be embroidered will then stop the machine and cut off any color you can...

Users Manual - English
Page 178
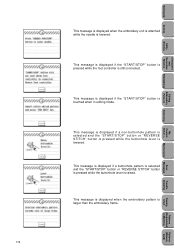
... between color changes. This message is displayed when a key on the screen is touched while the needle is connected. This message is displayed when the foot controller is used while the embroidery unit is down. 175 Error Maintenance Messages Trouble shooting Sewing Chart Patterns (Programmed in embroidering mode. This message is displayed...
... between color changes. This message is displayed when a key on the screen is touched while the needle is connected. This message is displayed when the foot controller is used while the embroidery unit is down. 175 Error Maintenance Messages Trouble shooting Sewing Chart Patterns (Programmed in embroidering mode. This message is displayed...
Users Manual - English
Page 179
.... This message is displayed if the "START/STOP" button is still connected. This message is displayed if the "START/STOP" button is pressed while the foot controller is touched when in Machine) Patterns (Memory Card)
.... This message is displayed if the "START/STOP" button is still connected. This message is displayed if the "START/STOP" button is pressed while the foot controller is touched when in Machine) Patterns (Memory Card)


