

Accessory Catalog
Page 13
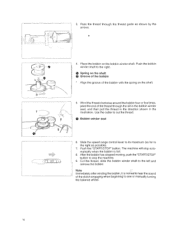
... foot. 1. Move fabric about 1" (2.5 cm) past the needle to sew the first row in one of stitching and use that to get started. Brother Embellishment Feet 23 Bed Runner & Pillowcase Innov-is moved forward, its teeth catch a fabric and force it forward into the slot, and stitch slowly. ...be evenly spaced by trying different combinations of the presser foot is Project Book (See pages 16 and 17 for most consistent results. Install and manually thread a twin needle. 2. The ruffling blade on the lower portion of stitch length, tuck setting and depth setting. 2. Adjust the amount of...
... foot. 1. Move fabric about 1" (2.5 cm) past the needle to sew the first row in one of stitching and use that to get started. Brother Embellishment Feet 23 Bed Runner & Pillowcase Innov-is moved forward, its teeth catch a fabric and force it forward into the slot, and stitch slowly. ...be evenly spaced by trying different combinations of the presser foot is Project Book (See pages 16 and 17 for most consistent results. Install and manually thread a twin needle. 2. The ruffling blade on the lower portion of stitch length, tuck setting and depth setting. 2. Adjust the amount of...

Accessory Catalog
Page 34
... range of the proper stabilizer helps to provide a good foundation as well as a useful and decorative wooden thread rack that can stand on your instruction manual for advice on Backing Stabilizer 11" x 1 yd. (3 Pieces) SA5810 Tear-Away Medium Weight Stabilizer 15" x 10 yds SA5815 Tear-Away Medium ... Quattro™ 6000D, Duetta™ 4500D/Innov-is 4000D, 2500D, 1500D, 1200 series, PC and ULT series machines and the PE-400D and Innov-is Project Book (See page 33 for details.) www.brother.com Here is a wonderful set as well as preventing fabric slippage and puckering. Polyester retains...
... range of the proper stabilizer helps to provide a good foundation as well as a useful and decorative wooden thread rack that can stand on your instruction manual for advice on Backing Stabilizer 11" x 1 yd. (3 Pieces) SA5810 Tear-Away Medium Weight Stabilizer 15" x 10 yds SA5815 Tear-Away Medium ... Quattro™ 6000D, Duetta™ 4500D/Innov-is 4000D, 2500D, 1500D, 1200 series, PC and ULT series machines and the PE-400D and Innov-is Project Book (See page 33 for details.) www.brother.com Here is a wonderful set as well as preventing fabric slippage and puckering. Polyester retains...

Users Manual - English
Page 1
ouuu SEWING MACHINE --410- • r. (o0 ' ' `.r 3NFT I r • .4,e r • • 14. • -,3, .? 3 J Airi, OPERATION MANUAL brother®
ouuu SEWING MACHINE --410- • r. (o0 ' ' `.r 3NFT I r • .4,e r • • 14. • -,3, .? 3 J Airi, OPERATION MANUAL brother®

Users Manual - English
Page 2
...or push fabric while stitching. To reduce the risk of lint, dust, and loose cloth. 5. Replace bulb with any adjustments in this manual. 3. To disconnect, turn the main switch to the nearest authorized dealer or service center for household use bent needles. 13. "IMPORTANT...operate where aerosol (spray) products are being administered. 8. Switch the sewing machine to be left unattended while plugged in the instruction manual. Always unplug the sewing machine from the electrical outlet when removing covers, lubricating, or when making any air openings blocked. Do...
...or push fabric while stitching. To reduce the risk of lint, dust, and loose cloth. 5. Replace bulb with any adjustments in this manual. 3. To disconnect, turn the main switch to the nearest authorized dealer or service center for household use bent needles. 13. "IMPORTANT...operate where aerosol (spray) products are being administered. 8. Switch the sewing machine to be left unattended while plugged in the instruction manual. Always unplug the sewing machine from the electrical outlet when removing covers, lubricating, or when making any air openings blocked. Do...

Users Manual - English
Page 4
... pulley, thread take-up, needle, or other hot objects. 2. Plug the machine directly into the wall. When storing your nearest authorized Brother service center. 1 Be sure to clean the case. Do not use sewing machine available. For a longer service life 1. Remember to ... and machine, and should never be used. 3. Always consult the operation manual when replacing or installing any other parts to inspect and adjust the machine yourself. CONGRATULATIONS ON CHOOSING A BROTHER COMPUTER SEWING MACHINE Your machine is the most advanced computerized home use extension cords...
... pulley, thread take-up, needle, or other hot objects. 2. Plug the machine directly into the wall. When storing your nearest authorized Brother service center. 1 Be sure to clean the case. Do not use sewing machine available. For a longer service life 1. Remember to ... and machine, and should never be used. 3. Always consult the operation manual when replacing or installing any other parts to inspect and adjust the machine yourself. CONGRATULATIONS ON CHOOSING A BROTHER COMPUTER SEWING MACHINE Your machine is the most advanced computerized home use extension cords...

Users Manual - English
Page 19
... remove the bobbin. After the bobbin has stopped moving, push the "START/STOP" button to stop automatically when the bobbin is normal to sew or manually turning the balance wheel. 16 Wind the thread clockwise around the bobbin four or five times, pass the end of the clutch engaging when beginning...
... remove the bobbin. After the bobbin has stopped moving, push the "START/STOP" button to stop automatically when the bobbin is normal to sew or manually turning the balance wheel. 16 Wind the thread clockwise around the bobbin four or five times, pass the end of the clutch engaging when beginning...
Users Manual - English
Page 21
... of the bobbin with the spring on the bobbin winder shaft. Slide the speed range control lever to its maximum (as far to sew or manually turning the balance wheel. 16 Wind the thread clockwise around the bobbin four or five times, pass the end of the clutch engaging when beginning...
... of the bobbin with the spring on the bobbin winder shaft. Slide the speed range control lever to its maximum (as far to sew or manually turning the balance wheel. 16 Wind the thread clockwise around the bobbin four or five times, pass the end of the clutch engaging when beginning...

Users Manual - English
Page 22
.... --- - )Emat I 6 I f11111 3. Place the spool of the spool. 18 Push the NEEDLE POSITION" button to ensure that the upper threading is done correctly, this Operation Manual is lowered. ( 2.
.... --- - )Emat I 6 I f11111 3. Place the spool of the spool. 18 Push the NEEDLE POSITION" button to ensure that the upper threading is done correctly, this Operation Manual is lowered. ( 2.
Users Manual - English
Page 27
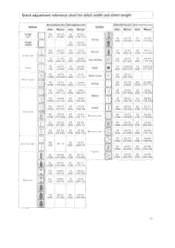
...64) (1/128-5/32) Bl.nd hem stitch - 0.0 10.01 +3 - -3 2.0 1.0-3 5 (5/641 (164-118) 5.0 3.0-5.0 0.4 0.3-1.0 (13164) (I /16-932) _1- Manual Auto. Manual [0.0 0.0-7.0 2.5 0.2-5 0 (0,0)1 (0-932) (132) (O28-1164) 2.5 0.2-5.0 (3/32) (I (5/64) (3164-118) (1/64) (1/64-3/64) 4.0 0.0-7.0 1.0 0 2-4.0 (5/32...(1/16-3/321 - stitch . - Applique 20 1.0-3.0 0.4 0.3-1.0 J I /128-1164) STITCH Mitch width [mm (inch.)] Stitch length [mm (inch.)) Auto. Manual Auto. Manual inn Darning Ain 7.0 2.5-7.0 2.0 0 4-2.5 (132) (132-9132) (5/64) (1/64-2.132) Stretch. i -- - - - 1.4 0 8-4 0 (1/16...
...64) (1/128-5/32) Bl.nd hem stitch - 0.0 10.01 +3 - -3 2.0 1.0-3 5 (5/641 (164-118) 5.0 3.0-5.0 0.4 0.3-1.0 (13164) (I /16-932) _1- Manual Auto. Manual [0.0 0.0-7.0 2.5 0.2-5 0 (0,0)1 (0-932) (132) (O28-1164) 2.5 0.2-5.0 (3/32) (I (5/64) (3164-118) (1/64) (1/64-3/64) 4.0 0.0-7.0 1.0 0 2-4.0 (5/32...(1/16-3/321 - stitch . - Applique 20 1.0-3.0 0.4 0.3-1.0 J I /128-1164) STITCH Mitch width [mm (inch.)] Stitch length [mm (inch.)) Auto. Manual Auto. Manual inn Darning Ain 7.0 2.5-7.0 2.0 0 4-2.5 (132) (132-9132) (5/64) (1/64-2.132) Stretch. i -- - - - 1.4 0 8-4 0 (1/16...
Users Manual - English
Page 28
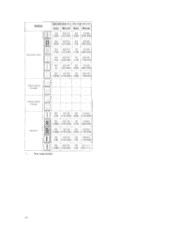
.... STITCH Stitch width (mm (inch.)) Stitch length (mm (inch.)) Auto. Manual 4.0 0.0-7.0 2.5 1.0-4.0 (5/32) (0.0-9/32) (3/32) (3164-5/32) fl 4.0 0.0-7.0 3.0 2.0-4 0 I.----.. (5132) (0.0-9/32) (1/81 (5/64-5/32) Decorative stitch : -.1 --'_ - •-._- , 5.5 0.0-7.0 T.6 1.0-4.0 (7/32) (0.0-9/32) (1/16) (3/64-5/321 3.5 0.0-7.0 1.6 0,2-4.0 (1/8) (0 0-9/32) (1/16) 11/128-5/32) 0.0 0.0-7.0 2.5 1.0-4.0 (0) (0 0-9/32) (3/...
.... STITCH Stitch width (mm (inch.)) Stitch length (mm (inch.)) Auto. Manual 4.0 0.0-7.0 2.5 1.0-4.0 (5/32) (0.0-9/32) (3/32) (3164-5/32) fl 4.0 0.0-7.0 3.0 2.0-4 0 I.----.. (5132) (0.0-9/32) (1/81 (5/64-5/32) Decorative stitch : -.1 --'_ - •-._- , 5.5 0.0-7.0 T.6 1.0-4.0 (7/32) (0.0-9/32) (1/16) (3/64-5/321 3.5 0.0-7.0 1.6 0,2-4.0 (1/8) (0 0-9/32) (1/16) 11/128-5/32) 0.0 0.0-7.0 2.5 1.0-4.0 (0) (0 0-9/32) (3/...

Users Manual - English
Page 34
... taken throuqh P thread guid6. 2. The bobbin setting procedures appear on the display allowing you quickly and easily operate the sewing machine. foor warrdd. 3. O Touch this manual. bobbin eo that appear on the display are based on the information in this key to find out how to replace the needle. After threading...
... taken throuqh P thread guid6. 2. The bobbin setting procedures appear on the display allowing you quickly and easily operate the sewing machine. foor warrdd. 3. O Touch this manual. bobbin eo that appear on the display are based on the information in this key to find out how to replace the needle. After threading...
Users Manual - English
Page 81
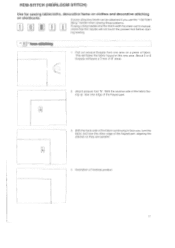
" hem-stitching 1 1. This will leave a 3 mm (1/8" area). 2. With the back side of the fabric continuing to manual, check that the needle will not touch the presser foot before start- Illustration of the frayed part. 3. About 5 or 6 threads will leave the fabric frayed ...
" hem-stitching 1 1. This will leave a 3 mm (1/8" area). 2. With the back side of the fabric continuing to manual, check that the needle will not touch the presser foot before start- Illustration of the frayed part. 3. About 5 or 6 threads will leave the fabric frayed ...


