
Users Manual - English
Page 2
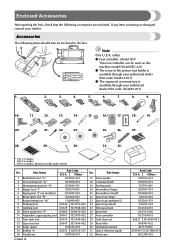
... any item is available,through your retailer. Part Name 1 Buttonhole foot "A" 2 Overcasting foot "G" 3 Monogramming foot "N" 4 Zipper foot "I" 5 Zigzag foot "J" (on this machine model NX-400/PC-420. ● The screw of the presser foot holder is available through your authorized dealer (Part code: XA4813-051). ● The organized accessory tray is... Adjustable zipper/piping foot 12 Non stick foot 13 Open toe foot 14 Seam ripper 15 Bobbin (4) 16 Needle set 29 Knee lifter 30 Operation manual 31 Quick reference guide 32 Hard case Part Code U.S.A.
... any item is available,through your retailer. Part Name 1 Buttonhole foot "A" 2 Overcasting foot "G" 3 Monogramming foot "N" 4 Zipper foot "I" 5 Zigzag foot "J" (on this machine model NX-400/PC-420. ● The screw of the presser foot holder is available through your authorized dealer (Part code: XA4813-051). ● The organized accessory tray is... Adjustable zipper/piping foot 12 Non stick foot 13 Open toe foot 14 Seam ripper 15 Bobbin (4) 16 Needle set 29 Knee lifter 30 Operation manual 31 Quick reference guide 32 Hard case Part Code U.S.A.
Users Manual - English
Page 8
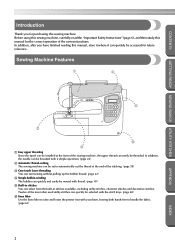
... Thank you have finished reading this sewing machine. Before using this sewing machine, carefully read the "Important Safety Instructions" (page 6), and then study this manual for purchasing this manual, store it where it can easily be set to handle the fabric. (page 61) APPENDIX INDEX 2 In addition, after you for the correct...
... Thank you have finished reading this sewing machine. Before using this sewing machine, carefully read the "Important Safety Instructions" (page 6), and then study this manual for purchasing this manual, store it where it can easily be set to handle the fabric. (page 61) APPENDIX INDEX 2 In addition, after you for the correct...

Users Manual - English
Page 12
... it must be supervised to the symbol "{" position when making any adjustments in the needle area, such as described in the instruction manual. 16. Always unplug the machine from all instructions before cleaning. Do not operate where aerosol (spray) products are being used or ...intended use by or near children. 2. Always unplug the machine from the accumulation of lint, dust, and loose cloth. 5. Never operate this manual. 3. Never drop or insert any air openings blocked. Young children should never be used by young children or infirm persons without supervision. 17...
... it must be supervised to the symbol "{" position when making any adjustments in the needle area, such as described in the instruction manual. 16. Always unplug the machine from all instructions before cleaning. Do not operate where aerosol (spray) products are being used or ...intended use by or near children. 2. Always unplug the machine from the accumulation of lint, dust, and loose cloth. 5. Never operate this manual. 3. Never drop or insert any air openings blocked. Young children should never be used by young children or infirm persons without supervision. 17...

Users Manual - English
Page 14
... avoid direct sunlight and high humidity locations. Use only neutral soaps or detergents to inspect and adjust the machine yourself. Always consult the operation manual when replacing or installing any other parts • A power failure occurs during use • Maintaining the machine • Leaving the machine ... off the power switch and unplug the cord when: • Operation is one of the operation manual to clean the case. Be sure to keep your local authorized Brother dealer. Do not store anything on the needle while sewing. For additional product information and updates, ...
... avoid direct sunlight and high humidity locations. Use only neutral soaps or detergents to inspect and adjust the machine yourself. Always consult the operation manual when replacing or installing any other parts • A power failure occurs during use • Maintaining the machine • Leaving the machine ... off the power switch and unplug the cord when: • Operation is one of the operation manual to clean the case. Be sure to keep your local authorized Brother dealer. Do not store anything on the needle while sewing. For additional product information and updates, ...
Users Manual - English
Page 19
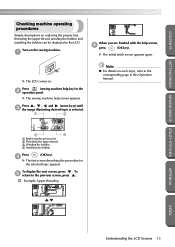
... ● For details on replacing the presser foot, threading the upper thread, winding the bobbin and installing the bobbin can be displayed in this Operation Manual. 3 4 1 Replacing the presser foot 2 Threading the upper thread 3 Winding the bobbin 4 Installing the bobbin Press (OK key). 4 X The first screen describing the procedure for the...
... ● For details on replacing the presser foot, threading the upper thread, winding the bobbin and installing the bobbin can be displayed in this Operation Manual. 3 4 1 Replacing the presser foot 2 Threading the upper thread 3 Winding the bobbin 4 Installing the bobbin Press (OK key). 4 X The first screen describing the procedure for the...
Users Manual - English
Page 35
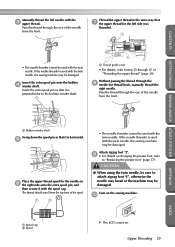
Pass the thread through the 8 needle bar thread hook, manually thread the right needle. Insert the extra spool pin so that it with the spool cap. CAUTION ● When using the twin needle, be sure ... the needle threader is perpendicular to the bobbin winder shaft. 1 1 Thread guide cover • For details, refer to "Replacing the presser foot" (page 37). CONTENTS Manually thread the left side was threaded. 1 • The needle threader cannot be used with the twin needle.
Pass the thread through the 8 needle bar thread hook, manually thread the right needle. Insert the extra spool pin so that it with the spool cap. CAUTION ● When using the twin needle, be sure ... the needle threader is perpendicular to the bobbin winder shaft. 1 1 Thread guide cover • For details, refer to "Replacing the presser foot" (page 37). CONTENTS Manually thread the left side was threaded. 1 • The needle threader cannot be used with the twin needle.

Users Manual - English
Page 59
... the presser foot or while the machine is sewing, otherwise damage to cut automatically, refer to "Automatically cutting the thread" (page 58). ■ Using the manual thread cutter When sewing with thread thicker than #30, nylon or metallic threads, or other special threads, use the thread cutter on setting the machine...
... the presser foot or while the machine is sewing, otherwise damage to cut automatically, refer to "Automatically cutting the thread" (page 58). ■ Using the manual thread cutter When sewing with thread thicker than #30, nylon or metallic threads, or other special threads, use the thread cutter on setting the machine...
Users Manual - English
Page 76
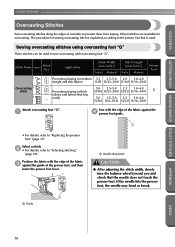
... details, refer to sew overcasting with overcasting foot "G". The procedure for overcasting. Stitch Name Pattern Stitch Key Application Stitch Width [mm (inch.)] Auto Manual Stitch Length [mm (inch.)] Auto Manual Presser Foot 11 Preventing fraying in medium 3.5 2.5-5.0 2.0 1.0-4.0 weight and thin fabrics (1/8) (3/32-3/16) (1/16) (1/16-3/16) Overcasting 12 stitch 13 Preventing fraying...
... details, refer to sew overcasting with overcasting foot "G". The procedure for overcasting. Stitch Name Pattern Stitch Key Application Stitch Width [mm (inch.)] Auto Manual Stitch Length [mm (inch.)] Auto Manual Presser Foot 11 Preventing fraying in medium 3.5 2.5-5.0 2.0 1.0-4.0 weight and thin fabrics (1/8) (3/32-3/16) (1/16) (1/16-3/16) Overcasting 12 stitch 13 Preventing fraying...
Users Manual - English
Page 77
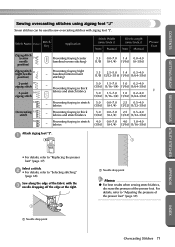
Preventing fraying in stretch fabrics - Preventing fraying in thick fabrics and stretch fabrics - Preventing fraying in stretch fabrics Stitch Width [mm (inch.)] Auto Manual Stitch Length [mm (inch.)] Auto Manual Presser Foot 3.5 0.0-7.0 1.4 0.0-4.0 (1/8) (0-1/4) (1/16) (0-3/16) 3.5 2.5-5.0 1.4 0.3-4.0 (1/8) (3/32-3/16) (1/16) (1/64-3/16) 5.0 1.5-7.0 1.0 0.2-4.0 (3/16) (1/16-1/4) (1/16) (1/64-3/16) J 5.0 1.5-7.0 1.0 0.2-4.0 (3/16) (1/16-1/4) (1/16) (1/64-3/16) 5.0 0.0-7.0 2.5 0.5-4.0 (3/16) (0-1/4) (3/32) (1/32-3/16...
Preventing fraying in stretch fabrics - Preventing fraying in thick fabrics and stretch fabrics - Preventing fraying in stretch fabrics Stitch Width [mm (inch.)] Auto Manual Stitch Length [mm (inch.)] Auto Manual Presser Foot 3.5 0.0-7.0 1.4 0.0-4.0 (1/8) (0-1/4) (1/16) (0-3/16) 3.5 2.5-5.0 1.4 0.3-4.0 (1/8) (3/32-3/16) (1/16) (1/64-3/16) 5.0 1.5-7.0 1.0 0.2-4.0 (3/16) (1/16-1/4) (1/16) (1/64-3/16) J 5.0 1.5-7.0 1.0 0.2-4.0 (3/16) (1/16-1/4) (1/16) (1/64-3/16) 5.0 0.0-7.0 2.5 0.5-4.0 (3/16) (0-1/4) (3/32) (1/32-3/16...
Users Manual - English
Page 78
Lower the presser foot lever, and then 2 manually thread the needle. • The needle threader cannot be used to "Replacing the presser foot" (page 37). Five stitches can be damaged. If the ...) (1/8-3/16) (3/32) (1/16-3/16) Hook the connecting fork of the fabric is cut off. Stitch Name Pattern Application Stitch Width [mm (inch.)] Auto Manual Stitch Length [mm (inch.)] Auto Manual Presser Foot 63 Sewing straight stitches while 0.0 0.0-2.5 2.5 0.2-5.0 cutting the fabric (0) (0-3/32) (3/32) (1/64-3/16) 64 Sewing zigzag stitches while 3.5 3.5-5.0 1.4 0.0-4.0 cutting the ...
Lower the presser foot lever, and then 2 manually thread the needle. • The needle threader cannot be used to "Replacing the presser foot" (page 37). Five stitches can be damaged. If the ...) (1/8-3/16) (3/32) (1/16-3/16) Hook the connecting fork of the fabric is cut off. Stitch Name Pattern Application Stitch Width [mm (inch.)] Auto Manual Stitch Length [mm (inch.)] Auto Manual Presser Foot 63 Sewing straight stitches while 0.0 0.0-2.5 2.5 0.2-5.0 cutting the fabric (0) (0-3/32) (3/32) (1/64-3/16) 64 Sewing zigzag stitches while 3.5 3.5-5.0 1.4 0.0-4.0 cutting the ...
Users Manual - English
Page 80
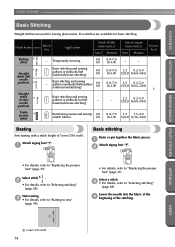
... zigzag foot "J". 2 J APPENDIX • For details, refer to "Selecting stitching" (page 68). Stitch Name Pattern Stitch Key Application Stitch Width [mm (inch.)] Auto Manual Stitch Length [mm (inch.)] Auto Manual Presser Foot Basting 6 stitch - Temporarily securing 0.0 0.0-7.0 (0) (0-1/4) - - 1 Straight stitch (left needle position) 2 Straight stitch 3 (center needle position) Basic stitching and sewing gathers or...
... zigzag foot "J". 2 J APPENDIX • For details, refer to "Selecting stitching" (page 68). Stitch Name Pattern Stitch Key Application Stitch Width [mm (inch.)] Auto Manual Stitch Length [mm (inch.)] Auto Manual Presser Foot Basting 6 stitch - Temporarily securing 0.0 0.0-7.0 (0) (0-1/4) - - 1 Straight stitch (left needle position) 2 Straight stitch 3 (center needle position) Basic stitching and sewing gathers or...
Users Manual - English
Page 82
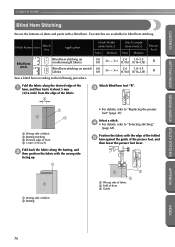
... guide of the presser foot, and then lower the presser foot lever. Stitch Name Pattern Stitch Key Application Stitch Width [mm (inch.)] Auto Manual Stitch Length [mm (inch.)] Auto Manual Presser Foot 17 Blind hem stitch 18 Blind hem stitching on mediumweight fabrics 0.0 (0) 3← - 3→ 2.0 (1/16) 1.0-3.5 (1/16-1/8) R Blind hem stitching on stretch...
... guide of the presser foot, and then lower the presser foot lever. Stitch Name Pattern Stitch Key Application Stitch Width [mm (inch.)] Auto Manual Stitch Length [mm (inch.)] Auto Manual Presser Foot 17 Blind hem stitch 18 Blind hem stitching on mediumweight fabrics 0.0 (0) 3← - 3→ 2.0 (1/16) 1.0-3.5 (1/16-1/8) R Blind hem stitching on stretch...
Users Manual - English
Page 84
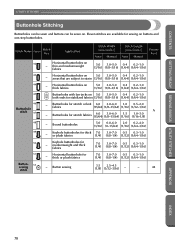
... (1/4) 3.0-7.0 0.5 0.3-1.0 (1/8-1/4) (1/32) (1/64-1/16) 50 Keyhole buttonholes for sewing on 5.0 3.0-5.0 0.4 0.2-1.0 areas that are available for - Stitch Name Pattern Stitch Key Application Stitch Width [mm (inch.)] Auto Manual Stitch Length [mm (inch.)] Auto Manual Presser Foot 42 Horizontal buttonholes on .
... (1/4) 3.0-7.0 0.5 0.3-1.0 (1/8-1/4) (1/32) (1/64-1/16) 50 Keyhole buttonholes for sewing on 5.0 3.0-5.0 0.4 0.2-1.0 areas that are available for - Stitch Name Pattern Stitch Key Application Stitch Width [mm (inch.)] Auto Manual Stitch Length [mm (inch.)] Auto Manual Presser Foot 42 Horizontal buttonholes on .
Users Manual - English
Page 91
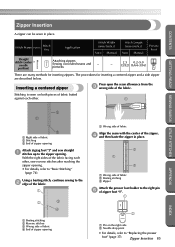
... other . 1 APPENDIX 2 1 3 1 Right side of fabric 2 Stitching 3 End of the fabric. Stitch Name Pattern Stitch Key Application Stitch Width [mm (inch.)] Auto Manual Stitch Length [mm (inch.)] Auto Manual Presser Foot Straight stitch (center 3 needle position) Attaching zippers Sewing concealed seams and - Inserting a centered zipper Press open the seam allowance from the...
... other . 1 APPENDIX 2 1 3 1 Right side of fabric 2 Stitching 3 End of the fabric. Stitch Name Pattern Stitch Key Application Stitch Width [mm (inch.)] Auto Manual Stitch Length [mm (inch.)] Auto Manual Presser Foot Straight stitch (center 3 needle position) Attaching zippers Sewing concealed seams and - Inserting a centered zipper Press open the seam allowance from the...
Users Manual - English
Page 95
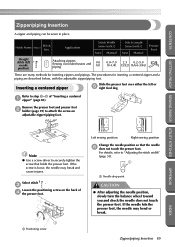
... BASICS UTILITY STITCHES Zipper/piping Insertion A zipper and piping can be sewn in place. Stitch Name Pattern Stitch Key Application Stitch Width [mm (inch.)] Auto Manual Stitch Length [mm (inch.)] Auto Manual Presser Foot Straight stitch (left or 5 right feed dog.
... BASICS UTILITY STITCHES Zipper/piping Insertion A zipper and piping can be sewn in place. Stitch Name Pattern Stitch Key Application Stitch Width [mm (inch.)] Auto Manual Stitch Length [mm (inch.)] Auto Manual Presser Foot Straight stitch (left or 5 right feed dog.
Users Manual - English
Page 97
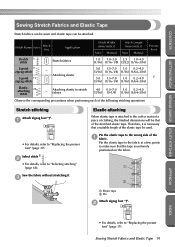
... sure that the tape is necessary that of the following stitching operations. Stitch Name Pattern Stitch Key Application Stitch Width [mm (inch.)] Auto Manual Stitch Length [mm (inch.)] Auto Manual Presser Foot Stretch 5 stitch Stretch fabrics 1.0 1.0-3.0 2.5 1.0-4.0 (1/16) (1/16-1/8) (3/32) (1/16-3/16) 2-point 9 zigzag stitch 3-point 10 zigzag stitch - Attaching elastic to "Replacing...
... sure that the tape is necessary that of the following stitching operations. Stitch Name Pattern Stitch Key Application Stitch Width [mm (inch.)] Auto Manual Stitch Length [mm (inch.)] Auto Manual Presser Foot Stretch 5 stitch Stretch fabrics 1.0 1.0-3.0 2.5 1.0-4.0 (1/16) (1/16-1/8) (3/32) (1/16-3/16) 2-point 9 zigzag stitch 3-point 10 zigzag stitch - Attaching elastic to "Replacing...

Users Manual - English
Page 99
...) 0.0-7.0 (0-1/4) 1.6 0.2-5.0 (1/16) (1/64-3/16) J 22 - 4.0 0.0-7.0 1.2 0.2-4.0 (3/16) (0-1/4) (1/16) (1/64-3/16) Joining 23 stitch 24 - Stitch Name Pattern Stitch Key Application Stitch Width [mm (inch.)] Auto Manual Stitch Length [mm (inch.)] Auto Manual Presser Foot 7 Zigzag stitch 60 Attaching appliqués (center baseline/reverse stitching) 3.5 0.0-7.0 1.4 0.0-4.0 (1/8) (0-1/4) (1/16) (0-3/16) - Attaching appliqués and binding 3.5 2.5-5.0 2.5 1.6-4.0 (1/8) (3/32-3/16) (3/32...
...) 0.0-7.0 (0-1/4) 1.6 0.2-5.0 (1/16) (1/64-3/16) J 22 - 4.0 0.0-7.0 1.2 0.2-4.0 (3/16) (0-1/4) (1/16) (1/64-3/16) Joining 23 stitch 24 - Stitch Name Pattern Stitch Key Application Stitch Width [mm (inch.)] Auto Manual Stitch Length [mm (inch.)] Auto Manual Presser Foot 7 Zigzag stitch 60 Attaching appliqués (center baseline/reverse stitching) 3.5 0.0-7.0 1.4 0.0-4.0 (1/8) (0-1/4) (1/16) (0-3/16) - Attaching appliqués and binding 3.5 2.5-5.0 2.5 1.6-4.0 (1/8) (3/32-3/16) (3/32...
Users Manual - English
Page 106
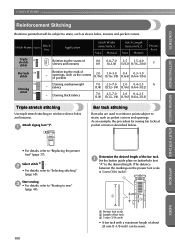
...; For details, refer to "Replacing the presser foot" (page 37). INDEX Stitch Name Pattern Stitch Key Application Stitch Width [mm (inch.)] Auto Manual Stitch Length [mm (inch.)] Auto Manual Presser Foot Triple 4 stretch stitch Reinforcing the seams of about 28 mm (1-1/8 inch) can be subject to strain, such as pocket corners and...
...; For details, refer to "Replacing the presser foot" (page 37). INDEX Stitch Name Pattern Stitch Key Application Stitch Width [mm (inch.)] Auto Manual Stitch Length [mm (inch.)] Auto Manual Presser Foot Triple 4 stretch stitch Reinforcing the seams of about 28 mm (1-1/8 inch) can be subject to strain, such as pocket corners and...
Users Manual - English
Page 110
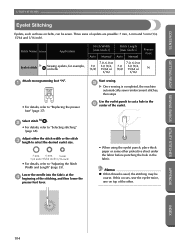
... (1/4, 15/64 and 3/16 inch). Stitch Name Pattern Application 56 Eyelet stitch Sewing eyelets, for example, on belts Stitch Width [mm (inch.)] Auto Manual Stitch Length [mm (inch.)] Auto Manual Presser Foot 7.0, 6.0 or 7.0, 6.0 or 7.0 5.0 (1/4, 7.0 5.0 (1/4, (1/4) 15/64 or (1/4) 15/64 or N 3/16) 3/16) Attach monogramming foot "N". 1 • For details, refer to "Adjusting the...
... (1/4, 15/64 and 3/16 inch). Stitch Name Pattern Application 56 Eyelet stitch Sewing eyelets, for example, on belts Stitch Width [mm (inch.)] Auto Manual Stitch Length [mm (inch.)] Auto Manual Presser Foot 7.0, 6.0 or 7.0, 6.0 or 7.0 5.0 (1/4, 7.0 5.0 (1/4, (1/4) 15/64 or (1/4) 15/64 or N 3/16) 3/16) Attach monogramming foot "N". 1 • For details, refer to "Adjusting the...
Users Manual - English
Page 111
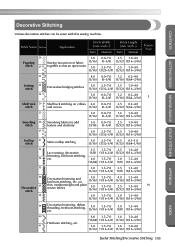
Stitch Name Pattern Application Stitch Width [mm (inch.)] Auto Manual Stitch Length [mm (inch.)] Auto Manual Presser Foot 26 Fagoting stitch 27 Sewing two pieces of fabric together across an open seam 5.0 (3/16) 5.0 (3/16) 0.0-7.0 (0-1/4) 2.5-7.0 (3/25-1/4) 2.5 1.0-4.0 (3/32) (1/16-3/16) 2.5 1.0-4.0 (3/32) (1/16-3/16) ...
Stitch Name Pattern Application Stitch Width [mm (inch.)] Auto Manual Stitch Length [mm (inch.)] Auto Manual Presser Foot 26 Fagoting stitch 27 Sewing two pieces of fabric together across an open seam 5.0 (3/16) 5.0 (3/16) 0.0-7.0 (0-1/4) 2.5-7.0 (3/25-1/4) 2.5 1.0-4.0 (3/32) (1/16-3/16) 2.5 1.0-4.0 (3/32) (1/16-3/16) ...


