Software Users Manual - English
Page 12
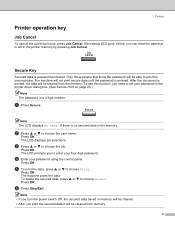
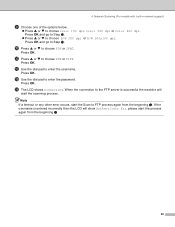
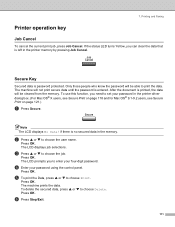
...c Press a or b to choose Delete. The LCD prompts you need to print the secured data. a Press Secure. b Press a or b to enter your four-digit password. To use this function, you to choose the user name. f Press Stop/Exit. Note • If you turn the power switch Off, the secured data...from memory. 6 Press OK. Press OK. If the status LED turns Yellow, you print the secured data it will not print secure data until the password is password protected. Press OK. After the document is left in the memory. e To print the data, press a or b to choose Print. Note The LCD...
...c Press a or b to choose Delete. The LCD prompts you need to print the secured data. a Press Secure. b Press a or b to enter your four-digit password. To use this function, you to choose the user name. f Press Stop/Exit. Note • If you turn the power switch Off, the secured data...from memory. 6 Press OK. Press OK. If the status LED turns Yellow, you print the secured data it will not print secure data until the password is password protected. Press OK. After the document is left in the memory. e To print the data, press a or b to choose Print. Note The LCD...
Software Users Manual - English
Page 31
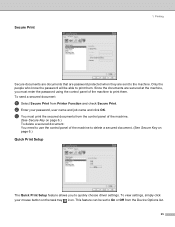
... name and job name and click OK. Printing 1 Secure documents are documents that are password protected when they are secured at the machine, you to print them . b Enter your mouse button on page 6.) Quick Print Setup 1 The Quick Print Setup ... documents are sent to print them . To send a secured document: a Select Secure Print from the Device Options list. 25 Only the people who know the password will be set to delete a secured document. (See Secure Key on the task tray icon. c You must enter the...
... name and job name and click OK. Printing 1 Secure documents are documents that are password protected when they are secured at the machine, you to print them . b Enter your mouse button on page 6.) Quick Print Setup 1 The Quick Print Setup ... documents are sent to print them . To send a secured document: a Select Secure Print from the Device Options list. 25 Only the people who know the password will be set to delete a secured document. (See Secure Key on the task tray icon. c You must enter the...
Software Users Manual - English
Page 32
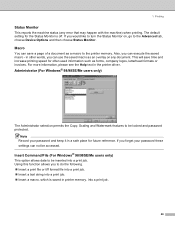
...Me users only) 1 This option allows data to the printer memory. Also, you forget your password and keep it in printer memory, into a print job. 26 If you can not be locked and password protected. Macro 1 You can use the saved macro as a macro to be inserted into a...„ Insert a print file or tiff format file into a print job. „ Insert a text string into a print job. 1. Note Record your password these settings can execute the saved macro - Using this function allows you can save time and increase printing speed for the Status Monitor is saved...
...Me users only) 1 This option allows data to the printer memory. Also, you forget your password and keep it in printer memory, into a print job. 26 If you can not be locked and password protected. Macro 1 You can use the saved macro as a macro to be inserted into a...„ Insert a print file or tiff format file into a print job. „ Insert a text string into a print job. 1. Note Record your password these settings can execute the saved macro - Using this function allows you can save time and increase printing speed for the Status Monitor is saved...
Software Users Manual - English
Page 92
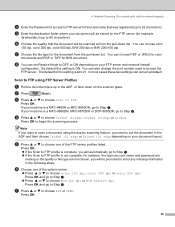
... scanned at default. Note If you need to put the document in network support) d Enter the Password for access to Step d. Press OK and go to Step k. „ If the Scan to FTP...built-in the ADF and then choose 2sided (L) edge or 2sided (S) edge depending on the FTP server (for example /brother/abc/) (up to access the FTP server. If your document layout. e Press a or b to 32 characters). ...to scan a document using FTP Server Profiles 4 a Put the document face up to choose one of the FTP server profiles listed. You can choose PDF or JPEG for color documents and ...
... scanned at default. Note If you need to put the document in network support) d Enter the Password for access to Step d. Press OK and go to Step k. „ If the Scan to FTP...built-in the ADF and then choose 2sided (L) edge or 2sided (S) edge depending on the FTP server (for example /brother/abc/) (up to access the FTP server. If your document layout. e Press a or b to 32 characters). ...to scan a document using FTP Server Profiles 4 a Put the document face up to choose one of the FTP server profiles listed. You can choose PDF or JPEG for color documents and ...

Software Users Manual - English
Page 93
... Note If there is successful the machine will start the scanning process. Press OK. g Use the dial pad to enter the destination folder (for example /brother/abc/, up to Step f. If you choose Change Quality, go to Step d. Scan to Step i. 87 f Use the dial pad to enter the ... scanning feature, you choose Enter Username, go to Step e. d Press a or b to put the document in network support) h Press a or b to enter the password. Press OK. Press OK. Press OK. i Use the dial pad to Step l. Press OK. If you need to choose 2sided (L)edge, 2sided (S)edge or 1sided...
... Note If there is successful the machine will start the scanning process. Press OK. g Use the dial pad to enter the destination folder (for example /brother/abc/, up to Step f. If you choose Change Quality, go to Step d. Scan to Step i. 87 f Use the dial pad to enter the ... scanning feature, you choose Enter Username, go to Step e. d Press a or b to put the document in network support) h Press a or b to enter the password. Press OK. Press OK. Press OK. i Use the dial pad to Step l. Press OK. If you need to choose 2sided (L)edge, 2sided (S)edge or 1sided...
Software Users Manual - English
Page 94
... successful the machine will show Authenticate Err, please start the process again from the beginning a. Network Scanning (For models with built-in network support) i Choose one of the options below. „ Press a or b to enter the username. Press OK. l Use the dial pad to choose color 150 dpi, color 300 dpi... Step j. „ Press a or b to choose PDF or TIFF. k Press a or b to choose B/W 200 dpi or B/W 200x100 dpi. Press OK and go to enter the password. j Press a or b to FTP process again from the beginning a. 88 Press OK. Press OK. 4.
... successful the machine will show Authenticate Err, please start the process again from the beginning a. Network Scanning (For models with built-in network support) i Choose one of the options below. „ Press a or b to enter the username. Press OK. l Use the dial pad to choose color 150 dpi, color 300 dpi... Step j. „ Press a or b to choose PDF or TIFF. k Press a or b to choose B/W 200 dpi or B/W 200x100 dpi. Press OK and go to enter the password. j Press a or b to FTP process again from the beginning a. 88 Press OK. Press OK. 4.
Software Users Manual - English
Page 95
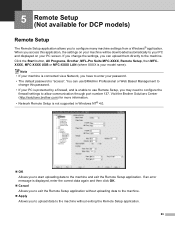
Note • If your password. • The default password is unable to use Remote Setup, you may need to configure the firewall settings to configure many machine settings from a Windows® application. Visit the Brother Solutions Center (http://solutions.brother.com) for DCP models) 5 Remote Setup 5 The Remote... enter your machine is connected via a Network, you have to the machine and exit the Remote Setup application. When you access this password. • If your model name). If you change the settings, you to upload data to the machine without uploading data to the...
Note • If your password. • The default password is unable to use Remote Setup, you may need to configure the firewall settings to configure many machine settings from a Windows® application. Visit the Brother Solutions Center (http://solutions.brother.com) for DCP models) 5 Remote Setup 5 The Remote... enter your machine is connected via a Network, you have to the machine and exit the Remote Setup application. When you access this password. • If your model name). If you change the settings, you to upload data to the machine without uploading data to the...
Software Users Manual - English
Page 117
...to choose Delete. f Press Stop/Exit. 111 If the status LED turns Yellow, you can clear the data that is password protected. The machine will not print secure data until the password is no secured data in the printer driver dialog box. (For Mac OS® X users, see Secure Print on page... b to choose the job. e To print the Data, press a or b to choose the user name. d Enter your password in the memory. b Press a or b to choose Print. Only those people who know the password will be able to print the data. Note The LCD displays No Data! To use this function, you...
...to choose Delete. f Press Stop/Exit. 111 If the status LED turns Yellow, you can clear the data that is password protected. The machine will not print secure data until the password is no secured data in the printer driver dialog box. (For Mac OS® X users, see Secure Print on page... b to choose the job. e To print the Data, press a or b to choose the user name. d Enter your password in the memory. b Press a or b to choose Print. Only those people who know the password will be able to print the data. Note The LCD displays No Data! To use this function, you...

Software Users Manual - English
Page 124
Printing and Faxing Secure Print 7 Secure documents are documents that are password protected when they are secured at the machine, you must print the secured document from the control panel of the machine. (See Secure Key on ... the control panel of the machine to delete a secured document. (See Secure Key on page 111.) 118 b Enter your password, user name and job name and click Print. c You must enter the password using the control panel of the machine to print them . a Choose Secure Print and check Secure Print. Only the...
Printing and Faxing Secure Print 7 Secure documents are documents that are password protected when they are secured at the machine, you must print the secured document from the control panel of the machine. (See Secure Key on ... the control panel of the machine to delete a secured document. (See Secure Key on page 111.) 118 b Enter your password, user name and job name and click Print. c You must enter the password using the control panel of the machine to print them . a Choose Secure Print and check Secure Print. Only the...

Software Users Manual - English
Page 127
... document: a From the Output pull-down menu, choose Secure Print and then click Print. Printing and Faxing Secure Print 7 Secure documents are documents that are password protected when they are secured at the machine, you must print the secured documents from the control panel of the machine. (See Secure Key on... the machine to start. Secure Print dialog box will be able to delete a secured document. (See Secure Key on page 111.) 121 c You must enter a password at the control panel of the machine to print them . 7. Only the people who know the...
... document: a From the Output pull-down menu, choose Secure Print and then click Print. Printing and Faxing Secure Print 7 Secure documents are documents that are password protected when they are secured at the machine, you must print the secured documents from the control panel of the machine. (See Secure Key on... the machine to start. Secure Print dialog box will be able to delete a secured document. (See Secure Key on page 111.) 121 c You must enter a password at the control panel of the machine to print them . 7. Only the people who know the...

Software Users Manual - English
Page 178
... firewall configuration. Press OK to FTP. Press OK. „ If the Scan to FTP profile is port 21. d Enter the Password for access to FTP server for example /brother/abc/) (up to 32 characters). Scan to FTP using the duplex scanning feature, you want to scan a document using FTP Server ... folder where your machine is ON. e Press a or b to access the FTP server. You can also change the port number used to choose one of the FTP server profiles listed. Note If you need to Step e. Press OK. 172 If your document will automatically go to put the document...
... firewall configuration. Press OK to FTP. Press OK. „ If the Scan to FTP profile is port 21. d Enter the Password for access to FTP server for example /brother/abc/) (up to 32 characters). Scan to FTP using the duplex scanning feature, you want to scan a document using FTP Server ... folder where your machine is ON. e Press a or b to access the FTP server. You can also change the port number used to choose one of the FTP server profiles listed. Note If you need to Step e. Press OK. 172 If your document will automatically go to put the document...

Software Users Manual - English
Page 179
... put the document in the ADF, or face down on your machine is successful the machine will start the scanning process. Scan to enter the password. b Press (Scan). e Press a or b to choose 2sided (L)edge, 2sided (S)edge or 1sided. Press OK. d Press a or b to choose Manual. If you choose ...a MFC-8860DN, MFC-8870DW or DCP-8065DN, go to Step l. Press OK. g Use the dial pad to enter the destination folder (for example /brother/abc/, up in the ADF and then choose 2sided (L) edge or 2sided (S) edge depending on the scanner glass. Note If you want to scan a ...
... put the document in the ADF, or face down on your machine is successful the machine will start the scanning process. Scan to enter the password. b Press (Scan). e Press a or b to choose 2sided (L)edge, 2sided (S)edge or 1sided. Press OK. d Press a or b to choose Manual. If you choose ...a MFC-8860DN, MFC-8870DW or DCP-8065DN, go to Step l. Press OK. g Use the dial pad to enter the destination folder (for example /brother/abc/, up in the ADF and then choose 2sided (L) edge or 2sided (S) edge depending on the scanner glass. Note If you want to scan a ...

Software Users Manual - English
Page 180
... OK and go to j. „ Press a or b to FTP process again from the beginning a. 174 Press OK. Press OK. k Press a or b to enter the password. m Use the dial pad to choose PDF or TIFF. 10. l Use the dial pad to choose color 150 dpi, color 300 dpi or color 600.... If the user name is successful the machine will show Authenticate Err, please start the scanning process. Network Scanning (Not available for DCP-8060) i Choose one of the options below. „ Press a or b to enter the username. Press OK. j Press a or b to the FTP server is entered incorrectly then...
... OK and go to j. „ Press a or b to FTP process again from the beginning a. 174 Press OK. Press OK. k Press a or b to enter the password. m Use the dial pad to choose PDF or TIFF. 10. l Use the dial pad to choose color 150 dpi, color 300 dpi or color 600.... If the user name is successful the machine will show Authenticate Err, please start the scanning process. Network Scanning (Not available for DCP-8060) i Choose one of the options below. „ Press a or b to enter the username. Press OK. j Press a or b to the FTP server is entered incorrectly then...

Software Users Manual - English
Page 181
You cannot print the data until it is connected via a Network, you have to enter your password. „ OK Allows you access this application, the settings on your machine will be downloaded automatically to print the chosen items on your Macintosh® ... and exit the Remote Setup application. When you to start uploading data to the machine. If an error message is in Macintosh HD/Library/Printers/Brother/Utilities. Click Apply to upload the new data to the machine and then click Print. „ Export Allows you can upload them directly to a file...
You cannot print the data until it is connected via a Network, you have to enter your password. „ OK Allows you access this application, the settings on your machine will be downloaded automatically to print the chosen items on your Macintosh® ... and exit the Remote Setup application. When you to start uploading data to the machine. If an error message is in Macintosh HD/Library/Printers/Brother/Utilities. Click Apply to upload the new data to the machine and then click Print. „ Export Allows you can upload them directly to a file...

Users Manual - English
Page 22
... the stored number in the dialing memory and LDAP server* (*MFC-8860DN and MFC-8870DW only). Search/Speed Dial Lets you enter your four-digit password. (For details about using Secure Function Lock, you can switch restricted users by pressing Shift and Search/Speed Dial simultaneously and then the three-digit...
... the stored number in the dialing memory and LDAP server* (*MFC-8860DN and MFC-8870DW only). Search/Speed Dial Lets you enter your four-digit password. (For details about using Secure Function Lock, you can switch restricted users by pressing Shift and Search/Speed Dial simultaneously and then the three-digit...
Users Manual - English
Page 38
... Passwd: Enter & OK Key b Enter a four-digit number for the new password. f Press Stop/Exit. 24 Press OK. While setting lock is On, it , please call Brother Customer Service. Changing your password when the LCD shows Verify:. Make a careful note of your password. d Press Stop/Exit. Press OK. Press OK. d Enter a four-digit number...
... Passwd: Enter & OK Key b Enter a four-digit number for the new password. f Press Stop/Exit. 24 Press OK. While setting lock is On, it , please call Brother Customer Service. Changing your password when the LCD shows Verify:. Make a careful note of your password. d Press Stop/Exit. Press OK. Press OK. d Enter a four-digit number...

Users Manual - English
Page 39
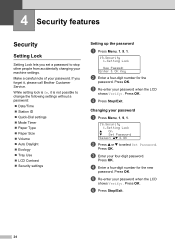
... Stop/Exit. Disabling at least one or more of the machine's... Password. Turning Setting Lock on 4 a Press Menu, 1, 9, 1. 19.Security 1.Setting Lock a On b Set Password Select...password. • Only administrators can set up a Public user, you can restrict one function is on, you can set up to 25 individual users and one Public user. • When you enter the wrong password...password. Security features Turning Setting Lock on/off 4 a Press Menu, 1, 9, 1. 19.Security 1.Setting Lock Password: Enter & OK Key b Enter your four-digit password. Re-enter the correct password...
... Stop/Exit. Disabling at least one or more of the machine's... Password. Turning Setting Lock on 4 a Press Menu, 1, 9, 1. 19.Security 1.Setting Lock a On b Set Password Select...password. • Only administrators can set up a Public user, you can restrict one function is on, you can set up to 25 individual users and one Public user. • When you enter the wrong password...password. Security features Turning Setting Lock on/off 4 a Press Menu, 1, 9, 1. 19.Security 1.Setting Lock Password: Enter & OK Key b Enter your four-digit password. Re-enter the correct password...

Users Manual - English
Page 40
... have set in these steps is used to turn Secure Function Lock on page 27. c Re-enter the password when the LCD shows Verify:. Note You must disable at least one function. Press OK. 19.Security Setup User a Public b User01 Select ab & OK d Press a or b to select Setup User. Press OK.... c Enter the administrator password. Press OK. See Setting up restricted users on page 27 and Turning Secure Function ...
... have set in these steps is used to turn Secure Function Lock on page 27. c Re-enter the password when the LCD shows Verify:. Note You must disable at least one function. Press OK. 19.Security Setup User a Public b User01 Select ab & OK d Press a or b to select Setup User. Press OK.... c Enter the administrator password. Press OK. See Setting up restricted users on page 27 and Turning Secure Function ...

Users Manual - English
Page 41
...g Press a or b to select Lock OffiOn. c Enter the administrator password. Press OK. Re-enter the correct password. Press OK. Turning Secure Function Lock on 4 a Press Menu, 1, 9, 2. 19.Security 2.Function Lock 4 a Lock OffiOn b Set Password Select ab & OK b Press a or b to select Enable or ... Select ab & OK b Press a or b to select Setup User. After you enter the wrong password when following the instructions below, the LCD will show Wrong password. Security features Setting up restricted users 4 You can set Fax Tx, repeat this step for Fax Rx...
...g Press a or b to select Lock OffiOn. c Enter the administrator password. Press OK. Re-enter the correct password. Press OK. Turning Secure Function Lock on 4 a Press Menu, 1, 9, 2. 19.Security 2.Function Lock 4 a Lock OffiOn b Set Password Select ab & OK b Press a or b to select Enable or ... Select ab & OK b Press a or b to select Setup User. After you enter the wrong password when following the instructions below, the LCD will show Wrong password. Security features Setting up restricted users 4 You can set Fax Tx, repeat this step for Fax Rx...

Users Manual - English
Page 42
... a or b to select the registered name of the user to log on the machine when Secure Function Lock is turned on. c Enter your four-digit password. Also, you press Secure. Chapter 4 Switching Users 4 This setting allows a restricted user to be logged on. Press OK. a Hold down Shift as the Mode Timer...
... a or b to select the registered name of the user to log on the machine when Secure Function Lock is turned on. c Enter your four-digit password. Also, you press Secure. Chapter 4 Switching Users 4 This setting allows a restricted user to be logged on. Press OK. a Hold down Shift as the Mode Timer...


