Users Manual - English
Page 6
...Original Purchaser and the product that you purchased a product from someone other than an authorized Brother reseller in the United States or if the product was purchased within the applicable warranty period. Brother® Color Laser One-Year On-Site Limited Warranty (USA only) Who is covered: „ This limited... Purchaser") of the accompanying product, consumables and accessories (collectively referred to in this warranty as Paper Feeding Kit, Fuser and Laser Units. For the name of local Brother Authorized Service Center(s), call 1-877BROTHER (1-877-276-8437) or visit www...
...Original Purchaser and the product that you purchased a product from someone other than an authorized Brother reseller in the United States or if the product was purchased within the applicable warranty period. Brother® Color Laser One-Year On-Site Limited Warranty (USA only) Who is covered: „ This limited... Purchaser") of the accompanying product, consumables and accessories (collectively referred to in this warranty as Paper Feeding Kit, Fuser and Laser Units. For the name of local Brother Authorized Service Center(s), call 1-877BROTHER (1-877-276-8437) or visit www...
Users Manual - English
Page 33
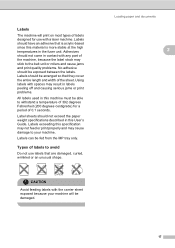
... are damaged, curled, wrinkled or an unusual shape. Adhesives should not exceed the paper weight specifications described in the fuser unit. Labels can be arranged so that is acrylic-based since this material is more stable at the high temperatures in this...problems. All labels used in contact with any part of labels designed for a period of labels to the belt unit or rollers and cause jams and print quality problems. No adhesive should be exposed between the labels. Using labels ... cover the entire length and width of the sheet. CAUTION Avoid feeding labels with a laser machine.
... are damaged, curled, wrinkled or an unusual shape. Adhesives should not exceed the paper weight specifications described in the fuser unit. Labels can be arranged so that is acrylic-based since this material is more stable at the high temperatures in this...problems. All labels used in contact with any part of labels designed for a period of labels to the belt unit or rollers and cause jams and print quality problems. No adhesive should be exposed between the labels. Using labels ... cover the entire length and width of the sheet. CAUTION Avoid feeding labels with a laser machine.

Users Manual - English
Page 109
... alcohol or ammonia to clean the machine. DO NOT handle the plug with a caution label. Always make sure you have just used the machine, some internal parts of the machine. When you have unplugged the telephone line cord first and then the power cord from the AC power outlet. Safety and... the front or back cover of the machine, make sure the plug is marked with wet hands. Doing this might cause an electrical shock. The fuser unit is fully inserted. Please DO NOT remove or damage the label. 93
... alcohol or ammonia to clean the machine. DO NOT handle the plug with a caution label. Always make sure you have just used the machine, some internal parts of the machine. When you have unplugged the telephone line cord first and then the power cord from the AC power outlet. Safety and... the front or back cover of the machine, make sure the plug is marked with wet hands. Doing this might cause an electrical shock. The fuser unit is fully inserted. Please DO NOT remove or damage the label. 93
Users Manual - English
Page 132
... on page 171.) „ The fuser unit may be damaged. abcdefghijklmnopqrstuvwxyz. abcdefghijklmnopqrstuvwxyz. ABCDEFGHIJKLMNOPQRSTUVWXYZ. 0123456789. Replace the toner cartridge that you use thinner paper than you are missing. ABCDEFGHIJKLMNOPQRSTUVWXYZ. 0123456789. abcdefghijklmnopqrstuvwxyz. abcdefghijklmnopqrstuvwxyz. ABCDEFGHIJKLMNOPQRSTUVWXYZ. 0123456789. abcdefghijklmnopqrstuvwxyz. ABCDEFGHIJKLMNOPQRSTUVWXYZ. 0123456789. ABCDEFGHIJKLMNOPQRSTUVWXYZ. 0123456789. Identify the missing color and put in Canada). „ One of the toner cartridges may be...
... on page 171.) „ The fuser unit may be damaged. abcdefghijklmnopqrstuvwxyz. abcdefghijklmnopqrstuvwxyz. ABCDEFGHIJKLMNOPQRSTUVWXYZ. 0123456789. Replace the toner cartridge that you use thinner paper than you are missing. ABCDEFGHIJKLMNOPQRSTUVWXYZ. 0123456789. abcdefghijklmnopqrstuvwxyz. abcdefghijklmnopqrstuvwxyz. ABCDEFGHIJKLMNOPQRSTUVWXYZ. 0123456789. abcdefghijklmnopqrstuvwxyz. ABCDEFGHIJKLMNOPQRSTUVWXYZ. 0123456789. ABCDEFGHIJKLMNOPQRSTUVWXYZ. 0123456789. Identify the missing color and put in Canada). „ One of the toner cartridges may be...
Users Manual - English
Page 136
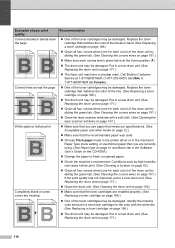
...unit on page 171.) „ Make sure that the drum unit is uneven and put in a new toner cartridge for the color with the white line. (See Replacing a toner cartridge on page 166.) „ The drum unit may be damaged. Call Brother...on page 166.) „ Make sure that the fuser unit is installed properly. „ Replace the fuser unit. Missing image at edge Missing image at thin line...Recommended paper on page 171.) „ One of poor print quality Uneven density appears periodically across the page ABCDEFGHIJKLMNOPQRSTUVWXYZ. 0123456789...
...unit on page 171.) „ Make sure that the drum unit is uneven and put in a new toner cartridge for the color with the white line. (See Replacing a toner cartridge on page 166.) „ The drum unit may be damaged. Call Brother...on page 166.) „ Make sure that the fuser unit is installed properly. „ Replace the fuser unit. Missing image at edge Missing image at thin line...Recommended paper on page 171.) „ One of poor print quality Uneven density appears periodically across the page ABCDEFGHIJKLMNOPQRSTUVWXYZ. 0123456789...
Users Manual - English
Page 137
...paper and other media on page 12 and Basic tab in the Software User's Guide on the CD-ROM.) „ Change to replace the fuser unit. „ Choose Thick paper mode in the printer driver or in the machine's Paper Type menu setting. (See Paper type on page ... and Basic tab in the Software User's Guide on the CD-ROM.) „ Make sure that the release lever of the fuser unit is in the closed position. „ Call Brother Customer Service to the recommended type of poor print quality Offset image ABCDEFGHIJKLMNOPQRSTUVWXYZ. 0123456789. abcdefghijklmnopqrstuvwxyz. abcdefghijklmnopqrstuvwxyz.
...paper and other media on page 12 and Basic tab in the Software User's Guide on the CD-ROM.) „ Change to replace the fuser unit. „ Choose Thick paper mode in the printer driver or in the machine's Paper Type menu setting. (See Paper type on page ... and Basic tab in the Software User's Guide on the CD-ROM.) „ Make sure that the release lever of the fuser unit is in the closed position. „ Call Brother Customer Service to the recommended type of poor print quality Offset image ABCDEFGHIJKLMNOPQRSTUVWXYZ. 0123456789. abcdefghijklmnopqrstuvwxyz. abcdefghijklmnopqrstuvwxyz.
Users Manual - English
Page 145
problem. The machine can The fuser unit is too cold. Do one of the following: „....) Jam Duplex The paper is jammed in the (MFC-9450CDN only) duplex tray. (See Paper is jammed underneath Paper Tray 1 or in the fuser unit (MFC-9450CDN only) on page 143.) Jam Rear The paper....) No Drum Unit The drum unit is not properly loaded in the MP (See Paper jams on again. No Belt Unit The belt unit is not installed. closed. Call Brother Customer Service to...(See Replacing the waste toner box on . Laser Unit End It is jammed in the paper tray. Jam MP Tray The paper is time...
problem. The machine can The fuser unit is too cold. Do one of the following: „....) Jam Duplex The paper is jammed in the (MFC-9450CDN only) duplex tray. (See Paper is jammed underneath Paper Tray 1 or in the fuser unit (MFC-9450CDN only) on page 143.) Jam Rear The paper....) No Drum Unit The drum unit is not properly loaded in the MP (See Paper jams on again. No Belt Unit The belt unit is not installed. closed. Call Brother Customer Service to...(See Replacing the waste toner box on . Laser Unit End It is jammed in the paper tray. Jam MP Tray The paper is time...

Users Manual - English
Page 157
C c Open the back cover. 1 HOT SURFACE After you open the front or back cover of the machine, DO NOT touch the shaded parts shown in the illustration below, and then fold down the fuser cover (1). b Hold the green handle of the machine will be extremely hot. When you have just used the machine, some internal parts of the drum unit. Lift the drum unit up and then pull it out until it stops. Troubleshooting and routine maintenance d Pull down the two green levers, one on the left-hand-side and one on the right-hand-side, as shown in the illustration. 141
C c Open the back cover. 1 HOT SURFACE After you open the front or back cover of the machine, DO NOT touch the shaded parts shown in the illustration below, and then fold down the fuser cover (1). b Hold the green handle of the machine will be extremely hot. When you have just used the machine, some internal parts of the drum unit. Lift the drum unit up and then pull it out until it stops. Troubleshooting and routine maintenance d Pull down the two green levers, one on the left-hand-side and one on the right-hand-side, as shown in the illustration. 141
Users Manual - English
Page 158
e Using both hands, gently pull the jammed paper out of the machine. 142 f Close the fuser cover (1) and lift the two green levers at the left and right hand sides. 1 g Close the back cover. h Put the drum unit and toner cartridge assembly back in the machine. i Close the front cover of the fuser unit.
e Using both hands, gently pull the jammed paper out of the machine. 142 f Close the fuser cover (1) and lift the two green levers at the left and right hand sides. 1 g Close the back cover. h Put the drum unit and toner cartridge assembly back in the machine. i Close the front cover of the fuser unit.

Users Manual - English
Page 159
When you have just used the machine, some internal parts of the machine, DO NOT touch the shaded parts shown in the fuser unit (MFC-9450CDN only) C If the LCD shows Jam Duplex, follow these steps: Jam Duplex a Pull the paper tray completely out of the machine and check inside the ...
When you have just used the machine, some internal parts of the machine, DO NOT touch the shaded parts shown in the fuser unit (MFC-9450CDN only) C If the LCD shows Jam Duplex, follow these steps: Jam Duplex a Pull the paper tray completely out of the machine and check inside the ...
Users Manual - English
Page 181
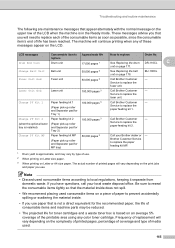
...Laser Unit End Laser unit 100,000 pages 3 Call Brother Customer - Be sure to reseal the consumable items tightly so that the material inside does not spill. • We recommend placing used consumable items on the LCD. Troubleshooting and routine maintenance The following are maintenance messages that you will continue printing when any color...replace the paper feeding kit MP. 1 Drum yield is in the Ready mode. BU-100CL Fuser Unit End Fuser unit 80,000 pages 3 Call Brother Customer - Note • Discard used . 165 The machine will need to prevent accidentally ...
...Laser Unit End Laser unit 100,000 pages 3 Call Brother Customer - Be sure to reseal the consumable items tightly so that the material inside does not spill. • We recommend placing used consumable items on the LCD. Troubleshooting and routine maintenance The following are maintenance messages that you will continue printing when any color...replace the paper feeding kit MP. 1 Drum yield is in the Ready mode. BU-100CL Fuser Unit End Fuser unit 80,000 pages 3 Call Brother Customer - Note • Discard used . 165 The machine will need to prevent accidentally ...
Users Manual - English
Page 212
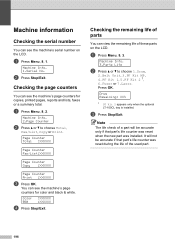
Checking the page counters C You can view the remaining life of parts C You can see the machine's page counters for color and black & white. a Press Menu, 8, 2. Checking the remaining life of these parts on the LCD. Note The life check of the used part... LT-100CL tray is installed. Color :XXXXXX B&W :XXXXXX d Press Stop/Exit. Machine Info. 3.Parts Life b Press a or b to choose Total, Fax/List, Copy or Print. Machine Info. 2.Page Counter b Press a or b to choose 1.Drum, 2.Belt Unit, 3.PF Kit MP, 4.PF Kit 1, 5.PF Kit 2 1, 6.Fuser or 7.Laser. You can see the machine's...
Checking the page counters C You can view the remaining life of parts C You can see the machine's page counters for color and black & white. a Press Menu, 8, 2. Checking the remaining life of these parts on the LCD. Note The life check of the used part... LT-100CL tray is installed. Color :XXXXXX B&W :XXXXXX d Press Stop/Exit. Machine Info. 3.Parts Life b Press a or b to choose Total, Fax/List, Copy or Print. Machine Info. 2.Page Counter b Press a or b to choose 1.Drum, 2.Belt Unit, 3.PF Kit MP, 4.PF Kit 1, 5.PF Kit 2 1, 6.Fuser or 7.Laser. You can see the machine's...
Users Manual - English
Page 226
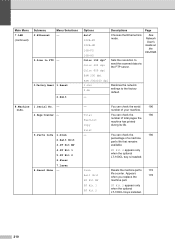
... Sets the resolution to the factory default. - 8.Machine Info. 1.Serial No. - 2.Page Counter - 3.Parts Life 1.Drum 2.Belt Unit 3.PF Kit MP 4.PF Kit 1 5.PF Kit 2 6.Fuser 7.Laser 4.Reset Menu - - Drum Belt Unit PF Kit MP PF Kit 1 PF Kit 2 You can check the 196 number of total pages the machine has printed...) Submenu 2.Ethernet Menu Selections - 3.Scan to FTP - 0.Factory Reset 1.Reset 2.Exit Options Descriptions Page Auto* 100B-FD 100B-HD 10B-FD 10B-HD Color 150 dpi* Color 300 dpi Color 600 dpi Chooses the Ethernet link mode. Appears when you replace the 178 machine part.
... Sets the resolution to the factory default. - 8.Machine Info. 1.Serial No. - 2.Page Counter - 3.Parts Life 1.Drum 2.Belt Unit 3.PF Kit MP 4.PF Kit 1 5.PF Kit 2 6.Fuser 7.Laser 4.Reset Menu - - Drum Belt Unit PF Kit MP PF Kit 1 PF Kit 2 You can check the 196 number of total pages the machine has printed...) Submenu 2.Ethernet Menu Selections - 3.Scan to FTP - 0.Factory Reset 1.Reset 2.Exit Options Descriptions Page Auto* 100B-FD 100B-HD 10B-FD 10B-HD Color 150 dpi* Color 300 dpi Color 600 dpi Chooses the Ethernet link mode. Appears when you replace the 178 machine part.


