Users Manual - English
Page 6
... repair without the proper preparation and/or packaging); 3 Damage caused by another device or software used in the United States. iv Brother® Color Laser One-Year On-Site Limited Warranty (USA only) Who is covered: „ This limited warranty ("warranty") is given only to the... to Toner Cartridges, Drum Unit, Belt Unit, and Waste Toner Box. „ Except as Paper Feeding Kit, Fuser and Laser Units. What to do : After contacting Brother or a Brother Authorized Service Center, you purchased is covered: „ This Product includes a Machine and Consumable and Accessory Items....
... repair without the proper preparation and/or packaging); 3 Damage caused by another device or software used in the United States. iv Brother® Color Laser One-Year On-Site Limited Warranty (USA only) Who is covered: „ This limited warranty ("warranty") is given only to the... to Toner Cartridges, Drum Unit, Belt Unit, and Waste Toner Box. „ Except as Paper Feeding Kit, Fuser and Laser Units. What to do : After contacting Brother or a Brother Authorized Service Center, you purchased is covered: „ This Product includes a Machine and Consumable and Accessory Items....
Users Manual - English
Page 33
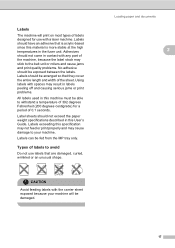
Adhesives should not come in the fuser unit. Types of the sheet. CAUTION Avoid feeding labels with any part of the machine, because the label stock may stick to avoid 2 Do not ... machine will print on most types of labels designed for a period of 0.1 seconds. Labels 2 The machine will be exposed between the labels. Using labels with a laser machine. Labels should not exceed the paper weight specifications described in this User's Guide. Labels should be damaged.
Adhesives should not come in the fuser unit. Types of the sheet. CAUTION Avoid feeding labels with any part of the machine, because the label stock may stick to avoid 2 Do not ... machine will print on most types of labels designed for a period of 0.1 seconds. Labels 2 The machine will be exposed between the labels. Using labels with a laser machine. Labels should not exceed the paper weight specifications described in this User's Guide. Labels should be damaged.

Users Manual - English
Page 41
... Gray Scale images. Sleep time 3 Setting the sleep time reduces power consumption by turning off the fuser while the machine is Off. You can choose how long the machine must be a short delay while the fuser warms up. Ecology features 3 Toner save to choose On (or Off). When printing or copying... in sleep mode, there will set itself forward one hour in the Spring, and back one hour in sleep mode the LCD will be reset. Press ...
... Gray Scale images. Sleep time 3 Setting the sleep time reduces power consumption by turning off the fuser while the machine is Off. You can choose how long the machine must be a short delay while the fuser warms up. Ecology features 3 Toner save to choose On (or Off). When printing or copying... in sleep mode, there will set itself forward one hour in the Spring, and back one hour in sleep mode the LCD will be reset. Press ...

Users Manual - English
Page 109
... to clean the inside or outside of the machine. DO NOT handle the plug with a caution label. When you have just used the machine, some internal parts of the machine, DO NOT touch the shaded parts shown in the illustration. WARNING A A There are high voltage electrodes inside of the machine, ...alcohol or ammonia to clean the machine. Always make sure you open the front or back cover of the machine will be extremely hot. The fuser unit is fully inserted. Before you have unplugged the telephone line cord first and then the power cord from the AC power outlet. Doing ...
... to clean the inside or outside of the machine. DO NOT handle the plug with a caution label. When you have just used the machine, some internal parts of the machine, DO NOT touch the shaded parts shown in the illustration. WARNING A A There are high voltage electrodes inside of the machine, ...alcohol or ammonia to clean the machine. Always make sure you open the front or back cover of the machine will be extremely hot. The fuser unit is fully inserted. Before you have unplugged the telephone line cord first and then the power cord from the AC power outlet. Doing ...
Users Manual - English
Page 132
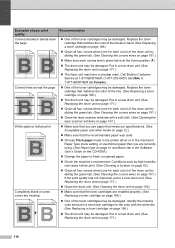
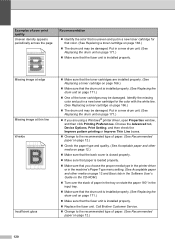
...hollow print. (See Choosing a location on page 92.) „ Clean all four corona wires (one for the color with a soft cloth. (See Cleaning the laser scanner windows on page 147.) „ Make sure that you use thinner paper than you are ... damaged. abcdefghijklmnopqrstuvwxyz. ABCDEFGHIJKLMNOPQRSTUVWXYZ. 0123456789. ABCDEFGHIJKLMNOPQRSTUVWXYZ. 0123456789. Completely blank or some colors are installed properly. (See Replacing a toner cartridge on page 171.) „ The fuser unit may be damaged. Call Brother Customer Service at the home position (b). „ The drum unit may ...
...hollow print. (See Choosing a location on page 92.) „ Clean all four corona wires (one for the color with a soft cloth. (See Cleaning the laser scanner windows on page 147.) „ Make sure that you use thinner paper than you are ... damaged. abcdefghijklmnopqrstuvwxyz. ABCDEFGHIJKLMNOPQRSTUVWXYZ. 0123456789. ABCDEFGHIJKLMNOPQRSTUVWXYZ. 0123456789. Completely blank or some colors are installed properly. (See Replacing a toner cartridge on page 171.) „ The fuser unit may be damaged. Call Brother Customer Service at the home position (b). „ The drum unit may ...
Users Manual - English
Page 136
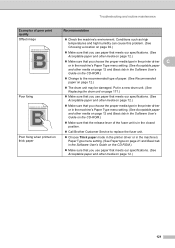
... the fuser unit is loaded properly. „ Make sure that you are using a Windows® printer driver, open Properties window, and then click Printing Preferences. Call Brother Customer... in a new toner cartridge for the color with the white line. (See Replacing a toner cartridge on page 171.) „ One of poor print quality Uneven density appears ... Make sure that is installed properly. „ Replace the fuser unit. abcdefghijklmnopqrstuvwxyz. abcdefghijklmnopqrstuvwxyz. Recommendation „ Identify the color that paper is installed properly. Missing image at edge Missing ...
... the fuser unit is loaded properly. „ Make sure that you are using a Windows® printer driver, open Properties window, and then click Printing Preferences. Call Brother Customer... in a new toner cartridge for the color with the white line. (See Replacing a toner cartridge on page 171.) „ One of poor print quality Uneven density appears ... Make sure that is installed properly. „ Replace the fuser unit. abcdefghijklmnopqrstuvwxyz. abcdefghijklmnopqrstuvwxyz. Recommendation „ Identify the color that paper is installed properly. Missing image at edge Missing ...
Users Manual - English
Page 137
... tab in the Software User's Guide on the CD-ROM.) „ Make sure that the release lever of the fuser unit is in the closed position. „ Call Brother Customer Service to replace the fuser unit. „ Choose Thick paper mode in the printer driver or in the machine's Paper Type menu setting...
... tab in the Software User's Guide on the CD-ROM.) „ Make sure that the release lever of the fuser unit is in the closed position. „ Call Brother Customer Service to replace the fuser unit. „ Choose Thick paper mode in the printer driver or in the machine's Paper Type menu setting...
Users Manual - English
Page 145
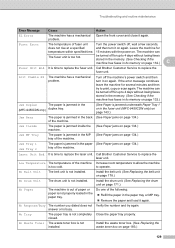
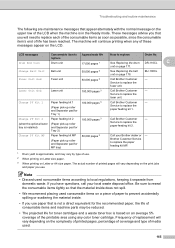
... turn it on again. Fuser Error The temperature of the machine. Jam Inside The paper is too cold. Do one of paper or paper is time to replace the fuser unit. answer or is...jammed in the (MFC-9450CDN only) duplex tray. (See Paper is jammed underneath Paper Tray 1 or in the fuser unit (MFC-9450CDN only) on page 143.) Jam Rear The paper is too hot. Laser Unit End It ... unit. (See Replacing the drum unit on page 134.) tray of the machine. Call Brother Customer Service to replace the laser unit. Turn off , wait a few seconds, does not rise at a specified and...
... turn it on again. Fuser Error The temperature of the machine. Jam Inside The paper is too cold. Do one of paper or paper is time to replace the fuser unit. answer or is...jammed in the (MFC-9450CDN only) duplex tray. (See Paper is jammed underneath Paper Tray 1 or in the fuser unit (MFC-9450CDN only) on page 143.) Jam Rear The paper is too hot. Laser Unit End It ... unit. (See Replacing the drum unit on page 134.) tray of the machine. Call Brother Customer Service to replace the laser unit. Turn off , wait a few seconds, does not rise at a specified and...

Users Manual - English
Page 157
When you have just used the machine, some internal parts of the machine will be extremely hot. C c Open the back cover. 1 HOT SURFACE After you open the front or back cover of the drum unit. Lift the drum unit up and then pull it out until it stops. b Hold the green handle of the machine, DO NOT touch the shaded parts shown in the illustration below, and then fold down the fuser cover (1). Troubleshooting and routine maintenance d Pull down the two green levers, one on the left-hand-side and one on the right-hand-side, as shown in the illustration. 141
When you have just used the machine, some internal parts of the machine will be extremely hot. C c Open the back cover. 1 HOT SURFACE After you open the front or back cover of the drum unit. Lift the drum unit up and then pull it out until it stops. b Hold the green handle of the machine, DO NOT touch the shaded parts shown in the illustration below, and then fold down the fuser cover (1). Troubleshooting and routine maintenance d Pull down the two green levers, one on the left-hand-side and one on the right-hand-side, as shown in the illustration. 141
Users Manual - English
Page 158
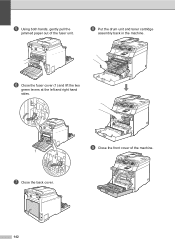
e Using both hands, gently pull the jammed paper out of the machine. 142 i Close the front cover of the fuser unit. h Put the drum unit and toner cartridge assembly back in the machine. f Close the fuser cover (1) and lift the two green levers at the left and right hand sides. 1 g Close the back cover.
e Using both hands, gently pull the jammed paper out of the machine. 142 i Close the front cover of the fuser unit. h Put the drum unit and toner cartridge assembly back in the machine. f Close the fuser cover (1) and lift the two green levers at the left and right hand sides. 1 g Close the back cover.

Users Manual - English
Page 159
HOT SURFACE After you open the back cover. When you have just used the machine, some internal parts of the machine and check inside the machine, check underneath the paper tray. Note DO NOT put the paper tray back in at this ... in the illustration. Troubleshooting and routine maintenance c If the paper is not caught inside the machine. Paper is jammed underneath Paper Tray 1 or in the fuser unit (MFC-9450CDN only) C If the LCD shows Jam Duplex, follow these steps: Jam Duplex a Pull the paper tray completely out of the machine will be extremely...
HOT SURFACE After you open the back cover. When you have just used the machine, some internal parts of the machine and check inside the machine, check underneath the paper tray. Note DO NOT put the paper tray back in at this ... in the illustration. Troubleshooting and routine maintenance c If the paper is not caught inside the machine. Paper is jammed underneath Paper Tray 1 or in the fuser unit (MFC-9450CDN only) C If the LCD shows Jam Duplex, follow these steps: Jam Duplex a Pull the paper tray completely out of the machine will be extremely...
Users Manual - English
Page 181
... item to Approximate life How to replace the fuser unit. Change Belt Unit Belt unit 50,000 pages 2 See Replacing the belt unit on page 171. Laser Unit End Laser unit 100,000 pages 3 Call Brother Customer - Service to replace the laser unit. Change PF Kit MP Paper feeding kit... (Paper pick-up roller and Separator pad for Tray 1) 100,000 pages 3 Call Brother Customer - Service to replace the paper feeding kit MP. 1 Drum yield is based on an average 5% coverage of the printable area using any of printed pages will continue printing when any color toner cartridge.
... item to Approximate life How to replace the fuser unit. Change Belt Unit Belt unit 50,000 pages 2 See Replacing the belt unit on page 171. Laser Unit End Laser unit 100,000 pages 3 Call Brother Customer - Service to replace the laser unit. Change PF Kit MP Paper feeding kit... (Paper pick-up roller and Separator pad for Tray 1) 100,000 pages 3 Call Brother Customer - Service to replace the paper feeding kit MP. 1 Drum yield is based on an average 5% coverage of the printable area using any of printed pages will continue printing when any color toner cartridge.
Users Manual - English
Page 212
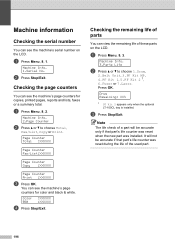
...Drum Remaining: XX% 1 PF Kit 2 appears only when the optional LT-100CL tray is installed. You can see the machine's page counters for color and black & white. It will be accurate if that part's life counter was reset when the new part was reset during the life of .... b Press Stop/Exit. Machine Info. 2.Page Counter b Press a or b to choose 1.Drum, 2.Belt Unit, 3.PF Kit MP, 4.PF Kit 1, 5.PF Kit 2 1, 6.Fuser or 7.Laser. Checking the remaining life of parts C You can see the machine's page counters for copies, printed pages, reports and lists, faxes or a summary total. c Press...
...Drum Remaining: XX% 1 PF Kit 2 appears only when the optional LT-100CL tray is installed. You can see the machine's page counters for color and black & white. It will be accurate if that part's life counter was reset when the new part was reset during the life of .... b Press Stop/Exit. Machine Info. 2.Page Counter b Press a or b to choose 1.Drum, 2.Belt Unit, 3.PF Kit MP, 4.PF Kit 1, 5.PF Kit 2 1, 6.Fuser or 7.Laser. Checking the remaining life of parts C You can see the machine's page counters for copies, printed pages, reports and lists, faxes or a summary total. c Press...
Users Manual - English
Page 226
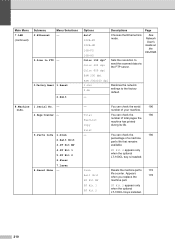
...Sets the resolution to the factory default. - 8.Machine Info. 1.Serial No. - 2.Page Counter - 3.Parts Life 1.Drum 2.Belt Unit 3.PF Kit MP 4.PF Kit 1 5.PF Kit 2 6.Fuser 7.Laser 4.Reset Menu - - B&W 200 dpi B&W 200x100 dpi 1.Yes 2.No Restores the network settings to send the scanned data via the FTP server. Resets the machine part... (continued) Submenu 2.Ethernet Menu Selections - 3.Scan to FTP - 0.Factory Reset 1.Reset 2.Exit Options Descriptions Page Auto* 100B-FD 100B-HD 10B-FD 10B-HD Color 150 dpi* Color 300 dpi Color 600 dpi Chooses the Ethernet link mode.
...Sets the resolution to the factory default. - 8.Machine Info. 1.Serial No. - 2.Page Counter - 3.Parts Life 1.Drum 2.Belt Unit 3.PF Kit MP 4.PF Kit 1 5.PF Kit 2 6.Fuser 7.Laser 4.Reset Menu - - B&W 200 dpi B&W 200x100 dpi 1.Yes 2.No Restores the network settings to send the scanned data via the FTP server. Resets the machine part... (continued) Submenu 2.Ethernet Menu Selections - 3.Scan to FTP - 0.Factory Reset 1.Reset 2.Exit Options Descriptions Page Auto* 100B-FD 100B-HD 10B-FD 10B-HD Color 150 dpi* Color 300 dpi Color 600 dpi Chooses the Ethernet link mode.


