Owners Manual
Page 128
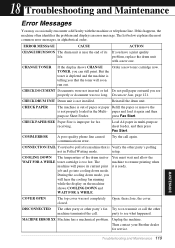
... press Fax Start. Then contact your Brother dealer for fax receiving. Troubleshooting and Maintenance 119 MAINTENANCE The list below explains the most common error messages, in the Multi- CHANGE TONER If the display shows CHANGE Order a new toner cartridge now. CHECK DRUM UNIT Drum unit is too hot. paper and load ... Waiting mode. Document Jam, page 121. closed. setup. 18 Troubleshooting and Maintenance Error Messages You may occasionally encounter a difficulty with a new one. If this happens, the machine often identifies the problem and displays an error message.
... press Fax Start. Then contact your Brother dealer for fax receiving. Troubleshooting and Maintenance 119 MAINTENANCE The list below explains the most common error messages, in the Multi- CHANGE TONER If the display shows CHANGE Order a new toner cartridge now. CHECK DRUM UNIT Drum unit is too hot. paper and load ... Waiting mode. Document Jam, page 121. closed. setup. 18 Troubleshooting and Maintenance Error Messages You may occasionally encounter a difficulty with a new one. If this happens, the machine often identifies the problem and displays an error message.
Owners Manual
Page 129
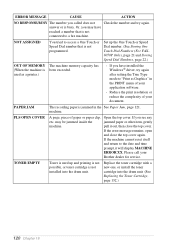
...inside the jammed paper or other item, gently machine. PLS OPEN COVER A page, piece of your Brother dealer for service. If you see any etc. pull it will display MACHINE ERROR XX. Please .... If the error message remains, open and close the top cover. NOT ASSIGNED You tried to access a One Touch or Speed Dial number that is been exceeded. Set up and printing is not possible, or toner cartridge...the top cover. TONER EMPTY Toner is not installed into the drum unit. (See Replacing the Toner Cartridge, page 132.) 120 Chapter 18 Replace the toner cartridge with a new...
...inside the jammed paper or other item, gently machine. PLS OPEN COVER A page, piece of your Brother dealer for service. If you see any etc. pull it will display MACHINE ERROR XX. Please .... If the error message remains, open and close the top cover. NOT ASSIGNED You tried to access a One Touch or Speed Dial number that is been exceeded. Set up and printing is not possible, or toner cartridge...the top cover. TONER EMPTY Toner is not installed into the drum unit. (See Replacing the Toner Cartridge, page 132.) 120 Chapter 18 Replace the toner cartridge with a new...

Owners Manual
Page 131
...-purpose Sheet Feeder I Clearing a Paper Jam in the Multi-purpose Sheet Feeder. Paper is jammed inside the machine. If paper is jammed near the drum unit, open the top cover and check that a torn piece of paper does not remain inside the Multi-purpose Sheet Feeder, push down the paper lever ... upwards out of the machine. Then, pull the jammed paper upwards and out of the feeder. Also, open the top cover and remove the drum unit. I Clearing a Paper Jam near the Drum Unit. If paper is jammed near drum unit 122 Chapter 18 Reinstall the drum unit and close the top cover.
...-purpose Sheet Feeder I Clearing a Paper Jam in the Multi-purpose Sheet Feeder. Paper is jammed inside the machine. If paper is jammed near the drum unit, open the top cover and check that a torn piece of paper does not remain inside the Multi-purpose Sheet Feeder, push down the paper lever ... upwards out of the machine. Then, pull the jammed paper upwards and out of the feeder. Also, open the top cover and remove the drum unit. I Clearing a Paper Jam near the Drum Unit. If paper is jammed near drum unit 122 Chapter 18 Reinstall the drum unit and close the top cover.

Owners Manual
Page 133
... cartridge and drum unit are the first two lines and last two lines, leaves 62 the screen but try again. The machine prints the first couple of a document. The machine cannot print full Reduce the printer resolution. General Printing Difficulties (For MFC-9030 and MFC-9070 Only)... checking the primary settings in your document when I view my document on the phone line. My headers or footers appear Most laser printers have text missing. Transmission verification prints "Results:NG" There is 51). Try sending the fax again. Reduce the complexity of...
... cartridge and drum unit are the first two lines and last two lines, leaves 62 the screen but try again. The machine prints the first couple of a document. The machine cannot print full Reduce the printer resolution. General Printing Difficulties (For MFC-9030 and MFC-9070 Only)... checking the primary settings in your document when I view my document on the phone line. My headers or footers appear Most laser printers have text missing. Transmission verification prints "Results:NG" There is 51). Try sending the fax again. Reduce the complexity of...
Owners Manual
Page 134
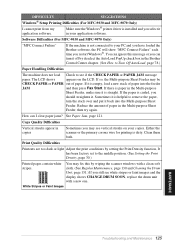
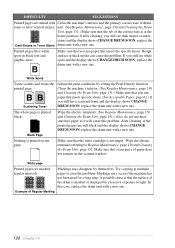
... press Fax Start. Either the scanner or the primary corona wire for printing is empty, load a new stack of paper in the Brother Control Center chapter. (See How to Turn Off AutoLoad, page 78.) Paper Handling Difficulties The machine does not load Check to remove the...(For MFC-9030 and MFC-9070 Only) I clear paper jams? Clean them both. White Stripes or Faint Images MAINTENANCE Troubleshooting and Maintenance 125 If so, the Multi-purpose Sheet Feeder may see white stripes or faint images and the display shows CHANGE DRUM SOON, replace the drum unit with a new one. Make...
... press Fax Start. Either the scanner or the primary corona wire for printing is empty, load a new stack of paper in the Brother Control Center chapter. (See How to Turn Off AutoLoad, page 78.) Paper Handling Difficulties The machine does not load Check to remove the...(For MFC-9030 and MFC-9070 Only) I clear paper jams? Clean them both. White Stripes or Faint Images MAINTENANCE Troubleshooting and Maintenance 125 If so, the Multi-purpose Sheet Feeder may see white stripes or faint images and the display shows CHANGE DRUM SOON, replace the drum unit with a new one. Make...
Owners Manual
Page 135
...Make sure that meets the specifications. If after cleaning, you use heatsensitive paper as it will cause this case, replace the drum unit with a new one . Black Page Nothing is at multiple pages to light. White Spots Toner scatters and stains the printed page. After cleaning... Make sure that the toner cartridge is printed black. Printed pages have scattered toner and the display shows CHANGE DRUM SOON, replace the drum unit with a new one . Scattering Toner Adjust the print conditions by themselves. DIFFICULTY SUGGESTIONS Printed pages are stained with Clean the machine...
...Make sure that meets the specifications. If after cleaning, you use heatsensitive paper as it will cause this case, replace the drum unit with a new one . Black Page Nothing is at multiple pages to light. White Spots Toner scatters and stains the printed page. After cleaning... Make sure that the toner cartridge is printed black. Printed pages have scattered toner and the display shows CHANGE DRUM SOON, replace the drum unit with a new one . Scattering Toner Adjust the print conditions by themselves. DIFFICULTY SUGGESTIONS Printed pages are stained with Clean the machine...

Owners Manual
Page 136
... it is placed on printed page. You may cause this condition to side. Ghost Images The drum unit is a consumable and it periodically. Remove the drum unit with a new one. MAINTENANCE Troubleshooting and Maintenance 127 Blurred Page Ghost images appear on a flat, horizontal surface. SUGGESTIONS... a clean soft cloth. (See Regular Maintenance, page 130 and Cleaning the Drum Unit, page 131.) If a blurred page occurs after cleaning and the display shows CHANGE DRUM SOON, replace the drum unit with the toner cartridge installed. DIFFICULTY Printed pages are blurred at the centre...
... it is placed on printed page. You may cause this condition to side. Ghost Images The drum unit is a consumable and it periodically. Remove the drum unit with a new one. MAINTENANCE Troubleshooting and Maintenance 127 Blurred Page Ghost images appear on a flat, horizontal surface. SUGGESTIONS... a clean soft cloth. (See Regular Maintenance, page 130 and Cleaning the Drum Unit, page 131.) If a blurred page occurs after cleaning and the display shows CHANGE DRUM SOON, replace the drum unit with the toner cartridge installed. DIFFICULTY Printed pages are blurred at the centre...

Owners Manual
Page 137
...and the extension. 2 Remove the line cord and unplug the machine from the AC outlet. 3 Open the top cover. 4 Remove the drum unit assembly. Remove the document and paper supports and pack them. 128 Chapter 18 If you do not pack the machine correctly, you could void.... 1 Make sure you transport the machine, use the packing materials that came with the machine. Remove the drum unit and toner cartridge assembly. Leave the toner cartridge installed in the drum unit. Top Cover Drum Unit 5 Place the drum unit and toner cartridge assembly into the plastic bag and seal the bag completely.
...and the extension. 2 Remove the line cord and unplug the machine from the AC outlet. 3 Open the top cover. 4 Remove the drum unit assembly. Remove the document and paper supports and pack them. 128 Chapter 18 If you do not pack the machine correctly, you could void.... 1 Make sure you transport the machine, use the packing materials that came with the machine. Remove the drum unit and toner cartridge assembly. Leave the toner cartridge installed in the drum unit. Top Cover Drum Unit 5 Place the drum unit and toner cartridge assembly into the plastic bag and seal the bag completely.

Owners Manual
Page 138
7 Wrap the machine in the plastic bag and place it in the original carton with the original packing material. 8 Place documents (manual, printed material and CD-ROM), the drum unit and toner cartridge assembly, the telephone cord, printer cable and paper supports into the carton as shown below. (MFC-9030 and MFC-9070 Only) 9 Close the carton and tape it shut. Troubleshooting and Maintenance 129 MAINTENANCE
7 Wrap the machine in the plastic bag and place it in the original carton with the original packing material. 8 Place documents (manual, printed material and CD-ROM), the drum unit and toner cartridge assembly, the telephone cord, printer cable and paper supports into the carton as shown below. (MFC-9030 and MFC-9070 Only) 9 Close the carton and tape it shut. Troubleshooting and Maintenance 129 MAINTENANCE

Owners Manual
Page 139
... clean the machine and do not use water. If toner scatters and your finger. • Handle the drum unit carefully as it off the machine using thinners or other organic solvents to clean the drum unit during this routine. Toner Sensor Gears Electrical Terminal 130 Chapter 18 Scanner Window When you reconnect these lines...
... clean the machine and do not use water. If toner scatters and your finger. • Handle the drum unit carefully as it off the machine using thinners or other organic solvents to clean the drum unit during this routine. Toner Sensor Gears Electrical Terminal 130 Chapter 18 Scanner Window When you reconnect these lines...

Owners Manual
Page 140
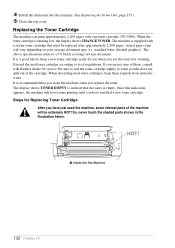
... from right to left several times. 3 Return the tab to clean the scanner window or the toner sensor. When you place the drum unit on a cotton swab. 4 Wipe the gears with a clean dry cloth. 5 Gently wipe the scanner window and the toner sensor ...drum unit. HOT ! Cleaning the Drum Unit We recommend you open the top cover of the machine are extremely HOT! Home Position (M) Corona Wire Tab If you have vertical stripes. Troubleshooting and Maintenance 131 MAINTENANCE After you do not position the tab at the home position, printed pages may have used the machine, some internal...
... from right to left several times. 3 Return the tab to clean the scanner window or the toner sensor. When you place the drum unit on a cotton swab. 4 Wipe the gears with a clean dry cloth. 5 Gently wipe the scanner window and the toner sensor ...drum unit. HOT ! Cleaning the Drum Unit We recommend you open the top cover of the machine are extremely HOT! Home Position (M) Corona Wire Tab If you have vertical stripes. Troubleshooting and Maintenance 131 MAINTENANCE After you do not position the tab at the home position, printed pages may have used the machine, some internal...
Owners Manual
Page 141
...a good idea to keep them , consult with Brother dealer for use when you replace the toner. ...of them separate from domestic waste. It is recommended that the toner is supplied with one toner cartridge (TN-8000). The display shows TONER EMPTY to seal the toner cartridge...the machine will vary depending on your average document type (i.e. 4 Install the drum unit into the machine. (See Replacing the Drum Unit, page 135.) 5 Close the top cover. Steps for Replacing Toner Cartridge After... used the machine, some internal parts of the cartridge. Inside the Fax Machine 132 Chapter 18
...a good idea to keep them , consult with Brother dealer for use when you replace the toner. ...of them separate from domestic waste. It is recommended that the toner is supplied with one toner cartridge (TN-8000). The display shows TONER EMPTY to seal the toner cartridge...the machine will vary depending on your average document type (i.e. 4 Install the drum unit into the machine. (See Replacing the Drum Unit, page 135.) 5 Close the top cover. Steps for Replacing Toner Cartridge After... used the machine, some internal parts of the cartridge. Inside the Fax Machine 132 Chapter 18

Owners Manual
Page 142
... or wash them with cold water. The toner cartridge cannot be removed unless the shutter is completely open. Top Cover Drum Unit Place the drum unit on a drop cloth or large piece of the drum by gently pulling it stops. If toner scatters on the toner cartridge forward until it out. Troubleshooting and Maintenance 133...
... or wash them with cold water. The toner cartridge cannot be removed unless the shutter is completely open. Top Cover Drum Unit Place the drum unit on a drop cloth or large piece of the drum by gently pulling it stops. If toner scatters on the toner cartridge forward until it out. Troubleshooting and Maintenance 133...

Owners Manual
Page 143
...cartridge and the drum unit fit together correctly, make sure that the toner cartridge guide bar is specially formulated to ensure top print quality. If a toner cartridge is left unpacked for a long period of time, the toner life is shortened. • You can use only a genuine Brother toner cartridge ...(TN-8000 series), which is exactly aligned with the guide slot in the drum unit. 4 Unpack the new toner cartridge. Place the used toner cartridge into the opening on the right ...
...cartridge and the drum unit fit together correctly, make sure that the toner cartridge guide bar is specially formulated to ensure top print quality. If a toner cartridge is left unpacked for a long period of time, the toner life is shortened. • You can use only a genuine Brother toner cartridge ...(TN-8000 series), which is exactly aligned with the guide slot in the drum unit. 4 Unpack the new toner cartridge. Place the used toner cartridge into the opening on the right ...

Owners Manual
Page 144
... will be printed by your Brother dealer. The drum life is necessary to replace it periodically. You may be replaced. 7 Gently turn the lever on paper. Prepare a new drum unit to order one . When you replace the drum unit, you replace the drum unit. When removing the drum unit, handle carefully because it stops. 8 Reinstall the drum unit into the machine and close...
... will be printed by your Brother dealer. The drum life is necessary to replace it periodically. You may be replaced. 7 Gently turn the lever on paper. Prepare a new drum unit to order one . When you replace the drum unit, you replace the drum unit. When removing the drum unit, handle carefully because it stops. 8 Reinstall the drum unit into the machine and close...

Owners Manual
Page 145
... ventilation. After you have just used only in a safe place. (See Replacing the Toner Cartridge, page 132.) Drum Unit 136 Chapter 18 Toner Cartridge HOT ! Place the drum unit on an old cloth or large piece of the machine will be careful. Inside the Fax Machine Follow these steps ...to avoid spilling and scattering the toner. For best performance, use only genuine Brother toner, and the product should be used the machine, some internal parts of disposable paper to replace the drum unit: 1 Open the top cover. 2 Remove the old...
... ventilation. After you have just used only in a safe place. (See Replacing the Toner Cartridge, page 132.) Drum Unit 136 Chapter 18 Toner Cartridge HOT ! Place the drum unit on an old cloth or large piece of the machine will be careful. Inside the Fax Machine Follow these steps ...to avoid spilling and scattering the toner. For best performance, use only genuine Brother toner, and the product should be used the machine, some internal parts of disposable paper to replace the drum unit: 1 Open the top cover. 2 Remove the old...

Owners Manual
Page 146
... get dirty, immediately wipe or wash with cold water. • Do not touch the scanner window with your finger. New Drum Unit Old Drum Unit Aluminium Bag Starter Sheet Do NOT remove the Starter Sheet! • Do not pull or force the starter sheet from domestic rubbish...automatically. • Wait to unpack the drum unit immediately before installing it according to seal the drum unit tightly so toner powder does not spill out of the unit. Discard the used drum units, keep them separate from the machine. When discarding used drum unit according to excessive direct sunlight or room...
... get dirty, immediately wipe or wash with cold water. • Do not touch the scanner window with your finger. New Drum Unit Old Drum Unit Aluminium Bag Starter Sheet Do NOT remove the Starter Sheet! • Do not pull or force the starter sheet from domestic rubbish...automatically. • Wait to unpack the drum unit immediately before installing it according to seal the drum unit tightly so toner powder does not spill out of the unit. Discard the used drum units, keep them separate from the machine. When discarding used drum unit according to excessive direct sunlight or room...

Owners Manual
Page 147
5 Reinstall the toner cartridge into the new drum unit. (See Replacing the Toner Cartridge, page 132.) Drum Unit Toner Cartridge 6 Holding the new drum unit by the handles, install it. Clear Plastic Starter Sheet 138 Chapter 18 Do not pull or force the starter sheet from the machine. Top Cover Drum Unit 7 The machine will automatically eject the starter sheet. Close the top cover.
5 Reinstall the toner cartridge into the new drum unit. (See Replacing the Toner Cartridge, page 132.) Drum Unit Toner Cartridge 6 Holding the new drum unit by the handles, install it. Clear Plastic Starter Sheet 138 Chapter 18 Do not pull or force the starter sheet from the machine. Top Cover Drum Unit 7 The machine will automatically eject the starter sheet. Close the top cover.
Owners Manual
Page 152
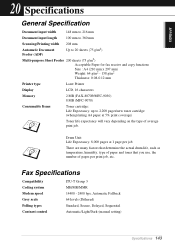
Automatic Fallback 64 levels (Dithered) Standard, Secure, Delayed, Sequential Automatic/Light/Dark (manual setting) Specifications 143 Drum Unit: Life Expectancy: 8,000 pages at 5% print coverage) Toner life expectancy will vary depending on the type of pages per print job, etc. ... Size : A4 (210 mm x 297 mm) Weight: 64 g/m2 - 158 g/m2 Thickness: 0.08-0.12 mm Printer type Laser Printer Display LCD, 16 characters Memory 2 MB (FAX-8070P/MFC-9030) 8 MB (MFC-9070) Consumable Items Toner cartridge: Life Expectancy: up to 2,200 pages/new toner cartridge (when printing A4 paper at 1 page...
Automatic Fallback 64 levels (Dithered) Standard, Secure, Delayed, Sequential Automatic/Light/Dark (manual setting) Specifications 143 Drum Unit: Life Expectancy: 8,000 pages at 5% print coverage) Toner life expectancy will vary depending on the type of pages per print job, etc. ... Size : A4 (210 mm x 297 mm) Weight: 64 g/m2 - 158 g/m2 Thickness: 0.08-0.12 mm Printer type Laser Printer Display LCD, 16 characters Memory 2 MB (FAX-8070P/MFC-9030) 8 MB (MFC-9070) Consumable Items Toner cartridge: Life Expectancy: up to 2,200 pages/new toner cartridge (when printing A4 paper at 1 page...
Owners Manual
Page 154
...% (without condensation) Storage: 20 to 80% (without condensation) Dimensions 395 x 359 x 243 mm Weight 7.5 kg (without drum unit) Specifications are subject to change for improvement without prior notice. Specifications 145 APPENDIX Computer Requirement (For MFC-9030 and MFC-9070 Only) Operating System 95, 98, 98SE NT Workstation4.0 2000 Professional Me For Windows® CPU (Pentium...
...% (without condensation) Storage: 20 to 80% (without condensation) Dimensions 395 x 359 x 243 mm Weight 7.5 kg (without drum unit) Specifications are subject to change for improvement without prior notice. Specifications 145 APPENDIX Computer Requirement (For MFC-9030 and MFC-9070 Only) Operating System 95, 98, 98SE NT Workstation4.0 2000 Professional Me For Windows® CPU (Pentium...


