Owners Manual
Page 6
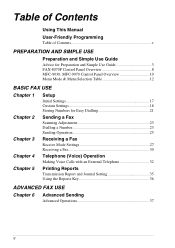
...User-Friendly Programming Table of Contents v PREPARATION AND SIMPLE USE Preparation and Simple Use Guide Advice for Preparation and Simple Use Guide 3 FAX-8070P Control Panel Overview 8 MFC-9030, MFC-9070 Control Panel Overview 10 Menu Mode & Menu Selection Table 12 BASIC FAX USE Chapter 1 Setup Initial Settings 17 Custom Settings 18 Storing Numbers for Easy Dialling 21 Chapter 2 Sending a Fax Scanning Adjustment 23 Dialling a Number 23 Sending Operation 25 Chapter 3 Receiving a Fax Receive Mode Settings 27 Receiving a Fax 30 Chapter 4 Telephone (Voice) Operation Making...
...User-Friendly Programming Table of Contents v PREPARATION AND SIMPLE USE Preparation and Simple Use Guide Advice for Preparation and Simple Use Guide 3 FAX-8070P Control Panel Overview 8 MFC-9030, MFC-9070 Control Panel Overview 10 Menu Mode & Menu Selection Table 12 BASIC FAX USE Chapter 1 Setup Initial Settings 17 Custom Settings 18 Storing Numbers for Easy Dialling 21 Chapter 2 Sending a Fax Scanning Adjustment 23 Dialling a Number 23 Sending Operation 25 Chapter 3 Receiving a Fax Receive Mode Settings 27 Receiving a Fax 30 Chapter 4 Telephone (Voice) Operation Making...
Owners Manual
Page 25
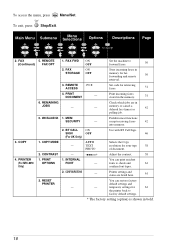
... FAX OPT 6. COPY MODE 2. CONFIGURATIONS - fonts to accept Page 2. PRINTER (For MFC-9070 Only) 5. PRINT OPTIONS 2. REMOTE ACCESS 4. BT CALL SIGN (For UK Only) - - 1. Set code for your type 58 of document. - + Adjust the contrast. 58 You can restore factory default settings and - Prohibits most functions except receiving faxes 42 into memory. FAX FWD 2. PRINT DOCUMENT - 1. Use with BT Call Sign. 46 AUTO TEXT PHOTO Selects the Copy resolution for retrieving faxes. 51 Print incoming faxes stored in the memory. 31 Check which jobs are listed...
... FAX OPT 6. COPY MODE 2. CONFIGURATIONS - fonts to accept Page 2. PRINTER (For MFC-9070 Only) 5. PRINT OPTIONS 2. REMOTE ACCESS 4. BT CALL SIGN (For UK Only) - - 1. Set code for your type 58 of document. - + Adjust the contrast. 58 You can restore factory default settings and - Prohibits most functions except receiving faxes 42 into memory. FAX FWD 2. PRINT DOCUMENT - 1. Use with BT Call Sign. 46 AUTO TEXT PHOTO Selects the Copy resolution for retrieving faxes. 51 Print incoming faxes stored in the memory. 31 Check which jobs are listed...
Owners Manual
Page 37
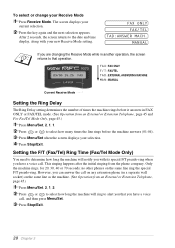
... ANSWERING MACHINE MAN:MANUAL Current Receive Mode Setting the Ring Delay The Ring Delay setting determines the number of times the machine rings before the machine answers (01-04). 3 Press Menu/Set when the screen displays your new Receive Mode setting. FAX ONLY FAX/TEL TAD:ANSWER MACH. Only the machine rings, for 20, 30, 40 or 70 seconds; MANUAL If you are changing the Receive Mode while in FAX ONLY or FAX/TEL mode. (See Operation from the phone...
... ANSWERING MACHINE MAN:MANUAL Current Receive Mode Setting the Ring Delay The Ring Delay setting determines the number of times the machine rings before the machine answers (01-04). 3 Press Menu/Set when the screen displays your new Receive Mode setting. FAX ONLY FAX/TEL TAD:ANSWER MACH. Only the machine rings, for 20, 30, 40 or 70 seconds; MANUAL If you are changing the Receive Mode while in FAX ONLY or FAX/TEL mode. (See Operation from the phone...

Owners Manual
Page 44
... ERROR, send the document again. If you set the machine to print activity reports at which to begin printing, in the next section. 1 Press Menu/Set, 2, 4, 2. 2 Press or to choose your setting and press Menu/Set. 4 Enter the time to choose a day at specific intervals (1, 3, 6, 12, 24 hours, 2, 4 or 7 days). This report lists the name or fax number of the receiving party, the time and date of certain pages, resend those pages. If you typically send multiple faxes...
... ERROR, send the document again. If you set the machine to print activity reports at which to begin printing, in the next section. 1 Press Menu/Set, 2, 4, 2. 2 Press or to choose your setting and press Menu/Set. 4 Enter the time to choose a day at specific intervals (1, 3, 6, 12, 24 hours, 2, 4 or 7 days). This report lists the name or fax number of the receiving party, the time and date of certain pages, resend those pages. If you typically send multiple faxes...
Owners Manual
Page 52
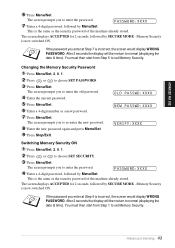
... 2 seconds the display will then return to choose SET SECURITY. 3 Press Menu/Set. Advanced Sending 43 The screen prompts you to enter the password. 7 Enter a 4-digit password, followed by Menu/Set. PASSWORD:XXXX This is incorrect, the screen would display WRONG PASSWORD. The screen prompts you enter at Step 7 is the same as a new password. 7 Press Menu/Set. Memory Security is now switched ON. ADVANCED FAX USE 6 Press Menu/Set. Changing the Memory Security Password 1 Press Menu/Set, 2, 0, 1. 2 Press or to normal (displaying the date & time).
... 2 seconds the display will then return to choose SET SECURITY. 3 Press Menu/Set. Advanced Sending 43 The screen prompts you to enter the password. 7 Enter a 4-digit password, followed by Menu/Set. PASSWORD:XXXX This is incorrect, the screen would display WRONG PASSWORD. The screen prompts you enter at Step 7 is the same as a new password. 7 Press Menu/Set. Memory Security is now switched ON. ADVANCED FAX USE 6 Press Menu/Set. Changing the Memory Security Password 1 Press Menu/Set, 2, 0, 1. 2 Press or to normal (displaying the date & time).
Owners Manual
Page 64
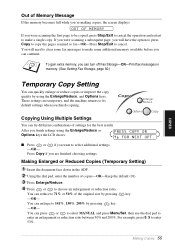
... turn off Fax Storage-OR-Print fax messages in the ADF. 2 Using the dial pad, enter the number of copies-OR-Keep the default (01). 3 Press Enlarge/Reduce. 4 Press or to 141%, 150%, 200% by using the Enlarge/Reduce or Options keys the LCD shows: PRESS COPY OR FOR NEXT OPT. Making Enlarged or Reduced Copies (Temporary Setting) 1 Insert the document face down in memory. (See Setting Fax Storage, page 50.) Temporary Copy Setting You can quickly...
... turn off Fax Storage-OR-Print fax messages in the ADF. 2 Using the dial pad, enter the number of copies-OR-Keep the default (01). 3 Press Enlarge/Reduce. 4 Press or to 141%, 150%, 200% by using the Enlarge/Reduce or Options keys the LCD shows: PRESS COPY OR FOR NEXT OPT. Making Enlarged or Reduced Copies (Temporary Setting) 1 Insert the document face down in memory. (See Setting Fax Storage, page 50.) Temporary Copy Setting You can quickly...
Owners Manual
Page 68
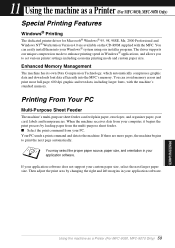
... by loading paper from your application software. Printing From Your PC Multi-Purpose Sheet Feeder The machine's multi-purpose sheet feeder can easily install them into the MFC's memory. You can avoid memory errors and print most full-page, 600 dpi graphic and text data, including larger fonts, with the MFC. 11 Using the machine as a Printer (For MFC-9030, MFC-9070 Only) 59 PRINTER/SCANNER Using the machine as a Printer (For MFC-9030, MFC-9070 Only) Special Printing Features Windows® Printing The dedicated printer driver...
... by loading paper from your application software. Printing From Your PC Multi-Purpose Sheet Feeder The machine's multi-purpose sheet feeder can easily install them into the MFC's memory. You can avoid memory errors and print most full-page, 600 dpi graphic and text data, including larger fonts, with the MFC. 11 Using the machine as a Printer (For MFC-9030, MFC-9070 Only) 59 PRINTER/SCANNER Using the machine as a Printer (For MFC-9030, MFC-9070 Only) Special Printing Features Windows® Printing The dedicated printer driver...
Owners Manual
Page 70
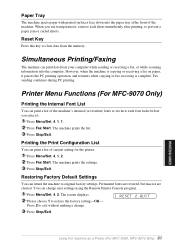
... key to clear data from your computer while sending or receiving a fax, or while scanning information into the paper tray at the front of the machine's internal (or resident) fonts to see how each font looks before you use transparencies, remove each sheet immediately after printing, to exit without making a change user settings using the Remote Printer Console program. 1 Press Menu/Set, 4, 2. Printer Menu Functions (For MFC-9070 Only) Printing the Internal Font List You can print data from the memory. Press 2 to prevent a paper jam...
... key to clear data from your computer while sending or receiving a fax, or while scanning information into the paper tray at the front of the machine's internal (or resident) fonts to see how each font looks before you use transparencies, remove each sheet immediately after printing, to exit without making a change user settings using the Remote Printer Console program. 1 Press Menu/Set, 4, 2. Printer Menu Functions (For MFC-9070 Only) Printing the Internal Font List You can print data from the memory. Press 2 to prevent a paper jam...
Owners Manual
Page 75
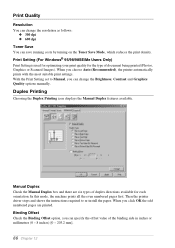
... the Duplex Printing icon displays the Manual Duplex features available. Print Setting (For Windows® 95/98/98SE/Me Users Only) Print Setting is used for optimizing your print quality for each orientation. Binding Offset Check the Binding Offset option, you can change the resolution as follows: N 300 dpi N 600 dpi Toner Save You can specify the offset value of document being printed (Photos, Graphics or Scanned Images). Then the printer driver stops and shows the instructions...
... the Duplex Printing icon displays the Manual Duplex features available. Print Setting (For Windows® 95/98/98SE/Me Users Only) Print Setting is used for optimizing your print quality for each orientation. Binding Offset Check the Binding Offset option, you can change the resolution as follows: N 300 dpi N 600 dpi Toner Save You can specify the offset value of document being printed (Photos, Graphics or Scanned Images). Then the printer driver stops and shows the instructions...
Owners Manual
Page 81
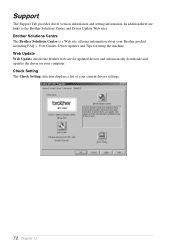
... The Brother Solutions Centre is a Web site offering information about your computer. Support The Support Tab provides driver version information and setting information. Web Update Web Update checks the brother web site for updated drivers and automatically downloads and updates the driver on your Brother product including FAQ's, User Guides, Driver updates and Tips for using the machine. In addition there are links to the Brother Solutions Centre and Driver Update Web sites. Check Setting The Check Setting selection displays a list of your current drivers settings. 72...
... The Brother Solutions Centre is a Web site offering information about your computer. Support The Support Tab provides driver version information and setting information. Web Update Web Update checks the brother web site for updated drivers and automatically downloads and updates the driver on your Brother product including FAQ's, User Guides, Driver updates and Tips for using the machine. In addition there are links to the Brother Solutions Centre and Driver Update Web sites. Check Setting The Check Setting selection displays a list of your current drivers settings. 72...
Owners Manual
Page 126
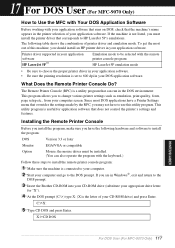
... use this machine, you should install an HP printer driver in the DOS environment: This program allows you may not have the following table shows the combination of your application software. To get the most DOS applications have a Printer Settings menu that overrides the settings made by the RPC, you to change various printer settings such as emulation, print quality, fonts, page setup etc., from your computer screen...
... use this machine, you should install an HP printer driver in the DOS environment: This program allows you may not have the following table shows the combination of your application software. To get the most DOS applications have a Printer Settings menu that overrides the settings made by the RPC, you to change various printer settings such as emulation, print quality, fonts, page setup etc., from your computer screen...
Owners Manual
Page 129
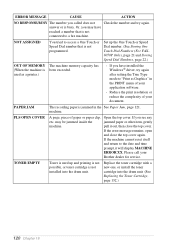
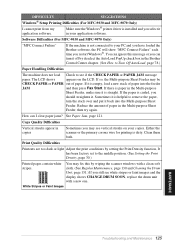
... display MACHINE ERROR XX. If the error message remains, open and close the top cover. Replace the toner cartridge with a new one, or install the toner cartridge into the drum unit. Set up and printing is not possible, or toner cartridge is jammed in the PRINT menu of your document. used up the One Touch or Speed Dial number. (See Storing One Touch Dial Numbers (For FAX8070P Only), page 21 and Storing Speed Dial Numbers, page 22.) OUT OF MEMORY The machine memory capacity has (When the machine is not connected to "Print as a printer.) - PAPER JAM...
... display MACHINE ERROR XX. If the error message remains, open and close the top cover. Replace the toner cartridge with a new one, or install the toner cartridge into the drum unit. Set up and printing is not possible, or toner cartridge is jammed in the PRINT menu of your document. used up the One Touch or Speed Dial number. (See Storing One Touch Dial Numbers (For FAX8070P Only), page 21 and Storing Speed Dial Numbers, page 22.) OUT OF MEMORY The machine memory capacity has (When the machine is not connected to "Print as a printer.) - PAPER JAM...

Owners Manual
Page 133
... connect the printer cable correctly. Reduce the complexity of your pages of font sizes within your application software. message occurs. Clean your scanner and make sure you to verify the machine's scanner operation. Transferring a fax call to allow for this. 124 Chapter 18 when I print them. to the machine. General Printing Difficulties (For MFC-9030 and MFC-9070 Only) The machine does not print. Reduce the graphic quality or the number OF MEMORY error of a document. Adjust...
... connect the printer cable correctly. Reduce the complexity of your pages of font sizes within your application software. message occurs. Clean your scanner and make sure you to verify the machine's scanner operation. Transferring a fax call to allow for this. 124 Chapter 18 when I print them. to the machine. General Printing Difficulties (For MFC-9030 and MFC-9070 Only) The machine does not print. Reduce the graphic quality or the number OF MEMORY error of a document. Adjust...
Owners Manual
Page 134
... software. Clean them both. If it . If the paper is empty, load a new stack of paper into the Multi-purpose Sheet Feeder. Either the scanner or the primary corona wire for printing is helpful to see white stripes or faint images and the display shows CHANGE DRUM SOON, replace the drum unit with a new one. You may see vertical streaks on the LCD. DIFFICULTY SUGGESTIONS Windows® Setup Printing Difficulties (For MFC-9030 and MFC-9070 Only) I clear paper jams? Make...
... software. Clean them both. If it . If the paper is empty, load a new stack of paper into the Multi-purpose Sheet Feeder. Either the scanner or the primary corona wire for printing is helpful to see white stripes or faint images and the display shows CHANGE DRUM SOON, replace the drum unit with a new one. You may see vertical streaks on the LCD. DIFFICULTY SUGGESTIONS Windows® Setup Printing Difficulties (For MFC-9030 and MFC-9070 Only) I clear paper jams? Make...
Owners Manual
Page 163
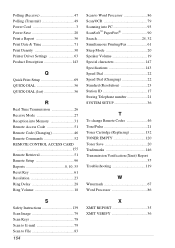
... Power Cord 3 Power Save 20 Print a Report 36 Print Date & Time 71 Print Density 30 Printer Driver Settings 63 Product Description 143 Q Quick Print Setup 69 QUICK-DIAL 36 QUICK-DIAL (list 36 R Real Time Transmission 26 Receive Mode 27 Reception into Memory 31 Remote Access Code 51 Remote Code (Changing 46 Remote Commands 52 REMOTE CONTROL ACCESS CARD 155 Remote Retrieval 51 Remote Setup 96 Reports 8, 10, 35 Reset Key 61 Resolution 23 Ring Delay 28 Ring Volume 18 Scan to Word Processor 86 Scan/OCR 79 Scanning...
... Power Cord 3 Power Save 20 Print a Report 36 Print Date & Time 71 Print Density 30 Printer Driver Settings 63 Product Description 143 Q Quick Print Setup 69 QUICK-DIAL 36 QUICK-DIAL (list 36 R Real Time Transmission 26 Receive Mode 27 Reception into Memory 31 Remote Access Code 51 Remote Code (Changing 46 Remote Commands 52 REMOTE CONTROL ACCESS CARD 155 Remote Retrieval 51 Remote Setup 96 Reports 8, 10, 35 Reset Key 61 Resolution 23 Ring Delay 28 Ring Volume 18 Scan to Word Processor 86 Scan/OCR 79 Scanning...

Quick Setup Guide
Page 1
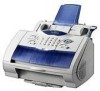
... toner evenly inside the cartridge. Enter your telephone number, then press Menu/Set. MFC-9030 MFC-9070 Quick Setup Guide THANK YOU! ... TAD:ANSWER MACH. Do NOT remove the Starter Sheet! FAX/TEL For receiving fax and voice calls on Brother Solutions Web Site: URL: http://solutions.brother.com Call Brother Customer Service at: 0161 931 2354 1 Packing List IEEE-1284 Compliant Bi-directioned Cable Mains Power Cord Telephone Line Cord CD-ROM Document Support Paper Support Owner's Manual Drum Unit Assembly (With Regular Toner Cartridge) Brother Quick Setup Guide...
... toner evenly inside the cartridge. Enter your telephone number, then press Menu/Set. MFC-9030 MFC-9070 Quick Setup Guide THANK YOU! ... TAD:ANSWER MACH. Do NOT remove the Starter Sheet! FAX/TEL For receiving fax and voice calls on Brother Solutions Web Site: URL: http://solutions.brother.com Call Brother Customer Service at: 0161 931 2354 1 Packing List IEEE-1284 Compliant Bi-directioned Cable Mains Power Cord Telephone Line Cord CD-ROM Document Support Paper Support Owner's Manual Drum Unit Assembly (With Regular Toner Cartridge) Brother Quick Setup Guide...

Quick Setup Guide
Page 2
... Today screen appears, click Next. From the Start menu, select Programs, Brother, Brother MFL Pro, Uninstall, and then follow the instructions on your Name and Company, either change or accept them, and then click Next. 7. Click Install Software. 4. See AutoLoad the Brother Control Centre, Chapter 13 in the Owner's Manual on as a printer and scanner in any Windows® application. • Please purchase the appropriate cable if you...
... Today screen appears, click Next. From the Start menu, select Programs, Brother, Brother MFL Pro, Uninstall, and then follow the instructions on your Name and Company, either change or accept them, and then click Next. 7. Click Install Software. 4. See AutoLoad the Brother Control Centre, Chapter 13 in the Owner's Manual on as a printer and scanner in any Windows® application. • Please purchase the appropriate cable if you...
Service Manual
Page 64
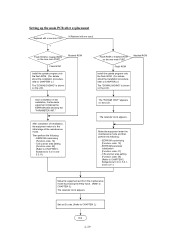
... clock appears. Setting up the main PCB after replacement Replaced with one used) Y Flash ROM or masked ROM on the LCD. N (Replaced with a new main PUB? Make the equipment enter the maintenance mode and then perform the following : - EEPROM customizing [Function code: 74] - EEPROM customizing [Function code: 74] - Upon completion of the maintenance mode. CIS scanner area setting [Function code: 55] (Refer to CHAPTER 2.) The "DOWNLOADING" is shown on the new main PUB?
... clock appears. Setting up the main PCB after replacement Replaced with one used) Y Flash ROM or masked ROM on the LCD. N (Replaced with a new main PUB? Make the equipment enter the maintenance mode and then perform the following : - EEPROM customizing [Function code: 74] - EEPROM customizing [Function code: 74] - Upon completion of the maintenance mode. CIS scanner area setting [Function code: 55] (Refer to CHAPTER 2.) The "DOWNLOADING" is shown on the new main PUB?
Service Manual
Page 91
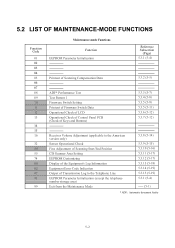
5.2 LIST OF MAINTENANCE-MODE FUNCTIONS Function Code 01 02 03 04 05 06 07 08 09 10 11 12 13 14 15 16 32 54 55 74 80 82 87 91 99 Maintenance-mode Functions Function EEPROM Parameter Initialization Reference Subsection (Page) 5.3.1 (5-4) Printout of Scanning Compensation Data 5.3.2 (5-5) ADF* Performance Test Test Pattern 1 Firmware Switch Setting Printout of Firmware Switch Data Operational Check of LCD Operational Check of Control Panel PCB (Check of Keys and Buttons) 5.3.3 (5-7) 5.3.4 (5-8) 5.3.5 (5-9) 5.3.5 (5-11) 5.3.6 (5-12) 5.3.7 (5-12) Receiver Volume Adjustment (applicable to ...
5.2 LIST OF MAINTENANCE-MODE FUNCTIONS Function Code 01 02 03 04 05 06 07 08 09 10 11 12 13 14 15 16 32 54 55 74 80 82 87 91 99 Maintenance-mode Functions Function EEPROM Parameter Initialization Reference Subsection (Page) 5.3.1 (5-4) Printout of Scanning Compensation Data 5.3.2 (5-5) ADF* Performance Test Test Pattern 1 Firmware Switch Setting Printout of Firmware Switch Data Operational Check of LCD Operational Check of Control Panel PCB (Check of Keys and Buttons) 5.3.3 (5-7) 5.3.4 (5-8) 5.3.5 (5-9) 5.3.5 (5-11) 5.3.6 (5-12) 5.3.7 (5-12) Receiver Volume Adjustment (applicable to ...
Service Manual
Page 136
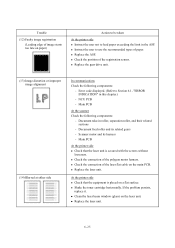
... toner cartridge horizontally. Clean the laser beam window (glass) on a flat surface. Replace the laser unit. 6-25 Check the position of the polygon motor harness. Main PCB At the scanner Check the following components: - Instruct the user to use the recommended types of the laser flat cable on the main PCB. Trouble (12) Faulty image registration (Leading edge of image starts too late on paper) Action to be taken At the printer side Instruct the user...
... toner cartridge horizontally. Clean the laser beam window (glass) on a flat surface. Replace the laser unit. 6-25 Check the position of the polygon motor harness. Main PCB At the scanner Check the following components: - Instruct the user to use the recommended types of the laser flat cable on the main PCB. Trouble (12) Faulty image registration (Leading edge of image starts too late on paper) Action to be taken At the printer side Instruct the user...


