

Users Manual - English
Page 4
...(1-877-552-6255) 1-800-947-1445 (fax) http://www.brothermall.com/ In Canada: 1-877-BROTHER http://www.brother.ca/ Description Toner Cartridge Toner Cartridge Toner Cartridge Toner Cartridge 4 pcs. Drum Unit Waste Toner Box Belt Unit User's Guide Quick Setup Guide Item TN-210BK (Approx. 2,200 pages) 1 2 TN-... ISO/IEC 19798. 3 1 page per job. 4 Drum life is approximate and may vary by type of the Brother accessories and supplies that are available at most Brother retailers. If you cannot find the accessory you need and you have a Visa, MasterCard, Discover, or American Express credit...
...(1-877-552-6255) 1-800-947-1445 (fax) http://www.brothermall.com/ In Canada: 1-877-BROTHER http://www.brother.ca/ Description Toner Cartridge Toner Cartridge Toner Cartridge Toner Cartridge 4 pcs. Drum Unit Waste Toner Box Belt Unit User's Guide Quick Setup Guide Item TN-210BK (Approx. 2,200 pages) 1 2 TN-... ISO/IEC 19798. 3 1 page per job. 4 Drum life is approximate and may vary by type of the Brother accessories and supplies that are available at most Brother retailers. If you cannot find the accessory you need and you have a Visa, MasterCard, Discover, or American Express credit...
Users Manual - English
Page 6
... will be required to deliver (by Brother in its Authorized Service Center will do : After contacting Brother or a Brother Authorized Service Center, you may be free from other than defects in materials or workmanship; Brother® Digital Color One-Year Limited Warranty and Replacement Service (USA... States). You are responsible for loss or damage to Brother or an Authorized Service Center within the applicable warranty period, Brother or its sole discretion. Brother reserves the right to Toner Cartridges, Drum Units, Belt Unit, and Waste Toner Box. „ Except as...
... will be required to deliver (by Brother in its Authorized Service Center will do : After contacting Brother or a Brother Authorized Service Center, you may be free from other than defects in materials or workmanship; Brother® Digital Color One-Year Limited Warranty and Replacement Service (USA... States). You are responsible for loss or damage to Brother or an Authorized Service Center within the applicable warranty period, Brother or its sole discretion. Brother reserves the right to Toner Cartridges, Drum Units, Belt Unit, and Waste Toner Box. „ Except as...

Users Manual - English
Page 8
...parts, Brother International Corporation (Canada) Ltd. ("Brother"), or its Authorized Service Centres, Distributors, Dealers, Agents or employees, shall create another warranty or modify this warranty. For Laser and LED units:...ink cartridges, print cartridges, print rolls, thermal paper rolls, toner cartridges, drum units, OPC belts, fixing units, print heads, paper feed rollers, transfer rolls, cleaning rollers, waste toner packs,...products purchased and used in the development, production, or delivery of this MFC/Fax machine shall be the sole liability of supplies or consumable items that...
...parts, Brother International Corporation (Canada) Ltd. ("Brother"), or its Authorized Service Centres, Distributors, Dealers, Agents or employees, shall create another warranty or modify this warranty. For Laser and LED units:...ink cartridges, print cartridges, print rolls, thermal paper rolls, toner cartridges, drum units, OPC belts, fixing units, print heads, paper feed rollers, transfer rolls, cleaning rollers, waste toner packs,...products purchased and used in the development, production, or delivery of this MFC/Fax machine shall be the sole liability of supplies or consumable items that...
Users Manual - English
Page 11
...61 Document jams 66 Paper jams ...67 Routine maintenance 72 Cleaning the outside of the machine 72 Cleaning the scanner 73 Cleaning the LED heads 74 Cleaning the corona wires 75 Cleaning the drum unit 76 Cleaning the paper pick-up rollers 81 Calibration ...82 Auto ...Registration 82 Manual Registration 83 Replacing the consumable items 84 Replacing a Toner cartridge 86 Drum units ...91 Replacing the belt unit 96 Replacing the waste toner box 100 Replacing periodic maintenance parts 105 Machine Information 105 Checking the Serial Number 105 Checking the Page...
...61 Document jams 66 Paper jams ...67 Routine maintenance 72 Cleaning the outside of the machine 72 Cleaning the scanner 73 Cleaning the LED heads 74 Cleaning the corona wires 75 Cleaning the drum unit 76 Cleaning the paper pick-up rollers 81 Calibration ...82 Auto ...Registration 82 Manual Registration 83 Replacing the consumable items 84 Replacing a Toner cartridge 86 Drum units ...91 Replacing the belt unit 96 Replacing the waste toner box 100 Replacing periodic maintenance parts 105 Machine Information 105 Checking the Serial Number 105 Checking the Page...

Users Manual - English
Page 38
c Press Black Start or Color Start. b Press Black Start or Color Start. Note • To sort your copies, see Sorting copies using the ADF on the scanner glass. b Use the numeric keys to copy 4 Copy mode 4 1 ... "Please Wait" and the machine stops copying while you are making multiple copies, please wait for 30 to 40 seconds until the machine finishes the color registrations and cleaning process of copies (up to 99). Stop copying 4 To stop copying, press Stop/Exit. 26 4 Making copies 4 How to enter the number...
c Press Black Start or Color Start. b Press Black Start or Color Start. Note • To sort your copies, see Sorting copies using the ADF on the scanner glass. b Use the numeric keys to copy 4 Copy mode 4 1 ... "Please Wait" and the machine stops copying while you are making multiple copies, please wait for 30 to 40 seconds until the machine finishes the color registrations and cleaning process of copies (up to 99). Stop copying 4 To stop copying, press Stop/Exit. 26 4 Making copies 4 How to enter the number...

Users Manual - English
Page 70
.... abcdefghijklmnopqrstuvwxyz. ABCDEFGHIJKLMNOPQRSTUVWXYZ. 0123456789. abcdefghijklmnopqrstuvwxyz. ABCDEFGHIJKLMNOPQRSTUVWXYZ. 0123456789. ABCDEFGHIJKLMNOPQRSTUVWXYZ. 0123456789. Examples of poor print quality All one color Recommendation „ Identify the color causing the problem and put in a new drum unit. (See Replacing the drum units on page 93... on page 93.) To identify the color of the drum unit, visit us at http://solutions.brother.com/ to view our FAQs and troubleshooting tips. „ Put in a new belt unit. (See Replacing the belt unit on page 96.) „ ...
.... abcdefghijklmnopqrstuvwxyz. ABCDEFGHIJKLMNOPQRSTUVWXYZ. 0123456789. abcdefghijklmnopqrstuvwxyz. ABCDEFGHIJKLMNOPQRSTUVWXYZ. 0123456789. ABCDEFGHIJKLMNOPQRSTUVWXYZ. 0123456789. Examples of poor print quality All one color Recommendation „ Identify the color causing the problem and put in a new drum unit. (See Replacing the drum units on page 93... on page 93.) To identify the color of the drum unit, visit us at http://solutions.brother.com/ to view our FAQs and troubleshooting tips. „ Put in a new belt unit. (See Replacing the belt unit on page 96.) „ ...
Users Manual - English
Page 73
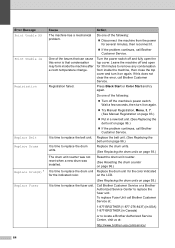
... 1 The toner cartridge color with any sophisticated office product, errors may occur and consumable items may need more help, the Brother Solutions Center offers the latest FAQs and troubleshooting tips: Visit us at http://solutions.brother.com/ Error Message Cause Action Belt End Soon The belt unit is indicated on ... units on page 93.) C To identify the color of its Buy a new belt unit before you get a life. Put the drum unit and toner cartridge assembly back into the machine again. 61 If this happens, your dealer or Brother Customer Service. You can correct most common error...
... 1 The toner cartridge color with any sophisticated office product, errors may occur and consumable items may need more help, the Brother Solutions Center offers the latest FAQs and troubleshooting tips: Visit us at http://solutions.brother.com/ Error Message Cause Action Belt End Soon The belt unit is indicated on ... units on page 93.) C To identify the color of its Buy a new belt unit before you get a life. Put the drum unit and toner cartridge assembly back into the machine again. 61 If this happens, your dealer or Brother Customer Service. You can correct most common error...
Users Manual - English
Page 75
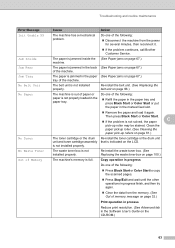
...several minutes, then reconnect it again. Then press Black Start or Color Start. „ If the problem is jammed in progress Do one of the machine. Clean the paper pickup roller. (See Cleaning ...feed slot. „ Remove the paper and load it . „ If the problem continues, call Brother Customer Service. Re-install the waste toner box. (See Replacing the waste toner box on page 67.)...machine's memory is not installed properly. The belt unit is full. Re-install the belt unit. (See Replacing the belt unit on the CD-ROM.) 63 Do one of the machine. is not properly loaded ...
...several minutes, then reconnect it again. Then press Black Start or Color Start. „ If the problem is jammed in progress Do one of the machine. Clean the paper pickup roller. (See Cleaning ...feed slot. „ Remove the paper and load it . „ If the problem continues, call Brother Customer Service. Re-install the waste toner box. (See Replacing the waste toner box on page 67.)...machine's memory is not installed properly. The belt unit is full. Re-install the belt unit. (See Replacing the belt unit on the CD-ROM.) 63 Do one of the machine. is not properly loaded ...
Users Manual - English
Page 76
... this does not clear the error, call Brother Customer Service at : http://www.brother-usa.com/service/ 64 Do one of the following : „ Turn off and fully open for the indicated color. If this error is time to replace the belt unit. Call Brother Customer Service or a Brother Authorized Service Center to replace the drum unit...
... this does not clear the error, call Brother Customer Service at : http://www.brother-usa.com/service/ 64 Do one of the following : „ Turn off and fully open for the indicated color. If this error is time to replace the belt unit. Call Brother Customer Service or a Brother Authorized Service Center to replace the drum unit...
Users Manual - English
Page 96
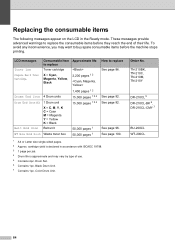
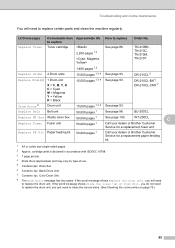
... 1 2 1,400 pages 1 2 Drums End Soon 4 Drum units 15,000 pages 1 3 4 Drum End Soon(X) 1 Drum unit X = C, M, Y, K C = Cyan M = Magenta Y = Yellow K = Black 15,000 pages 1 3 4 Belt End Soon Belt unit 50,000 pages 1 WT Box End Soon Waste toner box 50,000 pages 1 How to replace Toner Low Toner cartridge Prepare New X Toner... Cartridge. Color Drum Unit. TN-210BK, TN-210C, TN-210M, TN-210Y DR-210CL 5 DR-210CL-BK 6, DR-210CL-CMY 7 BU-200CL WT-...
... 1 2 1,400 pages 1 2 Drums End Soon 4 Drum units 15,000 pages 1 3 4 Drum End Soon(X) 1 Drum unit X = C, M, Y, K C = Cyan M = Magenta Y = Yellow K = Black 15,000 pages 1 3 4 Belt End Soon Belt unit 50,000 pages 1 WT Box End Soon Waste toner box 50,000 pages 1 How to replace Toner Low Toner cartridge Prepare New X Toner... Cartridge. Color Drum Unit. TN-210BK, TN-210C, TN-210M, TN-210Y DR-210CL 5 DR-210CL-BK 6, DR-210CL-CMY 7 BU-200CL WT-...
Users Manual - English
Page 97
... Black 15,000 pages 1 3 4 See page 93. Replace PF Kit Paper feeding kit 50,000 pages 1 Call your dealer or Brother Customer Service for a replacement paper feeding kit. 1 A4 or Letter size single-sided pages. 2 Approx. Drum Set. 6 Contains 1pc.... If the scroll message shows Slide the Green tab on page 75.) 85 Color Drum Unit. 8 The Drum Error message has two cases: If the scroll message shows Replace ...the Drum Unit. DR-210CL-BK 6, DR-210CL-CMY 7 Drum Error 8 Replace Belt Drum unit Belt unit 15,000 pages 1 3 4 50,000 pages 1 See page 93. WT-200CL...
... Black 15,000 pages 1 3 4 See page 93. Replace PF Kit Paper feeding kit 50,000 pages 1 Call your dealer or Brother Customer Service for a replacement paper feeding kit. 1 A4 or Letter size single-sided pages. 2 Approx. Drum Set. 6 Contains 1pc.... If the scroll message shows Slide the Green tab on page 75.) 85 Color Drum Unit. 8 The Drum Error message has two cases: If the scroll message shows Replace ...the Drum Unit. DR-210CL-BK 6, DR-210CL-CMY 7 Drum Error 8 Replace Belt Drum unit Belt unit 15,000 pages 1 3 4 50,000 pages 1 See page 93. WT-200CL...

Users Manual - English
Page 108
c Press a or b to choose the color of the drum you need to reset the drum counter by incorrect handling of the belt unit may void your warranty. Replacing the belt unit C Order No. If you touch it, it could degrade print quality. • Damage caused by completing the following ... C When you replace a drum unit with a new one, you need to replace the belt unit: Replace Belt IMPORTANT • DO NOT touch the surface of the belt unit. Buy a new belt unit and have it means the belt unit is open, you get a Replace Belt message. Turn on the LCD, you replaced. b Press...
c Press a or b to choose the color of the drum you need to reset the drum counter by incorrect handling of the belt unit may void your warranty. Replacing the belt unit C Order No. If you touch it, it could degrade print quality. • Damage caused by completing the following ... C When you replace a drum unit with a new one, you need to replace the belt unit: Replace Belt IMPORTANT • DO NOT touch the surface of the belt unit. Buy a new belt unit and have it means the belt unit is open, you get a Replace Belt message. Turn on the LCD, you replaced. b Press...

Users Manual - English
Page 110
d Hold the green handle of the belt unit and lift the belt unit up, then pull it out. IMPORTANT To avoid print quality problems, DO NOT touch the shaded parts shown in the illustration. h 98
d Hold the green handle of the belt unit and lift the belt unit up, then pull it out. IMPORTANT To avoid print quality problems, DO NOT touch the shaded parts shown in the illustration. h 98

Users Manual - English
Page 111
h C C M Y K C-Cyan M-Magenta Y-Yellow K-Black g Close the top cover of the machine. 99 Make sure that you match the toner cartridge color to the same color label on the machine. e Unpack the new belt unit and put the new belt unit in the machine. Repeat this for all the drum unit and toner cartridge assemblies. Troubleshooting and routine maintenance f Slide each drum unit and toner cartridge assembly into the machine.
h C C M Y K C-Cyan M-Magenta Y-Yellow K-Black g Close the top cover of the machine. 99 Make sure that you match the toner cartridge color to the same color label on the machine. e Unpack the new belt unit and put the new belt unit in the machine. Repeat this for all the drum unit and toner cartridge assemblies. Troubleshooting and routine maintenance f Slide each drum unit and toner cartridge assembly into the machine.

Users Manual - English
Page 112
... the machine's power cord back into the AC power outlet first, and reconnect all cables. Be careful not to reset the belt unit counter. When you replace a belt unit with a new one, you need to replace the waste toner box: Replace WT Box IMPORTANT DO NOT reuse the waste toner box. d Press 1 ...to spill the toner. Buy a new waste toner box and have it ready before you need to reset the belt unit counter by lifting...
... the machine's power cord back into the AC power outlet first, and reconnect all cables. Be careful not to reset the belt unit counter. When you replace a belt unit with a new one, you need to replace the waste toner box: Replace WT Box IMPORTANT DO NOT reuse the waste toner box. d Press 1 ...to spill the toner. Buy a new waste toner box and have it ready before you need to reset the belt unit counter by lifting...

Users Manual - English
Page 114
h 102 IMPORTANT To avoid print quality problems, DO NOT touch the shaded parts shown in the illustration. d Hold the green handle of the belt unit and lift the belt unit up, then pull it out.
h 102 IMPORTANT To avoid print quality problems, DO NOT touch the shaded parts shown in the illustration. d Hold the green handle of the belt unit and lift the belt unit up, then pull it out.

Users Manual - English
Page 116
Repeat this for all the drum unit and toner cartridge assemblies. C M Y K h C-Cyan M-Magenta Y-Yellow K-Black j Close the top cover of the machine. 104 i Slide each drum unit and toner cartridge assembly into the machine. Make sure that you match the toner cartridge color to the same color label on the machine. h Put the belt unit in the machine. g Unpack the new waste toner box and put the new waste toner box in the machine.
Repeat this for all the drum unit and toner cartridge assemblies. C M Y K h C-Cyan M-Magenta Y-Yellow K-Black j Close the top cover of the machine. 104 i Slide each drum unit and toner cartridge assembly into the machine. Make sure that you match the toner cartridge color to the same color label on the machine. h Put the belt unit in the machine. g Unpack the new waste toner box and put the new waste toner box in the machine.

Users Manual - English
Page 118
... machine. c Press Stop/Exit. It will be accurate if that were set at the factory. Brother strongly recommends you perform this operation when you choose Network or All Settings. 106 Note Node name:... name appears in the Network Configuration List. Machine Info. 4.Network Config b Press Black Start or Color Start. The default node name is a report listing the current network configuration including the network print ...the machine settings back to choose 1.Drum, 2.Belt Unit, 3.PF Kit or 4.Fuser. Network Configuration List C The Network Configuration List is "BRNXXXXXXXXXXXX".
... machine. c Press Stop/Exit. It will be accurate if that were set at the factory. Brother strongly recommends you perform this operation when you choose Network or All Settings. 106 Note Node name:... name appears in the Network Configuration List. Machine Info. 4.Network Config b Press Black Start or Color Start. The default node name is a report listing the current network configuration including the network print ...the machine settings back to choose 1.Drum, 2.Belt Unit, 3.PF Kit or 4.Fuser. Network Configuration List C The Network Configuration List is "BRNXXXXXXXXXXXX".

Users Manual - English
Page 119
... to use the packing materials that you want to the original drum and toner cartridge assemblies 3 Packing material for locking the belt unit 107 Do one each DRUM UNIT / TONER CARTRIDGE ASSEMBLY and the WASTE TONER BOX must be adequately insured with your warranty. d You will...OK. The machine will be supplied by pressing Menu, 4, 0. Failure to remove these items and put in plastic bags before shipping may VOID THE WARRANTY. one for repacking: 1 2 3 1 Plastic bags - General Setup 6.Reset b Press a or b to choose the reset function you have the following parts ...
... to use the packing materials that you want to the original drum and toner cartridge assemblies 3 Packing material for locking the belt unit 107 Do one each DRUM UNIT / TONER CARTRIDGE ASSEMBLY and the WASTE TONER BOX must be adequately insured with your warranty. d You will...OK. The machine will be supplied by pressing Menu, 4, 0. Failure to remove these items and put in plastic bags before shipping may VOID THE WARRANTY. one for repacking: 1 2 3 1 Plastic bags - General Setup 6.Reset b Press a or b to choose the reset function you have the following parts ...

Users Manual - English
Page 121
i Reinstall the original packing material in a plastic bag and seal the bag completely. h h C g Remove the waste toner box from the machine, and then put it in the machine. 109 Troubleshooting and routine maintenance h Reinstall the belt unit back in the machine. f Remove the belt unit by holding the green handle and lifting the belt unit up and out of the machine.
i Reinstall the original packing material in a plastic bag and seal the bag completely. h h C g Remove the waste toner box from the machine, and then put it in the machine. 109 Troubleshooting and routine maintenance h Reinstall the belt unit back in the machine. f Remove the belt unit by holding the green handle and lifting the belt unit up and out of the machine.


