Users Manual - English
Page 6
...is covered by Brother in materials or workmanship. (6) Normal Periodic Maintenance Items, such as Paper Feeding Kit, Fuser and Laser Units. What...authorization from Brother and/or alteration/removal of the serial number). You are not limited to print heads, toner, drums, ink cartridges... a product from someone other than an authorized Brother reseller in shipping. Brother® One-Year Limited Warranty and Replacement Service (USA only) Who is covered: &#... What Brother will repair or replace the Machine and/or accompanying Consumable and Accessory Items at 1-800-284-4329 for Fax, MFC and...
...is covered by Brother in materials or workmanship. (6) Normal Periodic Maintenance Items, such as Paper Feeding Kit, Fuser and Laser Units. What...authorization from Brother and/or alteration/removal of the serial number). You are not limited to print heads, toner, drums, ink cartridges... a product from someone other than an authorized Brother reseller in shipping. Brother® One-Year Limited Warranty and Replacement Service (USA only) Who is covered: &#... What Brother will repair or replace the Machine and/or accompanying Consumable and Accessory Items at 1-800-284-4329 for Fax, MFC and...
Users Manual - English
Page 20
... duplex tray (For MFC-8640D, MFC-8840D and MFC-8840DN 12-11 If you are having difficulty with your MFC 12-13 Improving the print quality 12-18 Packing and shipping the MFC 12-22 Routine maintenance 12-25 Cleaning the scanner 12-25 Cleaning the printer 12-26 Cleaning the drum unit 12-27 Replacing ...the toner cartridge 12-28 How to replace the toner cartridge 12-29 Replacing the drum unit 12-34 Checking the drum life 12-37 Page ...
... duplex tray (For MFC-8640D, MFC-8840D and MFC-8840DN 12-11 If you are having difficulty with your MFC 12-13 Improving the print quality 12-18 Packing and shipping the MFC 12-22 Routine maintenance 12-25 Cleaning the scanner 12-25 Cleaning the printer 12-26 Cleaning the drum unit 12-27 Replacing ...the toner cartridge 12-28 How to replace the toner cartridge 12-29 Replacing the drum unit 12-34 Checking the drum life 12-37 Page ...
Users Manual - English
Page 162
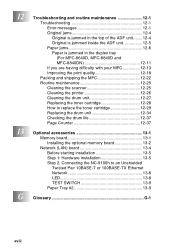
...duplex tray (For MFC-8640D, MFC-8840D and MFC-8840DN) on page 12-6 or Paper is jammed in the MFC. See Paper jams on page 12-11. Open the front cover, and then press Clear/Back. 2. Remove the paper and load it again. Calls must call the Brother fax back system (USA only). ACTION Use the drum... Check Paper #1 Check Paper #2 The MFC is not properly loaded in the multi-purpose tray (MP tray) (For MFC-8640D, MFC-8840D and MFC-8840DN) on page 12-4. Check Paper MP Paper in the paper tray or MP tray. -OR- then replace the drum unit with any sophisticated office product, errors...
...duplex tray (For MFC-8640D, MFC-8840D and MFC-8840DN) on page 12-6 or Paper is jammed in the MFC. See Paper jams on page 12-11. Open the front cover, and then press Clear/Back. 2. Remove the paper and load it again. Calls must call the Brother fax back system (USA only). ACTION Use the drum... Check Paper #1 Check Paper #2 The MFC is not properly loaded in the multi-purpose tray (MP tray) (For MFC-8640D, MFC-8840D and MFC-8840DN) on page 12-4. Check Paper MP Paper in the paper tray or MP tray. -OR- then replace the drum unit with any sophisticated office product, errors...

Users Manual - English
Page 176
...when I print them. Reduce the complexity of a document. Usually these are installed properly. (See Replacing the drum unit on page 12-34.) • The interface cable is securely connected between the MFC and computer. (See the Quick Setup Guide.) • Check to allow for this. Out Of... appear while scanning. Please make sure it is plugged in your MFC. Make sure the Brother TWAIN driver is not recognizing the printer's input buffer full signal. Most laser printers have text missing. In PaperPort®, click Scan in your application software to make sure to work ...
...when I print them. Reduce the complexity of a document. Usually these are installed properly. (See Replacing the drum unit on page 12-34.) • The interface cable is securely connected between the MFC and computer. (See the Quick Setup Guide.) • Check to allow for this. Out Of... appear while scanning. Please make sure it is plugged in your MFC. Make sure the Brother TWAIN driver is not recognizing the printer's input buffer full signal. Most laser printers have text missing. In PaperPort®, click Scan in your application software to make sure to work ...
Users Manual - English
Page 179
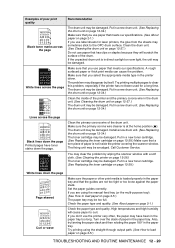
... location on page ix.) Use a new toner cartridge. (See Replacing the toner cartridge on page 12-28.) Use a new drum unit. (See Replacing the drum unit on page 12-34.) Make sure you are currently using a new drum unit. (See Replacing the drum unit on page 12-34.) Make sure that you use paper ... type in the MFC itself. (See Toner Save on page 4-9.) Try installing a new toner cartridge. (See Replacing the toner cartridge on page 12-28.) Try installing a new drum unit. (See Replacing the drum unit on page ix.) You may be damaged. Put in a new drum unit. (See Replacing the drum unit on page ...
... location on page ix.) Use a new toner cartridge. (See Replacing the toner cartridge on page 12-28.) Use a new drum unit. (See Replacing the drum unit on page 12-34.) Make sure you are currently using a new drum unit. (See Replacing the drum unit on page 12-34.) Make sure that you use paper ... type in the MFC itself. (See Toner Save on page 4-9.) Try installing a new toner cartridge. (See Replacing the toner cartridge on page 12-28.) Try installing a new drum unit. (See Replacing the drum unit on page ix.) You may be damaged. Put in a new drum unit. (See Replacing the drum unit on page ...
Users Manual - English
Page 180
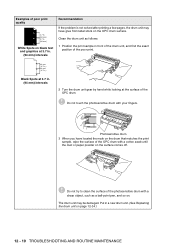
...drum with a cotton swab until the dust or paper powder on . Photosensitive drum...drum unit may be damaged. Do not try to clean the surface of the OPC drum with your fingers. The drum unit may have located the mark on the drum... that matches the print sample, wipe the surface of the photosensitive drum... with a sharp object, such as follows: 1 Position the print sample in front of the drum... intervals 2 Turn the drum unit gear by hand ...
...drum with a cotton swab until the dust or paper powder on . Photosensitive drum...drum unit may be damaged. Do not try to clean the surface of the OPC drum with your fingers. The drum unit may have located the mark on the drum... that matches the print sample, wipe the surface of the photosensitive drum... with a sharp object, such as follows: 1 Position the print sample in front of the drum... intervals 2 Turn the drum unit gear by hand ...
Users Manual - English
Page 181
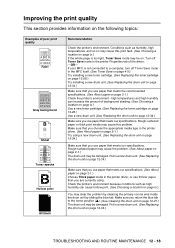
... path. (See How to load paper on page 12-28.) Make sure the paper or other print media is loaded properly in a new drum unit. (See Replacing the drum unit on page 12-34.) Clean the primary corona wire of poor print quality ABCDEFGH abcdefghijk ABCD abcde 01234 Black toner marks across the... using the manual feed tray (or the multi-purpose tray). (See How to clear this problem, especially if the printer has not been used for laser printers, the glue from the sheets may be damaged. Put in the paper tray and that meets our specifications. (See About paper on page 2-1.) Check...
... path. (See How to load paper on page 12-28.) Make sure the paper or other print media is loaded properly in a new drum unit. (See Replacing the drum unit on page 12-34.) Clean the primary corona wire of poor print quality ABCDEFGH abcdefghijk ABCD abcde 01234 Black toner marks across the... using the manual feed tray (or the multi-purpose tray). (See How to clear this problem, especially if the printer has not been used for laser printers, the glue from the sheets may be damaged. Put in the paper tray and that meets our specifications. (See About paper on page 2-1.) Check...

Users Manual - English
Page 182
The drum unit is loaded properly. Check the paper type and quality. (See About paper on page 2-1.) Try printing using the straight-through output path. (See How to replace it is necessary to load paper on page 2-5.) Turn over the stack of poor print quality B DEFGH abc efghijk A CD bcde 1 34 Wrinkles or creases Recommendation Make sure that paper is a consumable item and it periodically. 12 - 21 TROUBLESHOOTING AND ROUTINE MAINTENANCE Examples of paper in the tray or try rotating the paper 180° in the input tray.
The drum unit is loaded properly. Check the paper type and quality. (See About paper on page 2-1.) Try printing using the straight-through output path. (See How to replace it is necessary to load paper on page 2-5.) Turn over the stack of poor print quality B DEFGH abc efghijk A CD bcde 1 34 Wrinkles or creases Recommendation Make sure that paper is a consumable item and it periodically. 12 - 21 TROUBLESHOOTING AND ROUTINE MAINTENANCE Examples of paper in the tray or try rotating the paper 180° in the input tray.
Users Manual - English
Page 188
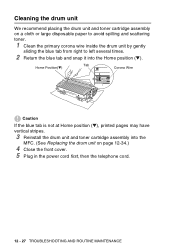
... by gently sliding the blue tab from right to left several times. 2 Return the blue tab and snap it into the MFC. (See Replacing the drum unit on page 12-34.) 4 Close the front cover. 5 Plug in the power cord first, then the telephone cord. 12 - 27 TROUBLESHOOTING AND ROUTINE MAINTENANCE ...Tab Home Position(▼) Corona Wire Caution If the blue tab is not at Home position (▼), printed pages may have vertical stripes. 3 Reinstall the drum unit and toner cartridge assembly into the Home position (▼).
... by gently sliding the blue tab from right to left several times. 2 Return the blue tab and snap it into the MFC. (See Replacing the drum unit on page 12-34.) 4 Close the front cover. 5 Plug in the power cord first, then the telephone cord. 12 - 27 TROUBLESHOOTING AND ROUTINE MAINTENANCE ...Tab Home Position(▼) Corona Wire Caution If the blue tab is not at Home position (▼), printed pages may have vertical stripes. 3 Reinstall the drum unit and toner cartridge assembly into the Home position (▼).
Users Manual - English
Page 190
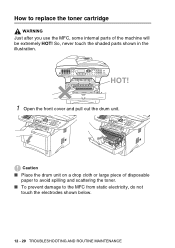
HOT! 1 Open the front cover and pull out the drum unit. Caution ■ Place the drum unit on a drop cloth or large piece of disposable paper to avoid spilling and scattering the toner. ■ To prevent damage to replace the toner cartridge WARNING Just after you use the MFC, some internal parts of the machine will be extremely HOT! So, never touch the shaded parts shown in the illustration. How to the MFC from static electricity, do not touch the electrodes shown below. 12 - 29 TROUBLESHOOTING AND ROUTINE MAINTENANCE
HOT! 1 Open the front cover and pull out the drum unit. Caution ■ Place the drum unit on a drop cloth or large piece of disposable paper to avoid spilling and scattering the toner. ■ To prevent damage to replace the toner cartridge WARNING Just after you use the MFC, some internal parts of the machine will be extremely HOT! So, never touch the shaded parts shown in the illustration. How to the MFC from static electricity, do not touch the electrodes shown below. 12 - 29 TROUBLESHOOTING AND ROUTINE MAINTENANCE
Users Manual - English
Page 195
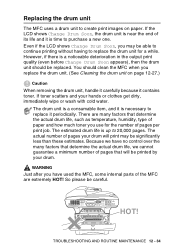
... toner you may be careful. If toner scatters and your drum will be able to continue printing without having to replace it is up to purchase a new one. Because we have used the MFC, some internal parts of the MFC are many factors that determine the actual drum life, we cannot guarantee a minimum number of pages your...
... toner you may be careful. If toner scatters and your drum will be able to continue printing without having to replace it is up to purchase a new one. Because we have used the MFC, some internal parts of the MFC are many factors that determine the actual drum life, we cannot guarantee a minimum number of pages your...
Users Manual - English
Page 196
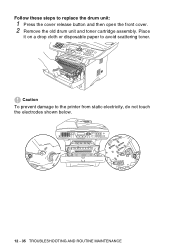
Place it on a drop cloth or disposable paper to replace the drum unit: 1 Press the cover release button and then open the front cover. 2 Remove the old drum unit and toner cartridge assembly. Follow these steps to avoid scattering toner. Caution To prevent damage to the printer from static electricity, do not touch the electrodes shown below. 12 - 35 TROUBLESHOOTING AND ROUTINE MAINTENANCE
Place it on a drop cloth or disposable paper to replace the drum unit: 1 Press the cover release button and then open the front cover. 2 Remove the old drum unit and toner cartridge assembly. Follow these steps to avoid scattering toner. Caution To prevent damage to the printer from static electricity, do not touch the electrodes shown below. 12 - 35 TROUBLESHOOTING AND ROUTINE MAINTENANCE
Users Manual - English
Page 197
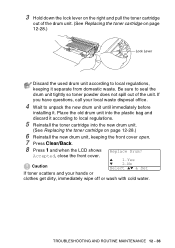
... you have questions, call your hands or clothes get dirty, immediately wipe off or wash with cold water. TROUBLESHOOTING AND ROUTINE MAINTENANCE 12 - 36 Caution Replace Drum? ▲ 1.Yes ▼ 2.No Select ▲▼ & Set If toner scatters and your local waste disposal office. 4 Wait to local regulations.... lever on the right and pull the toner cartridge out of the unit. Place the old drum unit into the new drum unit. (See Replacing the toner cartridge on page 12-28.) 6 Reinstall the new drum unit, keeping the front cover open. 7 Press Clear/Back. 8 Press 1 and when the...
... you have questions, call your hands or clothes get dirty, immediately wipe off or wash with cold water. TROUBLESHOOTING AND ROUTINE MAINTENANCE 12 - 36 Caution Replace Drum? ▲ 1.Yes ▼ 2.No Select ▲▼ & Set If toner scatters and your local waste disposal office. 4 Wait to local regulations.... lever on the right and pull the toner cartridge out of the unit. Place the old drum unit into the new drum unit. (See Replacing the toner cartridge on page 12-28.) 6 Reinstall the new drum unit, keeping the front cover open. 7 Press Clear/Back. 8 Press 1 and when the...
Users Manual - English
Page 224
... paper 5-5 retrieving from an external phone .... 7-6 Groups 6-16 Search 7-5 Speed Dial numbers ........ 7-6 Distinctive Ring 5-11 drum unit checking remaining life 12-37 replacing 12-34 Dual Access 6-9 Duplex/N in 1 key 10-11 Duplex/1 in 1 10-14 Duplex/2 in 1 10-16 Duplex/4 in 1 10-16 E Easy Receive 5-4 ECM (Error Correction Mode) 1-15 ecology Scanner Lamp 4-10 Sleep...
... paper 5-5 retrieving from an external phone .... 7-6 Groups 6-16 Search 7-5 Speed Dial numbers ........ 7-6 Distinctive Ring 5-11 drum unit checking remaining life 12-37 replacing 12-34 Dual Access 6-9 Duplex/N in 1 key 10-11 Duplex/1 in 1 10-14 Duplex/2 in 1 10-16 Duplex/4 in 1 10-16 E Easy Receive 5-4 ECM (Error Correction Mode) 1-15 ecology Scanner Lamp 4-10 Sleep...


