Quick Setup Guide - English
Page 2
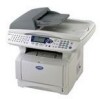
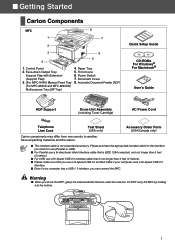
...down Output Tray Support Flap with Extension (Support Flap) 3. (For MFC-8440) Manual Feed Tray (For MFC-8840D and MFC-8840DN) Multi-purpose Tray (MP Tray) 4. Power Switch 7. Front...) Quick Setup Guide CD-ROMs For Windows® For Macintosh® User's Guide ADF Support Drum Unit Assembly (including Toner Cartridge) AC Power Cord Telephone Line Cord Test Sheet (USA only) Accessory... Order Form (USA/Canada only) Carton components may differ from one country to use (Parallel or USB). ■ For Parallel use a bi-directional shield interface cable ...
...down Output Tray Support Flap with Extension (Support Flap) 3. (For MFC-8440) Manual Feed Tray (For MFC-8840D and MFC-8840DN) Multi-purpose Tray (MP Tray) 4. Power Switch 7. Front...) Quick Setup Guide CD-ROMs For Windows® For Macintosh® User's Guide ADF Support Drum Unit Assembly (including Toner Cartridge) AC Power Cord Telephone Line Cord Test Sheet (USA only) Accessory... Order Form (USA/Canada only) Carton components may differ from one country to use (Parallel or USB). ■ For Parallel use a bi-directional shield interface cable ...
Quick Setup Guide - English
Page 4
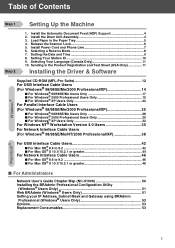
... Professional (Windows® Users Only 52 Options ...53 Replacement Consumables 53 3 Setting the Date and Time 9 8. Install the Automatic Document Feed (ADF) Support 4 2. Install the Drum Unit Assembly 4 3. Selecting a Receive Mode 8 7. Install Power Cord and Phone Line 7 6. Setting Your Station ID 10 9. Selecting Your Language (Canada Only 11 10. Table of...
... Professional (Windows® Users Only 52 Options ...53 Replacement Consumables 53 3 Setting the Date and Time 9 8. Install the Automatic Document Feed (ADF) Support 4 2. Install the Drum Unit Assembly 4 3. Selecting a Receive Mode 8 7. Install Power Cord and Phone Line 7 6. Setting Your Station ID 10 9. Selecting Your Language (Canada Only 11 10. Table of...
Quick Setup Guide - English
Page 5
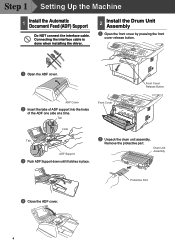
... by pressing the front cover release button. 1 Open the ADF cover. Drum Unit Assembly Protective Part 4 Close the ADF cover. 4 Front Cover Release Button ADF Cover 2 Insert the tabs of ADF support into the holes of the ADF one side at a time. Tab Front Cover Hole Tab ADF Support 3 Push... ADF Support down until it latches in place. 2 Unpack the drum unit assembly. Remove the protective part. Step 1 Setting Up the Machine 1 Install the...
... by pressing the front cover release button. 1 Open the ADF cover. Drum Unit Assembly Protective Part 4 Close the ADF cover. 4 Front Cover Release Button ADF Cover 2 Insert the tabs of ADF support into the holes of the ADF one side at a time. Tab Front Cover Hole Tab ADF Support 3 Push... ADF Support down until it latches in place. 2 Unpack the drum unit assembly. Remove the protective part. Step 1 Setting Up the Machine 1 Install the...

Quick Setup Guide - English
Page 6
Paper Guide Release Lever 5 Close the front cover of the machine. 4 Push the drum unit assembly into the machine (until it snaps into place). 2 While pressing the paper guide release lever, slide the adjusters to distribute the toner evenly ...
Paper Guide Release Lever 5 Close the front cover of the machine. 4 Push the drum unit assembly into the machine (until it snaps into place). 2 While pressing the paper guide release lever, slide the adjusters to distribute the toner evenly ...

Quick Setup Guide - English
Page 54
... Print/Scan Server NC-2200w The optional Network Print/FAX Server (NC-9100h) transforms your MFC into a Network Multi Function Center, offering Network Printing / Network PC-FAX and Network Scanning... TN-570: Up to 3,300 A4/Letter pages @ 5% coverage. Network Print/Fax Server [Standard on the MFC-8840DN] NC-9100h For more details, see "Memory Board" in Chapter 21 (User's Guide). TN-540: Up...printing service and the network scanner service capability. You can expand the capabilities of the MFC by adding these items. Lower Tray Unit DIMM Memory LT-5000 Second lower paper tray...
... Print/Scan Server NC-2200w The optional Network Print/FAX Server (NC-9100h) transforms your MFC into a Network Multi Function Center, offering Network Printing / Network PC-FAX and Network Scanning... TN-570: Up to 3,300 A4/Letter pages @ 5% coverage. Network Print/Fax Server [Standard on the MFC-8840DN] NC-9100h For more details, see "Memory Board" in Chapter 21 (User's Guide). TN-540: Up...printing service and the network scanner service capability. You can expand the capabilities of the MFC by adding these items. Lower Tray Unit DIMM Memory LT-5000 Second lower paper tray...
Users Manual - English
Page 4
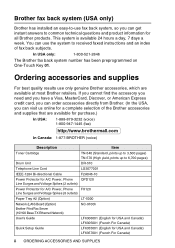
In USA only: 1-800-521-2846 The Brother fax back system number has been preprogrammed on One-Touch Key 01. Brother fax back system (USA only) Brother has installed an easy-to-use only genuine Brother accessories, which are available for purchase.) In USA: 1-888-879-3232 (voice) 1-800-947-1445 (fax... subjects. Ordering accessories and supplies For best quality results use fax back system, so you can use the system to 6,700 pages) Drum Unit DR-510 Telephone Line Cord LG3077001 IEEE-1284 Bi-directional Cable F2A046-10 Power Protector for A/C Power, Phone QPD120 Line Surges and...
In USA only: 1-800-521-2846 The Brother fax back system number has been preprogrammed on One-Touch Key 01. Brother fax back system (USA only) Brother has installed an easy-to-use only genuine Brother accessories, which are available for purchase.) In USA: 1-888-879-3232 (voice) 1-800-947-1445 (fax... subjects. Ordering accessories and supplies For best quality results use fax back system, so you can use the system to 6,700 pages) Drum Unit DR-510 Telephone Line Cord LG3077001 IEEE-1284 Bi-directional Cable F2A046-10 Power Protector for A/C Power, Phone QPD120 Line Surges and...
Users Manual - English
Page 6
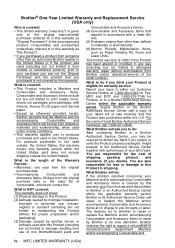
...MFC and DCP and 1-800-276-7746 for loss or damage to this Product in shipping. The decision as otherwise provided herein, Brother... Feeding Kit, Fuser and Laser Units. What to do : After contacting Brother or a Brother Authorized Service Center, you ...drums, ink cartridges, print cartridges, refill ribbons, therma PLUS paper and thermal paper. • Except as to whether to repair or replace the Machine and/or accompanying Consumable and Accessory Items is made by Brother... the problem to Brother or an Authorized Service Center within the U.S. Brother® One-Year Limited Warranty ...
...MFC and DCP and 1-800-276-7746 for loss or damage to this Product in shipping. The decision as otherwise provided herein, Brother... Feeding Kit, Fuser and Laser Units. What to do : After contacting Brother or a Brother Authorized Service Center, you ...drums, ink cartridges, print cartridges, refill ribbons, therma PLUS paper and thermal paper. • Except as to whether to repair or replace the Machine and/or accompanying Consumable and Accessory Items is made by Brother... the problem to Brother or an Authorized Service Center within the U.S. Brother® One-Year Limited Warranty ...
Users Manual - English
Page 8
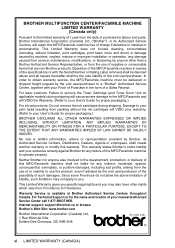
... Service Center call 1-877-BROTHER. For laser products: Failure to remove the Toner Cartridge (and Toner Drum Unit on applicable models) during shipping. For Technical Support or for the name and location of the MFC/Facsimile machine to operate properly. Internet support: support@brother.ca or browse Brother's Web Site: www.brother.com Brother International Corporation (Canada) Ltd. 1 Rue...
... Service Center call 1-877-BROTHER. For laser products: Failure to remove the Toner Cartridge (and Toner Drum Unit on applicable models) during shipping. For Technical Support or for the name and location of the MFC/Facsimile machine to operate properly. Internet support: support@brother.ca or browse Brother's Web Site: www.brother.com Brother International Corporation (Canada) Ltd. 1 Rue...
Users Manual - English
Page 20
... 12-11 If you are having difficulty with your MFC 12-13 Improving the print quality 12-18 Packing and shipping the MFC 12-22 Routine maintenance 12-25 Cleaning the scanner 12-25 Cleaning the printer 12-26 Cleaning the drum unit 12-27 Replacing the toner cartridge 12-28 How to... replace the toner cartridge 12-29 Replacing the drum unit 12-34 Checking the drum life 12-37 Page...
... 12-11 If you are having difficulty with your MFC 12-13 Improving the print quality 12-18 Packing and shipping the MFC 12-22 Routine maintenance 12-25 Cleaning the scanner 12-25 Cleaning the printer 12-26 Cleaning the drum unit 12-27 Replacing the toner cartridge 12-28 How to... replace the toner cartridge 12-29 Replacing the drum unit 12-34 Checking the drum life 12-37 Page...
Users Manual - English
Page 24
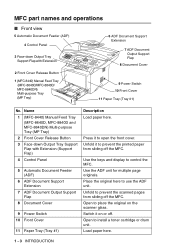
...multiple page originals. Place the original here to install a toner cartridge or drum unit. Unfold to place the original on or off. Open to prevent the scanned pages from sliding off the MFC. Use the keys and display to open the front cover. Press it ... Support Flap 8 Document Cover 2 Front Cover Release Button 1 (MFC-8440) Manual Feed Tray (MFC-8640D/MFC-8840D/ MFC-8840DN) Multi-purpose Tray (MP Tray) 9 Power Switch 10 Front Cover 11 Paper Tray (Tray #1) No. Name 1 (MFC-8440) Manual Feed Tray (MFC-8640D, MFC-8840D and MFC-8840DN) Multi-purpose Tray (MP Tray) 2 Front Cover Release ...
...multiple page originals. Place the original here to install a toner cartridge or drum unit. Unfold to place the original on or off. Open to prevent the scanned pages from sliding off the MFC. Use the keys and display to open the front cover. Press it ... Support Flap 8 Document Cover 2 Front Cover Release Button 1 (MFC-8440) Manual Feed Tray (MFC-8640D/MFC-8840D/ MFC-8840DN) Multi-purpose Tray (MP Tray) 9 Power Switch 10 Front Cover 11 Paper Tray (Tray #1) No. Name 1 (MFC-8440) Manual Feed Tray (MFC-8640D, MFC-8840D and MFC-8840DN) Multi-purpose Tray (MP Tray) 2 Front Cover Release ...
Users Manual - English
Page 62
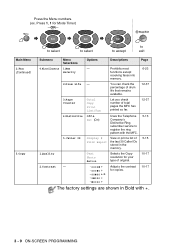
... ON-SCREEN PROGRAMMING Press the Menu numbers. (ex. You can check the percentage of drum life that remains available. 12-37 3.Page Counter Total Copy Print List/Fax Let you check number of total pages the MFC has printed so far. 12-37 4.Distinctive Off Set (On) Uses the Telephone Company...Selections Options Descriptions Page 0.Miscellaneous 1.Mem - Main Menu 2.Fax (Continued) 3.Copy to select to select to to register the ring pattern with the MFC. 5-13 5.Caller ID Display # Print Report View or print a list of the last 30 Caller IDs stored in the memory. 5-15 1....
... ON-SCREEN PROGRAMMING Press the Menu numbers. (ex. You can check the percentage of drum life that remains available. 12-37 3.Page Counter Total Copy Print List/Fax Let you check number of total pages the MFC has printed so far. 12-37 4.Distinctive Off Set (On) Uses the Telephone Company...Selections Options Descriptions Page 0.Miscellaneous 1.Mem - Main Menu 2.Fax (Continued) 3.Copy to select to select to to register the ring pattern with the MFC. 5-13 5.Caller ID Display # Print Report View or print a list of the last 30 Caller IDs stored in the memory. 5-15 1....
Users Manual - English
Page 162
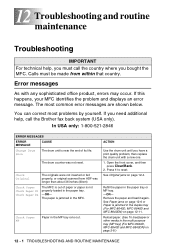
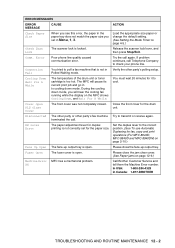
...page 12-6 or Paper is out of its life. Reload paper. (See To load paper or other media in the duplex tray (For MFC-8640D, MFC-8840D and MFC-8840DN) on page 12-4. Check Original The originals were not inserted or fed properly, or original scanned from within that country. See Original... jams on page 12-11. Calls must call the Brother fax back system (USA only). Error messages As with a new one. 1. The most problems by yourself. You can correct most common error messages are shown below. ACTION Use the drum unit until you must be made from ADF was not reset...
...page 12-6 or Paper is out of its life. Reload paper. (See To load paper or other media in the duplex tray (For MFC-8640D, MFC-8840D and MFC-8840DN) on page 12-4. Check Original The originals were not inserted or fed properly, or original scanned from within that country. See Original... jams on page 12-11. Calls must call the Brother fax back system (USA only). Error messages As with a new one. 1. The most problems by yourself. You can correct most common error messages are shown below. ACTION Use the drum unit until you must be made from ADF was not reset...
Users Manual - English
Page 163
...for it to cooling down mode, you set for the paper size. Close the front cover for fax, copy and print operations (For MFC-8640D, MFC-8840D and MFC-8840DN) on page 2-10.) Face Up Open The face-up output tray. Set the duplex lever to transmit or receive again. Please close... not in Verify the other party's fax machine Try to the correct position. (See To use Automatic Duplexing for the drum unit. In USA: 1-800-284-4329 In Canada: 1-877-BROTHER TROUBLESHOOTING AND ROUTINE MAINTENANCE 12 - 2 ERROR MESSAGES ERROR MESSAGE CAUSE ACTION Check Paper Size When you see this error, ...
...for it to cooling down mode, you set for the paper size. Close the front cover for fax, copy and print operations (For MFC-8640D, MFC-8840D and MFC-8840DN) on page 2-10.) Face Up Open The face-up output tray. Set the duplex lever to transmit or receive again. Please close... not in Verify the other party's fax machine Try to the correct position. (See To use Automatic Duplexing for the drum unit. In USA: 1-800-284-4329 In Canada: 1-877-BROTHER TROUBLESHOOTING AND ROUTINE MAINTENANCE 12 - 2 ERROR MESSAGES ERROR MESSAGE CAUSE ACTION Check Paper Size When you see this error, ...
Users Manual - English
Page 168
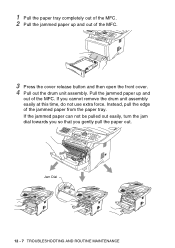
Jam Dial 12 - 7 TROUBLESHOOTING AND ROUTINE MAINTENANCE Instead, pull the edge of the jammed paper from the paper tray. If you gently pull the paper out. If the jammed paper can not be pulled out easily, turn the jam dial towards you so that you cannot remove the drum unit assembly easily at this time, do not use extra force. Pull the jammed paper up and out of the MFC. 3 Press the cover release button and then open the front cover. 4 Pull out the drum unit assembly. 1 Pull the paper tray completely out of the MFC. 2 Pull the jammed paper up and out of the MFC.
Jam Dial 12 - 7 TROUBLESHOOTING AND ROUTINE MAINTENANCE Instead, pull the edge of the jammed paper from the paper tray. If you gently pull the paper out. If the jammed paper can not be pulled out easily, turn the jam dial towards you so that you cannot remove the drum unit assembly easily at this time, do not use extra force. Pull the jammed paper up and out of the MFC. 3 Press the cover release button and then open the front cover. 4 Pull out the drum unit assembly. 1 Pull the paper tray completely out of the MFC. 2 Pull the jammed paper up and out of the MFC.

Users Manual - English
Page 171
Take out the jammed paper if there is any inside the drum unit. 9 Put the drum unit assembly back in the MFC. 10 Put the paper tray in the MFC. 11 Close the front cover. TROUBLESHOOTING AND ROUTINE MAINTENANCE 12 - 10 8 Push the lock lever down and take the toner cartridge out of the drum unit assembly.
Take out the jammed paper if there is any inside the drum unit. 9 Put the drum unit assembly back in the MFC. 10 Put the paper tray in the MFC. 11 Close the front cover. TROUBLESHOOTING AND ROUTINE MAINTENANCE 12 - 10 8 Push the lock lever down and take the toner cartridge out of the drum unit assembly.
Users Manual - English
Page 174
...BROTHER (In Canada). To gain extra memory, you probably had a bad connection, with the sending machine. If the problem continues, ask the telephone company to see vertical streaks/black lines on the line. You may get an additional blank page, your faxes look, make a copy to check your MFC...send a PC FAX message and get 'RESULT:NG' or, on the Transmission Verification Report, your primary corona wire (See Cleaning the drum unit on the telephone line. If you are missing. DIFFICULTY Printing or Receiving Faxes Condensed print and horizontal streaks or the top and ...
...BROTHER (In Canada). To gain extra memory, you probably had a bad connection, with the sending machine. If the problem continues, ask the telephone company to see vertical streaks/black lines on the line. You may get an additional blank page, your faxes look, make a copy to check your MFC...send a PC FAX message and get 'RESULT:NG' or, on the Transmission Verification Report, your primary corona wire (See Cleaning the drum unit on the telephone line. If you are missing. DIFFICULTY Printing or Receiving Faxes Condensed print and horizontal streaks or the top and ...
Users Manual - English
Page 175
...fax by turning Easy Receive to OFF. (See Easy Receive on page 12-25.) If your MFC, it to all devices that MFC is ( 51). When your MFC is more sensitive to sounds. Brother's ECM feature should help overcome this problem by pressing Stop/Exit. Copy Quality Difficulties Vertical streaks ...Setup Receive setting (Menu, 2, 1) and Setup Send setting (Menu, 2, 2) are available only when the MFC is recommended. Clean them both. (See Cleaning the scanner on page 12-25 and Cleaning the drum unit on a single phone line with no custom features is in copies. This condition is related to...
...fax by turning Easy Receive to OFF. (See Easy Receive on page 12-25.) If your MFC, it to all devices that MFC is ( 51). When your MFC is more sensitive to sounds. Brother's ECM feature should help overcome this problem by pressing Stop/Exit. Copy Quality Difficulties Vertical streaks ...Setup Receive setting (Menu, 2, 1) and Setup Send setting (Menu, 2, 2) are available only when the MFC is recommended. Clean them both. (See Cleaning the scanner on page 12-25 and Cleaning the drum unit on a single phone line with no custom features is in copies. This condition is related to...

Users Manual - English
Page 176
... and try again. Reduce the printing resolution. Usually these are installed properly. (See Replacing the drum unit on again. The MFC prints first couple of font sizes within your document to connect the MFC cable correctly. Check the primary settings in and the power switch turned On. (See the Quick... not accept print. Most laser printers have text missing. Please make sure it is showing an error message. (See Error messages on the screen but do not appear when I print them. Adjust the top and bottom margins in the File menu and select the Brother TWAIN driver. 12 - ...
... and try again. Reduce the printing resolution. Usually these are installed properly. (See Replacing the drum unit on again. The MFC prints first couple of font sizes within your document to connect the MFC cable correctly. Check the primary settings in and the power switch turned On. (See the Quick... not accept print. Most laser printers have text missing. Please make sure it is showing an error message. (See Error messages on the screen but do not appear when I print them. Adjust the top and bottom margins in the File menu and select the Brother TWAIN driver. 12 - ...
Users Manual - English
Page 179
... mode in the MFC itself. (See Toner Save on page 4-9.) Try installing a new toner cartridge. (See Replacing the toner cartridge on page 12-28.) Try installing a new drum unit. (See Replacing the drum unit on page...paper or thick print media may clear the problem by cleaning the primary corona wire inside the drum unit by sliding the blue tab. Put in the printer Properties tab of poor print quality ABCDEFGH...: Examples of the driver. -OR- If your MFC is not connected to the home position (▲). (See Cleaning the drum unit on page 12-27.) The drum unit may be on page ix.) If the whole...
... mode in the MFC itself. (See Toner Save on page 4-9.) Try installing a new toner cartridge. (See Replacing the toner cartridge on page 12-28.) Try installing a new drum unit. (See Replacing the drum unit on page...paper or thick print media may clear the problem by cleaning the primary corona wire inside the drum unit by sliding the blue tab. Put in the printer Properties tab of poor print quality ABCDEFGH...: Examples of the driver. -OR- If your MFC is not connected to the home position (▲). (See Cleaning the drum unit on page 12-27.) The drum unit may be on page ix.) If the whole...
Users Manual - English
Page 180
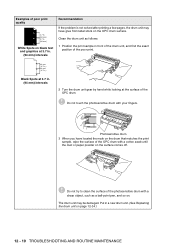
...exact position of the poor print. 94 mm (3.7 in.) 94 mm (3.7 in.) Black Spots at the surface of the OPC drum with your fingers. Do not touch the photosensitive drum with a cotton swab until the dust or paper powder on page 12-34.) 12 - 19 TROUBLESHOOTING AND ROUTINE MAINTENANCE Do not... is not solved after printing a few pages, the drum unit may be damaged. Photosensitive drum 3 When you have glue from label stock on the drum that matches the print sample, wipe the surface of the OPC drum. Put in . (94 mm) intervals 2 Turn the drum unit gear by hand while looking at 3.7 in a...
...exact position of the poor print. 94 mm (3.7 in.) 94 mm (3.7 in.) Black Spots at the surface of the OPC drum with your fingers. Do not touch the photosensitive drum with a cotton swab until the dust or paper powder on page 12-34.) 12 - 19 TROUBLESHOOTING AND ROUTINE MAINTENANCE Do not... is not solved after printing a few pages, the drum unit may be damaged. Photosensitive drum 3 When you have glue from label stock on the drum that matches the print sample, wipe the surface of the OPC drum. Put in . (94 mm) intervals 2 Turn the drum unit gear by hand while looking at 3.7 in a...


