Users Manual - English
Page 25
... and shipping the MFC 22-22 Routine maintenance 22-25 Cleaning the scanner 22-25 Cleaning the printer 22-26 Cleaning the drum unit 22-27 Replacing the toner cartridge 22-28 xxiv about the interface cable 21-4 Industry Canada Compliance Statement (Canada only 21-4 International ENERGY STAR® Compliance Statement 21-4 Laser safety 21...
... and shipping the MFC 22-22 Routine maintenance 22-25 Cleaning the scanner 22-25 Cleaning the printer 22-26 Cleaning the drum unit 22-27 Replacing the toner cartridge 22-28 xxiv about the interface cable 21-4 Industry Canada Compliance Statement (Canada only 21-4 International ENERGY STAR® Compliance Statement 21-4 Laser safety 21...

Users Manual - English
Page 26
How to replace the toner cartridge 22-29 Replacing the drum unit 22-34 Checking the drum life 22-37 Page Counter 22-37 23 Optional accessories 23-1 Memory board 23-1 ...-T or 100BASE-TX Ethernet Network 23-8 LED 23-8 TEST SWITCH 23-9 Paper Tray #2 23-9 G Glossary G-1 S Specifications S-1 Product description S-1 Ge nera l S-1 Print media S-2 Copy S-2 Fax S-3 Scanner S-4 Printer S-5 Interfaces S-5 Computer requirements S-6 Consumable items S-7 Network (LAN) board (NC-9100h S-8 24 Index I-1 25 Remote Retrieval Access card R-1 xxv
How to replace the toner cartridge 22-29 Replacing the drum unit 22-34 Checking the drum life 22-37 Page Counter 22-37 23 Optional accessories 23-1 Memory board 23-1 ...-T or 100BASE-TX Ethernet Network 23-8 LED 23-8 TEST SWITCH 23-9 Paper Tray #2 23-9 G Glossary G-1 S Specifications S-1 Product description S-1 Ge nera l S-1 Print media S-2 Copy S-2 Fax S-3 Scanner S-4 Printer S-5 Interfaces S-5 Computer requirements S-6 Consumable items S-7 Network (LAN) board (NC-9100h S-8 24 Index I-1 25 Remote Retrieval Access card R-1 xxv

Users Manual - English
Page 367
...while scanning. SUGGESTIONS Check the following: • The MFC is not recognizing the printer's input buffer full signal. Most laser printers have text missing. Adjust the top and bottom margins in your MFC. Make sure the Brother TWAIN driver is set up to work with your application...Brother TWAIN driver. Please make sure it prints garbage. Reduce the complexity of pages correctly, then some pages have a restricted area that will not accept print. In PaperPort®, click Scan in and the power switch turned On. (See the Quick Setup Guide on page 7.) • The toner cartridge...
...while scanning. SUGGESTIONS Check the following: • The MFC is not recognizing the printer's input buffer full signal. Most laser printers have text missing. Adjust the top and bottom margins in your MFC. Make sure the Brother TWAIN driver is set up to work with your application...Brother TWAIN driver. Please make sure it prints garbage. Reduce the complexity of pages correctly, then some pages have a restricted area that will not accept print. In PaperPort®, click Scan in and the power switch turned On. (See the Quick Setup Guide on page 7.) • The toner cartridge...
Users Manual - English
Page 370
.... Turn off Toner Save mode in the printer Properties tab of the driver. -OR- Make sure you return the blue tab to a computer, turn off Toner Save mode in the MFC itself. (See Toner Save on page 4-9.) Try installing a new toner cartridge. (See Replacing the toner cartridge on page 22-28.) Try installing a new...
.... Turn off Toner Save mode in the printer Properties tab of the driver. -OR- Make sure you return the blue tab to a computer, turn off Toner Save mode in the MFC itself. (See Toner Save on page 4-9.) Try installing a new toner cartridge. (See Replacing the toner cartridge on page 22-28.) Try installing a new...
Users Manual - English
Page 372
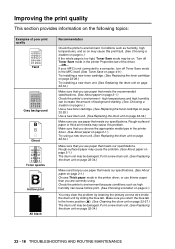
.... (See How to load paper on page 22-27.) The drum unit may be smudged. Put in a new toner cartridge. (See Replacing the toner cartridge on page 22-34.) The toner cartridge may be damaged. Set the paper guides correctly. Check the paper type and quality. (See About paper on page 2-5.)...27.) Do not use paper that has clips or staples because they will cause paper to clear this problem, especially if the printer has not been used for laser printers, the glue from the sheets may be damaged. Make sure that you use paper that meets our specifications. The fixing unit ...
.... (See How to load paper on page 22-27.) The drum unit may be smudged. Put in a new toner cartridge. (See Replacing the toner cartridge on page 22-34.) The toner cartridge may be damaged. Set the paper guides correctly. Check the paper type and quality. (See About paper on page 2-5.)...27.) Do not use paper that has clips or staples because they will cause paper to clear this problem, especially if the printer has not been used for laser printers, the glue from the sheets may be damaged. Make sure that you use paper that meets our specifications. The fixing unit ...
Users Manual - English
Page 378
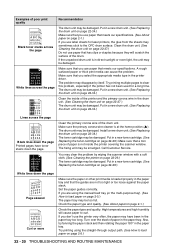
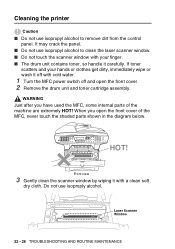
WARNING Just after you open the front cover. 2 Remove the drum unit and toner cartridge assembly. HOT! Do not use isoproply alcohol. If toner scatters and your finger. ■ The drum unit contains toner, so handle it carefully. Front view 3 ... you have used the MFC, some internal parts of the MFC, never touch the shaded parts shown in the diagram below. It may crack the panel. ■ Do not use isopropyl alcohol to remove dirt from the control panel. Laser Scanner Window 22 - 26 TROUBLESHOOTING AND ROUTINE MAINTENANCE Cleaning the printer Caution ■ Do not...
WARNING Just after you open the front cover. 2 Remove the drum unit and toner cartridge assembly. HOT! Do not use isoproply alcohol. If toner scatters and your finger. ■ The drum unit contains toner, so handle it carefully. Front view 3 ... you have used the MFC, some internal parts of the MFC, never touch the shaded parts shown in the diagram below. It may crack the panel. ■ Do not use isopropyl alcohol to remove dirt from the control panel. Laser Scanner Window 22 - 26 TROUBLESHOOTING AND ROUTINE MAINTENANCE Cleaning the printer Caution ■ Do not...

Users Manual - English
Page 387
Follow these steps to the printer from static electricity, do not touch the electrodes shown below. TROUBLESHOOTING AND ROUTINE MAINTENANCE 22 - 35 Caution To prevent damage to replace the drum unit: 1 Press the cover release button and then open the front cover. 2 Remove the old drum unit and toner cartridge assembly. Place it on a drop cloth or disposable paper to avoid scattering toner.
Follow these steps to the printer from static electricity, do not touch the electrodes shown below. TROUBLESHOOTING AND ROUTINE MAINTENANCE 22 - 35 Caution To prevent damage to replace the drum unit: 1 Press the cover release button and then open the front cover. 2 Remove the old drum unit and toner cartridge assembly. Place it on a drop cloth or disposable paper to avoid scattering toner.

Users Manual - English
Page 417
... 7-5 Setup Date and Time 4-1 Station ID (fax header) .....4-2 shipping the machine ...... 22-22 software Brother Control Center ... 14-1 ScanSoft® Paper Port® 13-19 Speed Dial 1-7 dialing 7-6 storing 7-1... click on the Scan Settings tab 15-9 Tone signals on Pulse line ..7-8 toner cartridge replacing 22-28, 22-29 tray use, setting copy 4-11 fax 4-12 troubleshooting ...having difficulty incoming calls 22-14 paper handling ...........22-16 phone line difficulties .22-13 printer difficulties ........22-15 printing or receiving faxes 22-13 two-line phone system .......1-19 ...
... 7-5 Setup Date and Time 4-1 Station ID (fax header) .....4-2 shipping the machine ...... 22-22 software Brother Control Center ... 14-1 ScanSoft® Paper Port® 13-19 Speed Dial 1-7 dialing 7-6 storing 7-1... click on the Scan Settings tab 15-9 Tone signals on Pulse line ..7-8 toner cartridge replacing 22-28, 22-29 tray use, setting copy 4-11 fax 4-12 troubleshooting ...having difficulty incoming calls 22-14 paper handling ...........22-16 phone line difficulties .22-13 printer difficulties ........22-15 printing or receiving faxes 22-13 two-line phone system .......1-19 ...


