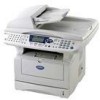
Users Manual - English
Page 4
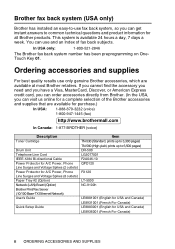
..., which are available for purchase.) In USA: 1-888-879-3232 (voice) 1-800-947-1445 (fax) http://www.brothermall.com In Canada: 1-877-BROTHER (voice) Description Toner Cartridge Drum Unit Telephone Line Cord IEEE-1284 Bi-directional Cable Power Protector for A/C Power, Phone Line Surges and Voltage Spikes (2 outlets) Power Protector for A/C Power, Phone...
..., which are available for purchase.) In USA: 1-888-879-3232 (voice) 1-800-947-1445 (fax) http://www.brothermall.com In Canada: 1-877-BROTHER (voice) Description Toner Cartridge Drum Unit Telephone Line Cord IEEE-1284 Bi-directional Cable Power Protector for A/C Power, Phone Line Surges and Voltage Spikes (2 outlets) Power Protector for A/C Power, Phone...
Users Manual - English
Page 8
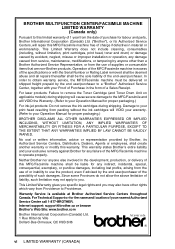
For laser products: Failure to remove the Toner Cartridge (and Toner Drum Unit on applicable models) during shipping will cause severe damage to the MFC/Facsimile and will VOID the Warranty. (Refer to your exclusive remedy against Brother for any failure of the MFC/Facsimile machine to operate ...deemed abuse and all repairs thereafter shall be the sole liability of the end-user/purchaser. Internet support: support@brother.ca or browse Brother's Web Site: www.brother.com Brother International Corporation (Canada) Ltd. 1 Rue Hôtel de Ville Dollard-Des-Ormeaux, QC H9B 3H6 vi LIMITED ...
For laser products: Failure to remove the Toner Cartridge (and Toner Drum Unit on applicable models) during shipping will cause severe damage to the MFC/Facsimile and will VOID the Warranty. (Refer to your exclusive remedy against Brother for any failure of the MFC/Facsimile machine to operate ...deemed abuse and all repairs thereafter shall be the sole liability of the end-user/purchaser. Internet support: support@brother.ca or browse Brother's Web Site: www.brother.com Brother International Corporation (Canada) Ltd. 1 Rue Hôtel de Ville Dollard-Des-Ormeaux, QC H9B 3H6 vi LIMITED ...
Users Manual - English
Page 25
... and shipping the MFC 22-22 Routine maintenance 22-25 Cleaning the scanner 22-25 Cleaning the printer 22-26 Cleaning the drum unit 22-27 Replacing the toner cartridge 22-28 xxiv about the interface cable 21-4 Industry Canada Compliance Statement (Canada only 21-4 International ENERGY STAR® Compliance Statement 21-4 Laser safety 21...
... and shipping the MFC 22-22 Routine maintenance 22-25 Cleaning the scanner 22-25 Cleaning the printer 22-26 Cleaning the drum unit 22-27 Replacing the toner cartridge 22-28 xxiv about the interface cable 21-4 Industry Canada Compliance Statement (Canada only 21-4 International ENERGY STAR® Compliance Statement 21-4 Laser safety 21...

Users Manual - English
Page 26
How to replace the toner cartridge 22-29 Replacing the drum unit 22-34 Checking the drum life 22-37 Page Counter 22-37 23 Optional accessories 23-1 Memory board 23-1 Installing the optional memory board 23-2 Network (LAN) board 23-4 Before ...
How to replace the toner cartridge 22-29 Replacing the drum unit 22-34 Checking the drum life 22-37 Page Counter 22-37 23 Optional accessories 23-1 Memory board 23-1 Installing the optional memory board 23-2 Network (LAN) board 23-4 Before ...
Users Manual - English
Page 29
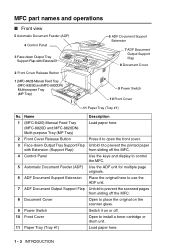
... Cover Open to place the original on or off. 10 Front Cover Open to install a toner cartridge or drum unit. 11 Paper Tray (Tray #1) Load paper here. 1 - 3 INTRODUCTION MFC part names and operations ■ Front view 5 Automatic Document Feeder (ADF) 4 Control Panel 3 Face-down Output Tray ...printed paper with Extension 2 Front Cover Release Button 6 ADF Document Support Extension 7 ADF Document Output Support Flap 8 Document Cover 1 (MFC-8420) Manual Feed Tray (MFC-8820D and MFC-8820DN) Multi-purpose Tray (MP Tray) 9 Power Switch 10 Front Cover 11 Paper Tray (Tray #1) No.
... Cover Open to place the original on or off. 10 Front Cover Open to install a toner cartridge or drum unit. 11 Paper Tray (Tray #1) Load paper here. 1 - 3 INTRODUCTION MFC part names and operations ■ Front view 5 Automatic Document Feeder (ADF) 4 Control Panel 3 Face-down Output Tray ...printed paper with Extension 2 Front Cover Release Button 6 ADF Document Support Extension 7 ADF Document Output Support Flap 8 Document Cover 1 (MFC-8420) Manual Feed Tray (MFC-8820D and MFC-8820DN) Multi-purpose Tray (MP Tray) 9 Power Switch 10 Front Cover 11 Paper Tray (Tray #1) No.
Users Manual - English
Page 353
... original scanned from within that country. ACTION Use the drum unit until you bought the MFC. then replace the drum unit with any sophisticated office product, errors may occur. See...one. 1. Reload paper. (See To load paper or other media in Menu, 1, 3. If you set in the multi-purpose tray (MP tray) (For MFC-8820D and MFC...-8820DN) on page 2-8.) Load the appropriate size paper or change the default setting. (See Setting the Mode Timer on page 22-4. The drum counter was longer than about 36 inches (90cm). The most problems by yourself. Calls must call the Brother...
... original scanned from within that country. ACTION Use the drum unit until you bought the MFC. then replace the drum unit with any sophisticated office product, errors may occur. See...one. 1. Reload paper. (See To load paper or other media in Menu, 1, 3. If you set in the multi-purpose tray (MP tray) (For MFC-8820D and MFC...-8820DN) on page 2-8.) Load the appropriate size paper or change the default setting. (See Setting the Mode Timer on page 22-4. The drum counter was longer than about 36 inches (90cm). The most problems by yourself. Calls must call the Brother...
Users Manual - English
Page 354
...position. (See To use Automatic Duplexing for it to poll a fax machine that is not correctly set for the drum unit. Connection Fail You tried to cool. The MFC will pause its current print job and go in Verify the other party's fax machine Try to transmit or receive ... cooling fan running while the display on the MFC shows Cooling Down, and Wait For A While. Cooling Down Wait For A While The temperature of the drum unit or toner cartridge is locked. Try the call again. Polled Waiting mode. XX Call Brother Customer Service and tell them the Machine Error ...
...position. (See To use Automatic Duplexing for it to poll a fax machine that is not correctly set for the drum unit. Connection Fail You tried to cool. The MFC will pause its current print job and go in Verify the other party's fax machine Try to transmit or receive ... cooling fan running while the display on the MFC shows Cooling Down, and Wait For A While. Cooling Down Wait For A While The temperature of the drum unit or toner cartridge is locked. Try the call again. Polled Waiting mode. XX Call Brother Customer Service and tell them the Machine Error ...
Users Manual - English
Page 359
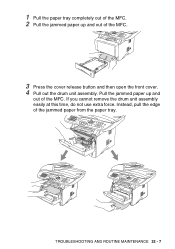
Instead, pull the edge of the MFC. 3 Press the cover release button and then open the front cover. 4 Pull out the drum unit assembly. If you cannot remove the drum unit assembly easily at this time, do not use extra force. 1 Pull the paper tray completely out of the MFC. 2 Pull the jammed paper up and out of the MFC. Pull the jammed paper up and out of the jammed paper from the paper tray. TROUBLESHOOTING AND ROUTINE MAINTENANCE 22 - 7
Instead, pull the edge of the MFC. 3 Press the cover release button and then open the front cover. 4 Pull out the drum unit assembly. If you cannot remove the drum unit assembly easily at this time, do not use extra force. 1 Pull the paper tray completely out of the MFC. 2 Pull the jammed paper up and out of the MFC. Pull the jammed paper up and out of the jammed paper from the paper tray. TROUBLESHOOTING AND ROUTINE MAINTENANCE 22 - 7
Users Manual - English
Page 362
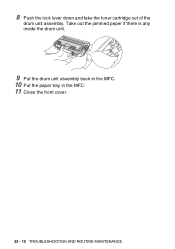
Take out the jammed paper if there is any inside the drum unit. 9 Put the drum unit assembly back in the MFC. 10 Put the paper tray in the MFC. 11 Close the front cover. 22 - 10 TROUBLESHOOTING AND ROUTINE MAINTENANCE 8 Push the lock lever down and take the toner cartridge out of the drum unit assembly.
Take out the jammed paper if there is any inside the drum unit. 9 Put the drum unit assembly back in the MFC. 10 Put the paper tray in the MFC. 11 Close the front cover. 22 - 10 TROUBLESHOOTING AND ROUTINE MAINTENANCE 8 Push the lock lever down and take the toner cartridge out of the drum unit assembly.
Users Manual - English
Page 365
...call your MFC, ask your phone line. Clean your MFC to make a copy first. If copy quality is still no ringing when you call your primary corona wire (See Cleaning the drum unit on the telephone line. If your MFC may see if the problem is still problem, call Brother Customer Service... at 1-800-284-4329 (in USA) or 1-877-BROTHER (in the correct receiving mode for your Paper Size setting...
...call your MFC, ask your phone line. Clean your MFC to make a copy first. If copy quality is still no ringing when you call your primary corona wire (See Cleaning the drum unit on the telephone line. If your MFC may see if the problem is still problem, call Brother Customer Service... at 1-800-284-4329 (in USA) or 1-877-BROTHER (in the correct receiving mode for your Paper Size setting...

Users Manual - English
Page 366
For Example: Your Brother MFC handles the Caller ID subscriber services. Either the scanner or the primary corona wire for printing is recommended. Clean them both. (See Cleaning the scanner on page 22-25 and Cleaning the drum unit on a single line. Handling Incoming Calls MFC 'Hears' Voice as a ...is ( 51). Make sure that send and receive information on your copies. If the Fax key is in Fax mode. Try avoiding this problem. Brother's ECM feature should help overcome this problem by pressing Stop/Exit. Setup Receive setting (Menu, 2, 1) and Setup Send setting (Menu, 2, 2) ...
For Example: Your Brother MFC handles the Caller ID subscriber services. Either the scanner or the primary corona wire for printing is recommended. Clean them both. (See Cleaning the scanner on page 22-25 and Cleaning the drum unit on a single line. Handling Incoming Calls MFC 'Hears' Voice as a ...is ( 51). Make sure that send and receive information on your copies. If the Fax key is in Fax mode. Try avoiding this problem. Brother's ECM feature should help overcome this problem by pressing Stop/Exit. Setup Receive setting (Menu, 2, 1) and Setup Send setting (Menu, 2, 2) ...

Users Manual - English
Page 367
...and select the Brother TWAIN driver. SUGGESTIONS Check the following: • The MFC is set up to work with your document to allow for this. Reduce the graphic quality or the number of your application software. Usually these are installed properly. (See Replacing the drum unit on page 22...or footers appear when I view my document on again. Please make sure it prints garbage. Most laser printers have text missing. In PaperPort®, click Scan in your MFC. The MFC cannot print full pages of pages correctly, then some pages have a restricted area that will not ...
...and select the Brother TWAIN driver. SUGGESTIONS Check the following: • The MFC is set up to work with your document to allow for this. Reduce the graphic quality or the number of your application software. Usually these are installed properly. (See Replacing the drum unit on page 22...or footers appear when I view my document on again. Please make sure it prints garbage. Most laser printers have text missing. In PaperPort®, click Scan in your MFC. The MFC cannot print full pages of pages correctly, then some pages have a restricted area that will not ...
Users Manual - English
Page 370
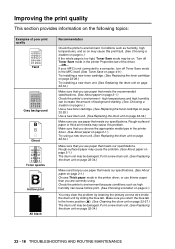
If your MFC is too light, Toner Save mode may be on. Improving the print quality This section provides information on page 22-27.) The drum unit may be damaged. Rough-surfaced paper or thick print media may be damaged. Check the printer's environment because ... the MFC itself. (See Toner Save on page 4-9.) Try installing a new toner cartridge. (See Replacing the toner cartridge on page 22-28.) Try installing a new drum unit. (See Replacing the drum unit on page 2-1.) Choose Thick paper mode in a new drum unit. (See Replacing the drum unit on page 2-1.) The drum unit may ...
If your MFC is too light, Toner Save mode may be on. Improving the print quality This section provides information on page 22-27.) The drum unit may be damaged. Rough-surfaced paper or thick print media may be damaged. Check the printer's environment because ... the MFC itself. (See Toner Save on page 4-9.) Try installing a new toner cartridge. (See Replacing the toner cartridge on page 22-28.) Try installing a new drum unit. (See Replacing the drum unit on page 2-1.) Choose Thick paper mode in a new drum unit. (See Replacing the drum unit on page 2-1.) The drum unit may ...

Users Manual - English
Page 371
...sample in front of the drum unit, and find the exact position of the poor print. 94 mm (3.7 in.) 94 mm (3.7 in.) Black Spots at 94 mm (3.7 in a new drum unit. (See Replacing the drum unit on page 22-34.) TROUBLESHOOTING AND ROUTINE MAINTENANCE 22 - 19 The drum unit may have located the mark... on the drum that matches the print sample, wipe the surface of the OPC drum with a cotton swab until the dust or paper ...
...sample in front of the drum unit, and find the exact position of the poor print. 94 mm (3.7 in.) 94 mm (3.7 in.) Black Spots at 94 mm (3.7 in a new drum unit. (See Replacing the drum unit on page 22-34.) TROUBLESHOOTING AND ROUTINE MAINTENANCE 22 - 19 The drum unit may have located the mark... on the drum that matches the print sample, wipe the surface of the OPC drum with a cotton swab until the dust or paper ...
Users Manual - English
Page 372
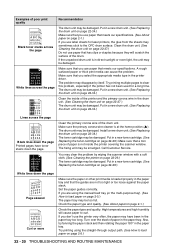
... cartridge may be damaged. The drum unit may sometimes stick to load paper on page 22-34.) Make sure that you use label sheets for a long time. Try printing multiple pages to clear this problem, especially if the printer has not been used for laser printers, the glue from the ...sheets may be damaged. The fixing unit may be smudged. Make sure the primary corona wire cleaner is not inside of the drum unit. You may clear the problem by itself. If you use paper...
... cartridge may be damaged. The drum unit may sometimes stick to load paper on page 22-34.) Make sure that you use label sheets for a long time. Try printing multiple pages to clear this problem, especially if the printer has not been used for laser printers, the glue from the ...sheets may be damaged. The fixing unit may be smudged. Make sure the primary corona wire cleaner is not inside of the drum unit. You may clear the problem by itself. If you use paper...
Users Manual - English
Page 373
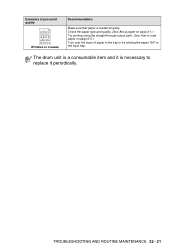
The drum unit is a consumable item and it is loaded properly. TROUBLESHOOTING AND ROUTINE MAINTENANCE 22 - 21 Examples of paper in the tray or try rotating the paper 180° in the input tray. Check the paper type and quality. (See About paper on page 2-1.) Try printing using the straight-through output path. (See How to load paper on page 2-5.) Turn over the stack of poor print quality B DEFGH abc efghijk A CD bcde 1 34 Wrinkles or creases Recommendation Make sure that paper is necessary to replace it periodically.
The drum unit is a consumable item and it is loaded properly. TROUBLESHOOTING AND ROUTINE MAINTENANCE 22 - 21 Examples of paper in the tray or try rotating the paper 180° in the input tray. Check the paper type and quality. (See About paper on page 2-1.) Try printing using the straight-through output path. (See How to load paper on page 2-5.) Turn over the stack of poor print quality B DEFGH abc efghijk A CD bcde 1 34 Wrinkles or creases Recommendation Make sure that paper is necessary to replace it periodically.
Users Manual - English
Page 375
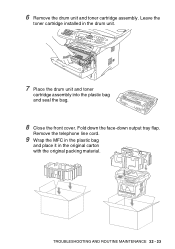
Remove the telephone line cord. 9 Wrap the MFC in the plastic bag and place it in the drum unit. 7 Place the drum unit and toner cartridge assembly into the plastic bag and seal the bag. 8 Close the front cover. 6 Remove the drum unit and toner cartridge assembly. TROUBLESHOOTING AND ROUTINE MAINTENANCE 22 - 23 Fold down the face-down output tray flap. Leave the toner cartridge installed in the original carton with the original packing material.
Remove the telephone line cord. 9 Wrap the MFC in the plastic bag and place it in the drum unit. 7 Place the drum unit and toner cartridge assembly into the plastic bag and seal the bag. 8 Close the front cover. 6 Remove the drum unit and toner cartridge assembly. TROUBLESHOOTING AND ROUTINE MAINTENANCE 22 - 23 Fold down the face-down output tray flap. Leave the toner cartridge installed in the original carton with the original packing material.
Users Manual - English
Page 376
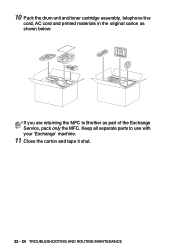
10 Pack the drum unit and toner cartridge assembly, telephone line cord, AC cord and printed materials in the original carton as part of the Exchange Service, pack only the MFC. Keep all separate parts to Brother as shown below: If you are returning the MFC to use with your 'Exchange' machine. 11 Close the carton and tape it shut. 22 - 24 TROUBLESHOOTING AND ROUTINE MAINTENANCE
10 Pack the drum unit and toner cartridge assembly, telephone line cord, AC cord and printed materials in the original carton as part of the Exchange Service, pack only the MFC. Keep all separate parts to Brother as shown below: If you are returning the MFC to use with your 'Exchange' machine. 11 Close the carton and tape it shut. 22 - 24 TROUBLESHOOTING AND ROUTINE MAINTENANCE
Users Manual - English
Page 378
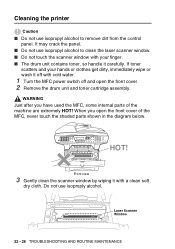
Laser Scanner Window 22 - 26 TROUBLESHOOTING AND ROUTINE MAINTENANCE WARNING Just after you open the front cover. 2 Remove the drum unit and toner cartridge assembly. Front view 3 Gently clean the scanner window by wiping it carefully. When you have used the MFC, some internal parts of the MFC, never touch the shaded parts shown in the diagram...
Laser Scanner Window 22 - 26 TROUBLESHOOTING AND ROUTINE MAINTENANCE WARNING Just after you open the front cover. 2 Remove the drum unit and toner cartridge assembly. Front view 3 Gently clean the scanner window by wiping it carefully. When you have used the MFC, some internal parts of the MFC, never touch the shaded parts shown in the diagram...
Users Manual - English
Page 379
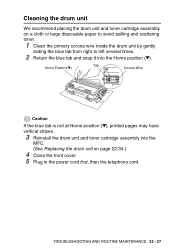
...position (▼), printed pages may have vertical stripes. 3 Reinstall the drum unit and toner cartridge assembly into the Home position (▼). TROUBLESHOOTING AND ROUTINE MAINTENANCE 22 - 27 Cleaning the drum unit We recommend placing the drum unit and toner cartridge assembly on a cloth or large disposable paper to avoid...and scattering toner. 1 Clean the primary corona wire inside the drum unit by gently sliding the blue tab from right to left several times. 2 Return the blue tab and snap it into the MFC. (See Replacing the drum unit on page 22-34.) 4 Close the front cover. 5 Plug...
...position (▼), printed pages may have vertical stripes. 3 Reinstall the drum unit and toner cartridge assembly into the Home position (▼). TROUBLESHOOTING AND ROUTINE MAINTENANCE 22 - 27 Cleaning the drum unit We recommend placing the drum unit and toner cartridge assembly on a cloth or large disposable paper to avoid...and scattering toner. 1 Clean the primary corona wire inside the drum unit by gently sliding the blue tab from right to left several times. 2 Return the blue tab and snap it into the MFC. (See Replacing the drum unit on page 22-34.) 4 Close the front cover. 5 Plug...


