
Users Manual - English
Page 68
...or external telephone, by dialing manually, or by using the dial pad, Speed-Dial or Search. b Pick up and try the call again. Note You can pick up , do one of the following : „ (MFC-665CW) Replace the handset or press Speaker Phone. „ (MFC-845CW) Press (Off) on ...: „ (MFC-665CW) Pick up the handset or press Speaker Phone. „ (MFC-845CW) Pick up the cordless handset and press (Talk) or press Speaker Phone on the machine. To end the call . If you have the MFC-845CW, please see the Digital Cordless Handset User's Guide. Speak clearly...
...or external telephone, by dialing manually, or by using the dial pad, Speed-Dial or Search. b Pick up and try the call again. Note You can pick up , do one of the following : „ (MFC-665CW) Replace the handset or press Speaker Phone. „ (MFC-845CW) Press (Off) on ...: „ (MFC-665CW) Pick up the handset or press Speaker Phone. „ (MFC-845CW) Pick up the cordless handset and press (Talk) or press Speaker Phone on the machine. To end the call . If you have the MFC-845CW, please see the Digital Cordless Handset User's Guide. Speak clearly...
Users Manual - English
Page 145
...and TrueType are trademarks or registerd trademarks of Broadcom Corporation in this manual has a Software License Agreement specific to the MultiMediaCard Association. PaperPort ...User's Guide, the Software User's Guide and the Network User's Guide are registered trademarks of their respective companies. 129 Brother is a registered trademark of Sony Corporation. and other countries. Memory Stick is a registered trademark of Brother Industries, Ltd. Safety and Legal Trademarks A The Brother logo is a registered trademark of Brother International Corporation. © 2006 Brother...
...and TrueType are trademarks or registerd trademarks of Broadcom Corporation in this manual has a Software License Agreement specific to the MultiMediaCard Association. PaperPort ...User's Guide, the Software User's Guide and the Network User's Guide are registered trademarks of their respective companies. 129 Brother is a registered trademark of Sony Corporation. and other countries. Memory Stick is a registered trademark of Brother Industries, Ltd. Safety and Legal Trademarks A The Brother logo is a registered trademark of Brother International Corporation. © 2006 Brother...
Users Manual - English
Page 148
.... (Canada only) Change Tone/Pulse setting. (See Quick Setup Guide.) Send a fax manually and wait to send the fax again. Out of your document and try changing the menu...party to hear the fax receiving tone before you press Black Start or Color Start. (See Sending a fax manually on page 44) Make sure the machine is on the CD-ROM.)... Reduce the complexity of memory message occurs. Ask the other person to send the color fax again. (See Replacing the ink cartridges on page 143.) Check that the On/Off key is in the Software User...
.... (Canada only) Change Tone/Pulse setting. (See Quick Setup Guide.) Send a fax manually and wait to send the fax again. Out of your document and try changing the menu...party to hear the fax receiving tone before you press Black Start or Color Start. (See Sending a fax manually on page 44) Make sure the machine is on the CD-ROM.)... Reduce the complexity of memory message occurs. Ask the other person to send the color fax again. (See Replacing the ink cartridges on page 143.) Check that the On/Off key is in the Software User...
Users Manual - English
Page 182
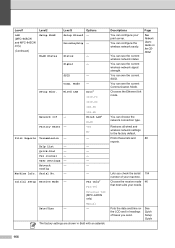
... needs. Status - Wired LAN Network I/F - Date/Time - You can choose the network connection type. Page See Network User's Guide on the LCD and in Bold with an asterisk. Choose the receive mode 46 that best suits your print server....MFC-665CW and MFC-845CW only) Setup WLAN (Continued) WLAN Status Level3 Options Setup Wizard - SecureEasySetup - Comm. Auto* 100B-FD 100B-HD 10B-FD 10B-HD Wired LAN* WLAN Yes No - Help List - - Fax Journal - - User Settings - - Config Machine Info. Fax Only* Fax/Tel External TAD (MFC-440CN only) Manual...
... needs. Status - Wired LAN Network I/F - Date/Time - You can choose the network connection type. Page See Network User's Guide on the LCD and in Bold with an asterisk. Choose the receive mode 46 that best suits your print server....MFC-665CW and MFC-845CW only) Setup WLAN (Continued) WLAN Status Level3 Options Setup Wizard - SecureEasySetup - Comm. Auto* 100B-FD 100B-HD 10B-FD 10B-HD Wired LAN* WLAN Yes No - Help List - - Fax Journal - - User Settings - - Config Machine Info. Fax Only* Fax/Tel External TAD (MFC-440CN only) Manual...

Users Manual - English
Page 208
... handset of the complete Menu table that you press Black Start or Color Start to pick up a voice call that are using the same line...you can use this code (l 5 1) when you to begin sending. Manual fax Depending on an extension or external phone. Fax tones The signals sent ... for Broadcasting. F/T Ring Time The length of the fax that the Brother machine rings (when the Receive Mode setting is used for changing your machine... interrupt a fax call on your machine when you do not have the User's Guide with you. Dual Access Your machine can scan outgoing faxes or scheduled...
... handset of the complete Menu table that you press Black Start or Color Start to pick up a voice call that are using the same line...you can use this code (l 5 1) when you to begin sending. Manual fax Depending on an extension or external phone. Fax tones The signals sent ... for Broadcasting. F/T Ring Time The length of the fax that the Brother machine rings (when the Receive Mode setting is used for changing your machine... interrupt a fax call on your machine when you do not have the User's Guide with you. Dual Access Your machine can scan outgoing faxes or scheduled...

Users Manual - English
Page 211
... 6 ControlCenter See Software User's Guide on the CD-ROM Copy brightness 96 color saturation 96 contrast 96... 12 Cordless handset (MFC-845CW only) See Digital Cordless Handset User's Guide Cordless phone 62...Brother numbers i Customer Service i FAQs (frequently asked questions) ......... F Index A Access codes, storing and dialing 70 Accessories and supplies iii ADF (automatic document feeder) .... 11, 38 Answering machine (TAD 57 connecting 58 Apple® Macintosh® See Software User's Guide on a single line 133 D Dialing a pause 66 Caller ID history 65 Groups 40 manual...
... 6 ControlCenter See Software User's Guide on the CD-ROM Copy brightness 96 color saturation 96 contrast 96... 12 Cordless handset (MFC-845CW only) See Digital Cordless Handset User's Guide Cordless phone 62...Brother numbers i Customer Service i FAQs (frequently asked questions) ......... F Index A Access codes, storing and dialing 70 Accessories and supplies iii ADF (automatic document feeder) .... 11, 38 Answering machine (TAD 57 connecting 58 Apple® Macintosh® See Software User's Guide on a single line 133 D Dialing a pause 66 Caller ID history 65 Groups 40 manual...
Users Manual - English
Page 212
... memory 51 turning off 81 turning on 78 Fax, from PC See Software User's Guide on the CD-ROM Fax, stand-alone receiving 46 at end of conversation 44 Broadcasting 40 canceling from memory 43 color fax 39 contrast 41 delayed batch transmission 43 delayed fax 43 enter Fax mode... 38 from memory (Dual Access 42 from scanner glass 39 manual 44 overseas 43 phone line interference 143 Real Time Transmission 42 Resolution ...
... memory 51 turning off 81 turning on 78 Fax, from PC See Software User's Guide on the CD-ROM Fax, stand-alone receiving 46 at end of conversation 44 Broadcasting 40 canceling from memory 43 color fax 39 contrast 41 delayed batch transmission 43 delayed fax 43 enter Fax mode... 38 from memory (Dual Access 42 from scanner glass 39 manual 44 overseas 43 phone line interference 143 Real Time Transmission 42 Resolution ...

Users Manual - English
Page 213
...display 158 Brightness 31, 32 Contrast 31 Dim Timer 31 Help List 88 Off Timer 31 M Macintosh® See Software User's Guide on the CD-ROM Maintenance, routine 143 Manual dialing 63 receive 46 transmission 44 Memory Security 36 Memory Storage 158 Message Center mode erasing messages 73 Fax/Tel announcement...16 loading 17, 19, 21 printable area 23 size 27 size of document 11 type 15, 26 PaperPort® SE with OCR See Software User's Guide on the CD-ROM Phone line connections 58 difficulties 132 interference 143 multi-line (PBX 61 roll over lines 59 two-line phone ...
...display 158 Brightness 31, 32 Contrast 31 Dim Timer 31 Help List 88 Off Timer 31 M Macintosh® See Software User's Guide on the CD-ROM Maintenance, routine 143 Manual dialing 63 receive 46 transmission 44 Memory Security 36 Memory Storage 158 Message Center mode erasing messages 73 Fax/Tel announcement...16 loading 17, 19, 21 printable area 23 size 27 size of document 11 type 15, 26 PaperPort® SE with OCR See Software User's Guide on the CD-ROM Phone line connections 58 difficulties 132 interference 143 multi-line (PBX 61 roll over lines 59 two-line phone ...
Users Manual - English
Page 214
... Caller ID history ........ 67 setting up from outgoing calls 66 using 63 R Receive Mode 46 External TAD 46 Fax Only 46 Fax/Tel 46 Manual 46 Redial/Pause 64 Reducing copies 94 incoming faxes 51 Remote Retrieval 82 access code 82, 83 commands 84 getting your faxes 86 Remote Setup... See Software User's Guide on the CD-ROM. Print difficulties 130, 132 drivers 186 fax from memory 51 paper jams 141 report 88 resolution 186 specifications 186...
... Caller ID history ........ 67 setting up from outgoing calls 66 using 63 R Receive Mode 46 External TAD 46 Fax Only 46 Fax/Tel 46 Manual 46 Redial/Pause 64 Reducing copies 94 incoming faxes 51 Remote Retrieval 82 access code 82, 83 commands 84 getting your faxes 86 Remote Setup... See Software User's Guide on the CD-ROM. Print difficulties 130, 132 drivers 186 fax from memory 51 paper jams 141 report 88 resolution 186 specifications 186...
Quick Setup Guide - English
Page 8
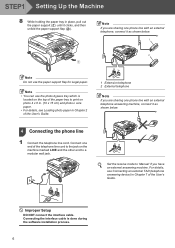
...clicks, and then unfold the paper support flap ( ). Note If you are sharing one end of the telephone line cord to the jack on the top of the paper tray to 'Manual' if you are sharing one phone line with an external telephone answering machine, connect it as shown below . 1...Improper Setup DO NOT connect the interface cable. Connect one phone line with an external telephone, connect it as shown below . 4 Connecting the phone line 1 Connect the telephone line cord. For details, see Loading photo paper in Chapter 2 of the User's Guide. 1 Extension telephone 2 External telephone Note...
...clicks, and then unfold the paper support flap ( ). Note If you are sharing one end of the telephone line cord to the jack on the top of the paper tray to 'Manual' if you are sharing one phone line with an external telephone answering machine, connect it as shown below . 1...Improper Setup DO NOT connect the interface cable. Connect one phone line with an external telephone, connect it as shown below . 4 Connecting the phone line 1 Connect the telephone line cord. For details, see Loading photo paper in Chapter 2 of the User's Guide. 1 Extension telephone 2 External telephone Note...
Quick Setup Guide - English
Page 15
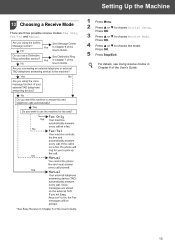
Press OK. 4 Press a or b to choose Receive Mode. For details, see Using receive modes in Chapter 6 of the User's Guide. 13 Press OK. 3 Press a or b to choose the mode. Setting Up the Machine 13 Choosing a Receive Mode There are three possible receive modes: Fax Only, Fax/Tel and Manual. 1 Press Menu. 2 Press a or b to choose Initial Setup. Press OK. 5 Press Stop/Exit.
Press OK. 4 Press a or b to choose Receive Mode. For details, see Using receive modes in Chapter 6 of the User's Guide. 13 Press OK. 3 Press a or b to choose the mode. Setting Up the Machine 13 Choosing a Receive Mode There are three possible receive modes: Fax Only, Fax/Tel and Manual. 1 Press Menu. 2 Press a or b to choose Initial Setup. Press OK. 5 Press Stop/Exit.
Quick Setup Guide - English
Page 29
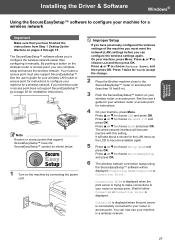
...29 for the LAN menu on the machine by connecting the power cord. See the user's guide for your wireless router or access point for a wireless network Important Make sure...become inactive with this setting. Press 1 twice for Yes to accept the change. 2 Place the Brother machine close to configure your machine for instructions. 4 On your router or access point. Your ...™ software to the SecureEasySetup™ router or access point (less than configuring it manually. Wait till either Connected or Connection Error is trying to make connections to choose SecureEasySetup and...
...29 for the LAN menu on the machine by connecting the power cord. See the user's guide for your wireless router or access point for a wireless network Important Make sure...become inactive with this setting. Press 1 twice for Yes to accept the change. 2 Place the Brother machine close to configure your machine for instructions. 4 On your router or access point. Your ...™ software to the SecureEasySetup™ router or access point (less than configuring it manually. Wait till either Connected or Connection Error is trying to make connections to choose SecureEasySetup and...
Quick Setup Guide - English
Page 33
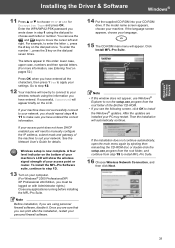
...the setup.exe program from step 15 to choose TKIP or AES for details. See the Network User's Guide for Encryption Type and press OK. Wireless setup is now complete. If the language screen... appears, choose your language. 15 The CD-ROM main menu will need to manually configure the IP address, subnet mask and gateway of your access point does not have DHCP ...12 Your machine will automatically continue. If successful, Connected will show the wireless signal strength of the Brother CD-ROM. • If you see Entering Text on the bottom of the machine to move...
...the setup.exe program from step 15 to choose TKIP or AES for details. See the Network User's Guide for Encryption Type and press OK. Wireless setup is now complete. If the language screen... appears, choose your language. 15 The CD-ROM main menu will need to manually configure the IP address, subnet mask and gateway of your access point does not have DHCP ...12 Your machine will automatically continue. If successful, Connected will show the wireless signal strength of the Brother CD-ROM. • If you see Entering Text on the bottom of the machine to move...
Quick Setup Guide - English
Page 44
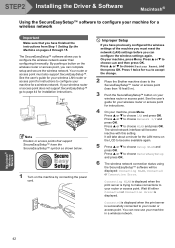
... By pushing a button on your machine for Yes to accept the change. 2 Place the Brother machine close to choose LAN and then press OK. Note Routers or access points that you...router or access point, you can complete setup and secure the wireless network. See the user's guide for your machine for installation instructions. If your wireless router or access point does ... 15. Press a or b to the SecureEasySetup™ router or access point (less than configuring it manually. The wired network interface will become available again. 5 Press a or b to choose SecureEasySetup and press...
... By pushing a button on your machine for Yes to accept the change. 2 Place the Brother machine close to choose LAN and then press OK. Note Routers or access points that you...router or access point, you can complete setup and secure the wireless network. See the user's guide for your machine for installation instructions. If your wireless router or access point does ... 15. Press a or b to the SecureEasySetup™ router or access point (less than configuring it manually. The wired network interface will become available again. 5 Press a or b to choose SecureEasySetup and press...
Quick Setup Guide - English
Page 48
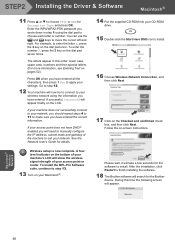
...174;. 14 Put the supplied CD-ROM into your network. Please wait, it will need to manually configure the IP address, subnet mask and gateway of your machine's LCD will now try to ... you have entered all the characters, then press 1 Yes to finish installing the software. 18 The Brother software will appear briefly on pages 52.) Press OK when you will take a few seconds for Encryption...b to move the cursor left and right. See the Network User's Guide for the Brother device. If successful, Connected will search for details. Follow the on the dial pad seven times.
...174;. 14 Put the supplied CD-ROM into your network. Please wait, it will need to manually configure the IP address, subnet mask and gateway of your machine's LCD will now try to ... you have entered all the characters, then press 1 Yes to finish installing the software. 18 The Brother software will appear briefly on pages 52.) Press OK when you will take a few seconds for Encryption...b to move the cursor left and right. See the Network User's Guide for the Brother device. If successful, Connected will search for details. Follow the on the dial pad seven times.


