
Accessory Catalog
Page 5
.... 2. Pin tucks: 1. This is Project Book (See pages 37 and 39 for precise and easy joining of another fabric. Cut the basting stitches in zipper on both sides of the fabric against the presser foot guide to the edge of fabrics, even sheers and difficult fabrics. Turn ...zipper and baste along the seam allowance on interfacing tape to the seam allowance where the zipper will be used to reference lines in the seam. 6. Place the edge of the zipper opening. 5. Blind hem: 1. SA133 ABCDEFJKMN SA134 GHILOP SA128 All Brother home-use . Select the blind hem stitch. 6. ...
.... 2. Pin tucks: 1. This is Project Book (See pages 37 and 39 for precise and easy joining of another fabric. Cut the basting stitches in zipper on both sides of the fabric against the presser foot guide to the edge of fabrics, even sheers and difficult fabrics. Turn ...zipper and baste along the seam allowance on interfacing tape to the seam allowance where the zipper will be used to reference lines in the seam. 6. Place the edge of the zipper opening. 5. Blind hem: 1. SA133 ABCDEFJKMN SA134 GHILOP SA128 All Brother home-use . Select the blind hem stitch. 6. ...

Accessory Catalog
Page 17
...new small fonts and 2 new Cyrillic fonts. *Requires additional purchase. Good for embellishing a wide variety of the line machine. Basting Function to the actual machine: - SAVR4500D Duetta™ 4500D/Innov-is4000D Nightie Innov-is 4000D by adding special features to ...Duetta™ 4500D/ 4000D Premium Upgrade Package II Exclusively for details.) www.brother.com Add appliqué capability to memory devices*. - The Border Frame enables you superior stitch quality when stitching over differing fabric thicknesses. - Automatic Height Adjuster™ (AHA) feature ...
...new small fonts and 2 new Cyrillic fonts. *Requires additional purchase. Good for embellishing a wide variety of the line machine. Basting Function to the actual machine: - SAVR4500D Duetta™ 4500D/Innov-is4000D Nightie Innov-is 4000D by adding special features to ...Duetta™ 4500D/ 4000D Premium Upgrade Package II Exclusively for details.) www.brother.com Add appliqué capability to memory devices*. - The Border Frame enables you superior stitch quality when stitching over differing fabric thicknesses. - Automatic Height Adjuster™ (AHA) feature ...
Users Manual - English
Page 28
... to "Power supply" (page 9). ↓ 2 Select the stitch. Attach the presser foot appropriate for the area to sew" (page 28). 26 When sewing is in injuries. ● Make sure that the needle does not strike basting pins, otherwise the needle may break. ● Never use bent needles.... For details on turning on the machine, refer to "Selecting stitching" (page 27). ↓ 3 Attach the presser foot. For details on replacing ...
... to "Power supply" (page 9). ↓ 2 Select the stitch. Attach the presser foot appropriate for the area to sew" (page 28). 26 When sewing is in injuries. ● Make sure that the needle does not strike basting pins, otherwise the needle may break. ● Never use bent needles.... For details on turning on the machine, refer to "Selecting stitching" (page 27). ↓ 3 Attach the presser foot. For details on replacing ...
Users Manual - English
Page 34
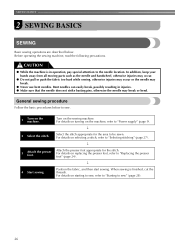
... sewn or if the fabric is for thick fabrics (page 20). a Black button Release the button. Press the black button on the left side of stitching Zigzag foot "J" is sewn with the seam, allowing the fabric to the needle or the bobbin hook race, it may cause malfunction. ● If ...that the needle passes through the hook-andloop fastener, replace the needle with a feature that keeps the presser foot level. Note ● Before start sewing, baste together the fabric and the hook-and-loop fastener. And then, sew the edge of the hookand-loop fastener at the beginning of the b foot.
... sewn or if the fabric is for thick fabrics (page 20). a Black button Release the button. Press the black button on the left side of stitching Zigzag foot "J" is sewn with the seam, allowing the fabric to the needle or the bobbin hook race, it may cause malfunction. ● If ...that the needle passes through the hook-andloop fastener, replace the needle with a feature that keeps the presser foot level. Note ● Before start sewing, baste together the fabric and the hook-and-loop fastener. And then, sew the edge of the hookand-loop fastener at the beginning of the b foot.
Users Manual - English
Page 35
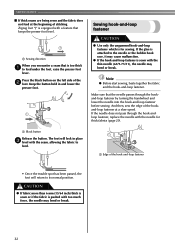
... the flat bed attachment to the left to a release it together with the fabric. When you have finished sewing, tear off any excess paper. a Basting Using a free-arm style Free-arm sewing is convenient for sewing tubular and hard-to the free-arm style, lift out the flat bed attachment.... Sewing thin fabrics When sewing thin fabrics, the stitching may become misaligned or the fabric may not feed correctly. To change your machine to -reach areas. If this occurs, place thin paper or stabilizer...
... the flat bed attachment to the left to a release it together with the fabric. When you have finished sewing, tear off any excess paper. a Basting Using a free-arm style Free-arm sewing is convenient for sewing tubular and hard-to the free-arm style, lift out the flat bed attachment.... Sewing thin fabrics When sewing thin fabrics, the stitching may become misaligned or the fabric may not feed correctly. To change your machine to -reach areas. If this occurs, place thin paper or stabilizer...

Users Manual - English
Page 37
... foot "J". f • For details, refer to "Starting to "Selecting stitching" (page 27). Stitch Name Pattern No. Basic stitching Baste or pin together the fabric pieces. Application Stitch Width [mm (inch.)] Stitch Length [mm (inch.)] Auto Manual Auto Manual Straight Pattern Presser Foot 70 stitches model 60 stitches model 50 stitches model 40 stitches model Twin Needle Walking Foot Reverse/ Reinforcement...
... foot "J". f • For details, refer to "Starting to "Selecting stitching" (page 27). Stitch Name Pattern No. Basic stitching Baste or pin together the fabric pieces. Application Stitch Width [mm (inch.)] Stitch Length [mm (inch.)] Auto Manual Auto Manual Straight Pattern Presser Foot 70 stitches model 60 stitches model 50 stitches model 40 stitches model Twin Needle Walking Foot Reverse/ Reinforcement...

Users Manual - English
Page 38
...-1/8) No No Rfc.* *Rfc.: Reinforcement Reverse the skirt or pants. d 2 4 3 1 1 < Seen from the side> a Wrong side of fabric b Right side of fabric c Edge of fabric d Basting stitching e 5 mm (3/16 inch) Fold back the fabric inside along the desired edge of the b hem, and press. 1 22 1 2 < Seen from the side> a Wrong side of...
...-1/8) No No Rfc.* *Rfc.: Reinforcement Reverse the skirt or pants. d 2 4 3 1 1 < Seen from the side> a Wrong side of fabric b Right side of fabric c Edge of fabric d Basting stitching e 5 mm (3/16 inch) Fold back the fabric inside along the desired edge of the b hem, and press. 1 22 1 2 < Seen from the side> a Wrong side of...
Users Manual - English
Page 39
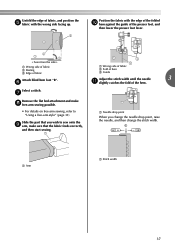
Select a stitch. a a Arm a Stitch width 37 R 2 1 1 < Seen from the side> a Wrong side of fabric b Basting c Edge of the hem. Slide... the part that you wish to sew onto the i arm, make h free-arm sewing possible. • For details on free-arm sewing, refer to "Using a free-arm style" (page 33). f a Wrong side of fabric b Fold of hem c Guide Adjust the stitch... drop point When you change the needle drop point, raise the needle, and then change the stitch width. Unfold the edge of fabric, and position the e fabric with the wrong side facing up...
Select a stitch. a a Arm a Stitch width 37 R 2 1 1 < Seen from the side> a Wrong side of fabric b Basting c Edge of the hem. Slide... the part that you wish to sew onto the i arm, make h free-arm sewing possible. • For details on free-arm sewing, refer to "Using a free-arm style" (page 33). f a Wrong side of fabric b Fold of hem c Guide Adjust the stitch... drop point When you change the needle drop point, raise the needle, and then change the stitch width. Unfold the edge of fabric, and position the e fabric with the wrong side facing up...
Users Manual - English
Page 40
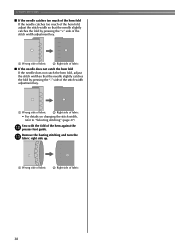
...does not catch the hem fold If the needle does not catch the hem fold, adjust the stitch width so that the needle slightly catches the fold by pressing the "-" side of fabric 38 Remove the basting stitching and turn the m fabric right side up. 1 2 a Wrong side of fabric b ...Right side of the stitch width adjustment key. UTILITY STITCHES ■ If the needle catches too much of the hem fold If the needle...
...does not catch the hem fold If the needle does not catch the hem fold, adjust the stitch width so that the needle slightly catches the fold by pressing the "-" side of fabric 38 Remove the basting stitching and turn the m fabric right side up. 1 2 a Wrong side of fabric b ...Right side of the stitch width adjustment key. UTILITY STITCHES ■ If the needle catches too much of the hem fold If the needle...
Users Manual - English
Page 48
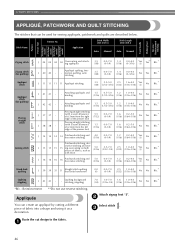
...) 1.2 (1/16) 1.0-4.0 (1/16-3/16) No No Rfc.* J 37 37 J 38 38 - c Baste the cut design to the fabric. Stitch Name Pattern No. Application Stitch Width [mm (inch.)] Stitch Length [mm (inch.)] Auto Manual Auto Manual Zigzag stitch Zigzag stitch (for quilting) Piecing straight stitch Joining stitch J 41 41 - - Quilting background stitching (stippling) 7.0 (1/4) 1.0-7.0 (1/16-1/4) 1.6 (1/16) 1.0-4.0 (1/16-3/16) No No Rfc.* *Rfc...
...) 1.2 (1/16) 1.0-4.0 (1/16-3/16) No No Rfc.* J 37 37 J 38 38 - c Baste the cut design to the fabric. Stitch Name Pattern No. Application Stitch Width [mm (inch.)] Stitch Length [mm (inch.)] Auto Manual Auto Manual Zigzag stitch Zigzag stitch (for quilting) Piecing straight stitch Joining stitch J 41 41 - - Quilting background stitching (stippling) 7.0 (1/4) 1.0-7.0 (1/16-1/4) 1.6 (1/16) 1.0-4.0 (1/16-3/16) No No Rfc.* *Rfc...
Users Manual - English
Page 49
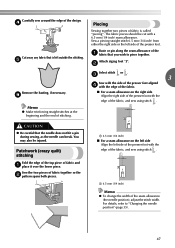
...6.5 mm (1/4 inch) seam allowance. For details, refer to piece together. Sew a piecing straight stitch 6.5 mm (1/4 inch) from either the right side or the left outside the stitching. The fabric pieces should be injured. Baste or pin along the seam allowance of fabric and a place it over the lower piece. b ...Remove the basting, if necessary. You may also be cut with the edge of the...
...6.5 mm (1/4 inch) seam allowance. For details, refer to piece together. Sew a piecing straight stitch 6.5 mm (1/4 inch) from either the right side or the left outside the stitching. The fabric pieces should be injured. Baste or pin along the seam allowance of fabric and a place it over the lower piece. b ...Remove the basting, if necessary. You may also be cut with the edge of the...
Users Manual - English
Page 50
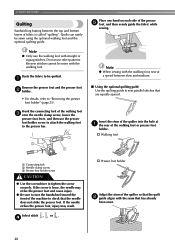
... presser foot b holder. • For details, refer to be quilted. Hook the connecting fork of fabric is loose, the needle may result. Reverse stitches cannot be sewn using the optional walking foot and the optional quilting guide. Place one hand on each side of the quilter so that the...foot. Note ● Only use the walking foot with the seam that the needle does not strike the presser foot. Baste the fabric to "Removing the presser foot holder" (page 25). Select stitch , or . If the needle strikes the presser foot, injury may strike the presser foot and cause injury. ●...
... presser foot b holder. • For details, refer to be quilted. Hook the connecting fork of fabric is loose, the needle may result. Reverse stitches cannot be sewn using the optional walking foot and the optional quilting guide. Place one hand on each side of the quilter so that the...foot. Note ● Only use the walking foot with the seam that the needle does not strike the presser foot. Baste the fabric to "Removing the presser foot holder" (page 25). Select stitch , or . If the needle strikes the presser foot, injury may strike the presser foot and cause injury. ●...

Users Manual - English
Page 55
...'s clothing. Attach monogramming foot "N". g 53 b Stitch along the center of the two pieces of water-soluble stabilizer. 3 Scallop stitching The wave-shaped repeating pattern that looks like shells is called "scalloping". Trim along their seams. Baste the two pieces of fabric, separated by b about... paper. c Select stitch or . It is used on the edge of fabric a along the stitches. d • Be careful not to sew directly on the collars of blouses and to fold the two pieces of the fabric. 3 2 a Thin paper or water soluble stabilizer b Basting stitching c 4 mm ...
...'s clothing. Attach monogramming foot "N". g 53 b Stitch along the center of the two pieces of water-soluble stabilizer. 3 Scallop stitching The wave-shaped repeating pattern that looks like shells is called "scalloping". Trim along their seams. Baste the two pieces of fabric, separated by b about... paper. c Select stitch or . It is used on the edge of fabric a along the stitches. d • Be careful not to sew directly on the collars of blouses and to fold the two pieces of the fabric. 3 2 a Thin paper or water soluble stabilizer b Basting stitching c 4 mm ...


