
Users Manual - English
Page 3
... you open the front or back cover of the printer, never touch the shaded parts shown in the illustrations below. Fuser is HOT! When you an electrical shock. WARNING Do not handle the plug with wet hands - Inside the printer ii Open the face-up output tray WARNING High ...Temperature After you have just used the printer, some parts inside the printer. Before you clean the printer, clear a paper jam or replace parts, make sure you have turned off the power ...
... you open the front or back cover of the printer, never touch the shaded parts shown in the illustrations below. Fuser is HOT! When you an electrical shock. WARNING Do not handle the plug with wet hands - Inside the printer ii Open the face-up output tray WARNING High ...Temperature After you have just used the printer, some parts inside the printer. Before you clean the printer, clear a paper jam or replace parts, make sure you have turned off the power ...

Users Manual - English
Page 18
... to clear them 6-8 JAM A1 (paper jam in the multi-purpose tray) ......... 6-10 JAM A2 / A3 / A4 / A5 (Paper jam inside the Paper tray 6-11 JAM B (paper jam inside the printer 6-14 JAM C (paper jam where the paper comes out / paper jam in the face-up output tray 6-17 JAM D (paper jam in the Duplex unit 6-19 JAM E (paper jam inside the mailbox unit...
... to clear them 6-8 JAM A1 (paper jam in the multi-purpose tray) ......... 6-10 JAM A2 / A3 / A4 / A5 (Paper jam inside the Paper tray 6-11 JAM B (paper jam inside the printer 6-14 JAM C (paper jam where the paper comes out / paper jam in the face-up output tray 6-17 JAM D (paper jam in the Duplex unit 6-19 JAM E (paper jam inside the mailbox unit...

Users Manual - English
Page 44
..., transparencies and other special paper in this chapter. If it touches the back of the tray and remains below the maximum paper mark ( ). ABOUT THIS PRINTER 1 - 25 Up to ( ) Figure 1-15 Make sure that the paper is not, the paper may not be fed correctly, resulting in a skewed printout or a paper... jam. 4 While pressing the [blue] paper-guide release lever, slide the paper guide to fit the paper size. 3 When loading paper in the multi-purpose tray, ...
..., transparencies and other special paper in this chapter. If it touches the back of the tray and remains below the maximum paper mark ( ). ABOUT THIS PRINTER 1 - 25 Up to ( ) Figure 1-15 Make sure that the paper is not, the paper may not be fed correctly, resulting in a skewed printout or a paper... jam. 4 While pressing the [blue] paper-guide release lever, slide the paper guide to fit the paper size. 3 When loading paper in the multi-purpose tray, ...

Users Manual - English
Page 48
For more information, see Chapter 3. 1 Open the multi-purpose tray and lower it may cause paper jams or misfeeds. ■ Do not print envelopes using duplex printing. ■ For proper printing, you can use the ...control panel Menu buttons to go to the PAPER menu to change the paper size. Figure 1-19 ABOUT THIS PRINTER 1 - 29 ■ Before you print envelopes, you must choose the same paper size from your software application as the paper in ...different types of paper at the same time in its Print menu, you must 'fan' the stack to avoid paper jams and misfeeds.
For more information, see Chapter 3. 1 Open the multi-purpose tray and lower it may cause paper jams or misfeeds. ■ Do not print envelopes using duplex printing. ■ For proper printing, you can use the ...control panel Menu buttons to go to the PAPER menu to change the paper size. Figure 1-19 ABOUT THIS PRINTER 1 - 29 ■ Before you print envelopes, you must choose the same paper size from your software application as the paper in ...different types of paper at the same time in its Print menu, you must 'fan' the stack to avoid paper jams and misfeeds.

Users Manual - English
Page 50
... and right-hand sides (as shown in the figure below the maximum paper mark ( ). ABOUT THIS PRINTER 1 - 31 Up to ( ) Figure 1-23 Make sure that have been creased after they touch the back of the printer open the face-up output tray to their original position. When you have been printed: At... the back of the tray and remain below ). Envelopes that the paper is not, the paper may not be fed properly, resulting in a skewed printout or a paper jam.
... and right-hand sides (as shown in the figure below the maximum paper mark ( ). ABOUT THIS PRINTER 1 - 31 Up to ( ) Figure 1-23 Make sure that have been creased after they touch the back of the printer open the face-up output tray to their original position. When you have been printed: At... the back of the tray and remain below ). Envelopes that the paper is not, the paper may not be fed properly, resulting in a skewed printout or a paper jam.

Users Manual - English
Page 54
... tray. ■ If your software application as organizer sheets, you can use organizer sheets that is damaged, curled, wrinkled or an unusual shape. ABOUT THIS PRINTER 1 - 35 Printing on labels, transparencies and other special paper Types of paper at the edges. ■ Do not put the punched holes near the actuator... panel Menu buttons to go to the PAPER menu to change the paper size. Figure 1-25 Before using paper that is used might damage the printer. ■ Do not load different types of special paper to avoid ■ Do not use paper that has holes in it may cause paper...
... tray. ■ If your software application as organizer sheets, you can use organizer sheets that is damaged, curled, wrinkled or an unusual shape. ABOUT THIS PRINTER 1 - 35 Printing on labels, transparencies and other special paper Types of paper at the edges. ■ Do not put the punched holes near the actuator... panel Menu buttons to go to the PAPER menu to change the paper size. Figure 1-25 Before using paper that is used might damage the printer. ■ Do not load different types of special paper to avoid ■ Do not use paper that has holes in it may cause paper...

Users Manual - English
Page 57
...paper is not, the paper may not be very hot! If it gently into the printer. ■ The print surface must be under the maximum paper marks that have just ...both sides of the paper in first and push it is neatly stacked and in a skewed printout or a paper jam. 5 While pressing the [blue] paper-guide release lever, slide the paper guide to feed paper into the tray... paper stack must be face up. ■ Put the leading edge of the tray. 1 - 38 ABOUT THIS PRINTER When you put paper in the multi-purpose tray, please remember the following: ■ During printing, the inside tray...
...paper is not, the paper may not be very hot! If it gently into the printer. ■ The print surface must be under the maximum paper marks that have just ...both sides of the paper in first and push it is neatly stacked and in a skewed printout or a paper jam. 5 While pressing the [blue] paper-guide release lever, slide the paper guide to feed paper into the tray... paper stack must be face up. ■ Put the leading edge of the tray. 1 - 38 ABOUT THIS PRINTER When you put paper in the multi-purpose tray, please remember the following: ■ During printing, the inside tray...

Users Manual - English
Page 110
... (CF) =#### FONT ID (HD) =#### FONT ID (CF) =#### FORMAT (HD) OK? PUBLIC FILE Select the user name and job name. SETUP (continued) Display Shows KEEP PCL JAM RECOVERY RAMDISK SIZE DELETE STORAGE TIME STYLE DATE & TIME Description =OFF/ON =OFF/ON =0/1/2/...MB RESTART...
... (CF) =#### FONT ID (HD) =#### FONT ID (CF) =#### FORMAT (HD) OK? PUBLIC FILE Select the user name and job name. SETUP (continued) Display Shows KEEP PCL JAM RECOVERY RAMDISK SIZE DELETE STORAGE TIME STYLE DATE & TIME Description =OFF/ON =OFF/ON =0/1/2/...MB RESTART...

Users Manual - English
Page 123
Display Shows SETUP (continued) PRINT MENU Submenu TONER LOW AUTO CONTINUE LOCK PANEL REPRINT PAGE PROTECTION EMULATION KEEP PCL JAM RECOVERY RAMDISK SIZE TIME STYLE MEDIA TYPE PAPER COPIES ORIENTATION PRINT POSITION AUTO FF TIME FF SUPPRESS HP LASERJET Factory setting CONTINUE =OFF =OFF =ON =...
Display Shows SETUP (continued) PRINT MENU Submenu TONER LOW AUTO CONTINUE LOCK PANEL REPRINT PAGE PROTECTION EMULATION KEEP PCL JAM RECOVERY RAMDISK SIZE TIME STYLE MEDIA TYPE PAPER COPIES ORIENTATION PRINT POSITION AUTO FF TIME FF SUPPRESS HP LASERJET Factory setting CONTINUE =OFF =OFF =ON =...
Users Manual - English
Page 169
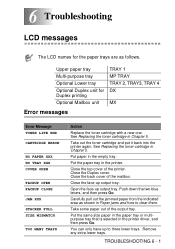
...See Replacing the toner cartridge in the printer driver, and then press Go. Remove any extra lower trays. Put the same size paper in the paper tray or multipurpose tray that is selected in Chapter 5. Put paper in Chapter 5. Carefully pull out the jammed paper from the indicated area as ... TRAY 4 DX MX Error messages Error Message TONER LIFE END CARTRIDGE ERROR NO PAPER XXX NO TRAY XXX COVER OPEN FACEUP OPEN FACEUP CLOSE JAM XXX STACKER FULL SIZE MISMATCH TOO MANY TRAYS Action Replace the toner cartridge with a new one. Upper paper tray Multi-purpose tray Optional Lower...
...See Replacing the toner cartridge in the printer driver, and then press Go. Remove any extra lower trays. Put the same size paper in the paper tray or multipurpose tray that is selected in Chapter 5. Put paper in Chapter 5. Carefully pull out the jammed paper from the indicated area as ... TRAY 4 DX MX Error messages Error Message TONER LIFE END CARTRIDGE ERROR NO PAPER XXX NO TRAY XXX COVER OPEN FACEUP OPEN FACEUP CLOSE JAM XXX STACKER FULL SIZE MISMATCH TOO MANY TRAYS Action Replace the toner cartridge with a new one. Upper paper tray Multi-purpose tray Optional Lower...
Users Manual - English
Page 174
.... ■ Make sure you have chosen the manual feed mode in the printer driver. ■ The printer can I use? Please call your application software to print on the size of the printer. ■ Clear the jammed paper (see your dealer for instructions. ■ Open the face-up output... tray. Problem The printer does not load paper. TROUBLESHOOTING 6 - 6 Recommendation ■ If paper is in the ...
.... ■ Make sure you have chosen the manual feed mode in the printer driver. ■ The printer can I use? Please call your application software to print on the size of the printer. ■ Clear the jammed paper (see your dealer for instructions. ■ Open the face-up output... tray. Problem The printer does not load paper. TROUBLESHOOTING 6 - 6 Recommendation ■ If paper is in the ...

Users Manual - English
Page 176
... LCD messages will stop. JAM A1 JAM A2 JAM A3 JAM A4 JAM A5 JAM B JAM C JAM D JAM E Figure 6-1 Paper jam in the multi-purpose tray Paper jam in the upper paper tray (TRAY1) Paper jam in the lower tray (TRAY 2) Paper jam in the lower tray (TRAY 3) Paper jam in the lower tray (TRAY 4) Paper jam inside the printer, the printer will appear to tell you...
... LCD messages will stop. JAM A1 JAM A2 JAM A3 JAM A4 JAM A5 JAM B JAM C JAM D JAM E Figure 6-1 Paper jam in the multi-purpose tray Paper jam in the upper paper tray (TRAY1) Paper jam in the lower tray (TRAY 2) Paper jam in the lower tray (TRAY 3) Paper jam in the lower tray (TRAY 4) Paper jam inside the printer, the printer will appear to tell you...

Users Manual - English
Page 177
...; Paper that are on the bottom of the paper tray as follows. Check where the jam is misfeeding or a lot of the printer. After you remove the jammed paper, there may jam in the paper tray, inside the printer, in the face-up output tray or where the paper comes out of pages are going... through at the same time when you print on the LCD after you have removed all the jammed paper, open...
...; Paper that are on the bottom of the paper tray as follows. Check where the jam is misfeeding or a lot of the printer. After you remove the jammed paper, there may jam in the paper tray, inside the printer, in the face-up output tray or where the paper comes out of pages are going... through at the same time when you print on the LCD after you have removed all the jammed paper, open...

Users Manual - English
Page 178
JAM A1 (paper jam in the multi-purpose tray) JAM A1 If there is a paper jam in the multi-purpose tray. TROUBLESHOOTING 6 - 10 Figure 6-3 3 When loading paper in the multi-purpose tray, make sure it touches the back of the tray and stays below the maximum paper mark ( ). 4 Open the top cover of the printer and close it back in the multi-purpose tray, follow these steps: 1 Remove the paper from the multi-purpose tray. 2 Fan the paper stack, then put it , or press Go to start printing.
JAM A1 (paper jam in the multi-purpose tray) JAM A1 If there is a paper jam in the multi-purpose tray. TROUBLESHOOTING 6 - 10 Figure 6-3 3 When loading paper in the multi-purpose tray, make sure it touches the back of the tray and stays below the maximum paper mark ( ). 4 Open the top cover of the printer and close it back in the multi-purpose tray, follow these steps: 1 Remove the paper from the multi-purpose tray. 2 Fan the paper stack, then put it , or press Go to start printing.

Users Manual - English
Page 179
JAM A2 / A3 / A4 / A5 (Paper jam inside the Paper tray) The LCD names for the paper trays are as follows. Tray Name Upper paper tray Tray 1 Optional Lower tray Tray 2 Tray 3 Tray 4 LCD Panel Desctiption A2 A3 A4 A5 JAM A2 JAM A3 JAM A4 JAM A5 Figure 6-4 Tray 1 Tray 2 Tray 3 Tray 4 6 - 11 TROUBLESHOOTING
JAM A2 / A3 / A4 / A5 (Paper jam inside the Paper tray) The LCD names for the paper trays are as follows. Tray Name Upper paper tray Tray 1 Optional Lower tray Tray 2 Tray 3 Tray 4 LCD Panel Desctiption A2 A3 A4 A5 JAM A2 JAM A3 JAM A4 JAM A5 Figure 6-4 Tray 1 Tray 2 Tray 3 Tray 4 6 - 11 TROUBLESHOOTING

Users Manual - English
Page 180
While pressing the [blue] paper-guide release lever, slide the paper guides to the lower position, as shown below the maximum paper mark ( ). Check that the guides are firmly in the slots. If a paper jam occurs inside the paper tray, follow these steps: 1 Pull the paper tray out of jammed paper, you can remove it by turning the dial to fit the paper size. Figure 6-5 ■ If you cannot pull out a small piece of the printer. 2 Pull out the jammed paper. TROUBLESHOOTING 6 - 12 Figure 6-6 3 Load paper below .
While pressing the [blue] paper-guide release lever, slide the paper guides to the lower position, as shown below the maximum paper mark ( ). Check that the guides are firmly in the slots. If a paper jam occurs inside the paper tray, follow these steps: 1 Pull the paper tray out of jammed paper, you can remove it by turning the dial to fit the paper size. Figure 6-5 ■ If you cannot pull out a small piece of the printer. 2 Pull out the jammed paper. TROUBLESHOOTING 6 - 12 Figure 6-6 3 Load paper below .

Users Manual - English
Page 181
4 Put the paper tray back in the printer. 5 Open the top cover of the printer, and then close it to resume printing. Do not pull out the upper paper tray while paper is feeding from a lower paper tray because this will cause a paper jam. 6 - 13 TROUBLESHOOTING
4 Put the paper tray back in the printer. 5 Open the top cover of the printer, and then close it to resume printing. Do not pull out the upper paper tray while paper is feeding from a lower paper tray because this will cause a paper jam. 6 - 13 TROUBLESHOOTING

Users Manual - English
Page 182
...■ When you do not spread toner. ■ Take care not to make sure that the printed pages have removed the jammed paper, print a few test pages. Inside the printer Open the face-up output tray Figure 6-7 ■ After you have no toner stains on them before you restart the print ...job. ■ Remove the jammed paper carefully so you open the top cover of the printer. 2 Take out the drum unit assembly (drum unit with cold water. TROUBLESHOOTING 6 - 14 This is HOT! Wash toner ...
...■ When you do not spread toner. ■ Take care not to make sure that the printed pages have removed the jammed paper, print a few test pages. Inside the printer Open the face-up output tray Figure 6-7 ■ After you have no toner stains on them before you restart the print ...job. ■ Remove the jammed paper carefully so you open the top cover of the printer. 2 Take out the drum unit assembly (drum unit with cold water. TROUBLESHOOTING 6 - 14 This is HOT! Wash toner ...
Users Manual - English
Page 183
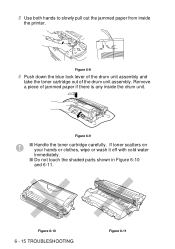
3 Use both hands to slowly pull out the jammed paper from inside the drum unit. If toner scatters on your hands or clothes, wipe or wash it off with cold water immediately. ■ Do not touch the shaded parts shown in Figure 6-10 and 6-11. Figure 6-8 4 Push down the blue lock lever of the drum unit assembly and take the toner cartridge out of jammed paper if there is any inside the printer. Figure 6-9 ■ Handle the toner cartridge carefully. Figure 6-10 6 - 15 TROUBLESHOOTING Figure 6-11 Remove a piece of the drum unit assembly.
3 Use both hands to slowly pull out the jammed paper from inside the drum unit. If toner scatters on your hands or clothes, wipe or wash it off with cold water immediately. ■ Do not touch the shaded parts shown in Figure 6-10 and 6-11. Figure 6-8 4 Push down the blue lock lever of the drum unit assembly and take the toner cartridge out of jammed paper if there is any inside the printer. Figure 6-9 ■ Handle the toner cartridge carefully. Figure 6-10 6 - 15 TROUBLESHOOTING Figure 6-11 Remove a piece of the drum unit assembly.

Users Manual - English
Page 185
JAM C (paper jam where the paper comes out / paper jam in the face-up output tray) JAM C When the paper jams where the paper comes out or behind the face-up output tray, remove the jammed paper as follows: 1 Use both hands to slowly pull the jammed paper from the paper exit. Figure 6-12 If a Duplex unit is on the printer. 6 - 17 TROUBLESHOOTING After you pull out the jammed paper, put the Duplex unit back on the printer, take it off the printer.
JAM C (paper jam where the paper comes out / paper jam in the face-up output tray) JAM C When the paper jams where the paper comes out or behind the face-up output tray, remove the jammed paper as follows: 1 Use both hands to slowly pull the jammed paper from the paper exit. Figure 6-12 If a Duplex unit is on the printer. 6 - 17 TROUBLESHOOTING After you pull out the jammed paper, put the Duplex unit back on the printer, take it off the printer.

