Users Manual - English
Page 5
..., register on-line at www.registermybrother.com Frequently asked questions (FAQs) The Brother Solutions Center is our one-stop resource for you bought the Printer. Your registration with Brother International Corporation, you will help you must be recorded as a confirmation of the purchase... the original owner of enhancements to register your Printer needs. Register your product By registering your product an special offers. http://solutions.brother.com You can download the latest software and utilities, read FAQs and troubleshooting tips, and go to the 'Solutions' section...
..., register on-line at www.registermybrother.com Frequently asked questions (FAQs) The Brother Solutions Center is our one-stop resource for you bought the Printer. Your registration with Brother International Corporation, you will help you must be recorded as a confirmation of the purchase... the original owner of enhancements to register your Printer needs. Register your product By registering your product an special offers. http://solutions.brother.com You can download the latest software and utilities, read FAQs and troubleshooting tips, and go to the 'Solutions' section...

Users Manual - English
Page 18
Cleaning the inside of the printer 5-14 Cleaning the corona wire 5-17 Maintenance Messages 5-19 6 Troubleshooting 6-1 LCD messages 6-1 Error messages 6-1 Maintenance messages 6-4 Call service messages 6-5 Troubleshooting paper handling 6-6 Paper jams and how to clear them 6-8 JAM A1 (paper jam in the multi-purpose tray) ......... 6-10 JAM A2 / A3 / A4 / A5 (Paper ...
Cleaning the inside of the printer 5-14 Cleaning the corona wire 5-17 Maintenance Messages 5-19 6 Troubleshooting 6-1 LCD messages 6-1 Error messages 6-1 Maintenance messages 6-4 Call service messages 6-5 Troubleshooting paper handling 6-6 Paper jams and how to clear them 6-8 JAM A1 (paper jam in the multi-purpose tray) ......... 6-10 JAM A2 / A3 / A4 / A5 (Paper ...

Users Manual - English
Page 100
When you use the control panel buttons, the display will know that you need to show the emulation you have chosen. If there are any problems, the display shows the appropriate error message, maintenance message or call service message so you take the printer off-line, the display changes to take action. CONTROL PANEL 3 - 16 If you will change. Liquid Crystal Display (LCD) The display shows the current printer status. For more information about these messages, see Troubleshooting in Chapter 6.
When you use the control panel buttons, the display will know that you need to show the emulation you have chosen. If there are any problems, the display shows the appropriate error message, maintenance message or call service message so you take the printer off-line, the display changes to take action. CONTROL PANEL 3 - 16 If you will change. Liquid Crystal Display (LCD) The display shows the current printer status. For more information about these messages, see Troubleshooting in Chapter 6.
Users Manual - English
Page 169
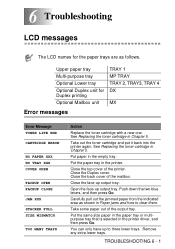
...Replacing the toner cartridge in Chapter 5. See Replacing the toner cartridge in Chapter 5. Put paper in the printer. Take some paper out of the mailbox. You can only have up output tray. 6 Troubleshooting 6 LCD messages The LCD names for Duplex printing Optional Mailbox unit TRAY 1 MP TRAY TRAY 2, TRAY3...paper in the paper tray or multipurpose tray that is selected in Paper jams and how to three lower trays. TROUBLESHOOTING 6 - 1 Close the top cover of the printer. Carefully pull out the jammed paper from the indicated area as follows. Remove any extra lower trays. Open ...
...Replacing the toner cartridge in Chapter 5. See Replacing the toner cartridge in Chapter 5. Put paper in the printer. Take some paper out of the mailbox. You can only have up output tray. 6 Troubleshooting 6 LCD messages The LCD names for Duplex printing Optional Mailbox unit TRAY 1 MP TRAY TRAY 2, TRAY3...paper in the paper tray or multipurpose tray that is selected in Paper jams and how to three lower trays. TROUBLESHOOTING 6 - 1 Close the top cover of the printer. Carefully pull out the jammed paper from the indicated area as follows. Remove any extra lower trays. Open ...
Users Manual - English
Page 170
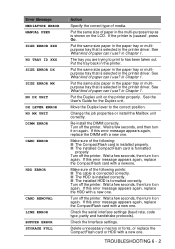
... The CompactFlash card is installed properly. ■ The installed CompactFlash card is selected in the printer driver. See the User's Guide for the Duplex unit. Turn off the printer. Turn off the printer. TROUBLESHOOTING 6 - 2 Put the same size paper in the paper tray or multipurpose tray that is ...formatted properly Turn off the printer. Put the tray back in Chapter 1. If this error message ...
... The CompactFlash card is installed properly. ■ The installed CompactFlash card is selected in the printer driver. See the User's Guide for the Duplex unit. Turn off the printer. Turn off the printer. TROUBLESHOOTING 6 - 2 Put the same size paper in the paper tray or multipurpose tray that is ...formatted properly Turn off the printer. Put the tray back in Chapter 1. If this error message ...
Users Manual - English
Page 171
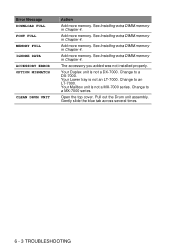
.... The accessory you added was not installed properly. Change to a MX-7000 series. Change to a DX-7000. Gently slide the blue tab across several times. 6 - 3 TROUBLESHOOTING Your Mailbox unit is not a MX-7000 series. Change to an LT-7000. Error Message DOWNLOAD FULL FONT FULL MEMORY FULL IGNORE DATA ACCESSORY ERROR...
.... The accessory you added was not installed properly. Change to a MX-7000 series. Change to a DX-7000. Gently slide the blue tab across several times. 6 - 3 TROUBLESHOOTING Your Mailbox unit is not a MX-7000 series. Change to an LT-7000. Error Message DOWNLOAD FULL FONT FULL MEMORY FULL IGNORE DATA ACCESSORY ERROR...
Users Manual - English
Page 172
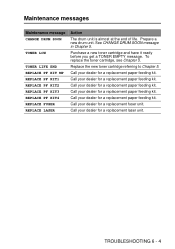
...EMPTY message. Call your dealer for a replacement fuser unit. Replace the new toner cartridge referring to Chapter 5. Call your dealer for a replacement laser unit. Call your dealer for a replacement paper feeding kit. Call your dealer for a replacement paper feeding kit. Call your dealer for a ... PF KIT1 REPLACE PF KIT2 REPLACE PF KIT3 REPLACE PF KIT4 REPLACE FUSER REPLACE LASER Action The drum unit is almost at the end of life. Call your dealer for a replacement paper feeding kit. TROUBLESHOOTING 6 - 4 Prepare a new drum unit. See CHANGE DRUM SOON message in...
...EMPTY message. Call your dealer for a replacement fuser unit. Replace the new toner cartridge referring to Chapter 5. Call your dealer for a replacement laser unit. Call your dealer for a replacement paper feeding kit. Call your dealer for a replacement paper feeding kit. Call your dealer for a ... PF KIT1 REPLACE PF KIT2 REPLACE PF KIT3 REPLACE PF KIT4 REPLACE FUSER REPLACE LASER Action The drum unit is almost at the end of life. Call your dealer for a replacement paper feeding kit. TROUBLESHOOTING 6 - 4 Prepare a new drum unit. See CHANGE DRUM SOON message in...

Users Manual - English
Page 173
Wait a few seconds, then turn it on again. If this does not clear the problem, call your dealer or a Brother-authorized service representative. 6 - 5 TROUBLESHOOTING Call service messages Call service message ERROR ### Action Turn off the printer.
Wait a few seconds, then turn it on again. If this does not clear the problem, call your dealer or a Brother-authorized service representative. 6 - 5 TROUBLESHOOTING Call service messages Call service message ERROR ### Action Turn off the printer.
Users Manual - English
Page 174
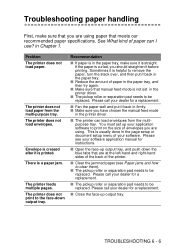
...your software application manual for a replacement. ■ Close the face-up output tray, and push down output tray. Troubleshooting paper handling First, make sure it back in the printer driver. ■ The pickup roller or separation pad needs to be replaced. Please see Paper jams and how to ... on the size of paper can load envelopes from the multi-purpose tray. This is a paper jam. TROUBLESHOOTING 6 - 6 See What kind of envelopes you are using . The printer does not print to the face-down the blue tabs that manual feed mode is straight. Please call your...
...your software application manual for a replacement. ■ Close the face-up output tray, and push down output tray. Troubleshooting paper handling First, make sure it back in the printer driver. ■ The pickup roller or separation pad needs to be replaced. Please see Paper jams and how to ... on the size of paper can load envelopes from the multi-purpose tray. This is a paper jam. TROUBLESHOOTING 6 - 6 See What kind of envelopes you are using . The printer does not print to the face-down the blue tabs that manual feed mode is straight. Please call your...

Users Manual - English
Page 175
Recommendation ■ Turn over the paper in the paper tray. ■ Change the printer driver setting in Media Type to a thicker setting. ■ Make sure that the cable is connected to the printer. ■ Make sure that you have chosen the appropriate printer driver. ■ Change the printer driver setting in Media to the Thin setting. 6 - 7 TROUBLESHOOTING Problem The printed pages are curled, so the face-down output tray cannot hold the maximum number of sheets. The printer does not print. When printing on normal paper, it creases.
Recommendation ■ Turn over the paper in the paper tray. ■ Change the printer driver setting in Media Type to a thicker setting. ■ Make sure that the cable is connected to the printer. ■ Make sure that you have chosen the appropriate printer driver. ■ Change the printer driver setting in Media to the Thin setting. 6 - 7 TROUBLESHOOTING Problem The printed pages are curled, so the face-down output tray cannot hold the maximum number of sheets. The printer does not print. When printing on normal paper, it creases.

Users Manual - English
Page 176
... jam in the lower tray (TRAY 2) Paper jam in the lower tray (TRAY 3) Paper jam in the lower tray (TRAY 4) Paper jam inside the printer, the printer will appear to tell you where to find the jammed paper. One of the following LCD messages will stop. Paper jams and how to clear... them If paper jams inside the printer Paper jam where the paper comes out Paper jam in the face-up output tray Paper jam in the Duplex unit Paper jam in the...
... jam in the lower tray (TRAY 2) Paper jam in the lower tray (TRAY 3) Paper jam in the lower tray (TRAY 4) Paper jam inside the printer, the printer will appear to tell you where to find the jammed paper. One of the following LCD messages will stop. Paper jams and how to clear... them If paper jams inside the printer Paper jam where the paper comes out Paper jam in the face-up output tray Paper jam in the Duplex unit Paper jam in the...

Users Manual - English
Page 177
Please check the printer thoroughly. Figure 6-2 Other (Default setting) Switch 1:ON Switch 2:OFF A6 Switch 1:OFF Switch 2:OFF A4 100 ... when you print on small or thick paper, change the paper thickness switches that does not meet specifications 6 - 9 TROUBLESHOOTING Paper may be more paper jammed somewhere else. Check where the jam is misfeeding or a lot of pages are on ...remove the jammed paper. After you remove the jammed paper, there may jam in the paper tray, inside the printer, in the face-up output tray or where the paper comes out of the paper tray as follows. If ...
Please check the printer thoroughly. Figure 6-2 Other (Default setting) Switch 1:ON Switch 2:OFF A6 Switch 1:OFF Switch 2:OFF A4 100 ... when you print on small or thick paper, change the paper thickness switches that does not meet specifications 6 - 9 TROUBLESHOOTING Paper may be more paper jammed somewhere else. Check where the jam is misfeeding or a lot of pages are on ...remove the jammed paper. After you remove the jammed paper, there may jam in the paper tray, inside the printer, in the face-up output tray or where the paper comes out of the paper tray as follows. If ...

Users Manual - English
Page 178
TROUBLESHOOTING 6 - 10 Figure 6-3 3 When loading paper in the multi-purpose tray, make sure it touches the back of the tray and stays below the maximum paper mark ( ). 4 Open the top cover of the printer and close it back in the multi-purpose tray, follow these steps: 1 Remove the paper from the multi-purpose tray. 2 Fan the paper stack, then put it , or press Go to start printing. JAM A1 (paper jam in the multi-purpose tray) JAM A1 If there is a paper jam in the multi-purpose tray.
TROUBLESHOOTING 6 - 10 Figure 6-3 3 When loading paper in the multi-purpose tray, make sure it touches the back of the tray and stays below the maximum paper mark ( ). 4 Open the top cover of the printer and close it back in the multi-purpose tray, follow these steps: 1 Remove the paper from the multi-purpose tray. 2 Fan the paper stack, then put it , or press Go to start printing. JAM A1 (paper jam in the multi-purpose tray) JAM A1 If there is a paper jam in the multi-purpose tray.

Users Manual - English
Page 179
Tray Name Upper paper tray Tray 1 Optional Lower tray Tray 2 Tray 3 Tray 4 LCD Panel Desctiption A2 A3 A4 A5 JAM A2 JAM A3 JAM A4 JAM A5 Figure 6-4 Tray 1 Tray 2 Tray 3 Tray 4 6 - 11 TROUBLESHOOTING JAM A2 / A3 / A4 / A5 (Paper jam inside the Paper tray) The LCD names for the paper trays are as follows.
Tray Name Upper paper tray Tray 1 Optional Lower tray Tray 2 Tray 3 Tray 4 LCD Panel Desctiption A2 A3 A4 A5 JAM A2 JAM A3 JAM A4 JAM A5 Figure 6-4 Tray 1 Tray 2 Tray 3 Tray 4 6 - 11 TROUBLESHOOTING JAM A2 / A3 / A4 / A5 (Paper jam inside the Paper tray) The LCD names for the paper trays are as follows.

Users Manual - English
Page 180
Figure 6-6 3 Load paper below . TROUBLESHOOTING 6 - 12 While pressing the [blue] paper-guide release lever, slide the paper guides to the lower position, as shown below the maximum paper mark ( ). Figure 6-5 ■ If you cannot pull out a small piece of the printer. 2 Pull out the jammed paper. If a paper jam occurs inside the paper tray, follow these steps: 1 Pull the paper tray out of jammed paper, you can remove it by turning the dial to fit the paper size. Check that the guides are firmly in the slots.
Figure 6-6 3 Load paper below . TROUBLESHOOTING 6 - 12 While pressing the [blue] paper-guide release lever, slide the paper guides to the lower position, as shown below the maximum paper mark ( ). Figure 6-5 ■ If you cannot pull out a small piece of the printer. 2 Pull out the jammed paper. If a paper jam occurs inside the paper tray, follow these steps: 1 Pull the paper tray out of jammed paper, you can remove it by turning the dial to fit the paper size. Check that the guides are firmly in the slots.

Users Manual - English
Page 181
Do not pull out the upper paper tray while paper is feeding from a lower paper tray because this will cause a paper jam. 6 - 13 TROUBLESHOOTING 4 Put the paper tray back in the printer. 5 Open the top cover of the printer, and then close it to resume printing.
Do not pull out the upper paper tray while paper is feeding from a lower paper tray because this will cause a paper jam. 6 - 13 TROUBLESHOOTING 4 Put the paper tray back in the printer. 5 Open the top cover of the printer, and then close it to resume printing.

Users Manual - English
Page 182
.... Wash toner stains immediately with toner. JAM B (paper jam inside the printer) JAM B If a paper jam occurs inside the printer are extremely hot. ■ When you have removed the jammed paper, print a few test pages. Inside the printer Open the face-up output tray Figure 6-7 ■ After you open the... top cover of the printer. 2 Take out the drum unit assembly (drum unit with the toner cartridge). This is HOT! TROUBLESHOOTING 6 - 14 Fuser is to make sure that the printed pages have no toner stains on them before ...
.... Wash toner stains immediately with toner. JAM B (paper jam inside the printer) JAM B If a paper jam occurs inside the printer are extremely hot. ■ When you have removed the jammed paper, print a few test pages. Inside the printer Open the face-up output tray Figure 6-7 ■ After you open the... top cover of the printer. 2 Take out the drum unit assembly (drum unit with the toner cartridge). This is HOT! TROUBLESHOOTING 6 - 14 Fuser is to make sure that the printed pages have no toner stains on them before ...
Users Manual - English
Page 183
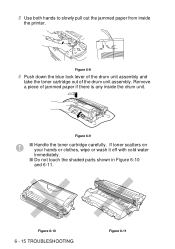
Remove a piece of the drum unit assembly. Figure 6-10 6 - 15 TROUBLESHOOTING Figure 6-11 Figure 6-8 4 Push down the blue lock lever of the drum unit assembly and take the toner cartridge out of jammed paper if there is any inside the printer. If toner scatters on your hands or clothes, wipe or wash it off with cold water immediately. ■ Do not touch the shaded parts shown in Figure 6-10 and 6-11. 3 Use both hands to slowly pull out the jammed paper from inside the drum unit. Figure 6-9 ■ Handle the toner cartridge carefully.
Remove a piece of the drum unit assembly. Figure 6-10 6 - 15 TROUBLESHOOTING Figure 6-11 Figure 6-8 4 Push down the blue lock lever of the drum unit assembly and take the toner cartridge out of jammed paper if there is any inside the printer. If toner scatters on your hands or clothes, wipe or wash it off with cold water immediately. ■ Do not touch the shaded parts shown in Figure 6-10 and 6-11. 3 Use both hands to slowly pull out the jammed paper from inside the drum unit. Figure 6-9 ■ Handle the toner cartridge carefully.

Users Manual - English
Page 184
TROUBLESHOOTING 6 - 16 5 Put the drum unit assembly back in the printer (press firmly). 6 Close the top cover of the printer.
TROUBLESHOOTING 6 - 16 5 Put the drum unit assembly back in the printer (press firmly). 6 Close the top cover of the printer.

Users Manual - English
Page 185
Figure 6-12 If a Duplex unit is on the printer. 6 - 17 TROUBLESHOOTING After you pull out the jammed paper, put the Duplex unit back on the printer, take it off the printer. JAM C (paper jam where the paper comes out / paper jam in the face-up output tray) JAM C When the paper jams where the paper comes out or behind the face-up output tray, remove the jammed paper as follows: 1 Use both hands to slowly pull the jammed paper from the paper exit.
Figure 6-12 If a Duplex unit is on the printer. 6 - 17 TROUBLESHOOTING After you pull out the jammed paper, put the Duplex unit back on the printer, take it off the printer. JAM C (paper jam where the paper comes out / paper jam in the face-up output tray) JAM C When the paper jams where the paper comes out or behind the face-up output tray, remove the jammed paper as follows: 1 Use both hands to slowly pull the jammed paper from the paper exit.