Users Manual - English
Page 17
...of the paper ..... 4-4 Paper orientation for printing on both sides of the paper 4-5 Mailbox unit 4-6 Network option NC-4100h (For HL-7050 only 4-8 Installing the Network board 4-8 CompactFlash card 4-11 Installing the CompactFlash card 4-12 RAM expansion 4-13 Installing extra DIMM memory ... consumables 5-1 Toner cartridge 5-2 TONER LOW Message 5-2 (Appears at intervals 5-2 TONER LIFE END message 5-2 Replacing the toner cartridge 5-3 Drum unit 5-6 CHANGE DRUM SOON message 5-6 Replacing the drum unit 5-6 Replacing Maintenance Parts 5-11 Cleaning 5-12 Cleaning the outside of the...
...of the paper ..... 4-4 Paper orientation for printing on both sides of the paper 4-5 Mailbox unit 4-6 Network option NC-4100h (For HL-7050 only 4-8 Installing the Network board 4-8 CompactFlash card 4-11 Installing the CompactFlash card 4-12 RAM expansion 4-13 Installing extra DIMM memory ... consumables 5-1 Toner cartridge 5-2 TONER LOW Message 5-2 (Appears at intervals 5-2 TONER LIFE END message 5-2 Replacing the toner cartridge 5-3 Drum unit 5-6 CHANGE DRUM SOON message 5-6 Replacing the drum unit 5-6 Replacing Maintenance Parts 5-11 Cleaning 5-12 Cleaning the outside of the...
Users Manual - English
Page 20
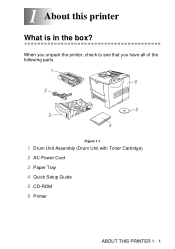
When you unpack the printer, check to see that you have all of the following parts. 1 6 2 5 3 4 Figure 1-1 1 Drum Unit Assembly (Drum Unit with Toner Cartridge) 2 AC Power Cord 3 Paper Tray 4 Quick Setup Guide 5 CD-ROM 6 Printer ABOUT THIS PRINTER 1 - 1 1 About this printer 1 What is in the box?
When you unpack the printer, check to see that you have all of the following parts. 1 6 2 5 3 4 Figure 1-1 1 Drum Unit Assembly (Drum Unit with Toner Cartridge) 2 AC Power Cord 3 Paper Tray 4 Quick Setup Guide 5 CD-ROM 6 Printer ABOUT THIS PRINTER 1 - 1 1 About this printer 1 What is in the box?
Users Manual - English
Page 107
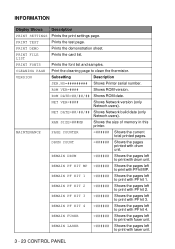
... REMAIN PF KIT MP =###### Shows the pages left to print with drum unit. VERSION Subsetting Description SER.NO=######### Shows Printer serial number. NET DATE=##/##/## Shows Network build date (only Network users). REMAIN DRUM =###### Shows the pages left to print with PF kit MP. RAM... PF KIT 4 =###### Shows the pages left to print with PF kit 1. REMAIN LASER =###### Shows the pages left to clean the thermistor. REMAIN PF KIT 2 =###### Shows the pages left to print with laser unit. 3 - 23 CONTROL PANEL MAINTENANCE PAGE COUNTER =###### Shows the current total printed...
... REMAIN PF KIT MP =###### Shows the pages left to print with drum unit. VERSION Subsetting Description SER.NO=######### Shows Printer serial number. NET DATE=##/##/## Shows Network build date (only Network users). REMAIN DRUM =###### Shows the pages left to print with PF kit MP. RAM... PF KIT 4 =###### Shows the pages left to print with PF kit 1. REMAIN LASER =###### Shows the pages left to clean the thermistor. REMAIN PF KIT 2 =###### Shows the pages left to print with laser unit. 3 - 23 CONTROL PANEL MAINTENANCE PAGE COUNTER =###### Shows the current total printed...
Users Manual - English
Page 150
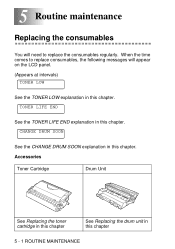
When the time comes to replace the consumables regularly. CHANGE DRUM SOON See the CHANGE DRUM SOON explanation in this chapter. Accessories Toner Cartridge Drum Unit See Replacing the toner cartridge in this chapter See Replacing the drum unit in this chapter 5 - 1 ROUTINE MAINTENANCE 5 Routine maintenance 5 Replacing the consumables You will need to replace consumables...
When the time comes to replace the consumables regularly. CHANGE DRUM SOON See the CHANGE DRUM SOON explanation in this chapter. Accessories Toner Cartridge Drum Unit See Replacing the toner cartridge in this chapter See Replacing the drum unit in this chapter 5 - 1 ROUTINE MAINTENANCE 5 Routine maintenance 5 Replacing the consumables You will need to replace consumables...
Users Manual - English
Page 151
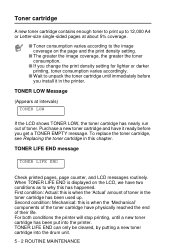
...or darker printing, toner consumption varies accordingly. ■ Wait to unpack the toner cartridge until a new toner cartridge has been put into the drum unit. 5 - 2 ROUTINE MAINTENANCE TONER LOW Message (Appears at about 5% coverage. ■ Toner consumption varies according to the image coverage on...cartridge has nearly run out of their life. To replace the toner cartridge, see Replacing the toner cartridge in the printer. For both conditions the printer will stop printing, until immediately before you install it ready before you get a TONER EMPTY message. TONER LIFE END ...
...or darker printing, toner consumption varies accordingly. ■ Wait to unpack the toner cartridge until a new toner cartridge has been put into the drum unit. 5 - 2 ROUTINE MAINTENANCE TONER LOW Message (Appears at about 5% coverage. ■ Toner consumption varies according to the image coverage on...cartridge has nearly run out of their life. To replace the toner cartridge, see Replacing the toner cartridge in the printer. For both conditions the printer will stop printing, until immediately before you install it ready before you get a TONER EMPTY message. TONER LIFE END ...
Users Manual - English
Page 155
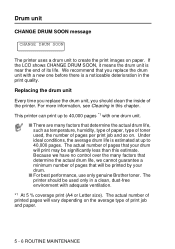
...on the average type of print job and paper. 5 - 6 ROUTINE MAINTENANCE The printer should clean the inside of the printer. Replacing the drum unit Every time you replace the drum unit, you replace the drum unit with one before there is near the end of printed pages will print may ...be printed by your drum. ■ For best performance, use only genuine Brother toner. This printer can print up...
...on the average type of print job and paper. 5 - 6 ROUTINE MAINTENANCE The printer should clean the inside of the printer. Replacing the drum unit Every time you replace the drum unit, you replace the drum unit with one before there is near the end of printed pages will print may ...be printed by your drum. ■ For best performance, use only genuine Brother toner. This printer can print up...
Users Manual - English
Page 156
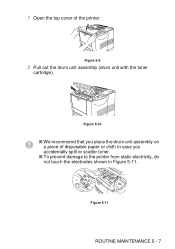
Figure 5-9 2 Pull out the drum unit assembly (drum unit with the toner cartridge). Figure 5-10 ■ We recommend that you place the drum unit assembly on a piece of the printer. Figure 5-11 ROUTINE MAINTENANCE 5 - 7 1 Open the top cover of disposable paper or cloth in case you accidentally spill or scatter toner. ■ To prevent damage to the printer from static electricity, do not touch the electrodes shown in Figure 5-11.
Figure 5-9 2 Pull out the drum unit assembly (drum unit with the toner cartridge). Figure 5-10 ■ We recommend that you place the drum unit assembly on a piece of the printer. Figure 5-11 ROUTINE MAINTENANCE 5 - 7 1 Open the top cover of disposable paper or cloth in case you accidentally spill or scatter toner. ■ To prevent damage to the printer from static electricity, do not touch the electrodes shown in Figure 5-11.
Users Manual - English
Page 157
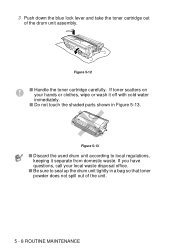
... not touch the shaded parts shown in a bag so that toner powder does not spill out of the drum unit assembly. Figure 5-13 ■ Discard the used drum unit according to seal up the drum unit tightly in Figure 5-13. Figure 5-12 ■ Handle the toner cartridge carefully. 3 Push down the blue lock...
... not touch the shaded parts shown in a bag so that toner powder does not spill out of the drum unit assembly. Figure 5-13 ■ Discard the used drum unit according to seal up the drum unit tightly in Figure 5-13. Figure 5-12 ■ Handle the toner cartridge carefully. 3 Push down the blue lock...

Users Manual - English
Page 158
If you put it may damage the drum unit. ■ Do not touch the shaded parts shown in Figure 5-14. Figure 5-14 5 Put the toner cartridge in the new drum unit. Exposure to unpack a drum unit until immediately before you install the toner cartridge properly, or it in the printer. Figure 5-15 ■ Make sure you put the cartridge in properly, the blue lock lever is lifted automatically. ROUTINE MAINTENANCE 5 - 9 4 Unpack the new drum unit. ■ Wait to direct sunlight or room light may separate from the drum when you pick up the drum unit.
If you put it may damage the drum unit. ■ Do not touch the shaded parts shown in Figure 5-14. Figure 5-14 5 Put the toner cartridge in the new drum unit. Exposure to unpack a drum unit until immediately before you install the toner cartridge properly, or it in the printer. Figure 5-15 ■ Make sure you put the cartridge in properly, the blue lock lever is lifted automatically. ROUTINE MAINTENANCE 5 - 9 4 Unpack the new drum unit. ■ Wait to direct sunlight or room light may separate from the drum when you pick up the drum unit.

Users Manual - English
Page 159
See Cleaning in the printer. Figure 5-16 ■ We recommend that you clean the inside of the printer when you replace only the toner cartridge, do not reset the page counter. 8 Close the top cover of the printer. 5 - 10 ROUTINE MAINTENANCE 6 Put the drum unit assembly in this chapter. 7 Reset the page counter following the instructions we have supplied with the new drum unit. ■ If you replace the drum unit.
See Cleaning in the printer. Figure 5-16 ■ We recommend that you clean the inside of the printer when you replace only the toner cartridge, do not reset the page counter. 8 Close the top cover of the printer. 5 - 10 ROUTINE MAINTENANCE 6 Put the drum unit assembly in this chapter. 7 Reset the page counter following the instructions we have supplied with the new drum unit. ■ If you replace the drum unit.
Users Manual - English
Page 161
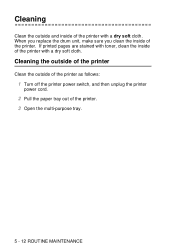
When you replace the drum unit, make sure you clean the inside of the printer with a dry soft cloth. Cleaning Clean the outside of the printer as follows: 1 Turn off the printer power switch, and then unplug the printer power cord. 2 Pull the paper tray out of the printer. 3 Open the multi-purpose tray. 5 - 12 ROUTINE MAINTENANCE Cleaning the outside of the printer Clean the outside and inside of the printer. If printed pages are stained with toner, clean the inside of the printer with a dry soft cloth.
When you replace the drum unit, make sure you clean the inside of the printer with a dry soft cloth. Cleaning Clean the outside of the printer as follows: 1 Turn off the printer power switch, and then unplug the printer power cord. 2 Pull the paper tray out of the printer. 3 Open the multi-purpose tray. 5 - 12 ROUTINE MAINTENANCE Cleaning the outside of the printer Clean the outside and inside of the printer. If printed pages are stained with toner, clean the inside of the printer with a dry soft cloth.

Users Manual - English
Page 163
Figure 5-19 Clean the inside of the printer as follows: 1 Turn off the toner with a dry cloth and immediately wash the clothes in cold water to avoid stains. ■ Never touch the hot fuser. ■ Be careful not to inhale the toner. Fuser is HOT! Cleaning the inside of the printer When you clean the inside of the printer, pay attention to the following: ■ If your clothes are smeared with toner, wipe off the printer power switch, and then unplug the printer power cord. 2 Open the top cover. 3 Take out the drum unit assembly. 5 - 14 ROUTINE MAINTENANCE
Figure 5-19 Clean the inside of the printer as follows: 1 Turn off the toner with a dry cloth and immediately wash the clothes in cold water to avoid stains. ■ Never touch the hot fuser. ■ Be careful not to inhale the toner. Fuser is HOT! Cleaning the inside of the printer When you clean the inside of the printer, pay attention to the following: ■ If your clothes are smeared with toner, wipe off the printer power switch, and then unplug the printer power cord. 2 Open the top cover. 3 Take out the drum unit assembly. 5 - 14 ROUTINE MAINTENANCE
Users Manual - English
Page 165
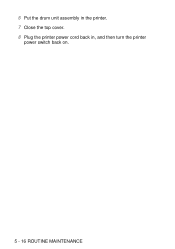
6 Put the drum unit assembly in the printer. 7 Close the top cover. 8 Plug the printer power cord back in, and then turn the printer power switch back on. 5 - 16 ROUTINE MAINTENANCE
6 Put the drum unit assembly in the printer. 7 Close the top cover. 8 Plug the printer power cord back in, and then turn the printer power switch back on. 5 - 16 ROUTINE MAINTENANCE
Users Manual - English
Page 166
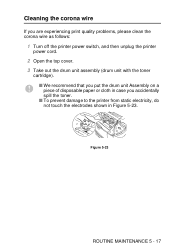
Figure 5-23 ROUTINE MAINTENANCE 5 - 17 Cleaning the corona wire If you are experiencing print quality problems, please clean the corona wire as follows: 1 Turn off the printer power switch, and then unplug the printer power cord. 2 Open the top cover. 3 Take out the drum unit assembly (drum unit with the toner cartridge). ■ We recommend that you put the drum unit Assembly on a piece of disposable paper or cloth in case you accidentally spill the toner. ■ To prevent damage to the printer from static electricity, do not touch the electrodes shown in Figure 5-23.
Figure 5-23 ROUTINE MAINTENANCE 5 - 17 Cleaning the corona wire If you are experiencing print quality problems, please clean the corona wire as follows: 1 Turn off the printer power switch, and then unplug the printer power cord. 2 Open the top cover. 3 Take out the drum unit assembly (drum unit with the toner cartridge). ■ We recommend that you put the drum unit Assembly on a piece of disposable paper or cloth in case you accidentally spill the toner. ■ To prevent damage to the printer from static electricity, do not touch the electrodes shown in Figure 5-23.
Users Manual - English
Page 167
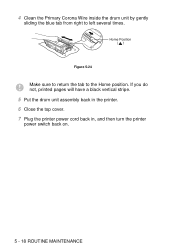
If you do not, printed pages will have a black vertical stripe. 5 Put the drum unit assembly back in the printer. 6 Close the top cover. 7 Plug the printer power cord back in, and then turn the printer power switch back on. 5 - 18 ROUTINE MAINTENANCE 4 Clean the Primary Corona Wire inside the drum unit by gently sliding the blue tab from right to the Home position. Home Position () Figure 5-24 Make sure to return the tab to left several times.
If you do not, printed pages will have a black vertical stripe. 5 Put the drum unit assembly back in the printer. 6 Close the top cover. 7 Plug the printer power cord back in, and then turn the printer power switch back on. 5 - 18 ROUTINE MAINTENANCE 4 Clean the Primary Corona Wire inside the drum unit by gently sliding the blue tab from right to the Home position. Home Position () Figure 5-24 Make sure to return the tab to left several times.
Users Manual - English
Page 171
... Add more memory. Your Duplex unit is not an LT-7000. Add more memory. Pull out the Drum unit assembly. Error Message DOWNLOAD FULL FONT FULL MEMORY FULL IGNORE DATA ACCESSORY ERROR OPTION MISMATCH CLEAN DRUM UNIT Action Add more memory. See Installing extra DIMM memory in Chapter 4. See Installing extra DIMM...
... Add more memory. Your Duplex unit is not an LT-7000. Add more memory. Pull out the Drum unit assembly. Error Message DOWNLOAD FULL FONT FULL MEMORY FULL IGNORE DATA ACCESSORY ERROR OPTION MISMATCH CLEAN DRUM UNIT Action Add more memory. See Installing extra DIMM memory in Chapter 4. See Installing extra DIMM...
Users Manual - English
Page 172
To replace the toner cartridge, see Chapter 5. Call your dealer for a replacement paper feeding kit. See CHANGE DRUM SOON message in Chapter 5. Call your dealer for a replacement fuser unit. Call your dealer for a replacement laser unit. Call your dealer for a replacement paper feeding kit. Call your dealer for a replacement paper feeding kit. Call...
To replace the toner cartridge, see Chapter 5. Call your dealer for a replacement paper feeding kit. See CHANGE DRUM SOON message in Chapter 5. Call your dealer for a replacement fuser unit. Call your dealer for a replacement laser unit. Call your dealer for a replacement paper feeding kit. Call your dealer for a replacement paper feeding kit. Call...

Users Manual - English
Page 182
... 6 - 14 This is HOT! WARNING ■ After you open the top cover of the printer. 2 Take out the drum unit assembly (drum unit with the toner cartridge). JAM B (paper jam inside the printer) JAM B If a paper jam occurs inside the printer are extremely hot. ■ When you have removed the jammed paper, print a few test...
... 6 - 14 This is HOT! WARNING ■ After you open the top cover of the printer. 2 Take out the drum unit assembly (drum unit with the toner cartridge). JAM B (paper jam inside the printer) JAM B If a paper jam occurs inside the printer are extremely hot. ■ When you have removed the jammed paper, print a few test...
Users Manual - English
Page 183
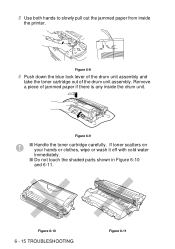
Figure 6-8 4 Push down the blue lock lever of the drum unit assembly and take the toner cartridge out of jammed paper if there is any inside the printer. Figure 6-9 ■ Handle the toner cartridge carefully. Figure 6-10 6 - 15 TROUBLESHOOTING Figure 6-11 Remove a piece of the drum unit assembly. 3 Use both hands to slowly pull out the jammed paper from inside the drum unit. If toner scatters on your hands or clothes, wipe or wash it off with cold water immediately. ■ Do not touch the shaded parts shown in Figure 6-10 and 6-11.
Figure 6-8 4 Push down the blue lock lever of the drum unit assembly and take the toner cartridge out of jammed paper if there is any inside the printer. Figure 6-9 ■ Handle the toner cartridge carefully. Figure 6-10 6 - 15 TROUBLESHOOTING Figure 6-11 Remove a piece of the drum unit assembly. 3 Use both hands to slowly pull out the jammed paper from inside the drum unit. If toner scatters on your hands or clothes, wipe or wash it off with cold water immediately. ■ Do not touch the shaded parts shown in Figure 6-10 and 6-11.
Users Manual - English
Page 184
TROUBLESHOOTING 6 - 16 5 Put the drum unit assembly back in the printer (press firmly). 6 Close the top cover of the printer.
TROUBLESHOOTING 6 - 16 5 Put the drum unit assembly back in the printer (press firmly). 6 Close the top cover of the printer.

