Quick Setup Guide - English
Page 3
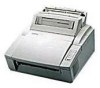
English: HL-1060 Quick Setup Guide, Body Action 1: Check the Supplied Items After taking the printer out of the carton and removing the packing materials, make sure that matches the bi-directional IEEE 1284 compliant interface of your dealer. 1 ... to purchase an interface cable that the following items are not damaged and none are missing: • Printer • Paper supports • Drum unit assembly (with Toner cartridge included) • 3.5" floppy disks for Windows® printer driver and fonts • Quick setup guide (this guidebook) • User's guide • Plastic Bag ...
English: HL-1060 Quick Setup Guide, Body Action 1: Check the Supplied Items After taking the printer out of the carton and removing the packing materials, make sure that matches the bi-directional IEEE 1284 compliant interface of your dealer. 1 ... to purchase an interface cable that the following items are not damaged and none are missing: • Printer • Paper supports • Drum unit assembly (with Toner cartridge included) • 3.5" floppy disks for Windows® printer driver and fonts • Quick setup guide (this guidebook) • User's guide • Plastic Bag ...
Quick Setup Guide - English
Page 4
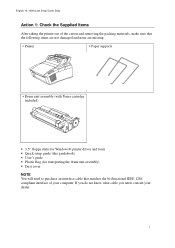
... will be ejected while the printer is warming-up after installing a new drum unit. (See Action 5 Illustration 4) 2 Open the top cover of the printer. 3 Holding the drum by its handles, install it into place. 2 The drum will slide easily into the printer. Starter Sheet CAUTION Do not... remove the starter sheet. English: HL-1060 Quick Setup Guide, Body Action 2: Install the Toner Cartridge/Drum Unit 1 Unpack the drum unit ...
... will be ejected while the printer is warming-up after installing a new drum unit. (See Action 5 Illustration 4) 2 Open the top cover of the printer. 3 Holding the drum by its handles, install it into place. 2 The drum will slide easily into the printer. Starter Sheet CAUTION Do not... remove the starter sheet. English: HL-1060 Quick Setup Guide, Body Action 2: Install the Toner Cartridge/Drum Unit 1 Unpack the drum unit ...

Quick Setup Guide - English
Page 11
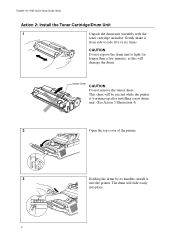
... AC power outlet. CAUTION Do not open the top cover until the printer ejects the starter sheet completely. English: HL-1060 Quick Setup Guide, Body Action 5: Plug in and Turn on the left side of your printer. 3 DrumF1eeder2 Alarm PaRpeeardy ToDnearta 4 Starter Sheet Make sure that the ...READY lamp is lit after the printer has warmed up immediately after it is warming-up (approximately 30 seconds). It may discard the starter sheet after installing a new drum unit. NOTE The ...
... AC power outlet. CAUTION Do not open the top cover until the printer ejects the starter sheet completely. English: HL-1060 Quick Setup Guide, Body Action 5: Plug in and Turn on the left side of your printer. 3 DrumF1eeder2 Alarm PaRpeeardy ToDnearta 4 Starter Sheet Make sure that the ...READY lamp is lit after the printer has warmed up immediately after it is warming-up (approximately 30 seconds). It may discard the starter sheet after installing a new drum unit. NOTE The ...
Quick Setup Guide - English
Page 19
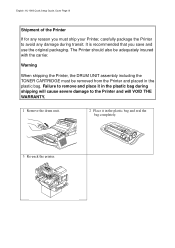
... in the plastic bag and seal the bag completely. 3 Re-pack the printer. Warning When shipping the Printer, the DRUM UNIT assembly including the TONER CARTRIDGE must ship your Printer, carefully package the Printer to the Printer and will cause severe damage to avoid any reason you save and use the... with the carrier. Failure to remove and place it in the plastic bag during transit. English: HL-1060 Quick Setup Guide, Cover Page III Shipment of the Printer If for any damage during shipping will VOID THE WARRANTY. 1 Remove the drum unit. 2 Place it in the plastic bag.
... in the plastic bag and seal the bag completely. 3 Re-pack the printer. Warning When shipping the Printer, the DRUM UNIT assembly including the TONER CARTRIDGE must ship your Printer, carefully package the Printer to the Printer and will cause severe damage to avoid any reason you save and use the... with the carrier. Failure to remove and place it in the plastic bag during transit. English: HL-1060 Quick Setup Guide, Cover Page III Shipment of the Printer If for any damage during shipping will VOID THE WARRANTY. 1 Remove the drum unit. 2 Place it in the plastic bag.

Service Manual
Page 17
... Supply Block High-voltage Power Supply Block Engine Control Block Operation Block (Operation Panel) Erase Lamp Laser Scanner Unit Drum Unit Transfer Block Drive Block (Stepping Motor) Paper Tray Unit Paper Feeder Manual Feed Developing Block Drum Charging Block Cleaner Block Toner Cartridge Image Generation System Fig. 2.1 Fixing Unit Paper Eject Block Paper...
... Supply Block High-voltage Power Supply Block Engine Control Block Operation Block (Operation Panel) Erase Lamp Laser Scanner Unit Drum Unit Transfer Block Drive Block (Stepping Motor) Paper Tray Unit Paper Feeder Manual Feed Developing Block Drum Charging Block Cleaner Block Toner Cartridge Image Generation System Fig. 2.1 Fixing Unit Paper Eject Block Paper...

Service Manual
Page 94
...A: January E: B: February F: C: March G: D: April H: May June July August J: September K: October L: November M: December (1) Printer on the package of the process unit (Drum unit with toner cartridge) 6D30 0 0 0 ANB YEAR MONTH DATE TONER TYPE LINE NO. FACTORY ID NO. (2) Process unit on... the main body D 6 9 5 0 5 4 8 8 MONTH YEAR SERIAL NO. ID NO. 1:HL-700 SERIES 9:HL-1060 FACTORY ID NO. V-1 N ...
...A: January E: B: February F: C: March G: D: April H: May June July August J: September K: October L: November M: December (1) Printer on the package of the process unit (Drum unit with toner cartridge) 6D30 0 0 0 ANB YEAR MONTH DATE TONER TYPE LINE NO. FACTORY ID NO. (2) Process unit on... the main body D 6 9 5 0 5 4 8 8 MONTH YEAR SERIAL NO. ID NO. 1:HL-700 SERIES 9:HL-1060 FACTORY ID NO. V-1 N ...


