Users Guide
Page 6
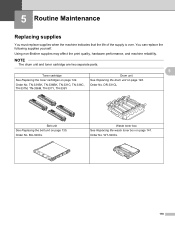
... ...115 Installing extra memory ...116 5 Routine Maintenance 118 Replacing supplies...118 Replacing the toner cartridges...122 Replacing the drum unit...128 Replacing the belt unit ...135 Resetting the belt counter...140 Replacing the waste toner box ...141 Cleaning and Checking the machine ...148 Cleaning the outside of the machine 148 Cleaning the...
... ...115 Installing extra memory ...116 5 Routine Maintenance 118 Replacing supplies...118 Replacing the toner cartridges...122 Replacing the drum unit...128 Replacing the belt unit ...135 Resetting the belt counter...140 Replacing the waste toner box ...141 Cleaning and Checking the machine ...148 Cleaning the outside of the machine 148 Cleaning the...

Users Guide
Page 97
...the drum unit life. Appears when you replace the drum unit. - Belt Life - Laser Life - - Appears when you replace the belt unit. PF Kit 1 Life - - Magenta(M) - For example, if the remaining life for the belt unit. - Displays the remaining life for the black toner cartridge is ...left to print with the laser unit. Reset Parts Life Drum Unit - (Appears only when the drum unit or belt Belt Unit - General Information Machine Info. (continued) Submenu 1 Parts Life Submenu 2 Toner Life Menu Selections Options Descriptions Black(BK) - Yellow(Y) -...
...the drum unit life. Appears when you replace the drum unit. - Belt Life - Laser Life - - Appears when you replace the belt unit. PF Kit 1 Life - - Magenta(M) - For example, if the remaining life for the belt unit. - Displays the remaining life for the black toner cartridge is ...left to print with the laser unit. Reset Parts Life Drum Unit - (Appears only when the drum unit or belt Belt Unit - General Information Machine Info. (continued) Submenu 1 Parts Life Submenu 2 Toner Life Menu Selections Options Descriptions Black(BK) - Yellow(Y) -...
Users Guide
Page 125
... 118 Order No. TN-331BK, TN-336BK, TN-331C, TN-336C, TN-331M, TN-336M, TN-331Y, TN-336Y Order No. DR-331CL Belt unit See Replacing the belt unit on page 128. BU-320CL Waste toner box See Replacing the waste toner box on page 122. NOTE The drum unit and... toner cartridge are two separate parts. 5 Toner cartridge Drum unit See Replacing the toner cartridges on page 141. Using non-Brother supplies may affect the...
... 118 Order No. TN-331BK, TN-336BK, TN-331C, TN-336C, TN-331M, TN-336M, TN-331Y, TN-336Y Order No. DR-331CL Belt unit See Replacing the belt unit on page 128. BU-320CL Waste toner box See Replacing the waste toner box on page 122. NOTE The drum unit and... toner cartridge are two separate parts. 5 Toner cartridge Drum unit See Replacing the toner cartridges on page 141. Using non-Brother supplies may affect the...
Users Guide
Page 126
... Y = Yellow BK = Black (Cyan, Magenta, Yellow) 1,500 pages 1 2 4 3,500 pages 1 2 5 TN-336C 5 TN-331M 4 TN-336M 5 5 TN-331Y 4 TN-336Y 5 Drum End Soon Belt End Soon Drum unit Belt unit 25,000 pages 1 3 50,000 pages (5 pages per job) 1 3 See page 129 See page 135 DR-331CL BU-320CL WT Box End...
... Y = Yellow BK = Black (Cyan, Magenta, Yellow) 1,500 pages 1 2 4 3,500 pages 1 2 5 TN-336C 5 TN-331M 4 TN-336M 5 5 TN-331Y 4 TN-336Y 5 Drum End Soon Belt End Soon Drum unit Belt unit 25,000 pages 1 3 50,000 pages (5 pages per job) 1 3 See page 129 See page 135 DR-331CL BU-320CL WT Box End...

Users Guide
Page 127
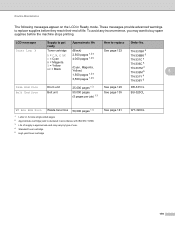
... 1 2 5 TN-331C 4 5 TN-336C 5 Open the Front Cover, replace Toner Cartridge. Cyan (C). Call Brother Customer Service for a replacement fuser unit. Yellow (Y). Magenta (M). Replace Drum Drum Stop Replace Belt Drum unit Drum unit Belt unit 25,000 pages 1 3 25,000 pages 1 3 50,000 pages (5 pages per job) 1 3 See...1 3 100,000 pages 1 3 Replace PF KitMP Paper feeding kit 50,000 pages 1 3 See page 141 WT-320CL Call Brother Customer Service for a replacement PF kit MP. 120 Routine Maintenance You must clean the machine regularly and replace supplies when the following ...
... 1 2 5 TN-331C 4 5 TN-336C 5 Open the Front Cover, replace Toner Cartridge. Cyan (C). Call Brother Customer Service for a replacement fuser unit. Yellow (Y). Magenta (M). Replace Drum Drum Stop Replace Belt Drum unit Drum unit Belt unit 25,000 pages 1 3 25,000 pages 1 3 50,000 pages (5 pages per job) 1 3 See...1 3 100,000 pages 1 3 Replace PF KitMP Paper feeding kit 50,000 pages 1 3 See page 141 WT-320CL Call Brother Customer Service for a replacement PF kit MP. 120 Routine Maintenance You must clean the machine regularly and replace supplies when the following ...

Users Guide
Page 142
...cover release button and pull open the front cover. 135 Routine Maintenance Replacing the belt unit 5 Order No. Replace Belt 5 When the following message appears on the LCD, you get a Replace Belt message. Replacing the belt unit 5 a Make sure that the machine is approximate and may vary by ...incorrect handling of use. To replace the belt unit, see Replacing the belt unit on . BU-320CL A new belt unit can print approximately 50,000 pages (5...
...cover release button and pull open the front cover. 135 Routine Maintenance Replacing the belt unit 5 Order No. Replace Belt 5 When the following message appears on the LCD, you get a Replace Belt message. Replacing the belt unit 5 a Make sure that the machine is approximate and may vary by ...incorrect handling of use. To replace the belt unit, see Replacing the belt unit on . BU-320CL A new belt unit can print approximately 50,000 pages (5...

Users Guide
Page 145
f Unpack the new belt unit and install it out. 5 IMPORTANT To avoid print quality problems, DO NOT touch the shaded parts shown in the machine. Routine Maintenance e Hold the blue handle of the belt unit with both hands and lift the belt unit up, and then pull it in the illustrations. Make sure the belt unit is level and fits firmly into place. 138
f Unpack the new belt unit and install it out. 5 IMPORTANT To avoid print quality problems, DO NOT touch the shaded parts shown in the machine. Routine Maintenance e Hold the blue handle of the belt unit with both hands and lift the belt unit up, and then pull it in the illustrations. Make sure the belt unit is level and fits firmly into place. 138
Users Guide
Page 147
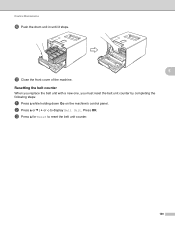
b Press a or b ( + or -) to reset the belt unit counter. 140 c Press a for Reset to display Belt Unit. Press OK. Routine Maintenance j Push the drum unit in until it stops. 5 k Close the front cover of the machine. Resetting the belt counter When you replace the belt unit with a new one, you must reset the belt unit counter by completing the following steps: a Press a while holding down Go on the machine's control panel.
b Press a or b ( + or -) to reset the belt unit counter. 140 c Press a for Reset to display Belt Unit. Press OK. Routine Maintenance j Push the drum unit in until it stops. 5 k Close the front cover of the machine. Resetting the belt counter When you replace the belt unit with a new one, you must reset the belt unit counter by completing the following steps: a Press a while holding down Go on the machine's control panel.

Users Guide
Page 151
Routine Maintenance e Hold the blue handle of orange packing material and discard them. The orange packing pieces are replacing the waste toner box for the first time, and is not required for the replacement waste toner box. f Remove the two pieces of the belt unit with both hands and lift the belt unit up, and then pull it out. 5 IMPORTANT To avoid print quality problems, DO NOT touch the shaded parts shown in the illustrations. NOTE This step is only necessary when you are installed at the factory to protect your machine during shipment. 144
Routine Maintenance e Hold the blue handle of orange packing material and discard them. The orange packing pieces are replacing the waste toner box for the first time, and is not required for the replacement waste toner box. f Remove the two pieces of the belt unit with both hands and lift the belt unit up, and then pull it out. 5 IMPORTANT To avoid print quality problems, DO NOT touch the shaded parts shown in the illustrations. NOTE This step is only necessary when you are installed at the factory to protect your machine during shipment. 144

Users Guide
Page 153
Make sure the waste toner box is level and fits firmly into the machine. j Make sure the blue lock lever (1) is in the release position as shown in the machine using the blue handle. Make sure the belt unit is level and fits firmly into place. 5 i Slide the belt unit back into place. Routine Maintenance h Unpack the new waste toner box and install it in the illustration. 1 146 2
Make sure the waste toner box is level and fits firmly into the machine. j Make sure the blue lock lever (1) is in the release position as shown in the machine using the blue handle. Make sure the belt unit is level and fits firmly into place. 5 i Slide the belt unit back into place. Routine Maintenance h Unpack the new waste toner box and install it in the illustration. 1 146 2

Users Guide
Page 175
Put the machine on the bottom packing material (1) and the packing material (2) on each packing material. Keep all separate parts, including the drum unit, toner cartridges, belt unit, waste toner box and printed materials, to the "FRONT" mark on the top of the Exchange Service, pack only the machine. Routine Maintenance d Wrap the machine in a plastic bag. Match the front side of the machine to use with your machine to Brother as part of the machine. FRONT 2 5 1 FRONT NOTE If you are returning your 'Exchange' machine. 168
Put the machine on the bottom packing material (1) and the packing material (2) on each packing material. Keep all separate parts, including the drum unit, toner cartridges, belt unit, waste toner box and printed materials, to the "FRONT" mark on the top of the Exchange Service, pack only the machine. Routine Maintenance d Wrap the machine in a plastic bag. Match the front side of the machine to use with your machine to Brother as part of the machine. FRONT 2 5 1 FRONT NOTE If you are returning your 'Exchange' machine. 168
Users Guide
Page 178
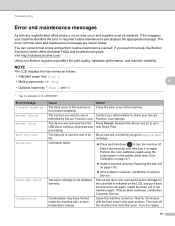
...tray: Tray 1 • Multi-purpose tray: MP Tray 6 • Optional lower tray 1: Tray 2 and T2 1 Tray 2 is indicated on HL-L8350CDWT. Function Lock settings. Reinsert the device and try to turn off . Perform the color calibration again using the control panel or the printer driver... (see Color Calibration on page 47). Install a new belt unit (see Replacing the belt unit on again. If the problem continues, call Brother Customer Service. The most errors and perform routine maintenance yourself. message. Wait a few seconds, and ...
...tray: Tray 1 • Multi-purpose tray: MP Tray 6 • Optional lower tray 1: Tray 2 and T2 1 Tray 2 is indicated on HL-L8350CDWT. Function Lock settings. Reinsert the device and try to turn off . Perform the color calibration again using the control panel or the printer driver... (see Color Calibration on page 47). Install a new belt unit (see Replacing the belt unit on again. If the problem continues, call Brother Customer Service. The most errors and perform routine maintenance yourself. message. Wait a few seconds, and ...
Users Guide
Page 179
... machine. See Paper is not installed correctly. on page 176. Contact your administrator to check your administrator to replace the drum unit. Reinstall the belt unit (see Cleaning the corona wires on page 184. Plug in the power cord, and then turn the machine on again. If... located inside the machine on page 154). Log to be available when the LCD displays Replace Drum (see the Network User's Guide.) No Belt Unit The belt unit is broken. The DIMM does not meet the required specifications. Turn off the machine and unplug the power cord....
... machine. See Paper is not installed correctly. on page 176. Contact your administrator to check your administrator to replace the drum unit. Reinstall the belt unit (see Cleaning the corona wires on page 184. Plug in the power cord, and then turn the machine on again. If... located inside the machine on page 154). Log to be available when the LCD displays Replace Drum (see the Network User's Guide.) No Belt Unit The belt unit is broken. The DIMM does not meet the required specifications. Turn off the machine and unplug the power cord....
Users Guide
Page 181
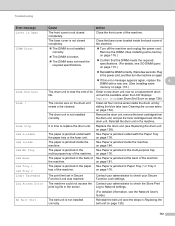
... the control panel (see Color Registration on page 112). Install a new belt unit (see Replacing the drum unit on page 128). counter on page 135). If the problem continues, call Brother Customer Service. Call Brother Customer Service or a Brother Authorized Service Center to replace the fuser unit. The machine will stop all...
... the control panel (see Color Registration on page 112). Install a new belt unit (see Replacing the drum unit on page 128). counter on page 135). If the problem continues, call Brother Customer Service. Call Brother Customer Service or a Brother Authorized Service Center to replace the fuser unit. The machine will stop all...

Users Guide
Page 203
...BR-Script printer driver). Identify the color causing the problem and put in a new toner cartridge (see Replacing the belt unit on page 135). ABCDEFGHIJKLMNOPQRSTUVWXYZ. 0123456789. abcdefghijklmnopqrstuvwxyz. See Enhance Black Printing in the control panel or the printer driver. ABCDEFGHIJKLMNOPQRSTUVWXYZ.... Replacing the drum unit on page 128). Install a new belt unit (see Replacing the toner cartridges on page 123). To identify the color of the toner cartridge, visit http://solutions.brother.com/ to view our FAQs and troubleshooting tips. Install a...
...BR-Script printer driver). Identify the color causing the problem and put in a new toner cartridge (see Replacing the belt unit on page 135). ABCDEFGHIJKLMNOPQRSTUVWXYZ. 0123456789. abcdefghijklmnopqrstuvwxyz. See Enhance Black Printing in the control panel or the printer driver. ABCDEFGHIJKLMNOPQRSTUVWXYZ.... Replacing the drum unit on page 128). Install a new belt unit (see Replacing the toner cartridges on page 123). To identify the color of the toner cartridge, visit http://solutions.brother.com/ to view our FAQs and troubleshooting tips. Install a...

Users Guide
Page 216
Appendix Supplies Model Toner Cartridge Drum Unit Belt Unit Inbox Standard High Yield Black Cyan, Magenta, Yellow Black Cyan, Magenta, Yellow Black Cyan, Magenta, Yellow HL-L8250CDN HL-L8350CDW HL-L8350CDWT Order No. Approx. 2,500 pages Letter or A4 page 1 - Approx. 2,500 pages Letter or A4 page 1 Approx. 1,500 pages Letter or A4 page 1 Approx. 4,...
Appendix Supplies Model Toner Cartridge Drum Unit Belt Unit Inbox Standard High Yield Black Cyan, Magenta, Yellow Black Cyan, Magenta, Yellow Black Cyan, Magenta, Yellow HL-L8250CDN HL-L8350CDW HL-L8350CDWT Order No. Approx. 2,500 pages Letter or A4 page 1 - Approx. 2,500 pages Letter or A4 page 1 Approx. 1,500 pages Letter or A4 page 1 Approx. 4,...

Users Guide
Page 218
... (K), yellow (Y), magenta (M), and cyan (C), respectively. When calibration occurs, the density level adjustment test patterns are printed on the belt unit. When registration errors occur, registration correction test patterns are printed on the belt unit. The toner density can change due to chemical changes to be improved.) A • When a used toner cartridge is...
... (K), yellow (Y), magenta (M), and cyan (C), respectively. When calibration occurs, the density level adjustment test patterns are printed on the belt unit. When registration errors occur, registration correction test patterns are printed on the belt unit. The toner density can change due to chemical changes to be improved.) A • When a used toner cartridge is...

Users Guide
Page 221
... (High Yield, Approx. 3,500 pages) 1 2 Drum Unit DR-331CL (Approx. 25,000 pages) 1 3 Waste Toner Box WT-320CL (Approx. 50,000 pages) 1 3 Belt Unit BU-320CL 50,000 pages (5 pages per job) 1 3 1 Letter or A4 size single-sided pages. 2 Approx. cartridge yield is declared in accordance with ISO.../IEC 19798. 3 Life is approximate and may vary by type of the Brother accessories and supplies that are available for purchase. If you cannot find the supply you need and have a Visa, MasterCard, Discover, or American...
... (High Yield, Approx. 3,500 pages) 1 2 Drum Unit DR-331CL (Approx. 25,000 pages) 1 3 Waste Toner Box WT-320CL (Approx. 50,000 pages) 1 3 Belt Unit BU-320CL 50,000 pages (5 pages per job) 1 3 1 Letter or A4 size single-sided pages. 2 Approx. cartridge yield is declared in accordance with ISO.../IEC 19798. 3 Life is approximate and may vary by type of the Brother accessories and supplies that are available for purchase. If you cannot find the supply you need and have a Visa, MasterCard, Discover, or American...

Quick Setup Guide
Page 1
... 6 feet (2 meters) long. Not all models are available at Brother Solutions Center: http://solutions.brother.com/. c Go to display General Setup, and then press OK. 2. HL-L8250CDN / HL-L8350CDW / HL-L8350CDWT Quick Setup Guide Unpack the machine and check the components Drum ...Unit (pre-installed) Waste Toner Box (pre-installed) Power Cord Toner Cartridges (Black, Cyan, Magenta and Yellow; pre-installed) Belt...
... 6 feet (2 meters) long. Not all models are available at Brother Solutions Center: http://solutions.brother.com/. c Go to display General Setup, and then press OK. 2. HL-L8250CDN / HL-L8350CDW / HL-L8350CDWT Quick Setup Guide Unpack the machine and check the components Drum ...Unit (pre-installed) Waste Toner Box (pre-installed) Power Cord Toner Cartridges (Black, Cyan, Magenta and Yellow; pre-installed) Belt...

Belt Unit Replacement Guide
Page 10
...; (7) 按 。 (1 2) 按 。 (3) 按 All Settings 4 Machine Info (5) 按 Machine Info 6) 按 Parts Life 7 8) 按 Belt Unit 9) 按 Yes (是)。 (10) 按 。 http://www.brother.com/original/index.html Brother Brother 9 (1 Go 2 Belt Unit OK 3) Reset (1 2 3) Machine Information Parts Life 4 5) Belt Unit 6) Yes 7 (1 2 3) All Settings 4 Machine Info. (기계 5) Machine Info 6) Parts Life...
...; (7) 按 。 (1 2) 按 。 (3) 按 All Settings 4 Machine Info (5) 按 Machine Info 6) 按 Parts Life 7 8) 按 Belt Unit 9) 按 Yes (是)。 (10) 按 。 http://www.brother.com/original/index.html Brother Brother 9 (1 Go 2 Belt Unit OK 3) Reset (1 2 3) Machine Information Parts Life 4 5) Belt Unit 6) Yes 7 (1 2 3) All Settings 4 Machine Info. (기계 5) Machine Info 6) Parts Life...


