Brother Meter Read Tool Users Guide
Page 4
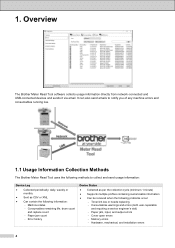
... It can also send emails to notify you of any machine errors and consumables running low. 1.1 Usage Information Collection Methods The Brother Meter Read Tool uses the following methods to collect and send usage information: Device Log Collected periodically: daily, weekly or... monthly Sent as CSV or XML Can contain the following information: Machine status Consumables remaining life, drum count and replace count Paper jam count Error history Device Status Collected as per the collection cycle (minimum 1 minute...
... It can also send emails to notify you of any machine errors and consumables running low. 1.1 Usage Information Collection Methods The Brother Meter Read Tool uses the following methods to collect and send usage information: Device Log Collected periodically: daily, weekly or... monthly Sent as CSV or XML Can contain the following information: Machine status Consumables remaining life, drum count and replace count Paper jam count Error history Device Status Collected as per the collection cycle (minimum 1 minute...
Reference Guide
Page 12
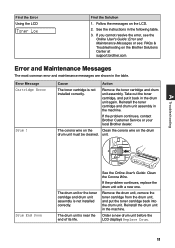
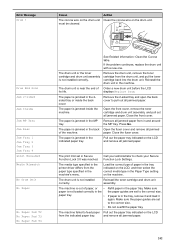
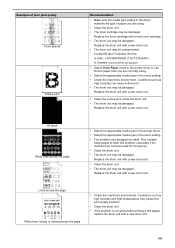
... the following table. 3. If the problem continues, contact Brother Customer Service or your local Brother dealer. Reinstall the drum unit in the machine. Error Message Cartridge Error Drum ! Reinstall the toner cartridge and drum unit assembly in the machine. Remove the drum unit, remove the toner cartridge from the drum unit, and put it back in the...
... the following table. 3. If the problem continues, contact Brother Customer Service or your local Brother dealer. Reinstall the drum unit in the machine. Error Message Cartridge Error Drum ! Reinstall the toner cartridge and drum unit assembly in the machine. Remove the drum unit, remove the toner cartridge from the drum unit, and put it back in the...
Reference Guide
Page 13
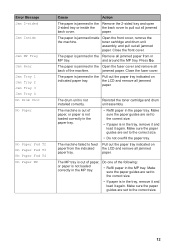
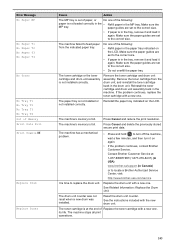
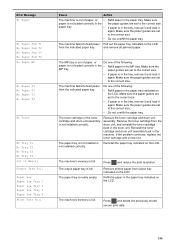
... back cover to the correct size. 12 toner cartridge and drum unit assembly, and pull out all jammed paper. Close the front cover. The drum unit is jammed in the tray, remove it and load it again. Reinstall the toner cartridge and drum unit assembly. • Refill paper in the paper tray. Error... Message Jam 2-sided Jam Inside Jam MP Tray Jam Rear Jam Tray 1 Jam Tray 2 Jam Tray 3 Jam Tray 4 No Drum Unit No Paper No Paper Fed T2 No Paper Fed T3 No Paper Fed T4 No Paper MP Cause Action The paper is jammed in...
... back cover to the correct size. 12 toner cartridge and drum unit assembly, and pull out all jammed paper. Close the front cover. The drum unit is jammed in the tray, remove it and load it again. Reinstall the toner cartridge and drum unit assembly. • Refill paper in the paper tray. Error... Message Jam 2-sided Jam Inside Jam MP Tray Jam Rear Jam Tray 1 Jam Tray 2 Jam Tray 3 Jam Tray 4 No Drum Unit No Paper No Paper Fed T2 No Paper Fed T3 No Paper Fed T4 No Paper MP Cause Action The paper is jammed in...
Reference Guide
Page 14
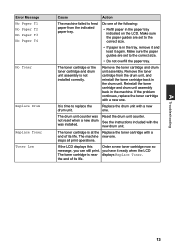
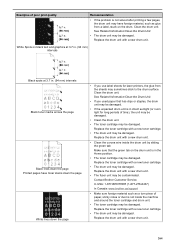
... paper guides are set to the correct size. • If paper is near displays Replace Toner. Reinstall the toner cartridge and drum unit assembly back in the drum unit. If the LCD displays this Order a new toner cartridge now so message, you have it ready when the LCD The ...8226; Do not overfill the paper tray. If the problem continues, replace the toner cartridge with a new one . A Troubleshooting 13 The drum unit counter was not reset when a new drum was installed. Do one . See the instructions included with a end of the following: • Refill paper in the tray, remove ...
... paper guides are set to the correct size. • If paper is near displays Replace Toner. Reinstall the toner cartridge and drum unit assembly back in the drum unit. If the LCD displays this Order a new toner cartridge now so message, you have it ready when the LCD The ...8226; Do not overfill the paper tray. If the problem continues, replace the toner cartridge with a new one . A Troubleshooting 13 The drum unit counter was not reset when a new drum was installed. Do one . See the instructions included with a end of the following: • Refill paper in the tray, remove ...
Reference Guide
Page 17
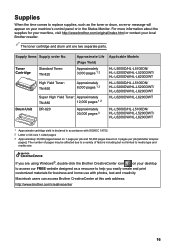
... 1 2 DR-820 Approximately 30,000 pages 3 Applicable Models HL-L5000D/HL-L5100DN/ HL-L5200DW/HL-L5200DWT/ HL-L6200DW/HL-L6200DWT HL-L5000D/HL-L5100DN/ HL-L5200DW/HL-L5200DWT/ HL-L6200DW/HL-L6200DWT HL-L6200DW/HL-L6200DWT HL-L5000D/HL-L5100DN/ HL-L5200DW/HL-L5200DWT/ HL-L6200DW/HL-L6200DWT 1 Approximate cartridge yield is declared in the Status Monitor. Supply Items Supply order No. Macintosh users can access Brother CreativeCenter at this web address: http://www...
... 1 2 DR-820 Approximately 30,000 pages 3 Applicable Models HL-L5000D/HL-L5100DN/ HL-L5200DW/HL-L5200DWT/ HL-L6200DW/HL-L6200DWT HL-L5000D/HL-L5100DN/ HL-L5200DW/HL-L5200DWT/ HL-L6200DW/HL-L6200DWT HL-L6200DW/HL-L6200DWT HL-L5000D/HL-L5100DN/ HL-L5200DW/HL-L5200DWT/ HL-L6200DW/HL-L6200DWT 1 Approximate cartridge yield is declared in the Status Monitor. Supply Items Supply order No. Macintosh users can access Brother CreativeCenter at this web address: http://www...
Online Users Guide HTML
Page 4
...Use the Network Connection Repair Tool (Windows 270 Where Can I Find My Brother Machine's Network Settings 272 I Cannot Complete the Wireless Network Setup Configuration 273 My Brother Machine Cannot Print over the Network 275 I Want to Check that My ...Network Devices are Working Correctly 277 Other Problems ...278 Check the Machine Information ...280 Reset Functions ...282 Network Reset ...283 Factory Reset ...284 Routine Maintenance ...285 Replace Supplies ...286 Replace the Toner Cartridge ...288 Replace the Drum...
...Use the Network Connection Repair Tool (Windows 270 Where Can I Find My Brother Machine's Network Settings 272 I Cannot Complete the Wireless Network Setup Configuration 273 My Brother Machine Cannot Print over the Network 275 I Want to Check that My ...Network Devices are Working Correctly 277 Other Problems ...278 Check the Machine Information ...280 Reset Functions ...282 Network Reset ...283 Factory Reset ...284 Routine Maintenance ...285 Replace Supplies ...286 Replace the Toner Cartridge ...288 Replace the Drum...
Online Users Guide HTML
Page 246
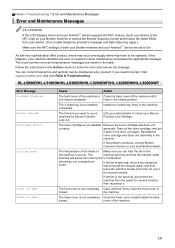
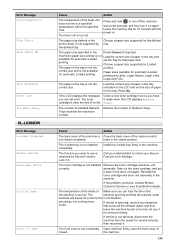
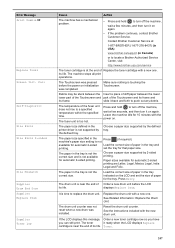
...current print is not installed completely. The 2-sided tray is not blocked. Remove the toner cartridge and drum unit assembly. If the problem continues, contact Brother Customer Service or your machine identifies the error or required routine maintenance and shows the appropriate message. ...of the machine. 241 The temperature of the inside the back closed position. If this happens, your local Brother dealer. HL-L5000D/HL-L5100DN/HL-L5200DW/HL-L5200DWT/HL-L6200DW/HL-L6200DWT Error Message 2-sided Disabled Access Denied Cartridge Error Cooling Down Cover is Open Cover is Open Cause ...
...current print is not installed completely. The 2-sided tray is not blocked. Remove the toner cartridge and drum unit assembly. If the problem continues, contact Brother Customer Service or your machine identifies the error or required routine maintenance and shows the appropriate message. ...of the machine. 241 The temperature of the inside the back closed position. If this happens, your local Brother dealer. HL-L5000D/HL-L5100DN/HL-L5200DW/HL-L5200DWT/HL-L6200DW/HL-L6200DWT Error Message 2-sided Disabled Access Denied Cartridge Error Cooling Down Cover is Open Cover is Open Cause ...
Online Users Guide HTML
Page 247
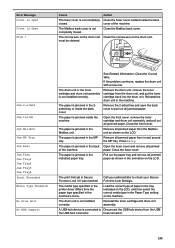
.... The paper is jammed in the 2sided tray or inside the machine. Open the front cover, remove the toner cartridge and drum unit assembly, and pull out all jammed paper. 242 Close the fuser cover. and remove all jammed paper. The paper is jammed in the back ... check your administrator to the correct size. Make sure the paper guides are set in and around the MP tray. Reinstall the toner cartridge and drum unit assembly. Error Message Drum ! Cause The corona wire on the LCD and remove all jammed paper from the paper type specified in the machine.
.... The paper is jammed in the 2sided tray or inside the machine. Open the front cover, remove the toner cartridge and drum unit assembly, and pull out all jammed paper. 242 Close the fuser cover. and remove all jammed paper. The paper is jammed in the back ... check your administrator to the correct size. Make sure the paper guides are set in and around the MP tray. Reinstall the toner cartridge and drum unit assembly. Error Message Drum ! Cause The corona wire on the LCD and remove all jammed paper from the paper type specified in the machine.
Online Users Guide HTML
Page 248
.... Contact Brother Customer Service at the end of the following : • Refill paper in the tray, remove it and load it again. The drum unit counter was not reset when a new drum was installed. The toner cartridge is at : 1-877-BROTHER (1-877-276-8437) (in USA) www.brother.ca/support... (in Canada) or to locate a Brother Authorized Service Center, visit: http://www.brother-usa.com/service It is time...
.... Contact Brother Customer Service at the end of the following : • Refill paper in the tray, remove it and load it again. The drum unit counter was not reset when a new drum was installed. The toner cartridge is at : 1-877-BROTHER (1-877-276-8437) (in USA) www.brother.ca/support... (in Canada) or to locate a Brother Authorized Service Center, visit: http://www.brother-usa.com/service It is time...
Online Users Guide HTML
Page 249
... then leave the machine turned on . Error Message Self-Diagnostic Size Error Size Error DX Size Mismatch Toner Low Too Many Trays HL-L6300DW Error Message 2-sided Disabled Access Denied Cartridge Error Cooling Down Cover is Open Cause Action The temperature of its current print is... several minutes, then reconnect it back in the tray is not installed completely. printing. Remove the toner cartridge and drum unit assembly. Press and hold to check your local Brother dealer. correct size and is too hot. The number of Optional Trays. If the problem continues, contact...
... then leave the machine turned on . Error Message Self-Diagnostic Size Error Size Error DX Size Mismatch Toner Low Too Many Trays HL-L6300DW Error Message 2-sided Disabled Access Denied Cartridge Error Cooling Down Cover is Open Cause Action The temperature of its current print is... several minutes, then reconnect it back in the tray is not installed completely. printing. Remove the toner cartridge and drum unit assembly. Press and hold to check your local Brother dealer. correct size and is too hot. The number of Optional Trays. If the problem continues, contact...
Online Users Guide HTML
Page 250
...shown on the machine. Call your administrator to Disconnect the USB hub device from the Mailbox unit as shown in the machine's menu. The drum unit is not installed correctly. The Mailbox back cover is jammed in and around the MP tray. Action Close the fuser cover located inside ...must be cleaned. Close the front cover. host connector. 245 The paper is jammed in the MP tray. A USB hub device is Open Drum ! Remove the drum unit, remove the toner cartridge from in the Mailbox unit. Load the correct type of the machine. Error Message Cover is Open Cover is...
...shown on the machine. Call your administrator to Disconnect the USB hub device from the Mailbox unit as shown in the machine's menu. The drum unit is not installed correctly. The Mailbox back cover is jammed in and around the MP tray. Action Close the fuser cover located inside ...must be cleaned. Close the front cover. host connector. 245 The paper is jammed in the MP tray. A USB hub device is Open Drum ! Remove the drum unit, remove the toner cartridge from in the Mailbox unit. Load the correct type of the machine. Error Message Cover is Open Cover is...
Online Users Guide HTML
Page 251
...problem continues, replace the toner cartridge with a new one of the following : • Refill paper in the paper tray indicated on the LCD from the drum unit, and reinstall the toner cartridge back in the tray, remove it and load it again. Refill the paper in the paper tray. Press and...guides are set to the correct size. • If paper is in the tray, remove it and load it again. Remove the toner cartridge and drum unit assembly. If paper is in the tray, remove it and load it again. The output paper tray is not installed correctly. The machine's ...
...problem continues, replace the toner cartridge with a new one of the following : • Refill paper in the paper tray indicated on the LCD from the drum unit, and reinstall the toner cartridge back in the tray, remove it and load it again. Refill the paper in the paper tray. Press and...guides are set to the correct size. • If paper is in the tray, remove it and load it again. Remove the toner cartridge and drum unit assembly. If paper is in the tray, remove it and load it again. The output paper tray is not installed correctly. The machine's ...
Online Users Guide HTML
Page 252
... Soon Supplies Replace Drum Supplies Toner Low Cause Action The machine has a mechanical problem. • Press and hold to a specified temperature within the specified time. Contact Brother Customer Service at: 1-877-BROTHER (1-877-276-8437) (in USA) www.brother.ca/support (in the printer driver is at...Make sure nothing is not available for automatic 2-sided Load the correct size of Order a new drum unit before the power on again. • If the problem continues, contact Brother Customer Service. Debris may be stuck between the Insert a piece of stiff paper between the lower...
... Soon Supplies Replace Drum Supplies Toner Low Cause Action The machine has a mechanical problem. • Press and hold to a specified temperature within the specified time. Contact Brother Customer Service at: 1-877-BROTHER (1-877-276-8437) (in USA) www.brother.ca/support (in the printer driver is at...Make sure nothing is not available for automatic 2-sided Load the correct size of Order a new drum unit before the power on again. • If the problem continues, contact Brother Customer Service. Debris may be stuck between the Insert a piece of stiff paper between the lower...
Online Users Guide HTML
Page 253
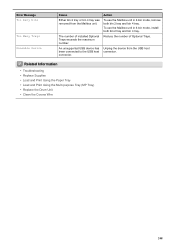
...; Replace Supplies • Load and Print Using the Paper Tray • Load and Print Using the Multi‑purpose Tray (MP Tray) • Replace the Drum Unit • Clean the Corona Wire 248 Unplug the device from the Mailbox unit. An unsupported USB device has been connected to the USB host...
...; Replace Supplies • Load and Print Using the Paper Tray • Load and Print Using the Multi‑purpose Tray (MP Tray) • Replace the Drum Unit • Clean the Corona Wire 248 Unplug the device from the Mailbox unit. An unsupported USB device has been connected to the USB host...
Online Users Guide HTML
Page 260
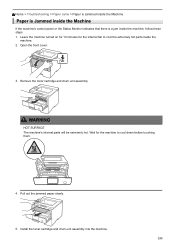
Install the toner cartridge and drum unit assembly into the machine. 255 WARNING HOT SURFACE The machine's internal parts will be extremely hot. Pull out the jammed paper slowly. 5. Wait for the internal fan to cool down before touching them. 4. Open the front cover. 3. Home > Troubleshooting > Paper Jams > Paper is Jammed inside the Machine... turned on for 10 minutes for the machine to cool the extremely hot parts inside the machine, follow these steps: 1. Remove the toner cartridge and drum unit assembly.
Install the toner cartridge and drum unit assembly into the machine. 255 WARNING HOT SURFACE The machine's internal parts will be extremely hot. Pull out the jammed paper slowly. 5. Wait for the internal fan to cool down before touching them. 4. Open the front cover. 3. Home > Troubleshooting > Paper Jams > Paper is Jammed inside the Machine... turned on for 10 minutes for the machine to cool the extremely hot parts inside the machine, follow these steps: 1. Remove the toner cartridge and drum unit assembly.
Online Users Guide HTML
Page 267
... If you use paper that the toner cartridge and drum unit are installed correctly. Check the interface cable connections and try printing a different document. IMPORTANT Using non-Brother supplies may be contaminated. Contact Brother Customer Service. Turn off Toner Save mode in the... machine's menu settings or the printer driver. • Clean the drum unit. • Clean the corona wire on , ...
... If you use paper that the toner cartridge and drum unit are installed correctly. Check the interface cable connections and try printing a different document. IMPORTANT Using non-Brother supplies may be contaminated. Contact Brother Customer Service. Turn off Toner Save mode in the... machine's menu settings or the printer driver. • Clean the drum unit. • Clean the corona wire on , ...
Online Users Guide HTML
Page 268
... may be damaged. Conditions such as high humidity can cause hollow print. • The drum unit may be damaged. In USA: 1-877-BROTHER (1-877-276-8437) In Canada: www.brother.ca/support • Select Thick Paper mode in the printer driver or use thinner paper than you are currently using... . • Clean the drum unit. • The toner cartridge may be damaged. Conditions ...
... may be damaged. Conditions such as high humidity can cause hollow print. • The drum unit may be damaged. In USA: 1-877-BROTHER (1-877-276-8437) In Canada: www.brother.ca/support • Select Thick Paper mode in the printer driver or use thinner paper than you are currently using... . • Clean the drum unit. • The toner cartridge may be damaged. Conditions ...
Online Users Guide HTML
Page 269
... the toner cartridge with a new toner cartridge. • The drum unit may be damaged. Replace the drum unit with a new toner cartridge. • The drum unit may be damaged. Replace the drum unit with a new drum unit. Contact Brother Customer Service. Replace the toner cartridge with a new drum unit. • The fuser unit may be contaminated. See...
... the toner cartridge with a new toner cartridge. • The drum unit may be damaged. Replace the drum unit with a new toner cartridge. • The drum unit may be damaged. Replace the drum unit with a new drum unit. Contact Brother Customer Service. Replace the toner cartridge with a new drum unit. • The fuser unit may be contaminated. See...
Online Users Guide HTML
Page 270
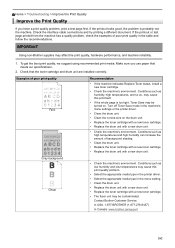
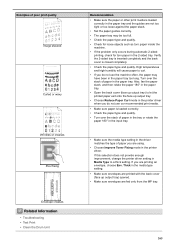
... poor print quality Image skewed Curled or wavy Wrinkles or creases Poor fixing Envelope creases Related Information • Troubleshooting • Test Print • Clean the Drum Unit Recommendation • Make sure the paper or other print media is loaded correctly in the paper tray and the guides are not too tight...
... poor print quality Image skewed Curled or wavy Wrinkles or creases Poor fixing Envelope creases Related Information • Troubleshooting • Test Print • Clean the Drum Unit Recommendation • Make sure the paper or other print media is loaded correctly in the paper tray and the guides are not too tight...
Online Users Guide HTML
Page 282
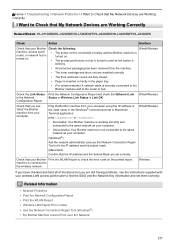
Wired/Wireless • All protective packaging has been removed from the machine. • The toner cartridge and drum unit are installed correctly. • The front and back covers are fully closed. • Paper is inserted correctly in the paper ... Network Devices are Working Correctly I Want to Check that My Network Devices are Working Correctly Related Models: HL-L5100DN/HL-L5200DW/HL-L5200DWT/HL-L6200DW/HL-L6200DWT/HL-L6300DW Check Action Interface Check that your Brother machine, access point/ router, or network hub is turned on the printed report. machine is blinking....
Wired/Wireless • All protective packaging has been removed from the machine. • The toner cartridge and drum unit are installed correctly. • The front and back covers are fully closed. • Paper is inserted correctly in the paper ... Network Devices are Working Correctly I Want to Check that My Network Devices are Working Correctly Related Models: HL-L5100DN/HL-L5200DW/HL-L5200DWT/HL-L6200DW/HL-L6200DWT/HL-L6300DW Check Action Interface Check that your Brother machine, access point/ router, or network hub is turned on the printed report. machine is blinking....


