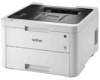
Command Reference Guide for Software Developers
Page 270
... (User Default Environment) set by sending a PJL command to use PJL Status Readback in this chapter. 7.1.1. turns off -line state, toner empty, displayed prompt message on the LCD and other in order to start communication INFO ... Synchronization with each command description to ...such as cover open, off all the data between the @PJL and codes. If the application can request, by @PJL SET or @PJL RESET command DINQUIRE ... STATUS READBACK COMMANDS 7.1. In order to you. 7.1.2. In this information when requested and also can receive correct responses...
... (User Default Environment) set by sending a PJL command to use PJL Status Readback in this chapter. 7.1.1. turns off -line state, toner empty, displayed prompt message on the LCD and other in order to start communication INFO ... Synchronization with each command description to ...such as cover open, off all the data between the @PJL and codes. If the application can request, by @PJL SET or @PJL RESET command DINQUIRE ... STATUS READBACK COMMANDS 7.1. In order to you. 7.1.2. In this information when requested and also can receive correct responses...

Online Users Guide HTML
Page 4
... Brother Machine Cannot Print over the Network 248 I Want to Check that My Network Devices are Working Correctly 250 Google Cloud Print Problems...251 AirPrint Problems ...252 Other Problems ...253 Check the Machine Information ...255 Reset Functions ...256 Machine Reset ...257 Network Reset ...258 Factory Reset ...259 Routine Maintenance ...260 Replace Supplies ...261 Replace the Toner...
... Brother Machine Cannot Print over the Network 248 I Want to Check that My Network Devices are Working Correctly 250 Google Cloud Print Problems...251 AirPrint Problems ...252 Other Problems ...253 Check the Machine Information ...255 Reset Functions ...256 Machine Reset ...257 Network Reset ...258 Factory Reset ...259 Routine Maintenance ...260 Replace Supplies ...261 Replace the Toner...
Online Users Guide HTML
Page 219
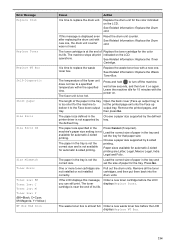
See Related Information: Replace the Drum Unit. If this message, Order a new toner cartridge before the LCD displays Replace WT Box. 214 Reset the drum unit counter. operations. Replace the waste toner box with a new one , the drum unit counter was not reset. correct size and is displayed even after replacing the drum unit with...
See Related Information: Replace the Drum Unit. If this message, Order a new toner cartridge before the LCD displays Replace WT Box. 214 Reset the drum unit counter. operations. Replace the waste toner box with a new one , the drum unit counter was not reset. correct size and is displayed even after replacing the drum unit with...

Online Users Guide HTML
Page 223
... Information: Replace the Belt Unit. Reset the drum unit counter. Pull out the drum units. Error Message Size Error 2-sided Size Mismatch Supplies Belt End Soon Supplies Drum End Soon Supplies Replace Belt Supplies Replace Drum Supplies Toner Low: X (X indicates the toner cartridge or drum unit color that paper...unit for the tray. The belt unit is near the end of its life. The toner displays Replace Toner. Order a new waste toner box before the LCD you can still print. Remove all the toner cartridges, and then put them back into the drum units. The paper in the tray...
... Information: Replace the Belt Unit. Reset the drum unit counter. Pull out the drum units. Error Message Size Error 2-sided Size Mismatch Supplies Belt End Soon Supplies Drum End Soon Supplies Replace Belt Supplies Replace Drum Supplies Toner Low: X (X indicates the toner cartridge or drum unit color that paper...unit for the tray. The belt unit is near the end of its life. The toner displays Replace Toner. Order a new waste toner box before the LCD you can still print. Remove all the toner cartridges, and then put them back into the drum units. The paper in the tray...
Online Users Guide HTML
Page 244
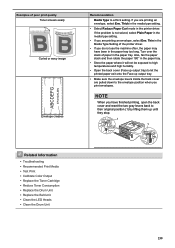
... stop. 1 1 Related Information • Troubleshooting • Recommended Print Media • Test Print • Calibrate Color Output • Replace the Toner Cartridge • Reduce Toner Consumption • Replace the Drum Unit • Replace the Belt Unit • Clean the LED Heads • Clean the Drum Unit 239 Turn... type setting. • If you do not use the machine often, the paper may have finished printing, open the back cover and reset the two gray levers back to their original position (1) by lifting them up output tray. • Make sure the envelope levers inside the...
... stop. 1 1 Related Information • Troubleshooting • Recommended Print Media • Test Print • Calibrate Color Output • Replace the Toner Cartridge • Reduce Toner Consumption • Replace the Drum Unit • Replace the Belt Unit • Clean the LED Heads • Clean the Drum Unit 239 Turn... type setting. • If you do not use the machine often, the paper may have finished printing, open the back cover and reset the two gray levers back to their original position (1) by lifting them up output tray. • Make sure the envelope levers inside the...

Online Users Guide HTML
Page 272
Open the top cover until it locks in the open position. Remove the toner cartridge and drum unit assembly for the machine to cool down before touching them. 3. Wait for the color shown on . 2. Make sure the machine...> Replace Supplies > Replace the Drum Unit Replace the Drum Unit Before starting the replacement procedure, see Related Information: Replace Supplies. >> Replace the Drum Unit >> Reset the Drum Counter (HL-L3210CW/HL-L3230CDN/HL-L3230CDW) >> Reset the Drum Counter (HL-L3270CDW) Replace the Drum Unit 1. WARNING HOT SURFACE The machine's internal parts will be extremely hot.
Open the top cover until it locks in the open position. Remove the toner cartridge and drum unit assembly for the machine to cool down before touching them. 3. Wait for the color shown on . 2. Make sure the machine...> Replace Supplies > Replace the Drum Unit Replace the Drum Unit Before starting the replacement procedure, see Related Information: Replace Supplies. >> Replace the Drum Unit >> Reset the Drum Counter (HL-L3210CW/HL-L3230CDN/HL-L3230CDW) >> Reset the Drum Counter (HL-L3270CDW) Replace the Drum Unit 1. WARNING HOT SURFACE The machine's internal parts will be extremely hot.

Online Users Guide HTML
Page 275
...unit. • If you reset the drum counter without replacing the drum unit, the machine will be used and so on the machine. IMPORTANT • To avoid print quality issues or damage to use only genuine Brother toner. • The machine should... be printed by following the next section. Make sure that determine the actual drum life, such as a reasonable determinant of pages may affect the print quality, hardware performance, and machine reliability. The number of the drum life. Reset the Drum Counter (HL-L3210CW/HL-L3230CDN/HL-L3230CDW...
...unit. • If you reset the drum counter without replacing the drum unit, the machine will be used and so on the machine. IMPORTANT • To avoid print quality issues or damage to use only genuine Brother toner. • The machine should... be printed by following the next section. Make sure that determine the actual drum life, such as a reasonable determinant of pages may affect the print quality, hardware performance, and machine reliability. The number of the drum life. Reset the Drum Counter (HL-L3210CW/HL-L3230CDN/HL-L3230CDW...

Online Users Guide HTML
Page 276
Select the toner color for the drum unit you just replaced. 5. Reset the Drum Counter (HL-L3270CDW) 1. Press [Drum]. 4. Related Information • Replace Supplies • Error and Maintenance Messages • Improve the Print Quality 271 Make sure the machine is turned on. 2. Press and hold for the drum unit you just replaced, and then press OK. 6. Select the toner color for about five seconds. 3. 4. Press OK to reset the drum counter. Select [Reset] to select [Drum]. 5. Press [Yes].
Select the toner color for the drum unit you just replaced. 5. Reset the Drum Counter (HL-L3270CDW) 1. Press [Drum]. 4. Related Information • Replace Supplies • Error and Maintenance Messages • Improve the Print Quality 271 Make sure the machine is turned on. 2. Press and hold for the drum unit you just replaced, and then press OK. 6. Select the toner color for about five seconds. 3. 4. Press OK to reset the drum counter. Select [Reset] to select [Drum]. 5. Press [Yes].

Online Users Guide HTML
Page 277
...internal parts will be extremely hot. Make sure the machine is turned on. 2. Home > Routine Maintenance > Replace Supplies > Replace the Belt Unit Replace the Belt Unit Before starting the replacement procedure, see Related Information: Replace Supplies. >> Replace the Belt Unit >> Reset the Belt Unit Counter (HL-L3210CW/HL-L3230CDN/HL-L3230CDW) >> Reset... the Belt Unit Counter (HL-L3270CDW) Replace the Belt Unit 1. Open the top cover until it locks...
...internal parts will be extremely hot. Make sure the machine is turned on. 2. Home > Routine Maintenance > Replace Supplies > Replace the Belt Unit Replace the Belt Unit Before starting the replacement procedure, see Related Information: Replace Supplies. >> Replace the Belt Unit >> Reset the Belt Unit Counter (HL-L3210CW/HL-L3230CDN/HL-L3230CDW) >> Reset... the Belt Unit Counter (HL-L3270CDW) Replace the Belt Unit 1. Open the top cover until it locks...

Online Users Guide HTML
Page 304
...display the [Calibrate] option, and then press OK. 5. Press . Related Information • Routine Maintenance • Reset the Machine's Calibration Settings • Error and Maintenance Messages • Improve the Print Quality • Monitor the...Toner] > [Calibration] > [Calibrate]. 2. Press a or b to select [Yes]. Press Cancel. Press [Yes]. Press a or b to select the [Printer] option, and then press OK. 2. HL-L3270CDW 1. To retrieve the data manually, you are using Brother's Status Monitor. >> HL-L3210CW/HL-L3230CDN/HL-L3230CDW >> HL-L3270CDW HL-L3210CW/HL-L3230CDN/HL-L3230CDW...
...display the [Calibrate] option, and then press OK. 5. Press . Related Information • Routine Maintenance • Reset the Machine's Calibration Settings • Error and Maintenance Messages • Improve the Print Quality • Monitor the...Toner] > [Calibration] > [Calibrate]. 2. Press a or b to select [Yes]. Press Cancel. Press [Yes]. Press a or b to select the [Printer] option, and then press OK. 2. HL-L3270CDW 1. To retrieve the data manually, you are using Brother's Status Monitor. >> HL-L3210CW/HL-L3230CDN/HL-L3230CDW >> HL-L3270CDW HL-L3210CW/HL-L3230CDN/HL-L3230CDW...

Online Users Guide HTML
Page 305
... then press OK. 2. Press . Home > Routine Maintenance > Calibrate Color Output > Reset the Machine's Calibration Settings Reset the Machine's Calibration Settings If the output color differs from what you see on your monitor, try resetting your machine's calibration parameters. >> HL-L3210CW/HL-L3230CDN/HL-L3230CDW >> HL-L3270CDW HL-L3210CW/HL-L3230CDN/HL-L3230CDW 1. Press a or b to display the [Calibration] option, and then press...
... then press OK. 2. Press . Home > Routine Maintenance > Calibrate Color Output > Reset the Machine's Calibration Settings Reset the Machine's Calibration Settings If the output color differs from what you see on your monitor, try resetting your machine's calibration parameters. >> HL-L3210CW/HL-L3230CDN/HL-L3230CDW >> HL-L3270CDW HL-L3210CW/HL-L3230CDN/HL-L3230CDW 1. Press a or b to display the [Calibration] option, and then press...

Online Users Guide HTML
Page 331
... wireless models) Level 2 Description [Machine Info.] Level 1 Level 2 Description Serial No. - Parts Life 1 Toner Drum Display the remaining life of use. [Initial Setup] Level 1 Level 2 Description Reset Machine Reset Restore all the machine settings that you dispose of each toner. Related Information • Settings and Features Tables 326 PF Kit 1 Display the remaining life...
... wireless models) Level 2 Description [Machine Info.] Level 1 Level 2 Description Serial No. - Parts Life 1 Toner Drum Display the remaining life of use. [Initial Setup] Level 1 Level 2 Description Reset Machine Reset Restore all the machine settings that you dispose of each toner. Related Information • Settings and Features Tables 326 PF Kit 1 Display the remaining life...
Online Users Guide HTML
Page 332
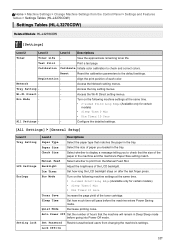
... unauthorized users from the Control Panel > Settings and Features Tables > Settings Tables (HL-L3270CDW) Settings Tables (HL-L3270CDW) Related Models: HL-L3270CDW [Settings] Level 2 Level 3 Level 4 Descriptions Toner Toner Life - Network - - Tray Setting - - Access the Wi-Fi Direct setting...tray. Home > Machine Settings > Change Machine Settings from changing the machine's settings. View the approximate remaining toner life. Reset Reset the calibration parameters to check that matches the paper in the machine and the machine's Paper Size setting ...
... unauthorized users from the Control Panel > Settings and Features Tables > Settings Tables (HL-L3270CDW) Settings Tables (HL-L3270CDW) Related Models: HL-L3270CDW [Settings] Level 2 Level 3 Level 4 Descriptions Toner Toner Life - Network - - Tray Setting - - Access the Wi-Fi Direct setting...tray. Home > Machine Settings > Change Machine Settings from changing the machine's settings. View the approximate remaining toner life. Reset Reset the calibration parameters to check that matches the paper in the machine and the machine's Paper Size setting ...

Online Users Guide HTML
Page 338
...HL-L3270CDW) Related Models: HL-L3270CDW (Wi-Fi Setup) Level 2 Level 3 (Wi-Fi Setup) TCP/IP 1 Descriptions Change the TCP/IP settings. Related Information • Settings and Features Tables 333 Setup Wizard Configure the wireless network settings using the Brother installation disc. View the approximate remaining toner...push method. Reset Reset the calibration parameters to the factory settings. 1 WLAN Enable 1 Turn the wireless interface on or off. 1 Available after the Wi-Fi® is set up. [Toner] Level 2 Level 3 Level 4 Descriptions Toner Toner Life Test ...
...HL-L3270CDW) Related Models: HL-L3270CDW (Wi-Fi Setup) Level 2 Level 3 (Wi-Fi Setup) TCP/IP 1 Descriptions Change the TCP/IP settings. Related Information • Settings and Features Tables 333 Setup Wizard Configure the wireless network settings using the Brother installation disc. View the approximate remaining toner...push method. Reset Reset the calibration parameters to the factory settings. 1 WLAN Enable 1 Turn the wireless interface on or off. 1 Available after the Wi-Fi® is set up. [Toner] Level 2 Level 3 Level 4 Descriptions Toner Toner Life Test ...


