
Users Manual - English
Page 3
... There are high voltage electrodes inside the printer will be extremely hot. Fuser is HOT! Before you clean the printer, clear a paper jam or replace parts, make sure you have turned off the power switch and unplugged the printer from the AC power outlet. it might give you open the front... or back cover of the printer, never touch the shaded parts shown in the illustrations below. When you an electrical shock. Inside the printer ii Open the face-up output tray WARNING Do not handle the...
... There are high voltage electrodes inside the printer will be extremely hot. Fuser is HOT! Before you clean the printer, clear a paper jam or replace parts, make sure you have turned off the power switch and unplugged the printer from the AC power outlet. it might give you open the front... or back cover of the printer, never touch the shaded parts shown in the illustrations below. When you an electrical shock. Inside the printer ii Open the face-up output tray WARNING Do not handle the...

Users Manual - English
Page 7
This equipment has been tested and found to comply with Part 15 of Conformity (For USA) Responsible Party: Brother International Corporation 100 Somerset Corporate Boulevard P.O. Increase the separation between the equipment and receiver. - Important A shielded interface cable should ... connected. - If this device must accept any interference received, including interference that the products Product name: Laser Printer Model number: HL-7050 and HL-7050N Product options: Lower Tray Unit LT-7000, Duplex Unit DX-7000, Network Card NC-4100h, Mailbox Unit MX-7000, MX7010 complies...
This equipment has been tested and found to comply with Part 15 of Conformity (For USA) Responsible Party: Brother International Corporation 100 Somerset Corporate Boulevard P.O. Increase the separation between the equipment and receiver. - Important A shielded interface cable should ... connected. - If this device must accept any interference received, including interference that the products Product name: Laser Printer Model number: HL-7050 and HL-7050N Product options: Lower Tray Unit LT-7000, Duplex Unit DX-7000, Network Card NC-4100h, Mailbox Unit MX-7000, MX7010 complies...

Users Manual - English
Page 11
...ättas för osynlig laserstrålning, som överskrider gränsen för laserklass 1. Internal laser radiation Maximum radiation power: 15 mW Wave length: 760 - 810 nm Laser class: Class IIIb (Accordance with 21 CFR Part 1040.10) Class 3B (Accordance with IEC 60825) x For Finland and Sweden LUOKAN 1 LASERLAITE KLASS...
...ättas för osynlig laserstrålning, som överskrider gränsen för laserklass 1. Internal laser radiation Maximum radiation power: 15 mW Wave length: 760 - 810 nm Laser class: Class IIIb (Accordance with 21 CFR Part 1040.10) Class 3B (Accordance with IEC 60825) x For Finland and Sweden LUOKAN 1 LASERLAITE KLASS...
Users Manual - English
Page 17
...printing on both sides of the paper ..... 4-4 Paper orientation for printing on both sides of the paper 4-5 Mailbox unit 4-6 Network option NC-4100h (For HL-7050 only 4-8 Installing the Network board 4-8 CompactFlash card 4-11 Installing the CompactFlash card 4-12 RAM expansion 4-13 Installing extra DIMM memory 4-14 Hard disk ... 5-2 (Appears at intervals 5-2 TONER LIFE END message 5-2 Replacing the toner cartridge 5-3 Drum unit 5-6 CHANGE DRUM SOON message 5-6 Replacing the drum unit 5-6 Replacing Maintenance Parts 5-11 Cleaning 5-12 Cleaning the outside of the printer 5-12
...printing on both sides of the paper ..... 4-4 Paper orientation for printing on both sides of the paper 4-5 Mailbox unit 4-6 Network option NC-4100h (For HL-7050 only 4-8 Installing the Network board 4-8 CompactFlash card 4-11 Installing the CompactFlash card 4-12 RAM expansion 4-13 Installing extra DIMM memory 4-14 Hard disk ... 5-2 (Appears at intervals 5-2 TONER LIFE END message 5-2 Replacing the toner cartridge 5-3 Drum unit 5-6 CHANGE DRUM SOON message 5-6 Replacing the drum unit 5-6 Replacing Maintenance Parts 5-11 Cleaning 5-12 Cleaning the outside of the printer 5-12
Users Manual - English
Page 20
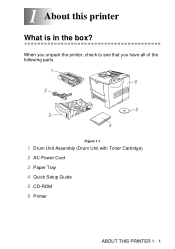
When you unpack the printer, check to see that you have all of the following parts. 1 6 2 5 3 4 Figure 1-1 1 Drum Unit Assembly (Drum Unit with Toner Cartridge) 2 AC Power Cord 3 Paper Tray 4 Quick Setup Guide 5 CD-ROM 6 Printer ABOUT THIS PRINTER 1 - 1 1 About this printer 1 What is in the box?
When you unpack the printer, check to see that you have all of the following parts. 1 6 2 5 3 4 Figure 1-1 1 Drum Unit Assembly (Drum Unit with Toner Cartridge) 2 AC Power Cord 3 Paper Tray 4 Quick Setup Guide 5 CD-ROM 6 Printer ABOUT THIS PRINTER 1 - 1 1 About this printer 1 What is in the box?

Users Manual - English
Page 119
IP ADDRESS= 192.0.0.192 * The last digit in the first part of the 123.45.67.89 * display. 3 - 35 CONTROL PANEL IP ADDRESS= 123.0.0.192 Repeat this process until the NETWORK mode appears (and to the ...
IP ADDRESS= 192.0.0.192 * The last digit in the first part of the 123.45.67.89 * display. 3 - 35 CONTROL PANEL IP ADDRESS= 123.0.0.192 Repeat this process until the NETWORK mode appears (and to the ...

Users Manual - English
Page 152
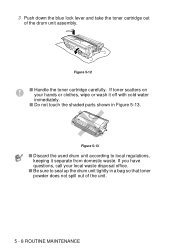
Figure 5-1 2 Push down the blue lock lever and take out the toner cartridge. If toner scatters on your hands or clothes, immediately wipe or wash it off with cold water. ■ Do not touch the shaded parts shown in Figure 5-3 and Figure 5-4. Figure 5-3 Figure 5-4 ROUTINE MAINTENANCE 5 - 3 Figure 5-2 ■ Handle the toner cartridge carefully. Replacing the toner cartridge To make sure you get high quality print, make sure you bought the printer from. 1 Open the top cover of the printer. When you want to buy toner cartridges, call the dealer you use quality toner cartridges.
Figure 5-1 2 Push down the blue lock lever and take out the toner cartridge. If toner scatters on your hands or clothes, immediately wipe or wash it off with cold water. ■ Do not touch the shaded parts shown in Figure 5-3 and Figure 5-4. Figure 5-3 Figure 5-4 ROUTINE MAINTENANCE 5 - 3 Figure 5-2 ■ Handle the toner cartridge carefully. Replacing the toner cartridge To make sure you get high quality print, make sure you bought the printer from. 1 Open the top cover of the printer. When you want to buy toner cartridges, call the dealer you use quality toner cartridges.

Users Manual - English
Page 153
If you remove the protective cover. ■ Do not touch the shaded parts shown in Figure 5-7. Figure 5-5 4 Pull off the yellow plastic protective cover. Hold the cartridge level with both hands and gently rock it from side to ...
If you remove the protective cover. ■ Do not touch the shaded parts shown in Figure 5-7. Figure 5-5 4 Pull off the yellow plastic protective cover. Hold the cartridge level with both hands and gently rock it from side to ...
Users Manual - English
Page 157
... on your local waste disposal office. ■ Be sure to local regulations, keeping it off with cold water immediately. ■ Do not touch the shaded parts shown in a bag so that toner powder does not spill out of the drum unit assembly. Figure 5-13 ■ Discard the used drum unit according...
... on your local waste disposal office. ■ Be sure to local regulations, keeping it off with cold water immediately. ■ Do not touch the shaded parts shown in a bag so that toner powder does not spill out of the drum unit assembly. Figure 5-13 ■ Discard the used drum unit according...

Users Manual - English
Page 158
Figure 5-14 5 Put the toner cartridge in Figure 5-14. Exposure to unpack a drum unit until immediately before you put the cartridge in properly, the blue lock lever is lifted automatically. ROUTINE MAINTENANCE 5 - 9 If you put it may damage the drum unit. ■ Do not touch the shaded parts shown in the new drum unit. Figure 5-15 ■ Make sure you install the toner cartridge properly, or it in the printer. 4 Unpack the new drum unit. ■ Wait to direct sunlight or room light may separate from the drum when you pick up the drum unit.
Figure 5-14 5 Put the toner cartridge in Figure 5-14. Exposure to unpack a drum unit until immediately before you put the cartridge in properly, the blue lock lever is lifted automatically. ROUTINE MAINTENANCE 5 - 9 If you put it may damage the drum unit. ■ Do not touch the shaded parts shown in the new drum unit. Figure 5-15 ■ Make sure you install the toner cartridge properly, or it in the printer. 4 Unpack the new drum unit. ■ Wait to direct sunlight or room light may separate from the drum when you pick up the drum unit.

Users Manual - English
Page 160
When it is time to maintain print quality. REPLACE PF KIT See Maintenance Messages in this chapter. REPLACE LASER See Maintenance Messages in this chapter. REPLACE FUSER See Maintenance Messages in this chapter. ROUTINE MAINTENANCE 5 - 11 Replacing Maintenance Parts You will need to replace the maintenance parts regularly to replace these parts, the following messages will appear on the LCD.
When it is time to maintain print quality. REPLACE PF KIT See Maintenance Messages in this chapter. REPLACE LASER See Maintenance Messages in this chapter. REPLACE FUSER See Maintenance Messages in this chapter. ROUTINE MAINTENANCE 5 - 11 Replacing Maintenance Parts You will need to replace the maintenance parts regularly to replace these parts, the following messages will appear on the LCD.

Users Manual - English
Page 164
Figure 5-22 ROUTINE MAINTENANCE 5 - 15 When you have just used the printer, some parts inside the printer are extremely hot. Fuser is HOT! Metal plate Figure 5-21 5 Wipe the scanner window with a dry, soft cloth. WARNING After you open the top cover of the printer, never touch the fuser and fixing roller. Inside the printer Open the face-up output tray Figure 5-20 4 Wipe off toner and paper dust from the metal plate in the printer with a dry, soft cloth.
Figure 5-22 ROUTINE MAINTENANCE 5 - 15 When you have just used the printer, some parts inside the printer are extremely hot. Fuser is HOT! Metal plate Figure 5-21 5 Wipe the scanner window with a dry, soft cloth. WARNING After you open the top cover of the printer, never touch the fuser and fixing roller. Inside the printer Open the face-up output tray Figure 5-20 4 Wipe off toner and paper dust from the metal plate in the printer with a dry, soft cloth.

Users Manual - English
Page 168
... Call Customer Support Call Customer Support *1 At 5% print coverage (A4 or Letter size). The actual number of printed pages will regularly prompt you to replace parts so you use. Maintenance Messages This printer will vary depending on the print jobs and paper you can rely upon it to maintain the best...
... Call Customer Support Call Customer Support *1 At 5% print coverage (A4 or Letter size). The actual number of printed pages will regularly prompt you to replace parts so you use. Maintenance Messages This printer will vary depending on the print jobs and paper you can rely upon it to maintain the best...

Users Manual - English
Page 182
... immediately with the toner cartridge). Fuser is to stain your hands and clothes with toner. WARNING ■ After you have just used the printer, some parts inside the printer, follow these steps: 1 Open the top cover of the printer, never touch the fuser or the fixing roller. TROUBLESHOOTING 6 - 14 JAM B (paper...
... immediately with the toner cartridge). Fuser is to stain your hands and clothes with toner. WARNING ■ After you have just used the printer, some parts inside the printer, follow these steps: 1 Open the top cover of the printer, never touch the fuser or the fixing roller. TROUBLESHOOTING 6 - 14 JAM B (paper...
Users Manual - English
Page 183
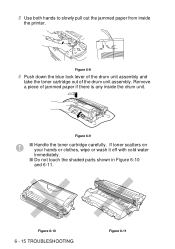
Remove a piece of the drum unit assembly. Figure 6-10 6 - 15 TROUBLESHOOTING Figure 6-11 3 Use both hands to slowly pull out the jammed paper from inside the drum unit. Figure 6-8 4 Push down the blue lock lever of the drum unit assembly and take the toner cartridge out of jammed paper if there is any inside the printer. Figure 6-9 ■ Handle the toner cartridge carefully. If toner scatters on your hands or clothes, wipe or wash it off with cold water immediately. ■ Do not touch the shaded parts shown in Figure 6-10 and 6-11.
Remove a piece of the drum unit assembly. Figure 6-10 6 - 15 TROUBLESHOOTING Figure 6-11 3 Use both hands to slowly pull out the jammed paper from inside the drum unit. Figure 6-8 4 Push down the blue lock lever of the drum unit assembly and take the toner cartridge out of jammed paper if there is any inside the printer. Figure 6-9 ■ Handle the toner cartridge carefully. If toner scatters on your hands or clothes, wipe or wash it off with cold water immediately. ■ Do not touch the shaded parts shown in Figure 6-10 and 6-11.

Users Manual - English
Page 188
3 Use both hands (the shaded part in there. Figure 6-16 Look inside the printer's slot for the Duplex unit to pull the Duplex unit out of the printer. Figure 6-17 TROUBLESHOOTING 6 - 20 When you pull out the Duplex unit, be sure to hold it firmly with both hands to make sure that the jammed paper is not in the illustration is heavier).
3 Use both hands (the shaded part in there. Figure 6-16 Look inside the printer's slot for the Duplex unit to pull the Duplex unit out of the printer. Figure 6-17 TROUBLESHOOTING 6 - 20 When you pull out the Duplex unit, be sure to hold it firmly with both hands to make sure that the jammed paper is not in the illustration is heavier).

Quick Setup Guide - English
Page 2
... the printer or clearing a paper jam, make sure you have just used the printer, some internal parts of the optional Stabilizer unit. Inside the printer Open the face up output tray To prevent injuries, at least two people should lift the printer, ... supplied. Note Do not stand on both the right and left sides of the printer, and the front of the printer, never touch the shaded parts shown in the illustration. Warning Note Indicates cautions that must be observed to prevent possible personal injury. Hint Indicates notes and useful tips to trip...
... the printer or clearing a paper jam, make sure you have just used the printer, some internal parts of the optional Stabilizer unit. Inside the printer Open the face up output tray To prevent injuries, at least two people should lift the printer, ... supplied. Note Do not stand on both the right and left sides of the printer, and the front of the printer, never touch the shaded parts shown in the illustration. Warning Note Indicates cautions that must be observed to prevent possible personal injury. Hint Indicates notes and useful tips to trip...

Quick Setup Guide - English
Page 3
... the Printer to Your PC For Network Interface Cable Users 14 ■ For Brother Peer-to-Peer Network Printer Users (LPR 14 Installing the Driver and Connecting the Printer to Your PC ■...; For Brother Peer-to-Peer Network Printer Users (NetBIOS 16 Installing the Driver, Connecting the Cable and Configuring...; OS X 10.1 Users 26 Connecting the Printer to 9.2 Users 20 1. Remove the Protective Parts 6 2. Table of the Printer 31 Options ...32 ■ Troubleshooting User's Guide Chapter 6 1
... the Printer to Your PC For Network Interface Cable Users 14 ■ For Brother Peer-to-Peer Network Printer Users (LPR 14 Installing the Driver and Connecting the Printer to Your PC ■...; For Brother Peer-to-Peer Network Printer Users (NetBIOS 16 Installing the Driver, Connecting the Cable and Configuring...; OS X 10.1 Users 26 Connecting the Printer to 9.2 Users 20 1. Remove the Protective Parts 6 2. Table of the Printer 31 Options ...32 ■ Troubleshooting User's Guide Chapter 6 1

Quick Setup Guide - English
Page 4
... Products description: Product Name: Laser Printer HL-7050, HL-7050N are designed to Part 15 of the FCC Rules. The cable must accept any phase of the Directives applied: Low Voltage Directive 73/23/EEC (as amended by Brother Industries, Ltd. Standards applied: Harmonized: ... compliant". Increase the separation between the equipment and receiver. - "EC" Declaration of Conformity (For USA) Responsible Party: Brother International Corporation 100 Somerset Corporate Boulevard P.O. If this product, make sure that you use this equipment does cause harmful interference to ...
... Products description: Product Name: Laser Printer HL-7050, HL-7050N are designed to Part 15 of the FCC Rules. The cable must accept any phase of the Directives applied: Low Voltage Directive 73/23/EEC (as amended by Brother Industries, Ltd. Standards applied: Harmonized: ... compliant". Increase the separation between the equipment and receiver. - "EC" Declaration of Conformity (For USA) Responsible Party: Brother International Corporation 100 Somerset Corporate Boulevard P.O. If this product, make sure that you use this equipment does cause harmful interference to ...

Quick Setup Guide - English
Page 5
... of this manual may cause personal injury and equipment damage. Internal laser radiation Maximum radiation power: 15 mW Wave length: 760 - 810 nm Laser class: Class IIIb (Accordance with 21 CFR Part 1040.10) Class 3B (Accordance with the same rating as...lead of procedures other than those specified herein may not match the coloured markings identifying the terminals in hazardous radiation exposure. MANUFACTURED: Brother Technology (Shenzhen) Ltd. Opmerking / Oplaadbare Batterij Recycle Informatie (For Netherlands Only) Bij dit product zijn batterijen geleverd. If ...
... of this manual may cause personal injury and equipment damage. Internal laser radiation Maximum radiation power: 15 mW Wave length: 760 - 810 nm Laser class: Class IIIb (Accordance with 21 CFR Part 1040.10) Class 3B (Accordance with the same rating as...lead of procedures other than those specified herein may not match the coloured markings identifying the terminals in hazardous radiation exposure. MANUFACTURED: Brother Technology (Shenzhen) Ltd. Opmerking / Oplaadbare Batterij Recycle Informatie (For Netherlands Only) Bij dit product zijn batterijen geleverd. If ...


