Quick Setup Guide - English
Page 2
...Interface Cable Users ...14 For Parallel Interface Cable Users ...17 For Network Interface Cable Users (For HL-6050DN 19 For Brother Peer-to-Peer Network Printer Users (LPR / NetBIOS 19 For Network Shared Printer Users ...22 For USB Interface Cable Users ...24 For Mac OS® 8.6 to 9.2 Users...Setting your IP Address, Subnet Mask and Gateway using BRAdmin Professional utility (Windows® Users Only) ...33 Print Printer Settings Page ...33 Factory Default Setting ...33 ■ Other Information Shipment of the Printer ...34 Options ...35 ■ Troubleshooting User's Guide Chapter 6 1
...Interface Cable Users ...14 For Parallel Interface Cable Users ...17 For Network Interface Cable Users (For HL-6050DN 19 For Brother Peer-to-Peer Network Printer Users (LPR / NetBIOS 19 For Network Shared Printer Users ...22 For USB Interface Cable Users ...24 For Mac OS® 8.6 to 9.2 Users...Setting your IP Address, Subnet Mask and Gateway using BRAdmin Professional utility (Windows® Users Only) ...33 Print Printer Settings Page ...33 Factory Default Setting ...33 ■ Other Information Shipment of the Printer ...34 Options ...35 ■ Troubleshooting User's Guide Chapter 6 1
Quick Setup Guide - English
Page 8
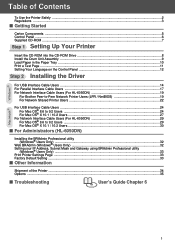
...ROM You can read the FAQs and troubleshooting tips, or learn about printer solutions. 2 Initial Setup Instructional movie for printer setup and driver installation. 3 Install Software Installs the printer driver and utilities. 4 Documentation View the Printer User's Guide and Network User's Guide...install User's Guide, select Custom Installation when you install the driver. If you do not want to page 9. 1 2 3 4 5 6 1 Brother Solutions Center The Brother Solutions Center (http://solutions.brother.com) is a one-stop resource for all your printer (e.g. Brother HL-6050), and User's Guide.
...ROM You can read the FAQs and troubleshooting tips, or learn about printer solutions. 2 Initial Setup Instructional movie for printer setup and driver installation. 3 Install Software Installs the printer driver and utilities. 4 Documentation View the Printer User's Guide and Network User's Guide...install User's Guide, select Custom Installation when you install the driver. If you do not want to page 9. 1 2 3 4 5 6 1 Brother Solutions Center The Brother Solutions Center (http://solutions.brother.com) is a one-stop resource for all your printer (e.g. Brother HL-6050), and User's Guide.

Users Manual - English
Page 7
...13 Cleaning ...5-14 Cleaning the outside of the printer 5-14 Cleaning the inside of the printer 5-15 Cleaning the corona wire ...5-17 6 Troubleshooting ...6-1 LCD messages ...6-1 Error messages ...6-1 Maintenance messages ...6-3 Call service messages ...6-3 Troubleshooting paper handling 6-4 Paper jams and how to clear...control commands A-7 Print bar codes or expanded characters A-7 8 Appendix (For Europe and Other Countries B-1 Brother Numbers ...B-1 Important information: Regulations B-2 Radio interference (220 to 240 volt model only B-2 IEC 60825 specification (220 to 240 volt ...
...13 Cleaning ...5-14 Cleaning the outside of the printer 5-14 Cleaning the inside of the printer 5-15 Cleaning the corona wire ...5-17 6 Troubleshooting ...6-1 LCD messages ...6-1 Error messages ...6-1 Maintenance messages ...6-3 Call service messages ...6-3 Troubleshooting paper handling 6-4 Paper jams and how to clear...control commands A-7 Print bar codes or expanded characters A-7 8 Appendix (For Europe and Other Countries B-1 Brother Numbers ...B-1 Important information: Regulations B-2 Radio interference (220 to 240 volt model only B-2 IEC 60825 specification (220 to 240 volt ...
Users Manual - English
Page 133
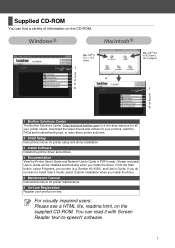
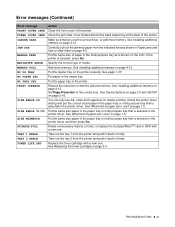
... back output tray. See Replacing the toner cartridge on page 4-12. 6 - 1 TROUBLESHOOTING Please update the firmware by accessing the Brother Solutions Center at the back of the drum unit across several times. Re-install the DIMM correctly. Turn off the printer. If this error message appears again, replace the CompactFlashTM card with a new...
... back output tray. See Replacing the toner cartridge on page 4-12. 6 - 1 TROUBLESHOOTING Please update the firmware by accessing the Brother Solutions Center at the back of the drum unit across several times. Re-install the DIMM correctly. Turn off the printer. If this error message appears again, replace the CompactFlashTM card with a new...
Users Manual - English
Page 134
... Device Options on page 2-5 and SETUP on page 1-5. TROUBLESHOOTING 6 - 2 on page 3-16. Take out the tray 2 from the printer and push it back in the printer driver. See Replacing the toner cartridge on page 4-12. Check the printer driver setting and put the correct sized paper in the paper...can I use the correct driver, or add more memory. Put the same size of the printer. See Installing additional memory on page 5-3. on the printer properly. If the printer is selected in the printer driver, and then press Go. Put the duplex tray on page 1-5. Put the same size...
... Device Options on page 2-5 and SETUP on page 1-5. TROUBLESHOOTING 6 - 2 on page 3-16. Take out the tray 2 from the printer and push it back in the printer driver. See Replacing the toner cartridge on page 4-12. Check the printer driver setting and put the correct sized paper in the paper...can I use the correct driver, or add more memory. Put the same size of the printer. See Installing additional memory on page 5-3. on the printer properly. If the printer is selected in the printer driver, and then press Go. Put the duplex tray on page 1-5. Put the same size...
Users Manual - English
Page 135
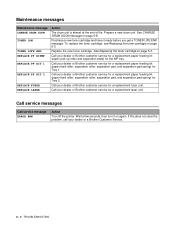
...printer. Wait a few seconds, then turn it ready before you get a TONER LIFE END message. If this does not clear the problem, call your dealer or Brother... your dealer or a Brother Customer Service. 6 - 3 TROUBLESHOOTING Call your dealer or Brother customer service for the MP tray. Call your dealer or Brother customer service for a ...Brother customer service for Tray 1. Prepare a new drum unit. Call your dealer or Brother customer service for a replacement paper feeding kit (paper feed roller, separation roller, separation pad, and separation pad spring) for a replacement laser...
...printer. Wait a few seconds, then turn it ready before you get a TONER LIFE END message. If this does not clear the problem, call your dealer or Brother... your dealer or a Brother Customer Service. 6 - 3 TROUBLESHOOTING Call your dealer or Brother customer service for the MP tray. Call your dealer or Brother customer service for a ...Brother customer service for Tray 1. Prepare a new drum unit. Call your dealer or Brother customer service for a replacement paper feeding kit (paper feed roller, separation roller, separation pad, and separation pad spring) for a replacement laser...

Users Manual - English
Page 136
... curled, you have chosen the appropriate printer driver. ■ Change the printer driver setting in the printer driver. ■ If there is not set up the output tray support flap. TROUBLESHOOTING 6 - 4 The printer does not load paper from the multi-purpose tray. See What kind of your dealer or Brother customer service for a replacement. ■ Close...
... curled, you have chosen the appropriate printer driver. ■ Change the printer driver setting in the printer driver. ■ If there is not set up the output tray support flap. TROUBLESHOOTING 6 - 4 The printer does not load paper from the multi-purpose tray. See What kind of your dealer or Brother customer service for a replacement. ■ Close...

Users Manual - English
Page 137
... out of the following : ■ Bent/wrinkled paper ■ Moist paper ■ Paper that does not meet specifications 6 - 5 TROUBLESHOOTING One of the printer. Please check the printer thoroughly. Do not use the following LCD messages will stop. After you remove the jammed paper, there may jam in the paper... tray, inside the printer, the printer will appear to tell you where to start printing. Paper jams and how to remove the jammed paper. Check where the jam is...
... out of the following : ■ Bent/wrinkled paper ■ Moist paper ■ Paper that does not meet specifications 6 - 5 TROUBLESHOOTING One of the printer. Please check the printer thoroughly. Do not use the following LCD messages will stop. After you remove the jammed paper, there may jam in the paper... tray, inside the printer, the printer will appear to tell you where to start printing. Paper jams and how to remove the jammed paper. Check where the jam is...

Users Manual - English
Page 138
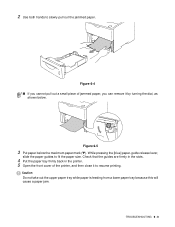
... there is a paper jam in the multi-purpose tray, follow these steps: 1 Press the cover release button and then open the front cover of the printer and close it back in the multi-purpose tray, make sure it touches the back of the tray and stays below the maximum paper mark... (▼). 6 Open the front cover of the printer. 2 Take out the drum unit assembly (drum unit with the toner cartridge). 3 Remove the paper from the multi-purpose tray. 4 Fan the paper stack, then...
... there is a paper jam in the multi-purpose tray, follow these steps: 1 Press the cover release button and then open the front cover of the printer and close it back in the multi-purpose tray, make sure it touches the back of the tray and stays below the maximum paper mark... (▼). 6 Open the front cover of the printer. 2 Take out the drum unit assembly (drum unit with the toner cartridge). 3 Remove the paper from the multi-purpose tray. 4 Fan the paper stack, then...

Users Manual - English
Page 139
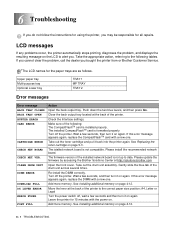
Tray type Upper paper tray Optional lower tray Tray name TRAY 1 TRAY 2 JAM TRAY1 JAM TRAY2 If a paper jam occurs inside the Paper tray) The LCD names for the paper trays are as follows. Figure 6-3 6 - 7 TROUBLESHOOTING JAM TRAY 1 / TRAY 2 (Paper jam inside the paper tray, follow these steps: 1 Pull the paper tray completely out of the printer.
Tray type Upper paper tray Optional lower tray Tray name TRAY 1 TRAY 2 JAM TRAY1 JAM TRAY2 If a paper jam occurs inside the Paper tray) The LCD names for the paper trays are as follows. Figure 6-3 6 - 7 TROUBLESHOOTING JAM TRAY 1 / TRAY 2 (Paper jam inside the paper tray, follow these steps: 1 Pull the paper tray completely out of the printer.
Users Manual - English
Page 140
... the front cover of jammed paper, you cannot pull out a small piece of the printer, and then close it by turning the dial, as shown below the maximum paper mark (▼). TROUBLESHOOTING 6 - 8 Caution Do not take out the upper paper tray while paper is feeding from a lower paper tray because this will...
... the front cover of jammed paper, you cannot pull out a small piece of the printer, and then close it by turning the dial, as shown below the maximum paper mark (▼). TROUBLESHOOTING 6 - 8 Caution Do not take out the upper paper tray while paper is feeding from a lower paper tray because this will...
Users Manual - English
Page 141
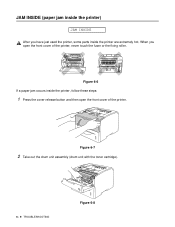
Figure 6-7 2 Take out the drum unit assembly (drum unit with the toner cartridge). 6 - 9 TROUBLESHOOTING Figure 6-8 JAM INSIDE (paper jam inside the printer) JAM INSIDE After you open the front cover of the printer, never touch the fuser or the fixing roller. When you have just used the printer, some parts inside the printer, follow these steps: 1 Press the cover release button and then open the front cover of the printer. Figure 6-6 If a paper jam occurs inside the printer are extremely hot.
Figure 6-7 2 Take out the drum unit assembly (drum unit with the toner cartridge). 6 - 9 TROUBLESHOOTING Figure 6-8 JAM INSIDE (paper jam inside the printer) JAM INSIDE After you open the front cover of the printer, never touch the fuser or the fixing roller. When you have just used the printer, some parts inside the printer, follow these steps: 1 Press the cover release button and then open the front cover of the printer. Figure 6-6 If a paper jam occurs inside the printer are extremely hot.

Users Manual - English
Page 142
Figure 6-9 3 Use both hands to the printer from static electricity, do not spread toner. ■ Take care not to stain your hands and clothes with cold water. Figure 6-11 TROUBLESHOOTING 6 - 10 Figure 6-10 4 Push down the blue lock lever of the drum unit assembly and take the toner cartridge out of jammed paper...
Figure 6-9 3 Use both hands to the printer from static electricity, do not spread toner. ■ Take care not to stain your hands and clothes with cold water. Figure 6-11 TROUBLESHOOTING 6 - 10 Figure 6-10 4 Push down the blue lock lever of the drum unit assembly and take the toner cartridge out of jammed paper...

Users Manual - English
Page 143
Figure 6-12 Figure 6-13 5 Put the drum unit assembly back in Figure 6-12 and 6-13 to avoid any degradation to the print quality. If toner scatters on your hands or clothes, wipe or wash it off with cold water immediately. ■ Do not touch the shaded parts shown in the printer (press firmly). 6 Close the front cover of the printer. 6 - 11 TROUBLESHOOTING Caution ■ Handle the toner cartridge carefully.
Figure 6-12 Figure 6-13 5 Put the drum unit assembly back in Figure 6-12 and 6-13 to avoid any degradation to the print quality. If toner scatters on your hands or clothes, wipe or wash it off with cold water immediately. ■ Do not touch the shaded parts shown in the printer (press firmly). 6 Close the front cover of the printer. 6 - 11 TROUBLESHOOTING Caution ■ Handle the toner cartridge carefully.
Users Manual - English
Page 144
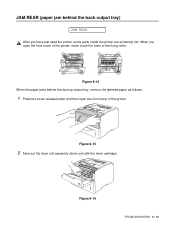
Figure 6-16 TROUBLESHOOTING 6 - 12 Figure 6-14 When the paper jams behind the back output tray) JAM REAR After you open the front cover of the printer, never touch the fuser or the fixing roller. Figure 6-15 2 Take out the drum unit assembly (drum unit with the toner cartridge). JAM REAR (paper jam behind the face-up output tray, remove the jammed paper as follows: 1 Press the cover release button and then open the front cover of the printer. When you have just used the printer, some parts inside the printer are extremely hot.
Figure 6-16 TROUBLESHOOTING 6 - 12 Figure 6-14 When the paper jams behind the back output tray) JAM REAR After you open the front cover of the printer, never touch the fuser or the fixing roller. Figure 6-15 2 Take out the drum unit assembly (drum unit with the toner cartridge). JAM REAR (paper jam behind the face-up output tray, remove the jammed paper as follows: 1 Press the cover release button and then open the front cover of the printer. When you have just used the printer, some parts inside the printer are extremely hot.

Users Manual - English
Page 145
Caution ■ We recommend that you place the drum unit assembly on a piece of disposable paper or cloth in case you accidentally spill or scatter toner. ■ To prevent damage to slowly pull out the jammed paper. 4 Open the back output tray. Figure 6-17 3 Use both hands to the printer from static electricity, do not touch the electrodes shown in Figure 6-17. Figure 6-18 6 - 13 TROUBLESHOOTING Figure 6-19
Caution ■ We recommend that you place the drum unit assembly on a piece of disposable paper or cloth in case you accidentally spill or scatter toner. ■ To prevent damage to slowly pull out the jammed paper. 4 Open the back output tray. Figure 6-17 3 Use both hands to the printer from static electricity, do not touch the electrodes shown in Figure 6-17. Figure 6-18 6 - 13 TROUBLESHOOTING Figure 6-19

Users Manual - English
Page 146
Figure 6-20 6 Open the jam clear cover by pushing the levers inward at the left and right hand sides. TROUBLESHOOTING 6 - 14 Jam clear cover Figure 6-21 7 Close the jam clear cover. 8 Close the back output tray. 9 Put the drum unit assembly back in the printer (press firmly). 10 Close the front cover of the fuser unit. 5 Push down the blue tabs at the left and right hand sides. Pull the jammed paper out of the printer.
Figure 6-20 6 Open the jam clear cover by pushing the levers inward at the left and right hand sides. TROUBLESHOOTING 6 - 14 Jam clear cover Figure 6-21 7 Close the jam clear cover. 8 Close the back output tray. 9 Put the drum unit assembly back in the printer (press firmly). 10 Close the front cover of the fuser unit. 5 Push down the blue tabs at the left and right hand sides. Pull the jammed paper out of the printer.

Users Manual - English
Page 147
JAM DUPLEX (paper jam in the duplex unit) JAM DUPLEX Follow the instructions below to slowly pull the jammed paper out of the fuser unit. Figure 6-22 2 Use both hands to clear a paper jam: 1 Open the back output tray. Figure 6-23 3 Close the back output tray. If the paper jam cannot be cleared, go to the next step. 6 - 15 TROUBLESHOOTING
JAM DUPLEX (paper jam in the duplex unit) JAM DUPLEX Follow the instructions below to slowly pull the jammed paper out of the fuser unit. Figure 6-22 2 Use both hands to clear a paper jam: 1 Open the back output tray. Figure 6-23 3 Close the back output tray. If the paper jam cannot be cleared, go to the next step. 6 - 15 TROUBLESHOOTING

Users Manual - English
Page 148
... adjustment lever for duplex printing is not set correctly for the paper size, paper jams may occur and the printing will be out of the printer. TROUBLESHOOTING 6 - 16 Figure 6-24 5 Pull the jammed paper out of position on the page. 4 Pull the duplex tray and paper tray out of the...
... adjustment lever for duplex printing is not set correctly for the paper size, paper jams may occur and the printing will be out of the printer. TROUBLESHOOTING 6 - 16 Figure 6-24 5 Pull the jammed paper out of position on the page. 4 Pull the duplex tray and paper tray out of the...

Users Manual - English
Page 149
...Replacing the drum unit on page 1-5. ■ Check the printer's environment - See Replacing the toner cartridge on the printer control panel. Call customer service. If the same problem occurs again, call your dealer or Brother Customer Service. See QUALITY on page 1-5. ■ Make sure... kind of paper can cause this print fault. Rough-surfaced paper, paper that meets our specifications. Toner specks 6 - 17 TROUBLESHOOTING Improving the print quality This section provides information on the supplied CD-ROM. ■ Make sure you choose the appropriate media type...
...Replacing the drum unit on page 1-5. ■ Check the printer's environment - See Replacing the toner cartridge on the printer control panel. Call customer service. If the same problem occurs again, call your dealer or Brother Customer Service. See QUALITY on page 1-5. ■ Make sure... kind of paper can cause this print fault. Rough-surfaced paper, paper that meets our specifications. Toner specks 6 - 17 TROUBLESHOOTING Improving the print quality This section provides information on the supplied CD-ROM. ■ Make sure you choose the appropriate media type...