
Quick Setup Guide - English
Page 3
... clearing a paper jam, make sure you have just used the printer, some internal parts of the printer, never touch the shaded parts shown in the illustration. Do not handle the plug or AC power cord with a caution label. Hint Indicates notes and useful tips to ... which is marked with wet hands. Safety Precautions To Use the Printer Safely Warning Indicates warnings that must be observed to use the printer properly or prevent damage to the printer. Please do Not remove or damage the label. 2 Inside the printer (Front View) Open the Back Output Tray (Back View) The...
... clearing a paper jam, make sure you have just used the printer, some internal parts of the printer, never touch the shaded parts shown in the illustration. Do not handle the plug or AC power cord with a caution label. Hint Indicates notes and useful tips to ... which is marked with wet hands. Safety Precautions To Use the Printer Safely Warning Indicates warnings that must be observed to use the printer properly or prevent damage to the printer. Please do Not remove or damage the label. 2 Inside the printer (Front View) Open the Back Output Tray (Back View) The...
Quick Setup Guide - English
Page 4
... to Part 15 of the International ENERGY STAR® Program is to 120 volt Model Only) This printer is no guarantee that the products Product name: Model number: Product options: Laser Printer HL-6050, 6050D and 6050DN HL-60 Lower Tray Unit LT-6000, Network Board NC-6100h complies with provisions of Conformity (For USA) Responsible Party: Brother International Corporation...
... to Part 15 of the International ENERGY STAR® Program is to 120 volt Model Only) This printer is no guarantee that the products Product name: Model number: Product options: Laser Printer HL-6050, 6050D and 6050DN HL-60 Lower Tray Unit LT-6000, Network Board NC-6100h complies with provisions of Conformity (For USA) Responsible Party: Brother International Corporation...
Quick Setup Guide - English
Page 5
...safe. Warning - Internal laser radiation Maximum radiation power: 10 mW Wave length: 760 - 810 nm Laser class: Class IIIb (Accordance with 21 CFR Part 1040.10) Class ...Brother Corporation (Asia) Ltd. CLASS 1LASERP RODUCT APPAREIL Å LASER DE CLASSE 1 LASER KLASSE 1 PRODUKT This printer has a Class 3B laser diode which produces invisible laser radiation in hazardous radiation exposure. Brother... information (for LAN connection (For model HL-6050DN only) Connect this printer near a power outlet that is mandatory for laser products manufactured on the back of procedures ...
...safe. Warning - Internal laser radiation Maximum radiation power: 10 mW Wave length: 760 - 810 nm Laser class: Class IIIb (Accordance with 21 CFR Part 1040.10) Class ...Brother Corporation (Asia) Ltd. CLASS 1LASERP RODUCT APPAREIL Å LASER DE CLASSE 1 LASER KLASSE 1 PRODUKT This printer has a Class 3B laser diode which produces invisible laser radiation in hazardous radiation exposure. Brother... information (for LAN connection (For model HL-6050DN only) Connect this printer near a power outlet that is mandatory for laser products manufactured on the back of procedures ...

Users Manual - English
Page 3
...or damage the label. it might give you have just used the printer, some parts inside the printer. Cleaning with volatile liquids such as thinner or benzene will damage the surface of the printer, never touch the shaded parts shown in the illustrations below. The fuser unit is marked with ...wet hands - There are high voltage electrodes inside the printer will damage the printer and the toner cartridge. Do not handle the plug...
...or damage the label. it might give you have just used the printer, some parts inside the printer. Cleaning with volatile liquids such as thinner or benzene will damage the surface of the printer, never touch the shaded parts shown in the illustrations below. The fuser unit is marked with ...wet hands - There are high voltage electrodes inside the printer will damage the printer and the toner cartridge. Do not handle the plug...

Users Manual - English
Page 7
... unit ...5-8 CHANGE DRUM SOON message 5-8 Replacing the drum unit ...5-8 Replacing Maintenance Parts ...5-13 Maintenance Messages 5-13 Cleaning ...5-14 Cleaning the outside of the printer 5-14 Cleaning the inside of the printer 5-15 Cleaning the corona wire ...5-17 6 Troubleshooting ...6-1 LCD messages ...6-1 Error... control commands A-7 Print bar codes or expanded characters A-7 8 Appendix (For Europe and Other Countries B-1 Brother Numbers ...B-1 Important information: Regulations B-2 Radio interference (220 to 240 volt model only B-2 IEC 60825 specification (220 to 240 volt ...
... unit ...5-8 CHANGE DRUM SOON message 5-8 Replacing the drum unit ...5-8 Replacing Maintenance Parts ...5-13 Maintenance Messages 5-13 Cleaning ...5-14 Cleaning the outside of the printer 5-14 Cleaning the inside of the printer 5-15 Cleaning the corona wire ...5-17 6 Troubleshooting ...6-1 LCD messages ...6-1 Error... control commands A-7 Print bar codes or expanded characters A-7 8 Appendix (For Europe and Other Countries B-1 Brother Numbers ...B-1 Important information: Regulations B-2 Radio interference (220 to 240 volt model only B-2 IEC 60825 specification (220 to 240 volt ...
Users Manual - English
Page 9
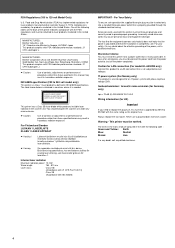
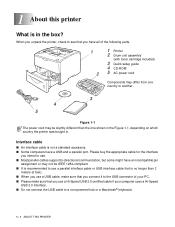
... cable for the interface you intend to use. ■ Most parallel cables support bi-directional communication, but some might have all of the following parts. 1 2 1 Printer 2 Drum unit assembly (with toner cartridge included) 3 Quick setup guide 4 CD-ROM 5 AC power cord Components may differ from one country to...4 5 Figure 1-1 The power cord may not be slightly different than the one shown in the Figure 1-1, depending on which country the printer was bought in the box? When you have an incompatible pin assignment or may be IEEE 1284-compliant. ■ It is recommended to ...
... cable for the interface you intend to use. ■ Most parallel cables support bi-directional communication, but some might have all of the following parts. 1 2 1 Printer 2 Drum unit assembly (with toner cartridge included) 3 Quick setup guide 4 CD-ROM 5 AC power cord Components may differ from one country to...4 5 Figure 1-1 The power cord may not be slightly different than the one shown in the Figure 1-1, depending on which country the printer was bought in the box? When you have an incompatible pin assignment or may be IEEE 1284-compliant. ■ It is recommended to ...

Users Manual - English
Page 93
...* 123.45.67.89 123.45.67.89* Press the + or - button until you have set your IP address. The last digit in the first part of the display. 3 - 22 CONTROL PANEL Press the Set button. Press the Set button.
...* 123.45.67.89 123.45.67.89* Press the + or - button until you have set your IP address. The last digit in the first part of the display. 3 - 22 CONTROL PANEL Press the Set button. Press the Set button.

Users Manual - English
Page 121
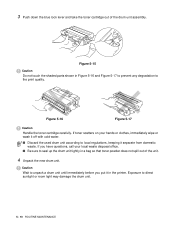
Figure 5-7 6 Put the new toner cartridge firmly into place. If you hear it lock into the drum unit until you put it may separate from the drum unit. 7 Gently wipe the scanner window with a dry, soft cloth. 5 - 6 ROUTINE MAINTENANCE Figure 5-9 Figure 5-8 Caution Make sure you have removed the protective cover. Caution Put the toner cartridge in the drum unit immediately after you insert the toner cartridge properly or it in properly, the lock lever will lift automatically. To prevent degradation to the print quality, do not touch the shaded parts shown in Figure 5-7.
Figure 5-7 6 Put the new toner cartridge firmly into place. If you hear it lock into the drum unit until you put it may separate from the drum unit. 7 Gently wipe the scanner window with a dry, soft cloth. 5 - 6 ROUTINE MAINTENANCE Figure 5-9 Figure 5-8 Caution Make sure you have removed the protective cover. Caution Put the toner cartridge in the drum unit immediately after you insert the toner cartridge properly or it in properly, the lock lever will lift automatically. To prevent degradation to the print quality, do not touch the shaded parts shown in Figure 5-7.
Users Manual - English
Page 125
... blue lock lever and take the toner cartridge out of the unit. 4 Unpack the new drum unit. Figure 5-15 Caution Do not touch the shaded parts shown in a bag so that toner powder does not spill out of the drum unit assembly. Caution Wait to unpack a drum unit until immediately before... or clothes, immediately wipe or wash it off with cold water. ■ Discard the used drum unit according to local regulations, keeping it in the printer. Exposure to the print quality. If you put it separate from domestic waste. If toner scatters on your local waste disposal office. ■ Be sure...
... blue lock lever and take the toner cartridge out of the unit. 4 Unpack the new drum unit. Figure 5-15 Caution Do not touch the shaded parts shown in a bag so that toner powder does not spill out of the drum unit assembly. Caution Wait to unpack a drum unit until immediately before... or clothes, immediately wipe or wash it off with cold water. ■ Discard the used drum unit according to local regulations, keeping it in the printer. Exposure to the print quality. If you put it separate from domestic waste. If toner scatters on your local waste disposal office. ■ Be sure...

Users Manual - English
Page 128
... will need to replace the maintenance parts regularly to replace these parts, the following messages will appear on the print jobs and paper you use. Maintenance Messages LCD Message REPLACE PF KITMP REPLACE PF KIT 1 REPLACE PF KIT 2 REPLACE FUSER REPLACE LASER Item Paper feeding kit for MP ... means the paper feed roller, separation roller, separation pad and separation pad spring. *3 At 5% print coverage (A4 or Letter size). Replacing Maintenance Parts You will vary depending on the LCD. When it is time to maintain print quality. REPLACE PF KITMP REPLACE PF KIT 1 REPLACE PF KIT 2...
... will need to replace the maintenance parts regularly to replace these parts, the following messages will appear on the print jobs and paper you use. Maintenance Messages LCD Message REPLACE PF KITMP REPLACE PF KIT 1 REPLACE PF KIT 2 REPLACE FUSER REPLACE LASER Item Paper feeding kit for MP ... means the paper feed roller, separation roller, separation pad and separation pad spring. *3 At 5% print coverage (A4 or Letter size). Replacing Maintenance Parts You will vary depending on the LCD. When it is time to maintain print quality. REPLACE PF KITMP REPLACE PF KIT 1 REPLACE PF KIT 2...

Users Manual - English
Page 130
...Cleaning the inside of the printer WWhen you clean the inside of the printer, pay attention to inhale the toner. ■ After you have just used the printer, some parts inside the printer are smeared with toner, wipe off the printer power switch, and then unplug the printer power cord. 2 Press the... cover release button and then open the front cover of the printer, never touch the fuser and fixing roller....
...Cleaning the inside of the printer WWhen you clean the inside of the printer, pay attention to inhale the toner. ■ After you have just used the printer, some parts inside the printer are smeared with toner, wipe off the printer power switch, and then unplug the printer power cord. 2 Press the... cover release button and then open the front cover of the printer, never touch the fuser and fixing roller....
Users Manual - English
Page 141
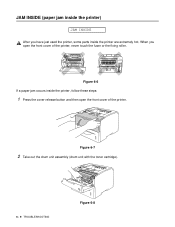
When you have just used the printer, some parts inside the printer, follow these steps: 1 Press the cover release button and then open the front cover of the printer. Figure 6-6 If a paper jam occurs inside the printer are extremely hot. Figure 6-7 2 Take out the drum unit assembly (drum unit with the toner cartridge). 6 - 9 TROUBLESHOOTING Figure 6-8 JAM INSIDE (paper jam inside the printer) JAM INSIDE After you open the front cover of the printer, never touch the fuser or the fixing roller.
When you have just used the printer, some parts inside the printer, follow these steps: 1 Press the cover release button and then open the front cover of the printer. Figure 6-6 If a paper jam occurs inside the printer are extremely hot. Figure 6-7 2 Take out the drum unit assembly (drum unit with the toner cartridge). 6 - 9 TROUBLESHOOTING Figure 6-8 JAM INSIDE (paper jam inside the printer) JAM INSIDE After you open the front cover of the printer, never touch the fuser or the fixing roller.

Users Manual - English
Page 143
Caution ■ Handle the toner cartridge carefully. If toner scatters on your hands or clothes, wipe or wash it off with cold water immediately. ■ Do not touch the shaded parts shown in the printer (press firmly). 6 Close the front cover of the printer. 6 - 11 TROUBLESHOOTING Figure 6-12 Figure 6-13 5 Put the drum unit assembly back in Figure 6-12 and 6-13 to avoid any degradation to the print quality.
Caution ■ Handle the toner cartridge carefully. If toner scatters on your hands or clothes, wipe or wash it off with cold water immediately. ■ Do not touch the shaded parts shown in the printer (press firmly). 6 Close the front cover of the printer. 6 - 11 TROUBLESHOOTING Figure 6-12 Figure 6-13 5 Put the drum unit assembly back in Figure 6-12 and 6-13 to avoid any degradation to the print quality.
Users Manual - English
Page 144
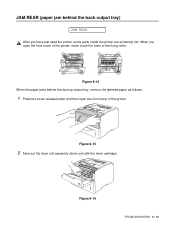
JAM REAR (paper jam behind the face-up output tray, remove the jammed paper as follows: 1 Press the cover release button and then open the front cover of the printer. Figure 6-15 2 Take out the drum unit assembly (drum unit with the toner cartridge). When you have just used the printer, some parts inside the printer are extremely hot. Figure 6-14 When the paper jams behind the back output tray) JAM REAR After you open the front cover of the printer, never touch the fuser or the fixing roller. Figure 6-16 TROUBLESHOOTING 6 - 12
JAM REAR (paper jam behind the face-up output tray, remove the jammed paper as follows: 1 Press the cover release button and then open the front cover of the printer. Figure 6-15 2 Take out the drum unit assembly (drum unit with the toner cartridge). When you have just used the printer, some parts inside the printer are extremely hot. Figure 6-14 When the paper jams behind the back output tray) JAM REAR After you open the front cover of the printer, never touch the fuser or the fixing roller. Figure 6-16 TROUBLESHOOTING 6 - 12

Users Manual - English
Page 175
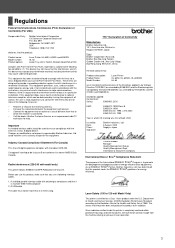
... installation. These limits are designed to provide reasonable protection against harmful interference in accordance with Part 15 of Conformity (For USA) Responsible Party: Brother International Corporation 100 Somerset Corporate Boulevard P.O. Operation is subject to the following two conditions: (1) ... device must accept any interference received, including interference that the products Product name: Model number: Product options: Laser Printer HL-6050D and HL-6050DN HL-60 Lower Tray Unit LT-6000, Network Board NC-6100h complies with the instructions, may not cause harmful...
... installation. These limits are designed to provide reasonable protection against harmful interference in accordance with Part 15 of Conformity (For USA) Responsible Party: Brother International Corporation 100 Somerset Corporate Boulevard P.O. Operation is subject to the following two conditions: (1) ... device must accept any interference received, including interference that the products Product name: Model number: Product options: Laser Printer HL-6050D and HL-6050DN HL-60 Lower Tray Unit LT-6000, Network Board NC-6100h complies with the instructions, may not cause harmful...

Users Manual - English
Page 176
...) This printer is certified as a Class I laser product under the U.S. FDA Regulations (100 to the Radiation Control for laser products manufactured on the back of user operation. MANUFACTURED: Brother Technology (Shenzhen) Ltd. Department of 1968. Cet appareil numérique de la classe B est conforme à la norme NMB-003 du Canada. Internal laser radiation Maximum...
...) This printer is certified as a Class I laser product under the U.S. FDA Regulations (100 to the Radiation Control for laser products manufactured on the back of user operation. MANUFACTURED: Brother Technology (Shenzhen) Ltd. Department of 1968. Cet appareil numérique de la classe B est conforme à la norme NMB-003 du Canada. Internal laser radiation Maximum...
Users Manual - English
Page 179
PRINT menu 3-25, 3-26 PRINT MENU menu 3-17 Print quality 2-4, 6-17 Printable area 1-8 Printer driver 2-1, 2-10 Printer parts 1-2, 1-3 Proof data 3-4 Proprinter XL mode 3-23 PS printer driver 2-1, 2-10 Public data 3-5 Q QUALITY menu 3-15, 3-25 R RAM 4-11 Recommended paper 1-7 Register your printer B-1, C-1 Reprint button 3-2, 3-3 RESET menu 3-21 S Secure data 3-5 SETUP menu 3-16, 3-25 Software 2-19 Status Monitor 2-6 T TCP/IP 3-20 Thick paper 1-17 Toner cartridge 5-1 W Watermark 2-4 Wireless Print Server (NC-7100w 4-6 I - 2
PRINT menu 3-25, 3-26 PRINT MENU menu 3-17 Print quality 2-4, 6-17 Printable area 1-8 Printer driver 2-1, 2-10 Printer parts 1-2, 1-3 Proof data 3-4 Proprinter XL mode 3-23 PS printer driver 2-1, 2-10 Public data 3-5 Q QUALITY menu 3-15, 3-25 R RAM 4-11 Recommended paper 1-7 Register your printer B-1, C-1 Reprint button 3-2, 3-3 RESET menu 3-21 S Secure data 3-5 SETUP menu 3-16, 3-25 Software 2-19 Status Monitor 2-6 T TCP/IP 3-20 Thick paper 1-17 Toner cartridge 5-1 W Watermark 2-4 Wireless Print Server (NC-7100w 4-6 I - 2

Network Users Manual - English
Page 4
...can radiate radio frequency energy and, if not installed and used in accordance with Part 15 of the FCC Rules. However, there is encouraged to try to correct the interference by Brother Industries, Ltd. Reorient or relocate the receiving antenna. - IMPORTANT INFORMATION: REGULATIONS... not occur in a residential installation. only) Responsible Party: Brother International Corporation 100 Somerset Corporate Boulevard Bridgewater, NJ 08807-0911, USA TEL: (908) 704-1700 declares, that may cause harmful interference to Part 15 of the FCC Rules. This equipment has been tested ...
...can radiate radio frequency energy and, if not installed and used in accordance with Part 15 of the FCC Rules. However, there is encouraged to try to correct the interference by Brother Industries, Ltd. Reorient or relocate the receiving antenna. - IMPORTANT INFORMATION: REGULATIONS... not occur in a residential installation. only) Responsible Party: Brother International Corporation 100 Somerset Corporate Boulevard Bridgewater, NJ 08807-0911, USA TEL: (908) 704-1700 declares, that may cause harmful interference to Part 15 of the FCC Rules. This equipment has been tested ...
Network Users Manual - English
Page 51
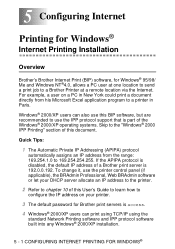
...for Windows® 95/98/ Me and Windows NT®4.0, allows a PC user at one location to send a print job to a Brother Printer at a remote location via the Internet. Quick Tips: 1 The Automatic Private IP Addressing (APIPA) protocol automatically assigns an IP address from his...; 2000/XP installation. 5 - 1 CONFIGURING INTERNET PRINTING FOR WINDOWS® If the APIPA protocol is disabled, the default IP address of a Brother print server is part of the Windows® 2000/XP operating systems. Skip to the "Windows® 2000 IPP Printing" section of this document. 5 Configuring Internet...
...for Windows® 95/98/ Me and Windows NT®4.0, allows a PC user at one location to send a print job to a Brother Printer at a remote location via the Internet. Quick Tips: 1 The Automatic Private IP Addressing (APIPA) protocol automatically assigns an IP address from his...; 2000/XP installation. 5 - 1 CONFIGURING INTERNET PRINTING FOR WINDOWS® If the APIPA protocol is disabled, the default IP address of a Brother print server is part of the Windows® 2000/XP operating systems. Skip to the "Windows® 2000 IPP Printing" section of this document. 5 Configuring Internet...
Network Users Manual - English
Page 53
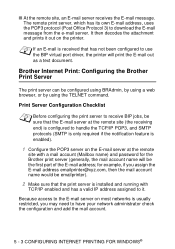
...print server, which has its own E-mail address, uses the POP3 protocol (Post Office Protocol 3) to use the BIP virtual port driver, the printer will be configured using BRAdmin, by using a web browser, or by using the TELNET command. Because access to the E-mail server on most ...the print server is enabled). 1 Configure the POP3 server on the printer. ■ At the remote site, an E-mail server receives the E-mail message. Brother Internet Print: Configuring the Brother Print Server The print server can be the first part of the E-mail address; If an E-mail is received that the ...
...print server, which has its own E-mail address, uses the POP3 protocol (Post Office Protocol 3) to use the BIP virtual port driver, the printer will be configured using BRAdmin, by using a web browser, or by using the TELNET command. Because access to the E-mail server on most ...the print server is enabled). 1 Configure the POP3 server on the printer. ■ At the remote site, an E-mail server receives the E-mail message. Brother Internet Print: Configuring the Brother Print Server The print server can be the first part of the E-mail address; If an E-mail is received that the ...


