
Quick Setup Guide - English
Page 34
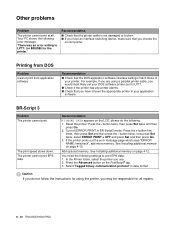
... Page To print the Printer Settings Page, use a fine ball point pen to hold down the Network Test Button for less than 5 seconds. Factory Default Setting If you wish to reset the print server back to its default factory settings (resetting all information such as the password and ...IP address information), use a fine ball point pen to the printer. BRAdmin will search for new devices automatically. 4 Enter the ...
... Page To print the Printer Settings Page, use a fine ball point pen to hold down the Network Test Button for less than 5 seconds. Factory Default Setting If you wish to reset the print server back to its default factory settings (resetting all information such as the password and ...IP address information), use a fine ball point pen to the printer. BRAdmin will search for new devices automatically. 4 Enter the ...
Users Manual - English
Page 6
button ...3-7 To move through menus on a Network 3-20 INTERFACE ...3-21 RESET MENU ...3-21 Set IP Address ...3-22 About emulation modes ...3-23 HP LaserJet Mode ...3-23 BR-Script 3 Mode ...HL-6050D 4-3 Installing the network board 4-3 Wireless print server (NC-7100w 4-6 Installing the network board 4-6 CompactFlash® card ...4-9 Inserting the CompactFlash® card 4-10 DIMM ...4-11 Installing additional memory 4-12 Optional fonts package ...4-15 Selecting the optional fonts 4-15 v Orange LED ...3-8 Liquid Crystal Display (LCD) ...3-9 Back light ...3-9 LCD message ...3-10 Printer...
button ...3-7 To move through menus on a Network 3-20 INTERFACE ...3-21 RESET MENU ...3-21 Set IP Address ...3-22 About emulation modes ...3-23 HP LaserJet Mode ...3-23 BR-Script 3 Mode ...HL-6050D 4-3 Installing the network board 4-3 Wireless print server (NC-7100w 4-6 Installing the network board 4-6 CompactFlash® card ...4-9 Inserting the CompactFlash® card 4-10 DIMM ...4-11 Installing additional memory 4-12 Optional fonts package ...4-15 Selecting the optional fonts 4-15 v Orange LED ...3-8 Liquid Crystal Display (LCD) ...3-9 Back light ...3-9 LCD message ...3-10 Printer...
Users Manual - English
Page 15
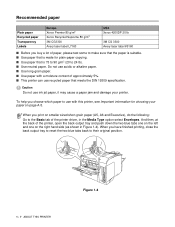
...■ Use paper that meets the DIN 19309 specification. And then, at the back of the printer, open the back output tray and push down the two blue tabs one on the left and ...test some to make sure that the paper is suitable. ■ Use paper that is made for choosing your printer. Caution Do not use recycled paper that is 75 to 90 g/m2 (20 to 24 lb). ■...Recycled Supreme 80 g/m2 3M CG3300 Avery laser label L7163 USA Xerox 4200DP 20 lb 3M CG 3300 Avery laser label #5160 ■ Before you have finished printing, close the back output tray to reset the two blue tabs back to their...
...■ Use paper that meets the DIN 19309 specification. And then, at the back of the printer, open the back output tray and push down the two blue tabs one on the left and ...test some to make sure that the paper is suitable. ■ Use paper that is made for choosing your printer. Caution Do not use recycled paper that is 75 to 90 g/m2 (20 to 24 lb). ■...Recycled Supreme 80 g/m2 3M CG3300 Avery laser label L7163 USA Xerox 4200DP 20 lb 3M CG 3300 Avery laser label #5160 ■ Before you have finished printing, close the back output tray to reset the two blue tabs back to their...

Users Manual - English
Page 33
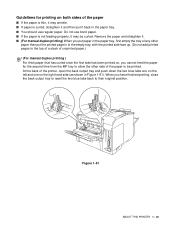
... have been creased after they have finished printing your envelopes, close the back output tray to reset the two blue tabs back to be fed properly, resulting in a skewed printout or a jam. 1 - 25 ABOUT THIS PRINTER Figure 1-31 5 Put envelopes in the MP tray so that they are neatly stacked and in... MP tray at any one on the right hand side (as shown in Figure 1-31). When you have been printed At the back of the printer, open the back output tray and push down the two blue tabs one on the left and one time, or it may not be printed...
... have been creased after they have finished printing your envelopes, close the back output tray to reset the two blue tabs back to be fed properly, resulting in a skewed printout or a jam. 1 - 25 ABOUT THIS PRINTER Figure 1-31 5 Put envelopes in the MP tray so that they are neatly stacked and in... MP tray at any one on the right hand side (as shown in Figure 1-31). When you have been printed At the back of the printer, open the back output tray and push down the two blue tabs one on the left and one time, or it may not be printed...
Users Manual - English
Page 48
..., first empty the tray of any other side of the paper to their original position. Do not use regular paper. At the back of the printer, open the back output tray and push down the two blue tabs one on the left and one on the right hand side (as shown... should use bond paper. ■ If the paper is curled, straighten it and then put the printed page in Figure 1-51). Figure 1-51 ABOUT THIS PRINTER 1 - 40 Remove the paper and straighten it. ■ (For manual duplex printing) When you have finished printing, close the back output tray to...
..., first empty the tray of any other side of the paper to their original position. Do not use regular paper. At the back of the printer, open the back output tray and push down the two blue tabs one on the left and one on the right hand side (as shown... should use bond paper. ■ If the paper is curled, straighten it and then put the printed page in Figure 1-51). Figure 1-51 ABOUT THIS PRINTER 1 - 40 Remove the paper and straighten it. ■ (For manual duplex printing) When you have finished printing, close the back output tray to...

Users Manual - English
Page 71
Although you can operate the printer with these factory settings unchanged, you can be restored to the default factory settings with user settings. Changing the user settings does not affect the factory settings. You cannot modify the present factory settings. See RESET MENU on page 3-24. The changed user settings can tailor the printer with the RESET MENU menu. Printer settings Factory settings The printer settings have been set at the factory before shipment. They are called factory settings. See List of factory settings on page 3-21. 2 - 21 DRIVER AND SOFTWARE
Although you can operate the printer with these factory settings unchanged, you can be restored to the default factory settings with user settings. Changing the user settings does not affect the factory settings. You cannot modify the present factory settings. See RESET MENU on page 3-24. The changed user settings can tailor the printer with the RESET MENU menu. Printer settings Factory settings The printer settings have been set at the factory before shipment. They are called factory settings. See List of factory settings on page 3-21. 2 - 21 DRIVER AND SOFTWARE

Users Manual - English
Page 74
... Make sure that you add more information about the settings in RAM, the data will be deleted when the printer is on page 4-11). CONTROL PANEL 3 - 3 We recommend that you reset the RAM disk size to 0MB after you finish using secure printing. ■ When you store data in the... printer driver, see CompactFlash® card on page 4-9), you can reprint from the computer again. ■ If REPRINT setting is 0MB....
... Make sure that you add more information about the settings in RAM, the data will be deleted when the printer is on page 4-11). CONTROL PANEL 3 - 3 We recommend that you reset the RAM disk size to 0MB after you finish using secure printing. ■ When you store data in the... printer driver, see CompactFlash® card on page 4-9), you can reprint from the computer again. ■ If REPRINT setting is 0MB....

Users Manual - English
Page 81
... displayed during normal operation: Printer Status Message IGNORE DATA JOB CANCELLING NOW INITIALIZING PAUSE PRESS SET TO PRINT PRINTING PROCESSING PROGRAMING-WAIT RAM SIZE=XX MB READY RESET TO FACTORY SETTINGS RESET TO USER SETTINGS RESOLUTION ADAPT SELF TEST SLEEP WARMING UP Meaning Printer is setting up . 3... - 10 CONTROL PANEL The printer is ignoring data processed using PS driver. Press the Go ...
... displayed during normal operation: Printer Status Message IGNORE DATA JOB CANCELLING NOW INITIALIZING PAUSE PRESS SET TO PRINT PRINTING PROCESSING PROGRAMING-WAIT RAM SIZE=XX MB READY RESET TO FACTORY SETTINGS RESET TO USER SETTINGS RESOLUTION ADAPT SELF TEST SLEEP WARMING UP Meaning Printer is setting up . 3... - 10 CONTROL PANEL The printer is ignoring data processed using PS driver. Press the Go ...

Users Manual - English
Page 84
... MENU See PRINT MENU on page 3-17. ■ NETWORK See NETWORK (only on a Network) on page 3-20. ■ INTERFACE See INTERFACE on page 3-21. ■ RESET MENU See RESET MENU on page 3-21.
... MENU See PRINT MENU on page 3-17. ■ NETWORK See NETWORK (only on a Network) on page 3-20. ■ INTERFACE See INTERFACE on page 3-21. ■ RESET MENU See RESET MENU on page 3-21.

Users Manual - English
Page 92
... Turns prime signal ON or OFF. HIGH SPEED =ON/OFF Turns High-Speed USB 2.0 communications ON or OFF. Resets the printer and restores all printer settings (including command settings) to settings you have previously made with the control panel buttons. See List of factory settings... on page 3-24. BI-DIR =ON/OFF Turns bi-directional parallel communications ON or OFF. Description Resets the printer and restores all printer settings (including command settings) to set the time-out period for the auto interface selection. = Level1, 2, 3 ... 15...
... Turns prime signal ON or OFF. HIGH SPEED =ON/OFF Turns High-Speed USB 2.0 communications ON or OFF. Resets the printer and restores all printer settings (including command settings) to settings you have previously made with the control panel buttons. See List of factory settings... on page 3-24. BI-DIR =ON/OFF Turns bi-directional parallel communications ON or OFF. Description Resets the printer and restores all printer settings (including command settings) to set the time-out period for the auto interface selection. = Level1, 2, 3 ... 15...

Users Manual - English
Page 95
...shows the factory settings. ■ The emulation mode affects the setting. Network factory default setting If you wish to reset the print server back to the factory setting when the printer is turned off and on the network board (NC-6100h) for display messages. ■ The COPY setting is always... restored to its default factory settings (resetting all information such as the password and IP address information), hold down ...
...shows the factory settings. ■ The emulation mode affects the setting. Network factory default setting If you wish to reset the print server back to the factory setting when the printer is turned off and on the network board (NC-6100h) for display messages. ■ The COPY setting is always... restored to its default factory settings (resetting all information such as the password and IP address information), hold down ...

Users Manual - English
Page 127
See the instructions supplied with the new drum unit. Caution Do not reset the drum counter when you replace only the toner cartridge. 9 Close the front cover of the printer. 5 - 12 ROUTINE MAINTENANCE 8 Reset the drum counter.
See the instructions supplied with the new drum unit. Caution Do not reset the drum counter when you replace only the toner cartridge. 9 Close the front cover of the printer. 5 - 12 ROUTINE MAINTENANCE 8 Reset the drum counter.
Users Manual - English
Page 155
... is not damaged or broken. ■ If you have chosen the appropriate printer in your application software. Recommendation If IGNORE DATA appears on the PostScript® tab. 3. Reset the printer: Press the - button twice, then press Set twice and then press Go. 2. Press the Advanced ...button on the LCD, please do not follow the instructions for using a parallel printer cable, you use. 2. The print speed slows ...
... is not damaged or broken. ■ If you have chosen the appropriate printer in your application software. Recommendation If IGNORE DATA appears on the PostScript® tab. 3. Reset the printer: Press the - button twice, then press Set twice and then press Go. 2. Press the Advanced ...button on the LCD, please do not follow the instructions for using a parallel printer cable, you use. 2. The print speed slows ...
Users Manual - English
Page 179
PRINT menu 3-25, 3-26 PRINT MENU menu 3-17 Print quality 2-4, 6-17 Printable area 1-8 Printer driver 2-1, 2-10 Printer parts 1-2, 1-3 Proof data 3-4 Proprinter XL mode 3-23 PS printer driver 2-1, 2-10 Public data 3-5 Q QUALITY menu 3-15, 3-25 R RAM 4-11 Recommended paper 1-7 Register your printer B-1, C-1 Reprint button 3-2, 3-3 RESET menu 3-21 S Secure data 3-5 SETUP menu 3-16, 3-25 Software 2-19 Status Monitor 2-6 T TCP/IP 3-20 Thick paper 1-17 Toner cartridge 5-1 W Watermark 2-4 Wireless Print Server (NC-7100w 4-6 I - 2
PRINT menu 3-25, 3-26 PRINT MENU menu 3-17 Print quality 2-4, 6-17 Printable area 1-8 Printer driver 2-1, 2-10 Printer parts 1-2, 1-3 Proof data 3-4 Proprinter XL mode 3-23 PS printer driver 2-1, 2-10 Public data 3-5 Q QUALITY menu 3-15, 3-25 R RAM 4-11 Recommended paper 1-7 Register your printer B-1, C-1 Reprint button 3-2, 3-3 RESET menu 3-21 S Secure data 3-5 SETUP menu 3-16, 3-25 Software 2-19 Status Monitor 2-6 T TCP/IP 3-20 Thick paper 1-17 Toner cartridge 5-1 W Watermark 2-4 Wireless Print Server (NC-7100w 4-6 I - 2

Network Users Manual - English
Page 109
... you will then allow you wish to change the IP address again, use a Web Browser, TELNET (using the SET IP ADDRESS command) the printer's control panel or factory reset the print server (which will not need to use the ARP command. To configure the print server and to verify the connection, enter... ping ipaddress where ipaddress is a router, you cannot use the ARP command again). If there is the IP address of a Brother print server using BOOTP, DHCP or RARP your Brother print server can receive an IP address from any attempts to do this chapter to enter the IP address. If your...
... you will then allow you wish to change the IP address again, use a Web Browser, TELNET (using the SET IP ADDRESS command) the printer's control panel or factory reset the print server (which will not need to use the ARP command. To configure the print server and to verify the connection, enter... ping ipaddress where ipaddress is a router, you cannot use the ARP command again). If there is the IP address of a Brother print server using BOOTP, DHCP or RARP your Brother print server can receive an IP address from any attempts to do this chapter to enter the IP address. If your...

Network Users Manual - English
Page 131
To get the latest firmware update, visit the Brother Solutions web site at http://solutions.brother.com/ Some software versions that you upgrade. This means that we provide will automatically factory reset your print server parameters. Because of this, we add a significant new feature to print a configuration...as a Novell or Unix system to send the new firmware file to avoid doing this , print out a configuration page (refer to your Brother print server: 1 Use the BRAdmin application (Recommended) 2 Use the FTP protocol (Recommended if running on how to our print server, it ...
To get the latest firmware update, visit the Brother Solutions web site at http://solutions.brother.com/ Some software versions that you upgrade. This means that we provide will automatically factory reset your print server parameters. Because of this, we add a significant new feature to print a configuration...as a Novell or Unix system to send the new firmware file to avoid doing this , print out a configuration page (refer to your Brother print server: 1 Use the BRAdmin application (Recommended) 2 Use the FTP protocol (Recommended if running on how to our print server, it ...


