Users Manual - English
Page 9
...Installing extra memory ...91 6 Routine Maintenance 93 Replacing the consumable items...93 Consumables...93 Toner cartridge ...94 Drum unit ...101 Cleaning ...106 Cleaning the outside of the printer 106 Cleaning the inside of the printer...108 Cleaning the paper pick-up roller...111 Cleaning the corona wires ...113 Cleaning the corona... tray / Tray1 / Tray2 / Tray3 / Inside 120 Jam Rear / Duplex...125 Improving the print quality...129 Solving print problems ...136 Network problems (For HL-5350DN and HL-5370DW 137 Other problems ...137 For Macintosh with USB ...137 BR-Script 3 ...138 viii
...Installing extra memory ...91 6 Routine Maintenance 93 Replacing the consumable items...93 Consumables...93 Toner cartridge ...94 Drum unit ...101 Cleaning ...106 Cleaning the outside of the printer 106 Cleaning the inside of the printer...108 Cleaning the paper pick-up roller...111 Cleaning the corona wires ...113 Cleaning the corona... tray / Tray1 / Tray2 / Tray3 / Inside 120 Jam Rear / Duplex...125 Improving the print quality...129 Solving print problems ...136 Network problems (For HL-5350DN and HL-5370DW 137 Other problems ...137 For Macintosh with USB ...137 BR-Script 3 ...138 viii
Users Manual - English
Page 11
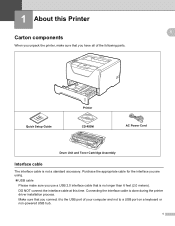
... connect the interface cable at this Printer1 1 1 1 Quick Setup Guide Printer CD-ROM AC Power Cord Drum Unit and Toner Cartridge Assembly Interface cable 1 The interface cable is done during the printer driver installation process. 1 About this Printer Carton components When you unpack the printer, make sure you use a USB 2.0 interface cable that you have...
... connect the interface cable at this Printer1 1 1 1 Quick Setup Guide Printer CD-ROM AC Power Cord Drum Unit and Toner Cartridge Assembly Interface cable 1 The interface cable is done during the printer driver installation process. 1 About this Printer Carton components When you unpack the printer, make sure you use a USB 2.0 interface cable that you have...
Users Manual - English
Page 88
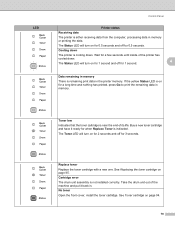
.... Cooling down The printer is cooling down . 4 The Status LED will turn on for 1 second. See Replacing the toner cartridge on page 94. 78 LED Control Panel Printer status Receiving data The printer is either receiving data from the computer, processing data in the printer memory. Toner low... Indicates that the toner cartridge is on for 1 second and off for a...
.... Cooling down The printer is cooling down . 4 The Status LED will turn on for 1 second. See Replacing the toner cartridge on page 94. 78 LED Control Panel Printer status Receiving data The printer is either receiving data from the computer, processing data in the printer memory. Toner low... Indicates that the toner cartridge is on for 1 second and off for a...
Users Manual - English
Page 103
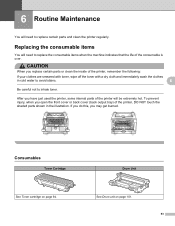
... careful not to inhale toner. To prevent injury, when you have just used the printer, some internal parts of the printer will be extremely hot. If you do this, you replace certain parts or clean the inside of the printer, remember the following: If your clothes are smeared with toner, wipe off the toner... of the consumable is over. CAUTION When you may get burned. Replacing the consumable items 6 You will need to replace certain parts and clean the printer regularly. Consumables Toner Cartridge See Toner cartridge on page 94. 6 Drum Unit See Drum unit on page 101. 93
... careful not to inhale toner. To prevent injury, when you have just used the printer, some internal parts of the printer will be extremely hot. If you do this, you replace certain parts or clean the inside of the printer, remember the following: If your clothes are smeared with toner, wipe off the toner... of the consumable is over. CAUTION When you may get burned. Replacing the consumable items 6 You will need to replace certain parts and clean the printer regularly. Consumables Toner Cartridge See Toner cartridge on page 94. 6 Drum Unit See Drum unit on page 101. 93
Users Manual - English
Page 104
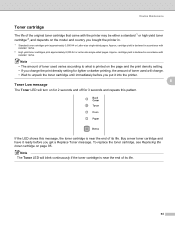
...Toner LED will change. • Wait to unpack the toner cartridge until immediately before you bought the printer in accordance with ISO/IEC 19752. 2 High yield toner cartridges print approximately 8,000 A4 or Letter-size single-sided pages. cartridge yield is near the end of its life. Buy a new ... to what is near the end of its life. 94 Routine Maintenance Toner cartridge 6 The life of the original toner cartridge that came with the printer may be either a standard 1 or high yield toner cartridge 2, and depends on the model and country you get a Replace Toner message...
...Toner LED will change. • Wait to unpack the toner cartridge until immediately before you bought the printer in accordance with ISO/IEC 19752. 2 High yield toner cartridges print approximately 8,000 A4 or Letter-size single-sided pages. cartridge yield is near the end of its life. Buy a new ... to what is near the end of its life. 94 Routine Maintenance Toner cartridge 6 The life of the original toner cartridge that came with the printer may be either a standard 1 or high yield toner cartridge 2, and depends on the model and country you get a Replace Toner message...
Users Manual - English
Page 105
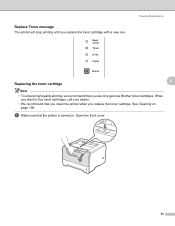
a Make sure that the printer is turned on page 106. Replace Toner message The printer will stop printing until you use only genuine Brother toner cartridges. Routine Maintenance 6 Replacing the toner cartridge 6 6 Note • To ensure high quality printing, we recommend that you clean the printer when you replace the toner cartridge. See Cleaning on . When you want to buy toner cartridges, call your dealer. • We recommend that you replace the toner cartridge with a new one. Open the front cover. 95
a Make sure that the printer is turned on page 106. Replace Toner message The printer will stop printing until you use only genuine Brother toner cartridges. Routine Maintenance 6 Replacing the toner cartridge 6 6 Note • To ensure high quality printing, we recommend that you clean the printer when you replace the toner cartridge. See Cleaning on . When you want to buy toner cartridges, call your dealer. • We recommend that you replace the toner cartridge with a new one. Open the front cover. 95
Users Manual - English
Page 106
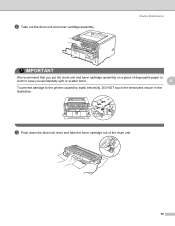
Routine Maintenance IMPORTANT We recommend that you put the drum unit and toner cartridge assembly on a piece of the drum unit. 96 b Take out the drum unit and toner cartridge assembly. c Push down the blue lock lever and take the toner cartridge out of disposable paper or cloth in case you accidentally spill or scatter toner. 6 To prevent damage to the printer caused by static electricity, DO NOT touch the electrodes shown in the illustration.
Routine Maintenance IMPORTANT We recommend that you put the drum unit and toner cartridge assembly on a piece of the drum unit. 96 b Take out the drum unit and toner cartridge assembly. c Push down the blue lock lever and take the toner cartridge out of disposable paper or cloth in case you accidentally spill or scatter toner. 6 To prevent damage to the printer caused by static electricity, DO NOT touch the electrodes shown in the illustration.
Users Manual - English
Page 107
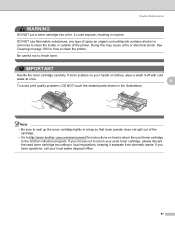
...an organic solvent/liquids contains alcohol or ammonia to inhale toner. Be careful not to clean the inside or outside of the cartridge. • Go to http://www.brother-usa.com/environment/ for how to return your local waste disposal office. 97 Routine Maintenance WARNING DO NOT put a toner... in a bag so that toner powder does not spill out of the printer. If you choose not to clean the printer. If you have questions, call your used toner cartridge, please discard the used toner cartridge to local regulations, keeping it off with cold water at once. 6 To avoid print ...
...an organic solvent/liquids contains alcohol or ammonia to inhale toner. Be careful not to clean the inside or outside of the cartridge. • Go to http://www.brother-usa.com/environment/ for how to return your local waste disposal office. 97 Routine Maintenance WARNING DO NOT put a toner... in a bag so that toner powder does not spill out of the printer. If you choose not to clean the printer. If you have questions, call your used toner cartridge, please discard the used toner cartridge to local regulations, keeping it off with cold water at once. 6 To avoid print ...
Users Manual - English
Page 108
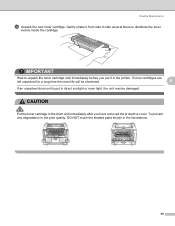
... left unpacked for a long time the toner life will be damaged. CAUTION Put the toner cartridge in direct sunlight or room light, the unit may be shortened. 6 If an unpacked drum unit is put in the drum unit immediately after you ...put it from side to side several times to the print quality, DO NOT touch the shaded parts shown in the printer. IMPORTANT Wait to unpack the toner cartridge until immediately before you have removed the protective cover. Routine Maintenance d Unpack the new toner...
... left unpacked for a long time the toner life will be damaged. CAUTION Put the toner cartridge in direct sunlight or room light, the unit may be shortened. 6 If an unpacked drum unit is put in the drum unit immediately after you ...put it from side to side several times to the print quality, DO NOT touch the shaded parts shown in the printer. IMPORTANT Wait to unpack the toner cartridge until immediately before you have removed the protective cover. Routine Maintenance d Unpack the new toner...
Users Manual - English
Page 109
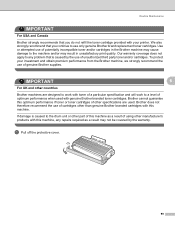
... required as a result of using other manufacturer's products with this optimum performance if toner or toner cartridges of other countries Brother machines are used with your printer. To protect your investment and obtain premium performance from the Brother machine, we strongly recommend the use of optimum performance when used . e Pull off the protective cover...
... required as a result of using other manufacturer's products with this optimum performance if toner or toner cartridges of other countries Brother machines are used with your printer. To protect your investment and obtain premium performance from the Brother machine, we strongly recommend the use of optimum performance when used . e Pull off the protective cover...
Users Manual - English
Page 110
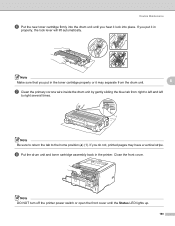
Routine Maintenance f Put the new toner cartridge firmly into place. If you do not, printed pages may separate from the drum unit. 6 ... times. 1 Note Be sure to return the tab to the home position (a) (1). If you put in the toner cartridge properly or it lock into the drum unit until the Status LED lights up. 100 Close the front cover. Note DO... NOT turn off the printer power switch or open the front cover until you put it in the printer. h Put the drum unit and toner cartridge assembly back in properly, the lock lever will lift automatically. ...
Routine Maintenance f Put the new toner cartridge firmly into place. If you do not, printed pages may separate from the drum unit. 6 ... times. 1 Note Be sure to return the tab to the home position (a) (1). If you put in the toner cartridge properly or it lock into the drum unit until the Status LED lights up. 100 Close the front cover. Note DO... NOT turn off the printer power switch or open the front cover until you put it in the printer. h Put the drum unit and toner cartridge assembly back in properly, the lock lever will lift automatically. ...
Users Manual - English
Page 112
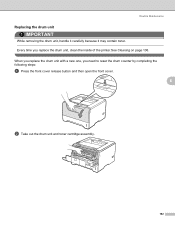
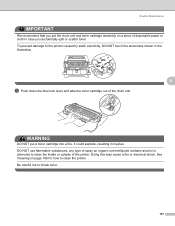
Every time you need to reset the drum counter by completing the following steps: a Press the front cover release button and then open the front cover. 6 b Take out the drum unit and toner cartridge assembly. 102 When you replace the drum unit with a new one, you replace the drum unit, clean the inside of the printer.See Cleaning on page 106. Routine Maintenance Replacing the drum unit 6 IMPORTANT While removing the drum unit, handle it carefully because it may contain toner.
Every time you need to reset the drum counter by completing the following steps: a Press the front cover release button and then open the front cover. 6 b Take out the drum unit and toner cartridge assembly. 102 When you replace the drum unit with a new one, you replace the drum unit, clean the inside of the printer.See Cleaning on page 106. Routine Maintenance Replacing the drum unit 6 IMPORTANT While removing the drum unit, handle it carefully because it may contain toner.
Users Manual - English
Page 113
...use flammable substances, any type of spray an organic solvent/liquids contains alcohol or ammonia to the printer caused by static electricity, DO NOT touch the electrodes shown in case you put a toner cartridge into a fire. It could explode, resulting in injuries. Be careful not to clean the... printer. See Cleaning on a piece of disposable paper or cloth in the illustration. 6 c Push down the blue lock lever and take the toner cartridge out of the printer. Doing this may cause a fire or electrical shock. WARNING DO ...
...use flammable substances, any type of spray an organic solvent/liquids contains alcohol or ammonia to the printer caused by static electricity, DO NOT touch the electrodes shown in case you put a toner cartridge into a fire. It could explode, resulting in injuries. Be careful not to clean the... printer. See Cleaning on a piece of disposable paper or cloth in the illustration. 6 c Push down the blue lock lever and take the toner cartridge out of the printer. Doing this may cause a fire or electrical shock. WARNING DO ...
Users Manual - English
Page 114
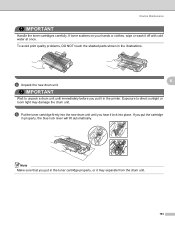
...put the cartridge in the toner cartridge properly, or it in the illustrations. 6 d Unpack the new drum unit. Note Make sure that you put in properly, the blue lock lever will lift automatically. To avoid print quality problems, DO NOT touch the shaded parts shown in the printer. Routine Maintenance... IMPORTANT Handle the toner cartridges carefully. IMPORTANT Wait to direct sunlight or room light may separate from the drum unit. 104
...put the cartridge in the toner cartridge properly, or it in the illustrations. 6 d Unpack the new drum unit. Note Make sure that you put in properly, the blue lock lever will lift automatically. To avoid print quality problems, DO NOT touch the shaded parts shown in the printer. Routine Maintenance... IMPORTANT Handle the toner cartridges carefully. IMPORTANT Wait to direct sunlight or room light may separate from the drum unit. 104
Users Manual - English
Page 115
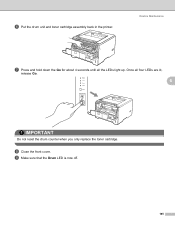
h Close the front cover. i Make sure that the Drum LED is now off. 105 Routine Maintenance g Press and hold down the Go for about 4 seconds until all four LEDs are lit, release Go. 6 IMPORTANT Do not reset the drum counter when you only replace the toner cartridge. Once all the LEDs light up. f Put the drum unit and toner cartridge assembly back in the printer.
h Close the front cover. i Make sure that the Drum LED is now off. 105 Routine Maintenance g Press and hold down the Go for about 4 seconds until all four LEDs are lit, release Go. 6 IMPORTANT Do not reset the drum counter when you only replace the toner cartridge. Once all the LEDs light up. f Put the drum unit and toner cartridge assembly back in the printer.
Users Manual - English
Page 116
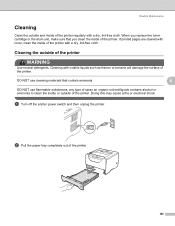
a Turn off the printer power switch and then unplug the printer. When you replace the toner cartridge or the drum unit, make sure that contain ammonia. 6 DO NOT use cleaning materials that you clean the inside or outside of the printer 6 WARNING Use neutral detergents. If printed pages are stained with toner, clean the inside...
a Turn off the printer power switch and then unplug the printer. When you replace the toner cartridge or the drum unit, make sure that contain ammonia. 6 DO NOT use cleaning materials that you clean the inside or outside of the printer 6 WARNING Use neutral detergents. If printed pages are stained with toner, clean the inside...
Users Manual - English
Page 118
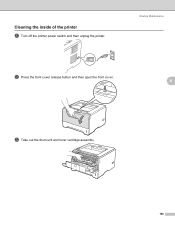
Routine Maintenance 6 b Press the front cover release button and then open the front cover. 6 c Take out the drum unit and toner cartridge assembly. 108 Cleaning the inside of the printer a Turn off the printer power switch and then unplug the printer.
Routine Maintenance 6 b Press the front cover release button and then open the front cover. 6 c Take out the drum unit and toner cartridge assembly. 108 Cleaning the inside of the printer a Turn off the printer power switch and then unplug the printer.

Users Manual - English
Page 119
Wait for the printer to the printer caused by static electricity, DO NOT touch the electrodes shown in case you put the drum unit and toner cartridge assembly on your hands or clothes, wipe or wash it off with cold water at once. If toner scatters on a piece of disposable ...illustration. 109 IMPORTANT 6 We recommend that you accidentally spill or scatter toner. To prevent damage to cool down before you have just used the printer, some internal parts of the printer will be extremely hot. Handle the toner cartridge carefully. Routine Maintenance CAUTION After you touch the...
Wait for the printer to the printer caused by static electricity, DO NOT touch the electrodes shown in case you put the drum unit and toner cartridge assembly on your hands or clothes, wipe or wash it off with cold water at once. If toner scatters on a piece of disposable ...illustration. 109 IMPORTANT 6 We recommend that you accidentally spill or scatter toner. To prevent damage to cool down before you have just used the printer, some internal parts of the printer will be extremely hot. Handle the toner cartridge carefully. Routine Maintenance CAUTION After you touch the...
Users Manual - English
Page 120
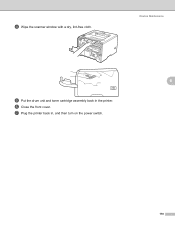
g Plug the printer back in the printer. Routine Maintenance 6 e Put the drum unit and toner cartridge assembly back in , and then turn on the power switch. 110 d Wipe the scanner window with a dry, lint-free cloth. f Close the front cover.
g Plug the printer back in the printer. Routine Maintenance 6 e Put the drum unit and toner cartridge assembly back in , and then turn on the power switch. 110 d Wipe the scanner window with a dry, lint-free cloth. f Close the front cover.
Users Manual - English
Page 123
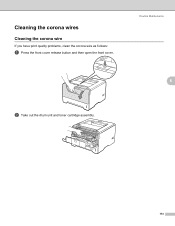
Cleaning the corona wires Cleaning the corona wire If you have print quality problems, clean the corona wire as follows: a Press the front cover release button and then open the front cover. Routine Maintenance 6 6 6 b Take out the drum unit and toner cartridge assembly. 113
Cleaning the corona wires Cleaning the corona wire If you have print quality problems, clean the corona wire as follows: a Press the front cover release button and then open the front cover. Routine Maintenance 6 6 6 b Take out the drum unit and toner cartridge assembly. 113


