Users Manual - English
Page 115
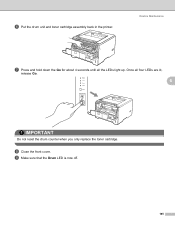
Routine Maintenance g Press and hold down the Go for about 4 seconds until all four LEDs are lit, release Go. 6 IMPORTANT Do not reset the drum counter when you only replace the toner cartridge. Once all the LEDs light up. i Make sure that the Drum LED is now off. 105 f Put the drum unit and toner cartridge assembly back in the printer. h Close the front cover.
Routine Maintenance g Press and hold down the Go for about 4 seconds until all four LEDs are lit, release Go. 6 IMPORTANT Do not reset the drum counter when you only replace the toner cartridge. Once all the LEDs light up. i Make sure that the Drum LED is now off. 105 f Put the drum unit and toner cartridge assembly back in the printer. h Close the front cover.
Network Users Manual - English
Page 120
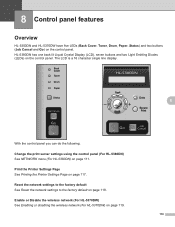
... and two Light Emitting Diodes (LEDs) on page 117. Print the Printer Settings Page See Printing the Printer Settings Page on the control panel. Enable or Disable the wireless network (For HL-5370DW) See Enabling or disabling the wireless network (For HL-5370DW) on page 118. Reset the network ...the print server settings using the control panel (For HL-5380DN) See NETWORK menu (For HL-5380DN) on the control panel. Control panel features8 8 Control panel features 8 Overview 8 HL-5350DN and HL-5370DW have five LEDs (Back Cover, Toner, Drum, Paper, Status) and two buttons (Job Cancel ...
... and two Light Emitting Diodes (LEDs) on page 117. Print the Printer Settings Page See Printing the Printer Settings Page on the control panel. Enable or Disable the wireless network (For HL-5370DW) See Enabling or disabling the wireless network (For HL-5370DW) on page 118. Reset the network ...the print server settings using the control panel (For HL-5380DN) See NETWORK menu (For HL-5380DN) on the control panel. Control panel features8 8 Control panel features 8 Overview 8 HL-5350DN and HL-5370DW have five LEDs (Back Cover, Toner, Drum, Paper, Status) and two buttons (Job Cancel ...


