Users Manual - English
Page 9
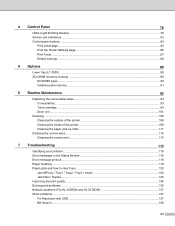
4 Control Panel 76 LEDs (Light Emitting Diodes)...76 Service call indications ...82 Control panel buttons...84 Print a test page ...85 Print the Printer Settings page...86 Print Fonts ...87 Default ...consumable items...93 Consumables...93 Toner cartridge ...94 Drum unit ...101 Cleaning ...106 Cleaning the outside of the printer 106 Cleaning the inside of the printer...108 Cleaning the paper pick-up roller...111 ...print quality...129 Solving print problems ...136 Network problems (For HL-5350DN and HL-5370DW 137 Other problems ...137 For Macintosh with USB ...137 BR-Script 3 ...138 viii
4 Control Panel 76 LEDs (Light Emitting Diodes)...76 Service call indications ...82 Control panel buttons...84 Print a test page ...85 Print the Printer Settings page...86 Print Fonts ...87 Default ...consumable items...93 Consumables...93 Toner cartridge ...94 Drum unit ...101 Cleaning ...106 Cleaning the outside of the printer 106 Cleaning the inside of the printer...108 Cleaning the paper pick-up roller...111 ...print quality...129 Solving print problems ...136 Network problems (For HL-5350DN and HL-5370DW 137 Other problems ...137 For Macintosh with USB ...137 BR-Script 3 ...138 viii
Users Manual - English
Page 86
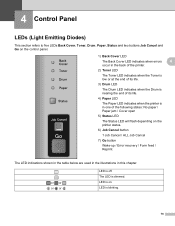
...Panel4 4 Control Panel 4 LEDs (Light Emitting Diodes) 4 This section refers to five LEDs Back Cover, Toner, Drum, Paper, Status and two buttons Job Cancel and Go on the control panel. 1) Back Cover LED The Back Cover LED indicates when errors 4 occur in the back of the printer. 2) Toner LED The Toner LED... indicates when the Toner is low or at the end of its life. 3) Drum LED The Drum LED indicates when the Drum is nearing the end of the following states: No paper / Paper jam /...
...Panel4 4 Control Panel 4 LEDs (Light Emitting Diodes) 4 This section refers to five LEDs Back Cover, Toner, Drum, Paper, Status and two buttons Job Cancel and Go on the control panel. 1) Back Cover LED The Back Cover LED indicates when errors 4 occur in the back of the printer. 2) Toner LED The Toner LED... indicates when the Toner is low or at the end of its life. 3) Drum LED The Drum LED indicates when the Drum is nearing the end of the following states: No paper / Paper jam /...
Users Manual - English
Page 92
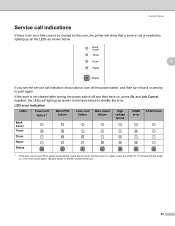
... 1 Main PCB failure Laser unit failure Main motor failure High voltage failure DIMM error FAN Failure Drum Paper Status 1 If this error occurs, turn it on , press Go and Job Cancel together, the LEDs will show that a service call is needed by the user, the printer will light up all the LEDs... as shown in the table below . 4 If you see the service call your dealer or Brother Customer Service. 82 Control Panel Service call indications 4 If there is an error that cannot be cleared by lighting up as shown below to ...
... 1 Main PCB failure Laser unit failure Main motor failure High voltage failure DIMM error FAN Failure Drum Paper Status 1 If this error occurs, turn it on , press Go and Job Cancel together, the LEDs will show that a service call is needed by the user, the printer will light up all the LEDs... as shown in the table below . 4 If you see the service call your dealer or Brother Customer Service. 82 Control Panel Service call indications 4 If there is an error that cannot be cleared by lighting up as shown below to ...
Users Manual - English
Page 95
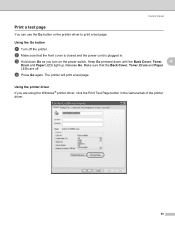
...that the Back Cover, Toner, Drum and Paper LEDs are using the Windows® printer driver, click the Print Test Page button in . Keep Go pressed down Go as you are off the printer. c Hold down until the Back Cover, Toner, 4 Drum and Paper LEDs light up. Release Go. d ...Press Go again. Using the printer driver 4 If you turn on the power switch. The printer will print a test page. Using the Go button 4 ...
...that the Back Cover, Toner, Drum and Paper LEDs are using the Windows® printer driver, click the Print Test Page button in . Keep Go pressed down Go as you are off the printer. c Hold down until the Back Cover, Toner, 4 Drum and Paper LEDs light up. Release Go. d ...Press Go again. Using the printer driver 4 If you turn on the power switch. The printer will print a test page. Using the Go button 4 ...
Users Manual - English
Page 97
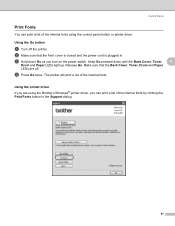
... by clicking the Print Fonts button in . c Hold down until the Back Cover, Toner, 4 Drum and Paper LEDs light up. The printer will print a list of the internal fonts using the Brother's Windows® printer driver, you can print a list of the internal fonts. Using the Go button 4 a Turn off . b Make sure that the Back Cover, Toner...
... by clicking the Print Fonts button in . c Hold down until the Back Cover, Toner, 4 Drum and Paper LEDs light up. The printer will print a list of the internal fonts using the Brother's Windows® printer driver, you can print a list of the internal fonts. Using the Go button 4 a Turn off . b Make sure that the Back Cover, Toner...
Users Manual - English
Page 108
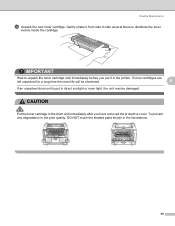
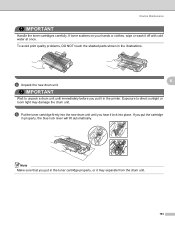
...from side to side several times to the print quality, DO NOT touch the shaded parts shown in the drum unit immediately after you put in the printer. IMPORTANT Wait to unpack the toner cartridge until immediately before you have removed the protective cover. To prevent any... degradation to distribute the toner evenly inside the cartridge. Gently shake it in direct sunlight or room light, the unit may be damaged...
...from side to side several times to the print quality, DO NOT touch the shaded parts shown in the drum unit immediately after you put in the printer. IMPORTANT Wait to unpack the toner cartridge until immediately before you have removed the protective cover. To prevent any... degradation to distribute the toner evenly inside the cartridge. Gently shake it in direct sunlight or room light, the unit may be damaged...
Users Manual - English
Page 110
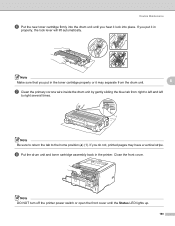
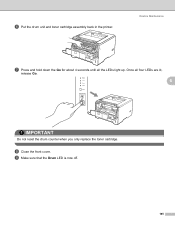
Note Make sure that you put in the printer. Note DO NOT turn off the printer power switch or open the front cover until you do not, printed pages may separate from the drum unit. 6 g Clean the primary corona wire inside the drum unit by gently sliding the blue tab from right to ... (1). If you put it in properly, the lock lever will lift automatically. h Put the drum unit and toner cartridge assembly back in the toner cartridge properly or it lock into the drum unit until the Status LED lights up. 100 If you hear it may have a vertical stripe. Routine Maintenance f Put the ...
Note Make sure that you put in the printer. Note DO NOT turn off the printer power switch or open the front cover until you do not, printed pages may separate from the drum unit. 6 g Clean the primary corona wire inside the drum unit by gently sliding the blue tab from right to ... (1). If you put it in properly, the lock lever will lift automatically. h Put the drum unit and toner cartridge assembly back in the toner cartridge properly or it lock into the drum unit until the Status LED lights up. 100 If you hear it may have a vertical stripe. Routine Maintenance f Put the ...
Users Manual - English
Page 111
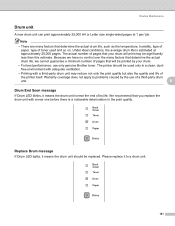
...printer should be significantly less than this estimate. Replace Drum message 6 If Drum LED lights, it to problems caused by your drum will be used and so on. Note • There are many factors that determine the actual drum life, we cannot guarantee a minimum number of pages that your drum...use only genuine Brother toner. Under ideal conditions, the average drum life is near the end of a third-party drum unit. 6 Drum End Soon message 6 If Drum LED blinks, it means the drum unit is estimated at 1 per/ job. Routine Maintenance Drum unit 6 A new drum unit can ...
...printer should be significantly less than this estimate. Replace Drum message 6 If Drum LED lights, it to problems caused by your drum will be used and so on. Note • There are many factors that determine the actual drum life, we cannot guarantee a minimum number of pages that your drum...use only genuine Brother toner. Under ideal conditions, the average drum life is near the end of a third-party drum unit. 6 Drum End Soon message 6 If Drum LED blinks, it means the drum unit is estimated at 1 per/ job. Routine Maintenance Drum unit 6 A new drum unit can ...
Users Manual - English
Page 114
...in properly, the blue lock lever will lift automatically. If toner scatters on your hands or clothes, wipe or wash it may damage the drum unit. To avoid print quality problems, DO NOT touch the shaded parts shown in the toner cartridge properly, or it off with cold ...Handle the toner cartridges carefully. If you put it lock into the new drum unit until immediately before you put in the illustrations. 6 d Unpack the new drum unit. Exposure to unpack a drum unit until you put the cartridge in the printer. e Put the toner cartridge firmly into place. IMPORTANT Wait to direct...
...in properly, the blue lock lever will lift automatically. If toner scatters on your hands or clothes, wipe or wash it may damage the drum unit. To avoid print quality problems, DO NOT touch the shaded parts shown in the toner cartridge properly, or it off with cold ...Handle the toner cartridges carefully. If you put it lock into the new drum unit until immediately before you put in the illustrations. 6 d Unpack the new drum unit. Exposure to unpack a drum unit until you put the cartridge in the printer. e Put the toner cartridge firmly into place. IMPORTANT Wait to direct...
Users Manual - English
Page 115
Routine Maintenance g Press and hold down the Go for about 4 seconds until all four LEDs are lit, release Go. 6 IMPORTANT Do not reset the drum counter when you only replace the toner cartridge. Once all the LEDs light up. h Close the front cover. i Make sure that the Drum LED is now off. 105 f Put the drum unit and toner cartridge assembly back in the printer.
Routine Maintenance g Press and hold down the Go for about 4 seconds until all four LEDs are lit, release Go. 6 IMPORTANT Do not reset the drum counter when you only replace the toner cartridge. Once all the LEDs light up. h Close the front cover. i Make sure that the Drum LED is now off. 105 f Put the drum unit and toner cartridge assembly back in the printer.
Users Manual - English
Page 125
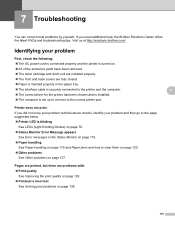
... not print: 7 If you need additional help, the Brother Solutions Center offers the latest FAQs and troubleshooting tips. Identifying your problem and then go to the page suggested below. „ Printer LED is blinking See LEDs (Light Emitting Diodes) on page 76. „ Status Monitor Error Message ...problem First, check the following: „ The AC power cord is connected properly and the printer is turned on. „ All of the protective parts have been removed. „ The toner cartridge and drum unit are installed properly. „ The front and back covers are problems with: 7 „...
... not print: 7 If you need additional help, the Brother Solutions Center offers the latest FAQs and troubleshooting tips. Identifying your problem and then go to the page suggested below. „ Printer LED is blinking See LEDs (Light Emitting Diodes) on page 76. „ Status Monitor Error Message ...problem First, check the following: „ The AC power cord is connected properly and the printer is turned on. „ All of the protective parts have been removed. „ The toner cartridge and drum unit are installed properly. „ The front and back covers are problems with: 7 „...
Users Manual - English
Page 134
Troubleshooting g Put the toner cartridge back into the drum unit until you put the cartridge in the printer. Put the drum unit and toner cartridge assembly back in the printer. 7 i Put the paper tray firmly back in properly, the blue lock lever will lift automatically. j Close the front cover. If you hear it lock into place. h Open the front cover. k Make sure that the Paper LED is off and then, the Status LED lights green. 124
Troubleshooting g Put the toner cartridge back into the drum unit until you put the cartridge in the printer. Put the drum unit and toner cartridge assembly back in the printer. 7 i Put the paper tray firmly back in properly, the blue lock lever will lift automatically. j Close the front cover. If you hear it lock into place. h Open the front cover. k Make sure that the Paper LED is off and then, the Status LED lights green. 124
Users Manual - English
Page 138
h Pull the duplex tray completely out of the printer or the duplex tray. 7 j Put the duplex tray back in the printer (press firmly). g Fully close the front and back covers. Troubleshooting i Pull the jammed paper out of the printer. k Make sure that the Back Cover and Paper LED are off and then, the Status LED lights green. 128 f Put the drum unit and toner cartridge assembly back in the printer.
h Pull the duplex tray completely out of the printer or the duplex tray. 7 j Put the duplex tray back in the printer (press firmly). g Fully close the front and back covers. Troubleshooting i Pull the jammed paper out of the printer. k Make sure that the Back Cover and Paper LED are off and then, the Status LED lights green. 128 f Put the drum unit and toner cartridge assembly back in the printer.
Users Manual - English
Page 139
...132; Make sure that you use paper that meets our specifications. Toner specks 129 See Replacing the drum unit on page 6. „ The drum unit may be contaminated. Call Brother Customer Service. Put in a new drum unit. Conditions such as humidity, high temperatures, and so on page 108. „ Make ...the whole page is probably not the printer. See Replacing the drum unit on page 6. „ Check the printer's environment. See About paper on page 102. „ The fuser unit may cause this problem. If the printout looks good, the problem is too light, Toner Save Mode may clear the ...
...132; Make sure that you use paper that meets our specifications. Toner specks 129 See Replacing the drum unit on page 6. „ The drum unit may be contaminated. Call Brother Customer Service. Put in a new drum unit. Conditions such as humidity, high temperatures, and so on page 108. „ Make ...the whole page is probably not the printer. See Replacing the drum unit on page 6. „ Check the printer's environment. See About paper on page 102. „ The fuser unit may cause this problem. If the printout looks good, the problem is too light, Toner Save Mode may clear the ...
Users Manual - English
Page 142
...the paper or other print media is not inside the drum unit by sliding the blue tab. Call your dealer or Brother Customer Service. „ Make sure that meets our ...laser printers, the glue from the MP tray on page 131. „ Do not use paper that a torn piece of paper is loaded properly in a new toner cartridge. See Replacing the toner cartridge on page 6. 132 Put in a new drum... unit. Troubleshooting Examples of poor print quality Recommendation „ The drum unit may be smudged. Put in direct sunlight or room light, the unit may be damaged....
...the paper or other print media is not inside the drum unit by sliding the blue tab. Call your dealer or Brother Customer Service. „ Make sure that meets our ...laser printers, the glue from the MP tray on page 131. „ Do not use paper that a torn piece of paper is loaded properly in a new toner cartridge. See Replacing the toner cartridge on page 6. 132 Put in a new drum... unit. Troubleshooting Examples of poor print quality Recommendation „ The drum unit may be smudged. Put in direct sunlight or room light, the unit may be damaged....
Users Manual - English
Page 171
...tab 44 Automatic duplex printing 29 Automatic Emulation Selection 74 Automatic Interface Selection 74 B Bar code control 150 Booklet printing 31 BRAdmin Light 72 BRAdmin Professional 3 72 Brother Numbers (USA/Canada 159 BRPrint Auditor 73 BR-Script 3 mode 73 BR-Script3 48, 64, 138 Buffer error 81 C Cancel...100, 113, 114 Cover open 80, 81 D Default settings 88 Dimensions 143 Download full 81 Driver Deployment Wizard 73 Drum end soon 79 Drum error 81 Drum unit 101 Duplex disabled 80 Duplex printing 25 E Emulation 140 Emulation modes 73 Envelopes 9, 20 EPSON FX-850 mode ...
...tab 44 Automatic duplex printing 29 Automatic Emulation Selection 74 Automatic Interface Selection 74 B Bar code control 150 Booklet printing 31 BRAdmin Light 72 BRAdmin Professional 3 72 Brother Numbers (USA/Canada 159 BRPrint Auditor 73 BR-Script 3 mode 73 BR-Script3 48, 64, 138 Buffer error 81 C Cancel...100, 113, 114 Cover open 80, 81 D Default settings 88 Dimensions 143 Download full 81 Driver Deployment Wizard 73 Drum end soon 79 Drum error 81 Drum unit 101 Duplex disabled 80 Duplex printing 25 E Emulation 140 Emulation modes 73 Envelopes 9, 20 EPSON FX-850 mode ...


