
Users Manual - English
Page 4
...; Make sure that contain ammonia. Cleaning with a dry, lint-free cloth and dispose of the printer. • DO NOT use cleaning materials that you have unplugged the printer from the AC power outlet. • Use neutral detergents. DO NOT use a vacuum cleaner to ignite inside the vacuum cleaner, potentially starting a fire. Doing... this might cause the toner dust to clean up scattered toner. iii DO NOT remove or damage the caution labels located on or around the fuser. CAUTION Cleaning the outside surface of it according to local regulations.
...; Make sure that contain ammonia. Cleaning with a dry, lint-free cloth and dispose of the printer. • DO NOT use cleaning materials that you have unplugged the printer from the AC power outlet. • Use neutral detergents. DO NOT use a vacuum cleaner to ignite inside the vacuum cleaner, potentially starting a fire. Doing... this might cause the toner dust to clean up scattered toner. iii DO NOT remove or damage the caution labels located on or around the fuser. CAUTION Cleaning the outside surface of it according to local regulations.

Users Manual - English
Page 64
.... Shows the current total printed pages. Shows the pages left to print with laser unit. 56 See Replacing periodic maintenance parts on page 84. See Replacing periodic maintenance parts on page 84. Shows printer serial number. Shows main firmware version. Shows the pages left to print with ...MB PAGE COUNTER DRUM COUNT REMAIN DRUM REMAIN PF KIT MP REMAIN PF KIT 1 REMAIN PF KIT 2 REMAIN PF KIT 3 REMAIN FUSER REMAIN LASER Descriptions Prints the Printer Settings page. Prints the list of memory in each menu, see the tables below. Shows the pages left to print with PF...
.... Shows the current total printed pages. Shows the pages left to print with laser unit. 56 See Replacing periodic maintenance parts on page 84. See Replacing periodic maintenance parts on page 84. Shows printer serial number. Shows main firmware version. Shows the pages left to print with ...MB PAGE COUNTER DRUM COUNT REMAIN DRUM REMAIN PF KIT MP REMAIN PF KIT 1 REMAIN PF KIT 2 REMAIN PF KIT 3 REMAIN FUSER REMAIN LASER Descriptions Prints the Printer Settings page. Prints the list of memory in each menu, see the tables below. Shows the pages left to print with PF...
Users Manual - English
Page 92
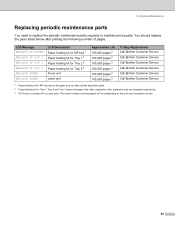
... The actual number of pages. LCD Message REPLACE PF KITMP REPLACE PF KIT 1 REPLACE PF KIT 2 REPLACE PF KIT 3 REPLACE FUSER REPLACE LASER LCD Description Paper feeding kit for MP tray 1 Paper feeding kit for Tray 1 2 Paper feeding kit for Tray 2 2 Paper feeding... 2 Fuser unit Laser unit Approximate Life 100,000 pages 3 100,000 pages 3 100,000 pages 3 100,000 pages 3 100,000 pages 3 100,000 pages 3 To Buy Replacement Call Brother Customer Service Call Brother Customer Service Call Brother Customer Service Call Brother Customer Service Call Brother Customer Service Call Brother Customer ...
... The actual number of pages. LCD Message REPLACE PF KITMP REPLACE PF KIT 1 REPLACE PF KIT 2 REPLACE PF KIT 3 REPLACE FUSER REPLACE LASER LCD Description Paper feeding kit for MP tray 1 Paper feeding kit for Tray 1 2 Paper feeding kit for Tray 2 2 Paper feeding... 2 Fuser unit Laser unit Approximate Life 100,000 pages 3 100,000 pages 3 100,000 pages 3 100,000 pages 3 100,000 pages 3 100,000 pages 3 To Buy Replacement Call Brother Customer Service Call Brother Customer Service Call Brother Customer Service Call Brother Customer Service Call Brother Customer Service Call Brother Customer ...
Users Manual - English
Page 100
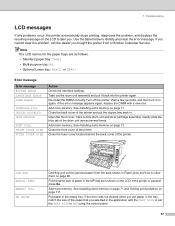
... the DIMM with the TRAY SIZE or set the TRAY SIZE to alert you selected in . Close the fuser cover located behind the back cover of the drum unit across several times. If the printer is shown on the LCD. If you cannot clear the problem, call the dealer you put the... duplex tray back in the application with a new one. Gently slide the blue tab of the printer. JAM XXX MANUAL FEED MEMORY FULL NO PAPER Carefully pull out the jammed paper from or Brother Customer Service. 7. Use the table below to clear them on the LCD to ANY using the control...
... the DIMM with the TRAY SIZE or set the TRAY SIZE to alert you selected in . Close the fuser cover located behind the back cover of the drum unit across several times. If the printer is shown on the LCD. If you cannot clear the problem, call the dealer you put the... duplex tray back in the application with a new one. Gently slide the blue tab of the printer. JAM XXX MANUAL FEED MEMORY FULL NO PAPER Carefully pull out the jammed paper from or Brother Customer Service. 7. Use the table below to clear them on the LCD to ANY using the control...
Users Manual - English
Page 101
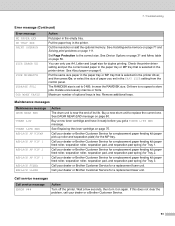
... ERROR ### Action Turn off the printer. Maintenance messages Maintenance message DRUM NEAR END TONER LOW TONER LIFE END REPLACE PF KITMP REPLACE PF KIT 1 REPLACE PF KIT 2 REPLACE PF KIT 3 REPLACE FUSER REPLACE LASER Action The drum unit is set in the empty tray. Call your dealer or Brother Customer Service for a replacement paper...
... ERROR ### Action Turn off the printer. Maintenance messages Maintenance message DRUM NEAR END TONER LOW TONER LIFE END REPLACE PF KITMP REPLACE PF KIT 1 REPLACE PF KIT 2 REPLACE PF KIT 3 REPLACE FUSER REPLACE LASER Action The drum unit is set in the empty tray. Call your dealer or Brother Customer Service for a replacement paper...

Users Manual - English
Page 111
f Put the drum unit and toner cartridge assembly back in the printer (press firmly). Wait for the printer to cool down before you to open the fuser cover (1). 1 e Using both hands, gently pull the jammed paper out of the fuser unit. g Fully close the front and back covers. 103 7. Troubleshooting d Pull the tabs at the left and right hand sides toward you touch the internal parts of the printer will be extremely hot. HOT SURFACE After you have just used the printer, some internal parts of the printer.
f Put the drum unit and toner cartridge assembly back in the printer (press firmly). Wait for the printer to cool down before you to open the fuser cover (1). 1 e Using both hands, gently pull the jammed paper out of the fuser unit. g Fully close the front and back covers. 103 7. Troubleshooting d Pull the tabs at the left and right hand sides toward you touch the internal parts of the printer will be extremely hot. HOT SURFACE After you have just used the printer, some internal parts of the printer.
Users Manual - English
Page 113
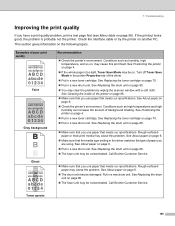
...Faint ABCDEFGH abcdefghijk ABCD abcde 01234 Gray background Recommendation „ Check the printer's environment. See Replacing the toner cartridge on , may be contaminated. Call Brother Customer Service. Call Brother Customer Service. 105 Examples of the printer on page 80. „ You may cause the problem. See ...If the printout looks good, the problem is too light, Toner Save Mode may cause this problem. See Positioning the printer on page 80. „ The fuser unit may cause this print fault. Rough-surfaced paper or thick print media may be on page 6. „ Put ...
...Faint ABCDEFGH abcdefghijk ABCD abcde 01234 Gray background Recommendation „ Check the printer's environment. See Replacing the toner cartridge on , may be contaminated. Call Brother Customer Service. Call Brother Customer Service. 105 Examples of the printer on page 80. „ You may cause the problem. See ...If the printout looks good, the problem is too light, Toner Save Mode may cause this problem. See Positioning the printer on page 80. „ The fuser unit may cause this print fault. Rough-surfaced paper or thick print media may be on page 6. „ Put ...
Users Manual - English
Page 114
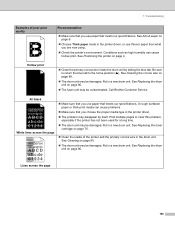
... humidity can cause problems. „ Make sure that you use paper that meets our specifications. Call Brother Customer Service. Print multiple pages to the home position (a). See Positioning the printer on page 85. „ The drum unit may disappear by sliding the blue tab. Lines across ... 89. „ The drum unit may be damaged. See Cleaning the corona wire on page 80. „ The fuser unit may be damaged. Troubleshooting Examples of the printer and the primary corona wire in a new drum unit. 7. A rough surfaced paper or thick print media can cause ...
... humidity can cause problems. „ Make sure that you use paper that meets our specifications. Call Brother Customer Service. Print multiple pages to the home position (a). See Positioning the printer on page 85. „ The drum unit may disappear by sliding the blue tab. Lines across ... 89. „ The drum unit may be damaged. See Cleaning the corona wire on page 80. „ The fuser unit may be damaged. Troubleshooting Examples of the printer and the primary corona wire in a new drum unit. 7. A rough surfaced paper or thick print media can cause ...
Users Manual - English
Page 116
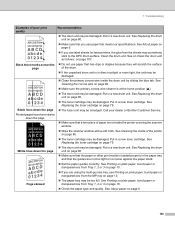
.... See Cleaning the corona wire on page 80. „ Make sure that you use label sheets for laser printers, the glue from the MP tray on page 80. „ Make sure that the paper or other print... drum. „ If the unpacked drum unit is in a new toner cartridge. Call your dealer or Brother Customer Service. „ Make sure that the guides are using the multi-puroise tray, see Printing on ...on plain paper, bond paper or transparencies from Tray 1, 2 or 3 on page 75. „ The fuser unit may be too full. ABCDEFGH abcdefghijk ABCD abcde 01234 White lines down the page. Put in direct ...
.... See Cleaning the corona wire on page 80. „ Make sure that you use label sheets for laser printers, the glue from the MP tray on page 80. „ Make sure that the paper or other print... drum. „ If the unpacked drum unit is in a new toner cartridge. Call your dealer or Brother Customer Service. „ Make sure that the guides are using the multi-puroise tray, see Printing on ...on plain paper, bond paper or transparencies from Tray 1, 2 or 3 on page 75. „ The fuser unit may be too full. ABCDEFGH abcdefghijk ABCD abcde 01234 White lines down the page. Put in direct ...

Quick Setup Guide - English
Page 4
...of it according to local regulations. DO NOT use a vacuum cleaner to ignite inside the printer. Before you have just used the printer, some internal parts of the printer. Doing this might cause the toner dust to clean up scattered toner. Doing this might ...cause a fire or electrical shock. 2 Inside the printer (Front View) Open the back cover (Back View) DO NOT remove or damage the caution labels located on or around the fuser...
...of it according to local regulations. DO NOT use a vacuum cleaner to ignite inside the printer. Before you have just used the printer, some internal parts of the printer. Doing this might cause the toner dust to clean up scattered toner. Doing this might ...cause a fire or electrical shock. 2 Inside the printer (Front View) Open the back cover (Back View) DO NOT remove or damage the caution labels located on or around the fuser...


