Users Manual - English
Page 7
... documents...52 Using the control panel LCD menu...55 Menu table...56 Default Settings ...68 Printer default setting...68 Network default setting ...68 5 Options Lower tray unit (LT-5300) ...69 DIMM ...70 DIMM types ...70 Installing extra memory ...71 6 Routine Maintenance Replacing the consumable items...73 Consumables...74 Toner cartridge ...74 Drum...
... documents...52 Using the control panel LCD menu...55 Menu table...56 Default Settings ...68 Printer default setting...68 Network default setting ...68 5 Options Lower tray unit (LT-5300) ...69 DIMM ...70 DIMM types ...70 Installing extra memory ...71 6 Routine Maintenance Replacing the consumable items...73 Consumables...74 Toner cartridge ...74 Drum...
Users Manual - English
Page 40
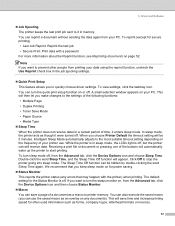
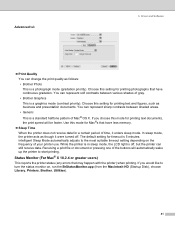
...to quickly choose driver settings. You can reprint a document without sending the data again from printing your PC. In sleep mode, the printer acts as a macro to the most suitable timeout setting depending on or off , from the Advanced tab, click the Device Options icon... and then choose Status Monitor. „ Macro You can still receive data. Intelligent Sleep Mode automatically adjusts to printer memory. We recommend that may happen with a password For more information about the Reprint function, see Reprinting documents on , from the Advanced tab...
...to quickly choose driver settings. You can reprint a document without sending the data again from printing your PC. In sleep mode, the printer acts as a macro to the most suitable timeout setting depending on or off , from the Advanced tab, click the Device Options icon... and then choose Status Monitor. „ Macro You can still receive data. Intelligent Sleep Mode automatically adjusts to printer memory. We recommend that may happen with a password For more information about the Reprint function, see Reprinting documents on , from the Advanced tab...
Users Manual - English
Page 41
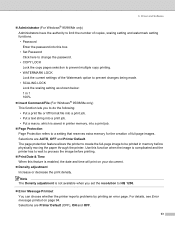
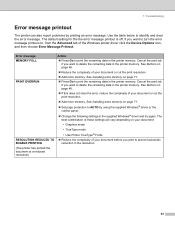
... Density adjustment is saved in printer memory, into a print job. „ Page Protection Page Protection refers to HQ 1200. „ Error Message Printout You can choose whether the printer reports problems by printing an error page. Selections are Printer Default (OFF), ON and OFF. 33 Selections are AUTO, OFF and Printer Default. Driver and Software...
... Density adjustment is saved in printer memory, into a print job. „ Page Protection Page Protection refers to HQ 1200. „ Error Message Printout You can choose whether the printer reports problems by printing an error page. Selections are Printer Default (OFF), ON and OFF. 33 Selections are AUTO, OFF and Printer Default. Driver and Software...
Users Manual - English
Page 49
... can still receive data. Use this setting for timeout is a standard halftone pattern of gray. • Brother Graphics This is off . The default setting for printing photographs that have less memory. „ Sleep Time When the printer does not receive data for printing text and figures, such as though it enters sleep mode...
... can still receive data. Use this setting for timeout is a standard halftone pattern of gray. • Brother Graphics This is off . The default setting for printing photographs that have less memory. „ Sleep Time When the printer does not receive data for printing text and figures, such as though it enters sleep mode...
Users Manual - English
Page 58
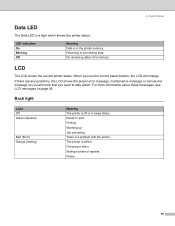
...the proper error message, maintenance message or call service message so you need to print Printing Warming up Job cancelling There is a problem with the printer. Choosing a menu Setting number of reprints Pause 50 For more information about these messages, see LCD messages on page 92. LED indication On Blinking... Off Meaning Data is off or in sleep status. No remaining data in the printer memory. LCD The LCD shows the current printer status. Back light Light Off Green (General) Red (Error) Orange (Setting) Meaning The...
...the proper error message, maintenance message or call service message so you need to print Printing Warming up Job cancelling There is a problem with the printer. Choosing a menu Setting number of reprints Pause 50 For more information about these messages, see LCD messages on page 92. LED indication On Blinking... Off Meaning Data is off or in sleep status. No remaining data in the printer memory. LCD The LCD shows the current printer status. Back light Light Off Green (General) Red (Error) Orange (Setting) Meaning The...

Users Manual - English
Page 59
... start printing. Busy processing data. This printer has XX MB memory. Printing with reduced resolution. Performing self-diagnostics. The printer is setting up . Press Go to start the printer again. Ready to the user settings. The printer settings return to print. Cancelling the job. 4. The printer is warming up . The printer has suspended its operations. Printing. The...
... start printing. Busy processing data. This printer has XX MB memory. Printing with reduced resolution. Performing self-diagnostics. The printer is setting up . Press Go to start the printer again. Ready to the user settings. The printer settings return to print. Cancelling the job. 4. The printer is warming up . The printer has suspended its operations. Printing. The...
Users Manual - English
Page 60
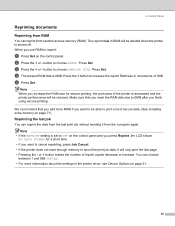
.... We recommend that you reset the RAM disk size to 0MB after you want to cancel reprinting, press Job Cancel. • If the printer does not have enough memory to print a lot of 1MB. Control Panel Reprinting documents Reprinting from RAM You can choose between 1 and 999 COPIES. • For more RAM...When you want to be able to spool the print job data, it from random access memory (RAM). b Press the + or - d The present RAM disk is set to increase the reprint RAM size in the printer driver, see Device Options on the control panel and you press Reprint, the LCD shows NO...
.... We recommend that you reset the RAM disk size to 0MB after you want to cancel reprinting, press Job Cancel. • If the printer does not have enough memory to print a lot of 1MB. Control Panel Reprinting documents Reprinting from RAM You can choose between 1 and 999 COPIES. • For more RAM...When you want to be able to spool the print job data, it from random access memory (RAM). b Press the + or - d The present RAM disk is set to increase the reprint RAM size in the printer driver, see Device Options on the control panel and you press Reprint, the LCD shows NO...

Users Manual - English
Page 64
...memory in the embedded memory. Shows the pages printed with PF kit 1. Shows the pages left to print with drum unit. See Replacing periodic maintenance parts on page 84. Prints the test page. Prints the demonstration sheet. Shows network firmware date. Shows the size of data saved in this printer... DRUM REMAIN PF KIT MP REMAIN PF KIT 1 REMAIN PF KIT 2 REMAIN PF KIT 3 REMAIN FUSER REMAIN LASER Descriptions Prints the Printer Settings page. Shows printer serial number. See Replacing periodic maintenance parts on page 84. Note The control panel LCD names for the paper ...
...memory in the embedded memory. Shows the pages printed with PF kit 1. Shows the pages left to print with drum unit. See Replacing periodic maintenance parts on page 84. Prints the test page. Prints the demonstration sheet. Shows network firmware date. Shows the size of data saved in this printer... DRUM REMAIN PF KIT MP REMAIN PF KIT 1 REMAIN PF KIT 2 REMAIN PF KIT 3 REMAIN FUSER REMAIN LASER Descriptions Prints the Printer Settings page. Shows printer serial number. See Replacing periodic maintenance parts on page 84. Note The control panel LCD names for the paper ...
Users Manual - English
Page 77
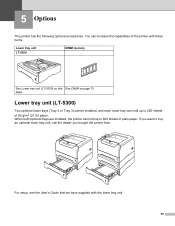
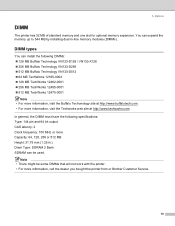
...) Two optional lower trays (Tray 2 or Tray 3) can be installed, and each lower tray can increase the capabilities of the printer with the lower tray unit. 69 If you bought the printer from. For setup, see the User's Guide that we have supplied with these items. Lower tray unit LT-5300 DIMM... memory See Lower tray unit (LT-5300) on this See DIMM on page 70. page. 5 Options This printer has the following optional accessories. You can hold up to buy an optional lower tray unit, call...
...) Two optional lower trays (Tray 2 or Tray 3) can be installed, and each lower tray can increase the capabilities of the printer with the lower tray unit. 69 If you bought the printer from. For setup, see the User's Guide that we have supplied with these items. Lower tray unit LT-5300 DIMM... memory See Lower tray unit (LT-5300) on this See DIMM on page 70. page. 5 Options This printer has the following optional accessories. You can hold up to buy an optional lower tray unit, call...
Users Manual - English
Page 78
You can be some DIMMs that will not work with the printer. • For more information, call the dealer you bought the printer from or Brother Customer Service. 70 Note • There might be used. In general, the DIMM must have the following DIMMs: „ 128 MB Buffalo Technology VN133-D128 /...: 64, 128, 256 or 512 MB Height: 31.75 mm (1.25 in.) Dram Type: SDRAM 2 Bank SDRAM can expand the memory up to 544 MB by installing dual in-line memory modules (DIMMs). 5. DIMM types You can install the following specifications: Type: 144 pin and 64 bit output CAS latency: 2 Clock...
You can be some DIMMs that will not work with the printer. • For more information, call the dealer you bought the printer from or Brother Customer Service. 70 Note • There might be used. In general, the DIMM must have the following DIMMs: „ 128 MB Buffalo Technology VN133-D128 /...: 64, 128, 256 or 512 MB Height: 31.75 mm (1.25 in.) Dram Type: SDRAM 2 Bank SDRAM can expand the memory up to 544 MB by installing dual in-line memory modules (DIMMs). 5. DIMM types You can install the following specifications: Type: 144 pin and 64 bit output CAS latency: 2 Clock...
Users Manual - English
Page 79
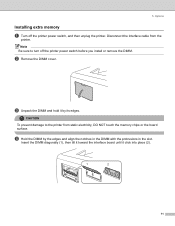
...Remove the DIMM cover. CAUTION To prevent damage to turn off the printer power switch, and then unplug the printer. c Unpack the DIMM and hold it click into place (2). 1 2 71 Options Installing extra memory a Turn off the printer power switch before you install or remove the DIMM. d Hold the... DIMM by its edges. Disconnect the interface cable from static electricity, DO NOT touch the memory chips or the board surface. Note Be sure to the printer from the printer. 5. Insert the DIMM diagonally (1), then tilt it toward the interface board until it by the edges...
...Remove the DIMM cover. CAUTION To prevent damage to turn off the printer power switch, and then unplug the printer. c Unpack the DIMM and hold it click into place (2). 1 2 71 Options Installing extra memory a Turn off the printer power switch before you install or remove the DIMM. d Hold the... DIMM by its edges. Disconnect the interface cable from static electricity, DO NOT touch the memory chips or the board surface. Note Be sure to the printer from the printer. 5. Insert the DIMM diagonally (1), then tilt it toward the interface board until it by the edges...

Users Manual - English
Page 80
See Menu table on the power switch. Note To make sure that you have installed the DIMM properly, you can print the printer settings page that shows the current memory size. Options f Reconnect the interface cable to your printer. Plug the printer back in, and then turn on page 56. 72 e Put the DIMM cover back on. 5.
See Menu table on the power switch. Note To make sure that you have installed the DIMM properly, you can print the printer settings page that shows the current memory size. Options f Reconnect the interface cable to your printer. Plug the printer back in, and then turn on page 56. 72 e Put the DIMM cover back on. 5.
Users Manual - English
Page 100
... seconds, and then turn it back into the printer again. Gently slide the blue tab of the printer. Close the front cover of the drum unit across several times. JAM XXX MANUAL FEED MEMORY FULL NO PAPER Carefully pull out the jammed paper from or Brother Customer Service. Put the same size of the... printer and put it on page 96. Add more memory. If you cannot clear the problem, call the dealer you . Take...
... seconds, and then turn it back into the printer again. Gently slide the blue tab of the printer. Close the front cover of the drum unit across several times. JAM XXX MANUAL FEED MEMORY FULL NO PAPER Carefully pull out the jammed paper from or Brother Customer Service. Put the same size of the... printer and put it on page 96. Add more memory. If you cannot clear the problem, call the dealer you . Take...
Users Manual - English
Page 101
... not clear the problem, call your dealer or Brother Customer Service for a replacement paper feeding kit (paper feed roller, separation roller, separation pad, and separation pad spring) for Tray 1. Cut the resolution or add the optional memory. Put the same size paper in the paper ... Or there is set in the printer driver. See Replacing the toner cartridge on again. Call your dealer or Brother Customer Service for a replacement paper feeding kit (paper pick up roller and separation plate) for a replacement laser unit. Call your dealer or Brother Customer Service for a replacement paper...
... not clear the problem, call your dealer or Brother Customer Service for a replacement paper feeding kit (paper feed roller, separation roller, separation pad, and separation pad spring) for Tray 1. Cut the resolution or add the optional memory. Put the same size paper in the paper ... Or there is set in the printer driver. See Replacing the toner cartridge on again. Call your dealer or Brother Customer Service for a replacement paper feeding kit (paper pick up roller and separation plate) for a replacement laser unit. Call your dealer or Brother Customer Service for a replacement paper...
Users Manual - English
Page 102
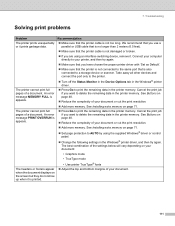
...error, reduce the complexity of your document or cut the print resolution. „ Add more memory. Use the table below to delete the remaining data in the printer memory. See Installing extra memory on page 71. „ Set page protection to turn the error message printout on your ... vary depending on , from the Advanced tab of your document before you want to prevent automatic reduction in the printer memory. Troubleshooting Error message printout The printer can also report problems by using the supplied Windows® driver or the control panel. „ Change the ...
...error, reduce the complexity of your document or cut the print resolution. „ Add more memory. Use the table below to delete the remaining data in the printer memory. See Installing extra memory on page 71. „ Set page protection to turn the error message printout on your ... vary depending on , from the Advanced tab of your document before you want to prevent automatic reduction in the printer memory. Troubleshooting Error message printout The printer can also report problems by using the supplied Windows® driver or the control panel. „ Change the ...
Users Manual - English
Page 119
... The headers or footers appear when the document displays on page 71. „ Set page protection to print the remaining data in the printer memory. The printer cannot print full pages of a document. See Buttons on page 48. „ Reduce the complexity of your document. 111 See Buttons on... try again. Cancel the print job if you want to delete the remaining data in the printer memory. Cancel the print job if you want to delete the remaining data in the printer memory. An error message PRINT OVERRUN is also connected to your document or cut the print resolution....
... The headers or footers appear when the document displays on page 71. „ Set page protection to print the remaining data in the printer memory. The printer cannot print full pages of a document. See Buttons on page 48. „ Reduce the complexity of your document. 111 See Buttons on... try again. Cancel the print job if you want to delete the remaining data in the printer memory. Cancel the print job if you want to delete the remaining data in the printer memory. An error message PRINT OVERRUN is also connected to your document or cut the print resolution....

Users Manual - English
Page 121
... Installing extra memory on page 71. You need the following the instructions for using the printer may cause you to print EPS data: a From the Start menu, select Control Panel and then Printer 1. 1 Printers and Faxes for all repairs. 113 The printer cannot print EPS data that includes binary. 7. b Right-click the Brother HL-5270DN/5280DW BR_Script3 series...
... Installing extra memory on page 71. You need the following the instructions for using the printer may cause you to print EPS data: a From the Start menu, select Control Panel and then Printer 1. 1 Printers and Faxes for all repairs. 113 The printer cannot print EPS data that includes binary. 7. b Right-click the Brother HL-5270DN/5280DW BR_Script3 series...
Users Manual - English
Page 123
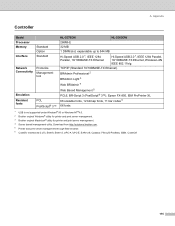
...brother.com. 5 Printer and print server management through Web browser. 6 Code39, Interleaved 2 of 5, EAN-8, EAN-13, UPC-A, UPC-E, EAN-128, Codabar, FIM (US-PostNet), ISBN, Code128 115 Appendix Controller Model Processor Memory Interface Network Connectivity Emulation Resident fonts Standard Option Standard Protocols Management tool PCL PostScript® 3™ HL-5270DN HL-5280DW... NT®4.0. 2 Brother original Windows® utility for printer and print server management. 3 Brother original Macintosh® utility for printer and print server management. 4 Server based...
...brother.com. 5 Printer and print server management through Web browser. 6 Code39, Interleaved 2 of 5, EAN-8, EAN-13, UPC-A, UPC-E, EAN-128, Codabar, FIM (US-PostNet), ISBN, Code128 115 Appendix Controller Model Processor Memory Interface Network Connectivity Emulation Resident fonts Standard Option Standard Protocols Management tool PCL PostScript® 3™ HL-5270DN HL-5280DW... NT®4.0. 2 Brother original Windows® utility for printer and print server management. 3 Brother original Macintosh® utility for printer and print server management. 4 Server based...
Users Manual - English
Page 152
D. Index Media specifications 117 Media type 6 Memory 70, 115 Multi-purpose tray 13, 16, 21 N Network 44 Network connectivity 115 Network default setting 68 NETWORK menu 63, 64 Network Print Software 44 O ... Paper handling 116 Paper jams 96 PAPER menu 57 Parallel interface 46 Plain paper 7 Power 4 Power supply 4 PRINT menu 58 Print quality 105 Printable area 9 Printer driver 28, 36, 42, 116 Processor 115 Proprinter XL mode 45 Q QUALITY menu 57 R Register your product 132, 137 Reprint 32, 52 Reprint button 48...
D. Index Media specifications 117 Media type 6 Memory 70, 115 Multi-purpose tray 13, 16, 21 N Network 44 Network connectivity 115 Network default setting 68 NETWORK menu 63, 64 Network Print Software 44 O ... Paper handling 116 Paper jams 96 PAPER menu 57 Parallel interface 46 Plain paper 7 Power 4 Power supply 4 PRINT menu 58 Print quality 105 Printable area 9 Printer driver 28, 36, 42, 116 Processor 115 Proprinter XL mode 45 Q QUALITY menu 57 R Register your product 132, 137 Reprint 32, 52 Reprint button 48...
Quick Setup Guide - English
Page 9
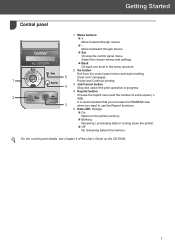
...menu and reprint setting. 5 Clear error messages. 1 Pause and Continue printing. 4 3 Job Cancel button Stop and cancel the print operation in the memory. It is recommended that you increase the RAMDISK size 3 when you want to use the Reprint functions. 5 Data LED: Orange „ On ...Data is in the printer memory. „ Blinking Receiving / processing data or cooling down the printer. „ Off No remaining data in progress. 4 Reprint button Choose the reprint menu and the number of the User...
...menu and reprint setting. 5 Clear error messages. 1 Pause and Continue printing. 4 3 Job Cancel button Stop and cancel the print operation in the memory. It is recommended that you increase the RAMDISK size 3 when you want to use the Reprint functions. 5 Data LED: Orange „ On ...Data is in the printer memory. „ Blinking Receiving / processing data or cooling down the printer. „ Off No remaining data in progress. 4 Reprint button Choose the reprint menu and the number of the User...


