Users Manual - English
Page 7
...-5300) ...56 DIMM ...57 DIMM types ...57 Installing extra memory ...58 Print server (NC-2100p) (For HL-5240 60 6 Routine Maintenance Replacing the consumable items...61 Consumables...61 Toner cartridge ...62 Drum unit ...68 Replacing periodic maintenance parts...72 Cleaning ...73 Cleaning the outside of the printer...73 Cleaning the inside of the...
...-5300) ...56 DIMM ...57 DIMM types ...57 Installing extra memory ...58 Print server (NC-2100p) (For HL-5240 60 6 Routine Maintenance Replacing the consumable items...61 Consumables...61 Toner cartridge ...62 Drum unit ...68 Replacing periodic maintenance parts...72 Cleaning ...73 Cleaning the outside of the printer...73 Cleaning the inside of the...

Users Manual - English
Page 69
When you have just used the printer, some internal parts of the printer will be extremely hot. Consumables Toner Cartridge Drum Unit See Toner cartridge on page 91. 6 Routine Maintenance You will need to replace the consumable items regularly. Replacing the consumable items You will need to inhale toner. • After you open...
When you have just used the printer, some internal parts of the printer will be extremely hot. Consumables Toner Cartridge Drum Unit See Toner cartridge on page 91. 6 Routine Maintenance You will need to replace the consumable items regularly. Replacing the consumable items You will need to inhale toner. • After you open...
Users Manual - English
Page 70
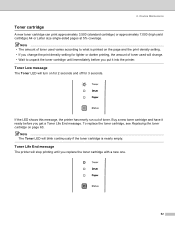
...; If you change the print density setting for 3 seconds. Toner Life End message The printer will change. • Wait to what is nearly empty. 6. Routine Maintenance Toner cartridge A new toner cartridge can print approximately 3,500 (standard cartridge) or approximately 7,000 (high yield cartridge) A4 or Letter size single-sided pages at...
...; If you change the print density setting for 3 seconds. Toner Life End message The printer will change. • Wait to what is nearly empty. 6. Routine Maintenance Toner cartridge A new toner cartridge can print approximately 3,500 (standard cartridge) or approximately 7,000 (high yield cartridge) A4 or Letter size single-sided pages at...

Users Manual - English
Page 71
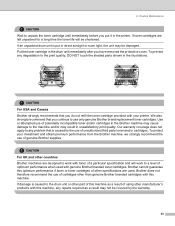
Routine Maintenance Replacing the toner cartridge Note • To ensure high quality printing, we recommend that you replace the toner cartridge. When you want to the printer from or Brother Customer Service. • We recommend that you put the drum unit and toner cartridge assembly on page 73. ...the front cover release button and then open the front cover. CAUTION We recommend that you clean the printer when you use only genuine Brother toner cartridges. To prevent damage to buy toner cartridges, call the dealer you bought the printer from static electricity, DO NOT touch ...
Routine Maintenance Replacing the toner cartridge Note • To ensure high quality printing, we recommend that you replace the toner cartridge. When you want to the printer from or Brother Customer Service. • We recommend that you put the drum unit and toner cartridge assembly on page 73. ...the front cover release button and then open the front cover. CAUTION We recommend that you clean the printer when you use only genuine Brother toner cartridges. To prevent damage to buy toner cartridges, call the dealer you bought the printer from static electricity, DO NOT touch ...

Users Manual - English
Page 72
... sure to local regulations, keeping it separate from side to side five or six times to spread the toner evenly inside the cartridge. 64 Routine Maintenance c Push down the blue lock lever and take the toner cartridge out of the cartridge. • Discard the used toner cartridge according to seal up...
... sure to local regulations, keeping it separate from side to side five or six times to spread the toner evenly inside the cartridge. 64 Routine Maintenance c Push down the blue lock lever and take the toner cartridge out of the cartridge. • Discard the used toner cartridge according to seal up...
Users Manual - English
Page 73
...unit may result in the illustrations. To protect your printer. CAUTION For UK and other countries Brother machines are designed to work to use only genuine Brother brand replacement toner cartridges. Routine Maintenance CAUTION Wait to the print quality, DO NOT touch the shaded parts shown in unsatisfactory print ...party toner and/or cartridges. To prevent any problem that is caused by the warranty. 65 If damage is put it in the Brother machine may cause damage to the drum unit or other manufacturer's products with toner of optimum performance when used . If toner cartridges ...
...unit may result in the illustrations. To protect your printer. CAUTION For UK and other countries Brother machines are designed to work to use only genuine Brother brand replacement toner cartridges. Routine Maintenance CAUTION Wait to the print quality, DO NOT touch the shaded parts shown in unsatisfactory print ...party toner and/or cartridges. To prevent any problem that is caused by the warranty. 65 If damage is put it in the Brother machine may cause damage to the drum unit or other manufacturer's products with toner of optimum performance when used . If toner cartridges ...
Users Manual - English
Page 74
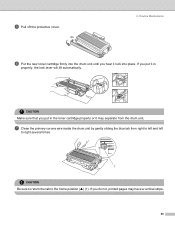
e Pull off the protective cover. 6. Routine Maintenance f Put the new toner cartridge firmly into place. g Clean the primary corona wire inside the drum unit by gently sliding the blue tab from the ...
e Pull off the protective cover. 6. Routine Maintenance f Put the new toner cartridge firmly into place. g Clean the primary corona wire inside the drum unit by gently sliding the blue tab from the ...
Users Manual - English
Page 75
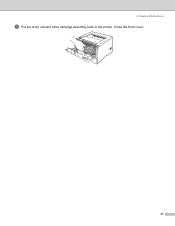
Routine Maintenance h Put the drum unit and toner cartridge assembly back in the printer. Close the front cover. 67 6.
Routine Maintenance h Put the drum unit and toner cartridge assembly back in the printer. Close the front cover. 67 6.

Users Manual - English
Page 76
...and life of the printer. Because we have no control over the many factors that will print may be printed by the use only genuine Brother toner. The actual number of its life. See Cleaning on . Warranty coverage does not apply to problems caused by your drum will be ...be used , number of a third-party drum unit. Every time you replace the drum unit with a third-party drum unit may contain toner. 6. Routine Maintenance Drum unit A new drum unit can print approximately 25,000 A4 or Letter size single-sided pages at approximately 25,000 pages. We recommend that...
...and life of the printer. Because we have no control over the many factors that will print may be printed by the use only genuine Brother toner. The actual number of its life. See Cleaning on . Warranty coverage does not apply to problems caused by your drum will be ...be used , number of a third-party drum unit. Every time you replace the drum unit with a third-party drum unit may contain toner. 6. Routine Maintenance Drum unit A new drum unit can print approximately 25,000 A4 or Letter size single-sided pages at approximately 25,000 pages. We recommend that...

Users Manual - English
Page 77
Press the front cover release button and then open the front cover. Improper Setup Do not reset the drum counter when you need to reset the drum counter by completing the following steps: a Make sure that the printer is turned on and the Drum LED is blinking. b Press and hold down Go for about 4 seconds until all four LEDs are lit, release Go. Once all the LEDs light up. Routine Maintenance When you replace the drum unit with a new one, you only replace the toner cartridge. c Take out the drum unit and toner cartridge assembly. 69 6.
Press the front cover release button and then open the front cover. Improper Setup Do not reset the drum counter when you need to reset the drum counter by completing the following steps: a Make sure that the printer is turned on and the Drum LED is blinking. b Press and hold down Go for about 4 seconds until all four LEDs are lit, release Go. Once all the LEDs light up. Routine Maintenance When you replace the drum unit with a new one, you only replace the toner cartridge. c Take out the drum unit and toner cartridge assembly. 69 6.
Users Manual - English
Page 78
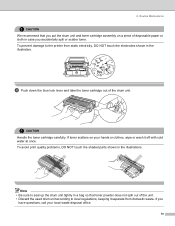
... that you put the drum unit and toner cartridge assembly on your local waste disposal office. 70 If you accidentally spill or scatter toner. Routine Maintenance CAUTION We recommend that toner powder does not spill out of the drum unit. d Push down the blue lock lever and take the toner cartridge...
... that you put the drum unit and toner cartridge assembly on your local waste disposal office. 70 If you accidentally spill or scatter toner. Routine Maintenance CAUTION We recommend that toner powder does not spill out of the drum unit. d Push down the blue lock lever and take the toner cartridge...
Users Manual - English
Page 79
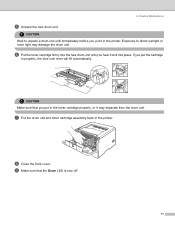
... to unpack a drum unit until you put the cartridge in the printer. i Make sure that you put in the printer. h Close the front cover. 6. Routine Maintenance e Unpack the new drum unit. If you hear it may damage the drum unit. g Put the drum unit and toner cartridge assembly back in the...
... to unpack a drum unit until you put the cartridge in the printer. i Make sure that you put in the printer. h Close the front cover. 6. Routine Maintenance e Unpack the new drum unit. If you hear it may damage the drum unit. g Put the drum unit and toner cartridge assembly back in the...
Users Manual - English
Page 80
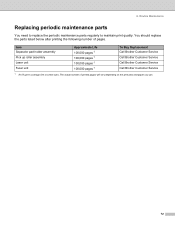
... 100,000 pages 1 100,000 pages 1 100,000 pages 1 100,000 pages 1 To Buy Replacement Call Brother Customer Service Call Brother Customer Service Call Brother Customer Service Call Brother Customer Service 1 At 5% print coverage (A4 or Letter size). 6. Routine Maintenance Replacing periodic maintenance parts You need to replace the periodic maintenance parts regularly to maintain print quality.
... 100,000 pages 1 100,000 pages 1 100,000 pages 1 100,000 pages 1 To Buy Replacement Call Brother Customer Service Call Brother Customer Service Call Brother Customer Service Call Brother Customer Service 1 At 5% print coverage (A4 or Letter size). 6. Routine Maintenance Replacing periodic maintenance parts You need to replace the periodic maintenance parts regularly to maintain print quality.
Users Manual - English
Page 81
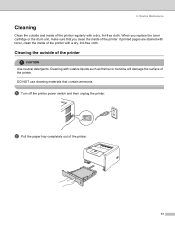
... the printer. 73 Cleaning the outside and inside of the printer CAUTION Use neutral detergents. b Pull the paper tray completely out of the printer. 6. Routine Maintenance Cleaning Clean the outside of the printer regularly with a dry, lint-free cloth. a Turn off the printer power switch and then unplug the printer. DO...
... the printer. 73 Cleaning the outside and inside of the printer CAUTION Use neutral detergents. b Pull the paper tray completely out of the printer. 6. Routine Maintenance Cleaning Clean the outside of the printer regularly with a dry, lint-free cloth. a Turn off the printer power switch and then unplug the printer. DO...

Users Manual - English
Page 82
e Wipe the inside the paper tray. f Put the paper tray back in , and then turn on the power switch. Routine Maintenance d Remove anything that is stuck inside of the paper tray with a dry, lint-free cloth to remove dust. g Plug the printer back in the printer. Cleaning the inside of the printer with a dry, lint-free cloth to remove dust. 6. c Wipe the outside of the printer a Turn off the printer power switch and then unplug the printer. 74
e Wipe the inside the paper tray. f Put the paper tray back in , and then turn on the power switch. Routine Maintenance d Remove anything that is stuck inside of the paper tray with a dry, lint-free cloth to remove dust. g Plug the printer back in the printer. Cleaning the inside of the printer with a dry, lint-free cloth to remove dust. 6. c Wipe the outside of the printer a Turn off the printer power switch and then unplug the printer. 74
Users Manual - English
Page 83
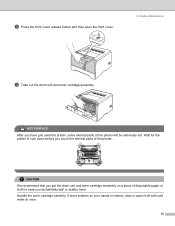
Routine Maintenance c Take out the drum unit and toner cartridge assembly. Handle the toner cartridge carefully. HOT SURFACE After you accidentally spill or scatter toner. CAUTION We ... hands or clothes, wipe or wash it off with cold water at once. 75 Wait for the printer to cool down before you touch the internal parts of the printer will be extremely hot. If toner scatters on a piece of disposable paper or cloth in case you have just used the...
Routine Maintenance c Take out the drum unit and toner cartridge assembly. Handle the toner cartridge carefully. HOT SURFACE After you accidentally spill or scatter toner. CAUTION We ... hands or clothes, wipe or wash it off with cold water at once. 75 Wait for the printer to cool down before you touch the internal parts of the printer will be extremely hot. If toner scatters on a piece of disposable paper or cloth in case you have just used the...
Users Manual - English
Page 84
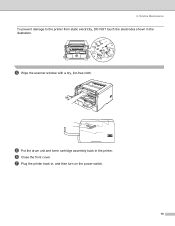
d Wipe the scanner window with a dry, lint-free cloth. e Put the drum unit and toner cartridge assembly back in , and then turn on the power switch. 76 g Plug the printer back in the printer. Routine Maintenance To prevent damage to the printer from static electricity, DO NOT touch the electrodes shown in the illustration. f Close the front cover. 6.
d Wipe the scanner window with a dry, lint-free cloth. e Put the drum unit and toner cartridge assembly back in , and then turn on the power switch. 76 g Plug the printer back in the printer. Routine Maintenance To prevent damage to the printer from static electricity, DO NOT touch the electrodes shown in the illustration. f Close the front cover. 6.
Users Manual - English
Page 85
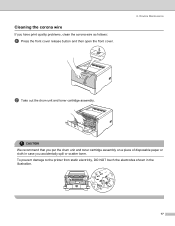
Cleaning the corona wire If you accidentally spill or scatter toner. Routine Maintenance b Take out the drum unit and toner cartridge assembly. To prevent damage to the printer from static electricity, DO NOT touch the electrodes shown in case you have print quality problems, clean the corona wire as follows: a Press the front cover release button and then open the front cover. 6. CAUTION We recommend that you put the drum unit and toner cartridge assembly on a piece of disposable paper or cloth in the illustration. 77
Cleaning the corona wire If you accidentally spill or scatter toner. Routine Maintenance b Take out the drum unit and toner cartridge assembly. To prevent damage to the printer from static electricity, DO NOT touch the electrodes shown in case you have print quality problems, clean the corona wire as follows: a Press the front cover release button and then open the front cover. 6. CAUTION We recommend that you put the drum unit and toner cartridge assembly on a piece of disposable paper or cloth in the illustration. 77
Users Manual - English
Page 86
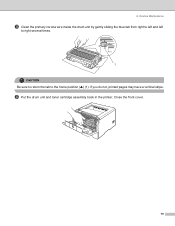
Routine Maintenance c Clean the primary corona wire inside the drum unit by gently sliding the blue tab from right to left and left to right several times. 1 CAUTION Be sure to return the tab to the home position (a) (1). d Put the drum unit and toner cartridge assembly back in the printer. If you do not, printed pages may have a vertical stripe. Close the front cover. 78 6.
Routine Maintenance c Clean the primary corona wire inside the drum unit by gently sliding the blue tab from right to left and left to right several times. 1 CAUTION Be sure to return the tab to the home position (a) (1). d Put the drum unit and toner cartridge assembly back in the printer. If you do not, printed pages may have a vertical stripe. Close the front cover. 78 6.
Users Manual - English
Page 137
...Emulation Selection 43 Automatic Interface Selection 44 B Back view 3 Bar code control 111 Basic tab 26 Booklet printing 23 BRAdmin Light 42 BRAdmin Professional 42 Brother Numbers (USA/Canada 123, 124 BR-Script 3 99 BR-Script 3 mode 43 BR-Script printer driver 34 Buffer error 48 C Carton contents ...43 I Incorrect paper size for DX 48 Interface 101 J Job cancel 51 L LEDs 45 Linux 24 Lower tray unit 56 M Macintosh 37, 98 Maintenance parts 72 Manual duplex printing 19 Media specifications 103 Media type 5 Memory 57, 101 Memory full 48 Multi-purpose tray 12, 15, 20 N ...
...Emulation Selection 43 Automatic Interface Selection 44 B Back view 3 Bar code control 111 Basic tab 26 Booklet printing 23 BRAdmin Light 42 BRAdmin Professional 42 Brother Numbers (USA/Canada 123, 124 BR-Script 3 99 BR-Script 3 mode 43 BR-Script printer driver 34 Buffer error 48 C Carton contents ...43 I Incorrect paper size for DX 48 Interface 101 J Job cancel 51 L LEDs 45 Linux 24 Lower tray unit 56 M Macintosh 37, 98 Maintenance parts 72 Manual duplex printing 19 Media specifications 103 Media type 5 Memory 57, 101 Memory full 48 Multi-purpose tray 12, 15, 20 N ...