Users Manual - English
Page 17
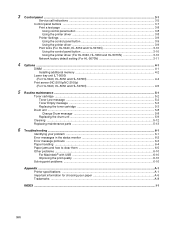
... 3-11 4 Options ...4-1 DIMM ...4-1 Installing additional memory 4-2 Lower tray unit (LT-5000) (For HL-5040, HL-5050 and HL-5070N 4-4 Print server (NC-2010p/NC-2100p) (For HL-5040, HL-5050 and HL-5070N 4-5 5 Routine maintenance ...5-1 Toner cartridge ...5-2 Toner Low message ...5-2 Toner Empty message ...5-3 Replacing the toner cartridge 5-3 Drum unit ...5-8 Change Drum message ...5-8 Replacing the drum unit ...5-9 Cleaning ...5-12 Replacing maintenance parts ...5-13 6 Troubleshooting ...6-1 Identifying...
... 3-11 4 Options ...4-1 DIMM ...4-1 Installing additional memory 4-2 Lower tray unit (LT-5000) (For HL-5040, HL-5050 and HL-5070N 4-4 Print server (NC-2010p/NC-2100p) (For HL-5040, HL-5050 and HL-5070N 4-5 5 Routine maintenance ...5-1 Toner cartridge ...5-2 Toner Low message ...5-2 Toner Empty message ...5-3 Replacing the toner cartridge 5-3 Drum unit ...5-8 Change Drum message ...5-8 Replacing the drum unit ...5-9 Cleaning ...5-12 Replacing maintenance parts ...5-13 6 Troubleshooting ...6-1 Identifying...
Users Manual - English
Page 18
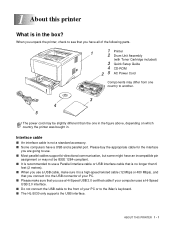
... have all of your computer uses a Hi-Speed USB 2.0 interface. ■ Do not connect the USB cable to the front of the following parts. 1 1 Printer 2 Drum Unit Assembly (with Toner Cartridge included) 3 Quick Setup Guide 4 CD-ROM 2 5 AC Power Cord Components may be slightly different than 6 feet (2 metres). ■ When you use... to the USB connector of your PC. ■ Please make sure that is no longer than the one country to the iMac's keyboard. ■ The HL-5030 only supports the USB interface.
... have all of your computer uses a Hi-Speed USB 2.0 interface. ■ Do not connect the USB cable to the front of the following parts. 1 1 Printer 2 Drum Unit Assembly (with Toner Cartridge included) 3 Quick Setup Guide 4 CD-ROM 2 5 AC Power Cord Components may be slightly different than 6 feet (2 metres). ■ When you use... to the USB connector of your PC. ■ Please make sure that is no longer than the one country to the iMac's keyboard. ■ The HL-5030 only supports the USB interface.
Users Manual - English
Page 85
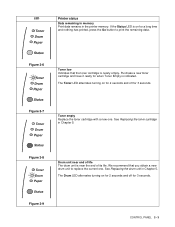
...replace the current one . We recommend that the toner cartridge is near end of life The drum unit is nearly empty. CONTROL PANEL 3 - 3 Toner low Indicates that you obtain a new drum unit to print the remaining data. Purchase a new toner cartridge and have it ready for 3 ...seconds. Drum unit near the end of its life. LED Toner Drum Paper Status Figure 3-6 Toner Drum Paper Status Figure 3-7 Toner Drum Paper Status Figure 3-8 Toner Drum Paper Status Figure 3-9 Printer status Data remaining in memory Print data remains ...
...replace the current one . We recommend that the toner cartridge is near end of life The drum unit is nearly empty. CONTROL PANEL 3 - 3 Toner low Indicates that you obtain a new drum unit to print the remaining data. Purchase a new toner cartridge and have it ready for 3 ...seconds. Drum unit near the end of its life. LED Toner Drum Paper Status Figure 3-6 Toner Drum Paper Status Figure 3-7 Toner Drum Paper Status Figure 3-8 Toner Drum Paper Status Figure 3-9 Printer status Data remaining in memory Print data remains ...
Users Manual - English
Page 99
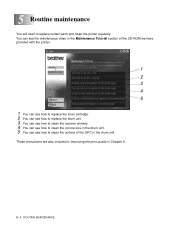
5 Routine maintenance You will need to clean the surface of the OPC in the drum unit. These instructions are also included in Improving the print quality in the drum unit. 5 You can see how to replace certain parts and clean the printer regularly. You can see the maintenance video in the Maintenance Tutorial ... CD-ROM we have provided with the printer. 1 2 3 4 5 1 You can see how to replace the toner cartridge. 2 You can see how to replace the drum unit. 3 You can see how to clean the scanner window. 4 You can see how to clean the corona wire in Chapter 6. 5 - 1 ROUTINE MAINTENANCE
5 Routine maintenance You will need to clean the surface of the OPC in the drum unit. These instructions are also included in Improving the print quality in the drum unit. 5 You can see how to replace certain parts and clean the printer regularly. You can see the maintenance video in the Maintenance Tutorial ... CD-ROM we have provided with the printer. 1 2 3 4 5 1 You can see how to replace the toner cartridge. 2 You can see how to replace the drum unit. 3 You can see how to clean the scanner window. 4 You can see how to clean the corona wire in Chapter 6. 5 - 1 ROUTINE MAINTENANCE
Users Manual - English
Page 102
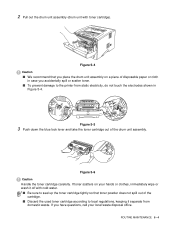
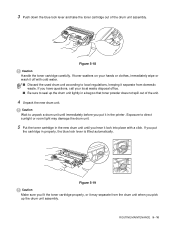
Figure 5-5 3 Push down the blue lock lever and take the toner cartridge out of the drum unit assembly. If toner scatters on your hands or clothes, immediately wipe or wash it separate from static electricity, do not touch the electrodes shown in ... accidentally spill or scatter toner. ■ To prevent damage to the printer from domestic waste. Figure 5-6 Caution Handle the toner cartridge carefully. 2 Pull out the drum unit assembly (drum unit with cold water. ■ Be sure to seal up the toner cartridge tightly so that you place the...
Figure 5-5 3 Push down the blue lock lever and take the toner cartridge out of the drum unit assembly. If toner scatters on your hands or clothes, immediately wipe or wash it separate from static electricity, do not touch the electrodes shown in ... accidentally spill or scatter toner. ■ To prevent damage to the printer from domestic waste. Figure 5-6 Caution Handle the toner cartridge carefully. 2 Pull out the drum unit assembly (drum unit with cold water. ■ Be sure to seal up the toner cartridge tightly so that you place the...
Users Manual - English
Page 103
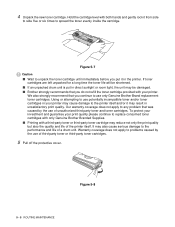
...be shortened. ■ If an unpacked drum unit is put it in unsatisfactory print quality. Figure 5-7 Caution ■ Wait to unpack the toner cartridge until immediately before you put in direct sunlight or room light, the unit may cause damage to use only Genuine Brother Brand replacement toner cartridges. Using or ... life of the printer itself and/or it from side to side five or six times to problems caused by the use of a drum unit. To protect your investment and guarantee your printer. Our warranty coverage does not apply to any problem that you do not refill the ...
...be shortened. ■ If an unpacked drum unit is put it in unsatisfactory print quality. Figure 5-7 Caution ■ Wait to unpack the toner cartridge until immediately before you put in direct sunlight or room light, the unit may cause damage to use only Genuine Brother Brand replacement toner cartridges. Using or ... life of the printer itself and/or it from side to side five or six times to problems caused by the use of a drum unit. To protect your investment and guarantee your printer. Our warranty coverage does not apply to any problem that you do not refill the ...
Users Manual - English
Page 104
Figure 5-11 Caution Make sure you put it in properly, the lock lever will lift automatically. If you fit the toner cartridge properly or it may separate from the drum unit. ROUTINE MAINTENANCE 5 - 6 Do not touch the shaded parts shown in Figure 5-9 and Figure 5-10 to prevent any degradation to the print quality. Figure 5-9 Figure 5-10 6 Put the new toner cartridge firmly into the drum unit until you have removed the protective cover. Caution Put the toner cartridge in the drum unit immediately after you hear it lock into place.
Figure 5-11 Caution Make sure you put it in properly, the lock lever will lift automatically. If you fit the toner cartridge properly or it may separate from the drum unit. ROUTINE MAINTENANCE 5 - 6 Do not touch the shaded parts shown in Figure 5-9 and Figure 5-10 to prevent any degradation to the print quality. Figure 5-9 Figure 5-10 6 Put the new toner cartridge firmly into the drum unit until you have removed the protective cover. Caution Put the toner cartridge in the drum unit immediately after you hear it lock into place.
Users Manual - English
Page 105
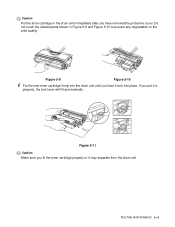
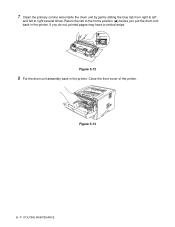
Figure 5-13 5 - 7 ROUTINE MAINTENANCE 7 Clean the primary corona wire inside the drum unit by gently sliding the blue tab from right to left and left to the home position (▲) before you do not, printed pages may have a vertical stripe. Close the front cover of the printer. Figure 5-12 8 Put the drum unit assembly back in the printer. If you put the drum unit back in the printer. Return the tab to right several times.
Figure 5-13 5 - 7 ROUTINE MAINTENANCE 7 Clean the primary corona wire inside the drum unit by gently sliding the blue tab from right to left and left to the home position (▲) before you do not, printed pages may have a vertical stripe. Close the front cover of the printer. Figure 5-12 8 Put the drum unit assembly back in the printer. If you put the drum unit back in the printer. Return the tab to right several times.
Users Manual - English
Page 106
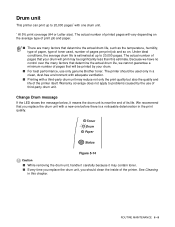
... should be significantly less than this chapter. We recommend that determine the actual drum life, such as the temperature, humidity, type of paper, type of pages that will be printed by the use only genuine Brother toner. Drum unit This printer can print up to 20,000 pages. Under ideal conditions, the... average drum life is estimated at up to 20,000 pages* with one before there is near the end...
... should be significantly less than this chapter. We recommend that determine the actual drum life, such as the temperature, humidity, type of paper, type of pages that will be printed by the use only genuine Brother toner. Drum unit This printer can print up to 20,000 pages. Under ideal conditions, the... average drum life is estimated at up to 20,000 pages* with one before there is near the end...
Users Manual - English
Page 107
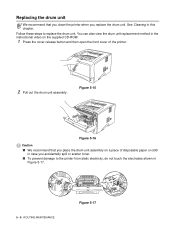
...; We recommend that you clean the printer when you replace the drum unit. You can also view the drum unit replacement method in the instructional video on a piece of the printer. 2 Pull out the drum unit assembly. Replacing the drum unit We recommend that you place the drum unit assembly on the supplied CD-ROM: 1 Press the cover release button...
...; We recommend that you clean the printer when you replace the drum unit. You can also view the drum unit replacement method in the instructional video on a piece of the printer. 2 Pull out the drum unit assembly. Replacing the drum unit We recommend that you place the drum unit assembly on the supplied CD-ROM: 1 Press the cover release button...
Users Manual - English
Page 108
...you put it off with a click. Figure 5-19 Caution Make sure you fit the toner cartridge properly, or it separate from the drum unit when you have questions, call your hands or clothes, immediately wipe or wash it in properly, the blue lock lever is lifted automatically... out of the unit. 4 Unpack the new drum unit. Figure 5-18 Caution Handle the toner cartridge carefully. If you pick up the drum unit tightly in a bag so that toner powder does not spill out of the drum unit assembly. ROUTINE MAINTENANCE 5 - 10 Caution Wait to unpack a drum unit until immediately before ...
...you put it off with a click. Figure 5-19 Caution Make sure you fit the toner cartridge properly, or it separate from the drum unit when you have questions, call your hands or clothes, immediately wipe or wash it in properly, the blue lock lever is lifted automatically... out of the unit. 4 Unpack the new drum unit. Figure 5-18 Caution Handle the toner cartridge carefully. If you pick up the drum unit tightly in a bag so that toner powder does not spill out of the drum unit assembly. ROUTINE MAINTENANCE 5 - 10 Caution Wait to unpack a drum unit until immediately before ...
Users Manual - English
Page 109
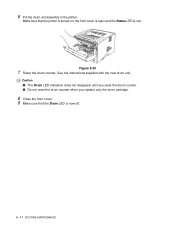
6 Put the drum unit assembly in the printer. See the instructions supplied with the new drum unit. Make sure that the Drum LED is red. Figure 5-20 7 Reset the drum counter. Caution ■ The Drum LED indication does not disappear until you reset the drum counter. ■ Do not reset the drum counter when you replace only the toner cartridge. 8 Close the front cover. 9 Make sure that the printer is turned on, the front cover is open and the Status LED is now off. 5 - 11 ROUTINE MAINTENANCE
6 Put the drum unit assembly in the printer. See the instructions supplied with the new drum unit. Make sure that the Drum LED is red. Figure 5-20 7 Reset the drum counter. Caution ■ The Drum LED indication does not disappear until you reset the drum counter. ■ Do not reset the drum counter when you replace only the toner cartridge. 8 Close the front cover. 9 Make sure that the printer is turned on, the front cover is open and the Status LED is now off. 5 - 11 ROUTINE MAINTENANCE
Users Manual - English
Page 110
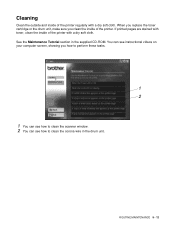
... cloth. ROUTINE MAINTENANCE 5 - 12 Cleaning Clean the outside and inside of the printer with a dry soft cloth. When you replace the toner cartridge or the drum unit, make sure you how to perform these tasks. 1 2 1 You can see how to clean the scanner window. 2 You can see instructional videos on your computer... inside of the printer. You can see how to clean the corona wire in the supplied CD-ROM. See the Maintenance Tutorial section in the drum unit.
... cloth. ROUTINE MAINTENANCE 5 - 12 Cleaning Clean the outside and inside of the printer with a dry soft cloth. When you replace the toner cartridge or the drum unit, make sure you how to perform these tasks. 1 2 1 You can see how to clean the scanner window. 2 You can see instructional videos on your computer... inside of the printer. You can see how to clean the corona wire in the supplied CD-ROM. See the Maintenance Tutorial section in the drum unit.
Users Manual - English
Page 112
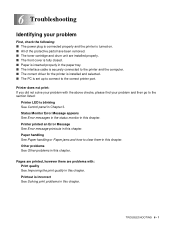
... power plug is connected properly and the printer is turned on. ■ All of the protective parts have been removed. ■ The toner cartridge and drum unit are installed properly. ■ The front cover is fully closed. ■ Paper is inserted properly in the paper tray. ■ The interface cable is securely...
... power plug is connected properly and the printer is turned on. ■ All of the protective parts have been removed. ■ The toner cartridge and drum unit are installed properly. ■ The front cover is fully closed. ■ Paper is inserted properly in the paper tray. ■ The interface cable is securely...
Users Manual - English
Page 118
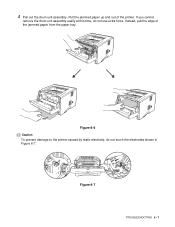
Pull the jammed paper up and out of the jammed paper from the paper tray. Instead, pull the edge of the printer. Figure 6-7 TROUBLESHOOTING 6 - 7 4 Pull out the drum unit assembly. If you cannot remove the drum unit assembly easily at this time, do not touch the electrodes shown in Figure 6-7. Figure 6-6 Caution To prevent damage to the printer caused by static electricity, do not use extra force.
Pull the jammed paper up and out of the jammed paper from the paper tray. Instead, pull the edge of the printer. Figure 6-7 TROUBLESHOOTING 6 - 7 4 Pull out the drum unit assembly. If you cannot remove the drum unit assembly easily at this time, do not touch the electrodes shown in Figure 6-7. Figure 6-6 Caution To prevent damage to the printer caused by static electricity, do not use extra force.
Users Manual - English
Page 120
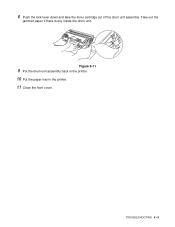
TROUBLESHOOTING 6 - 9 8 Push the lock lever down and take the toner cartridge out of the drum unit assembly. Take out the jammed paper if there is any inside the drum unit. Figure 6-11 9 Put the drum unit assembly back in the printer. 10 Put the paper tray in the printer. 11 Close the front cover.
TROUBLESHOOTING 6 - 9 8 Push the lock lever down and take the toner cartridge out of the drum unit assembly. Take out the jammed paper if there is any inside the drum unit. Figure 6-11 9 Put the drum unit assembly back in the printer. 10 Put the paper tray in the printer. 11 Close the front cover.
Users Manual - English
Page 121
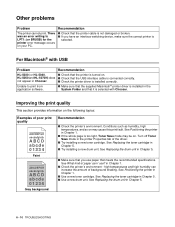
... high temperatures and high humidity can I use paper that the USB interface cable is turned on . See Replacing the drum unit in Chapter 5. ■ Try installing a new drum unit. HL-5050 and HL-5070N) does ■ Check that meets the recommended specifications. Improving the print quality This section provides information on may... is connected correctly. See Positioning the printer in the System Folder and that it is selected with USB Problem Recommendation HL-5030 (or HL-5040, ■ Check that the supplied Macintosh® printer driver is installed correctly.
... high temperatures and high humidity can I use paper that the USB interface cable is turned on . See Replacing the drum unit in Chapter 5. ■ Try installing a new drum unit. HL-5050 and HL-5070N) does ■ Check that meets the recommended specifications. Improving the print quality This section provides information on may... is connected correctly. See Positioning the printer in the System Folder and that it is selected with USB Problem Recommendation HL-5030 (or HL-5040, ■ Check that the supplied Macintosh® printer driver is installed correctly.
Users Manual - English
Page 122
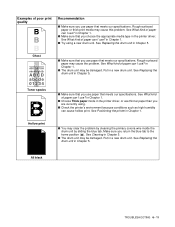
...paper can I use ? See What kind of paper can I use ? Make sure you are currently using a new drum unit. See Replacing the drum unit in a new drum unit. Put in Chapter 5. All black TROUBLESHOOTING 6 - 11 Rough-surfaced paper or thick print media may clear the problem by... ■ Make sure that you use paper that meets our specifications. See Replacing the drum unit in a new drum unit. Rough-surfaced paper may be damaged. See Cleaning in Chapter 5. ■ The drum unit may be damaged. Examples of poor print quality Recommendation ■ Make sure you choose...
...paper can I use ? See What kind of paper can I use ? Make sure you are currently using a new drum unit. See Replacing the drum unit in a new drum unit. Put in Chapter 5. All black TROUBLESHOOTING 6 - 11 Rough-surfaced paper or thick print media may clear the problem by... ■ Make sure that you use paper that meets our specifications. See Replacing the drum unit in a new drum unit. Rough-surfaced paper may be damaged. See Cleaning in Chapter 5. ■ The drum unit may be damaged. Examples of poor print quality Recommendation ■ Make sure you choose...
Users Manual - English
Page 123
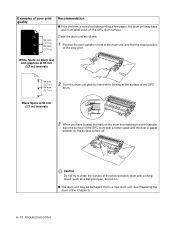
... the problem is not solved after printing a few pages, the drum unit may have glue from label stock on black text and graphics at 94 mm (3.7 in.) intervals 94 mm (3.7 in.) 94 mm (3.7 in.) 2 Turn the drum unit gear by hand while looking at 94 mm (3.7 in.) intervals ...surface of the photosensitive drum with a cotton swab until the dust or paper powder on . ■ The drum unit may be damaged. Examples of the OPC drum. See Replacing the drum unit in a new drum unit. White Spots on the OPC drum surface. Put in Chapter 5. 6 - 12 TROUBLESHOOTING Clean the drum unit as a ball-...
... the problem is not solved after printing a few pages, the drum unit may have glue from label stock on black text and graphics at 94 mm (3.7 in.) intervals 94 mm (3.7 in.) 94 mm (3.7 in.) 2 Turn the drum unit gear by hand while looking at 94 mm (3.7 in.) intervals ...surface of the photosensitive drum with a cotton swab until the dust or paper powder on . ■ The drum unit may be damaged. Examples of the OPC drum. See Replacing the drum unit in a new drum unit. White Spots on the OPC drum surface. Put in Chapter 5. 6 - 12 TROUBLESHOOTING Clean the drum unit as a ball-...
Users Manual - English
Page 124
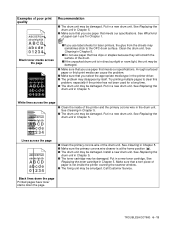
... damaged. A rough surfaced paper or thick print media can I use paper that meets our specifications. See Replacing the drum unit in a new drum unit. See Replacing the toner cartridge in a new drum unit. Put in Chapter 5. See Cleaning in Chapter 1. ■If you use label sheets for a long time. &#...that you use paper that has clips or staples because they will scratch the surface of the drum. ■If the unpacked drum unit is not inside of the drum unit. Put in a new drum unit. Black lines down the page Printed pages have toner stains down the page. in Chapter ...
... damaged. A rough surfaced paper or thick print media can I use paper that meets our specifications. See Replacing the drum unit in a new drum unit. See Replacing the toner cartridge in a new drum unit. Put in Chapter 5. See Cleaning in Chapter 1. ■If you use label sheets for a long time. &#...that you use paper that has clips or staples because they will scratch the surface of the drum. ■If the unpacked drum unit is not inside of the drum unit. Put in a new drum unit. Black lines down the page Printed pages have toner stains down the page. in Chapter ...


