Users Manual - English
Page 15
...6.8 The Alarm Indicator is On or Flashing 6-22 6.8.1 The Alarm Lamp is On ...6-22 6.8.2 The Alarm Lamp is Flashing ...6-22 6.9 Forcing the Printer to Print Remaining Data (When Printing is Halted 6-23 6.10 Cleaning the Density Sensor 6-24 CHAPTER 7 PAPER JAMS ...7-1 7.1 Clearing Paper Jams ...7-1 ... Jams in the Multi-purpose Tray 7-3 7.3 Paper Jams in the Paper Tray 7-4 7.4 Paper Jams Between the Print Head Cartridge and the Fuser Cartridge 7-6 Paper jams around the print head cartridge 7-6 Paper jams around the fuser cartridge 7-8 Paper longer than 355.6 mm (14 in.) jams 7-9 7.5 Paper...
...6.8 The Alarm Indicator is On or Flashing 6-22 6.8.1 The Alarm Lamp is On ...6-22 6.8.2 The Alarm Lamp is Flashing ...6-22 6.9 Forcing the Printer to Print Remaining Data (When Printing is Halted 6-23 6.10 Cleaning the Density Sensor 6-24 CHAPTER 7 PAPER JAMS ...7-1 7.1 Clearing Paper Jams ...7-1 ... Jams in the Multi-purpose Tray 7-3 7.3 Paper Jams in the Paper Tray 7-4 7.4 Paper Jams Between the Print Head Cartridge and the Fuser Cartridge 7-6 Paper jams around the print head cartridge 7-6 Paper jams around the fuser cartridge 7-8 Paper longer than 355.6 mm (14 in.) jams 7-9 7.5 Paper...

Users Manual - English
Page 16
... Introduction to the Optional and Consumable Items A-1 A.1.1 Options ...A-1 Hard Disk ...A-1 2 Tray Module...A-1 Memory Expansion Card ...A-1 A.1.2 Consumable Items ...A-2 Toner Cartridges ...A-2 Print Head Cartridge ...A-2 Transfer Roll Cartridge ...A-2 A.2 Getting Product Support Information A-3 A.3 General Specifications ...A-4 A.3.1 Printer Specifications...A-4 A.3.2 Network Specifications...A-7 Common Specifications ...A-7 TCP/IP Specifications ...A-7 NetBIOS Specifications ...A-7 NetWare Specifications...A-7 AppleTalk Specifications ...A-7 A.3.3 Printable Area ...A-8 A.4 Life Span of...
... Introduction to the Optional and Consumable Items A-1 A.1.1 Options ...A-1 Hard Disk ...A-1 2 Tray Module...A-1 Memory Expansion Card ...A-1 A.1.2 Consumable Items ...A-2 Toner Cartridges ...A-2 Print Head Cartridge ...A-2 Transfer Roll Cartridge ...A-2 A.2 Getting Product Support Information A-3 A.3 General Specifications ...A-4 A.3.1 Printer Specifications...A-4 A.3.2 Network Specifications...A-7 Common Specifications ...A-7 TCP/IP Specifications ...A-7 NetBIOS Specifications ...A-7 NetWare Specifications...A-7 AppleTalk Specifications ...A-7 A.3.3 Printable Area ...A-8 A.4 Life Span of...

Users Manual - English
Page 27
xxvii • When you remove the transfer roll cartridge from the printer because the waste toner collection box is full, do not attempt to empty the waste toner box and reuse the cartridge, as toner may spill inside the printer and deteriorate print quality. • Do not tilt or shake the print head cartridges or transfer roll cartridges when removing them temporarily. Loose toner can spill inside the printer and deteriorate print quality. Loose toner can spill inside the printer and cause damage.
xxvii • When you remove the transfer roll cartridge from the printer because the waste toner collection box is full, do not attempt to empty the waste toner box and reuse the cartridge, as toner may spill inside the printer and deteriorate print quality. • Do not tilt or shake the print head cartridges or transfer roll cartridges when removing them temporarily. Loose toner can spill inside the printer and deteriorate print quality. Loose toner can spill inside the printer and cause damage.

Users Manual - English
Page 43
... from overheating. Press [I] to turn it is printed. Use button B to open the upper part of the printer are output here, printed side facedown. The shaded part of the illustration above. The printer's power switch. Use button A to open the whole front cover. Use the meter as a guide to turn...Grille 9 Power Switch 10 Button B 11 Button A 12 Paper Meter Description Load paper here. Use this tray to clear paper jams, replace the print head cartridge, or transfer roll cartridge. Use the buttons and display to dissipate. Allows internal heat to control the printer.
... from overheating. Press [I] to turn it is printed. Use button B to open the upper part of the printer are output here, printed side facedown. The shaded part of the illustration above. The printer's power switch. Use button A to open the whole front cover. Use the meter as a guide to turn...Grille 9 Power Switch 10 Button B 11 Button A 12 Paper Meter Description Load paper here. Use this tray to clear paper jams, replace the print head cartridge, or transfer roll cartridge. Use the buttons and display to dissipate. Allows internal heat to control the printer.
Users Manual - English
Page 116
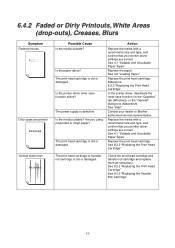
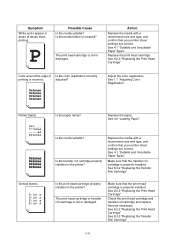
... Vertical black lines Possible Cause Is the media suitable? See 4.1 "Suitable and Unsuitable Paper Types" Replace the print head cartridge. The print head cartridge is defective. Is the printer driver toner save function on the "Graphics" tab (Windows), or the "General" dialog box (Macintosh). See 4.2... Types" Replace the paper. Replace the media with a recommend size and type, and confirm that your dealer or Brother authorized service representative. See 8.2.2 "Replacing the Print Head Cartridge" The print head cartridge or transfer roll cartridge is old or damaged.
... Vertical black lines Possible Cause Is the media suitable? See 4.1 "Suitable and Unsuitable Paper Types" Replace the print head cartridge. The print head cartridge is defective. Is the printer driver toner save function on the "Graphics" tab (Windows), or the "General" dialog box (Macintosh). See 4.2... Types" Replace the paper. Replace the media with a recommend size and type, and confirm that your dealer or Brother authorized service representative. See 8.2.2 "Replacing the Print Head Cartridge" The print head cartridge or transfer roll cartridge is old or damaged.
Users Manual - English
Page 117
...unwrapped for a long time (especially in the paper path. The transfer roll cartridge is old or damaged. Check the print head cartridge and transfer roll cartridge and replace them as necessary. Hair-like marks appear around areas of dense black printing. Is the...Reference 4.2 "Loading Paper" Replace the media with a recommend size and type, and confirm that your printer driver settings are correct. See 8.3.2 "Replacing the Transfer Roll Cartridge" 6-9 The print head cartridge or transfer roll cartridge is old or damaged. Replace the paper. See 8.2.2 "Replacing the ...
...unwrapped for a long time (especially in the paper path. The transfer roll cartridge is old or damaged. Check the print head cartridge and transfer roll cartridge and replace them as necessary. Hair-like marks appear around areas of dense black printing. Is the...Reference 4.2 "Loading Paper" Replace the media with a recommend size and type, and confirm that your printer driver settings are correct. See 8.3.2 "Replacing the Transfer Roll Cartridge" 6-9 The print head cartridge or transfer roll cartridge is old or damaged. Replace the paper. See 8.2.2 "Replacing the ...
Users Manual - English
Page 118
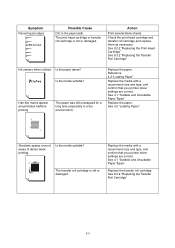
... a recommend size and type, and confirm that the print head cartridge is properly installed. See 8.3.2 "Replacing the Transfer Roll Cartridge" Is the print head cartridge properly installed in the printer? The print head cartridge or transfer roll cartridge is old or damaged. See... 8.2.2 "Replacing the Print Head Cartridge" Check the print head cartridge and transfer roll cartridge and replace them as...
... a recommend size and type, and confirm that the print head cartridge is properly installed. See 8.3.2 "Replacing the Transfer Roll Cartridge" Is the print head cartridge properly installed in the printer? The print head cartridge or transfer roll cartridge is old or damaged. See... 8.2.2 "Replacing the Print Head Cartridge" Check the print head cartridge and transfer roll cartridge and replace them as...

Users Manual - English
Page 126
... paper jammed in the paper rotator used for duplex printing. See 7.4 "Paper Jams Between the Print Head Cartridge and Fuser Cartridge" There is paper jammed in the printer. Action: Remove the transfer roll cartridge and clean the density sensor. Action: Press button B, open the... toner cartridge. See 8.1.2 "Replacing the Toner Cartridges" There is no yellow toner cartridge inserted in the printer or the cartridge is no paper jammed in the printer. Action: Replace the print head cartridge. Action: Press button A or B, open the front cover and remove the jammed media. Action...
... paper jammed in the paper rotator used for duplex printing. See 7.4 "Paper Jams Between the Print Head Cartridge and Fuser Cartridge" There is paper jammed in the printer. Action: Remove the transfer roll cartridge and clean the density sensor. Action: Press button B, open the... toner cartridge. See 8.1.2 "Replacing the Toner Cartridges" There is no yellow toner cartridge inserted in the printer or the cartridge is no paper jammed in the printer. Action: Replace the print head cartridge. Action: Press button A or B, open the front cover and remove the jammed media. Action...
Users Manual - English
Page 128
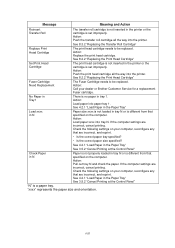
...8226; Is the correct paper tray specified? • Is the correct paper size specified? Action: Push the print head cartridge all the way into the printer. Action: Call your computer, reconfigure any that are incorrect, cancel printing. "xxxx" represents the paper size and orientation... in N specified on your dealer or Brother Customer Service for a replacement Fuser cartridge. See 8.2.2 "Replacing the Print Head Cartridge" Set Print Head Cartridge The print head cartridge is set improperly. No Paper in Tray1 There is no paper in the printer or the cartridge is not inserted in...
...8226; Is the correct paper tray specified? • Is the correct paper size specified? Action: Push the print head cartridge all the way into the printer. Action: Call your computer, reconfigure any that are incorrect, cancel printing. "xxxx" represents the paper size and orientation... in N specified on your dealer or Brother Customer Service for a replacement Fuser cartridge. See 8.2.2 "Replacing the Print Head Cartridge" Set Print Head Cartridge The print head cartridge is set improperly. No Paper in Tray1 There is no paper in the printer or the cartridge is not inserted in...
Users Manual - English
Page 135
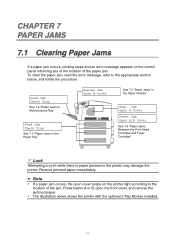
...paper jam, read the error message, refer to print while there is paper jammed in the Paper Rotator" Regi. The illustration above shows the printer with the optional 2 Tray Module installed. 7-1 CHAPTER 7 PAPER JAMS 7.1 Clearing Paper Jams If a paper jam occurs, printing stops and ... Jams in the Paper Tray" Duplex Jam Open B-Cover See 7.5 "Paper Jams in the printer may damage the 0 printer. Jam Open A-Cover Fuser Jam Open A/B Cover See 7.4 "Paper Jams Between the Print Head Cartridge and Fuser Cartridge" Look Attempting to the appropriate section below, and follow the procedure....
...paper jam, read the error message, refer to print while there is paper jammed in the Paper Rotator" Regi. The illustration above shows the printer with the optional 2 Tray Module installed. 7-1 CHAPTER 7 PAPER JAMS 7.1 Clearing Paper Jams If a paper jam occurs, printing stops and ... Jams in the Paper Tray" Duplex Jam Open B-Cover See 7.5 "Paper Jams in the printer may damage the 0 printer. Jam Open A-Cover Fuser Jam Open A/B Cover See 7.4 "Paper Jams Between the Print Head Cartridge and Fuser Cartridge" Look Attempting to the appropriate section below, and follow the procedure....
Users Manual - English
Page 141
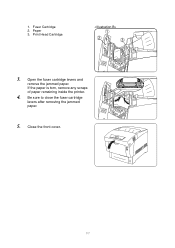
Open the fuser cartridge levers and remove the jammed paper. If the paper is torn, remove any scraps of paper remaining inside the printer. 4. Paper 3. Be sure to close the fuser cartridge levers after removing the jammed paper. 5. Print Head Cartridge 3. Close the front cover. 7-7 1. Fuser Cartridge 2.
Open the fuser cartridge levers and remove the jammed paper. If the paper is torn, remove any scraps of paper remaining inside the printer. 4. Paper 3. Be sure to close the fuser cartridge levers after removing the jammed paper. 5. Print Head Cartridge 3. Close the front cover. 7-7 1. Fuser Cartridge 2.

Users Manual - English
Page 152
...install them. Using a print head cartridge that is not recommended may spill inside the printer and cause damage. • To ensure good print quality, keep the print head cartridge level when handling it. • Only use print head cartridges recommended by Brother. Storage Precautions • Do... not unpack new print head cartridges until you are ...
...install them. Using a print head cartridge that is not recommended may spill inside the printer and cause damage. • To ensure good print quality, keep the print head cartridge level when handling it. • Only use print head cartridges recommended by Brother. Storage Precautions • Do... not unpack new print head cartridges until you are ...
Users Manual - English
Page 153
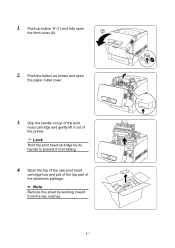
1. Grip the handle on top of the print head cartridge and gently lift it from the two notches. 8-7 Look Hold the print head cartridge by its 1 handle to prevent it out of the aluminum package. ✏ Note Remove the sheet by working inward from falling. 4. Push the button as shown and open the front cover (2). 2. Open the top of the new print head cartridge box and pull of the top part of the printer. Push up button 'A' (1) and fully open the paper outlet cover. 3.
1. Grip the handle on top of the print head cartridge and gently lift it from the two notches. 8-7 Look Hold the print head cartridge by its 1 handle to prevent it out of the aluminum package. ✏ Note Remove the sheet by working inward from falling. 4. Push the button as shown and open the front cover (2). 2. Open the top of the new print head cartridge box and pull of the top part of the printer. Push up button 'A' (1) and fully open the paper outlet cover. 3.

Users Manual - English
Page 154
... by the 2 handle. Do not allow the cartridge to touch anything when removing it from the print head cartridge (2). 8-8 Remove the tape from the top of the 4 seals to transport the printer over long distances in the future. 8. Place the cartridge onto a flat surface. Grip the handle on both ...sides and remove it . Pull the seals straight out. ✏ Note Keep the print head cartridge polystyrene packing, aluminum package, and box in ...
... by the 2 handle. Do not allow the cartridge to touch anything when removing it from the print head cartridge (2). 8-8 Remove the tape from the top of the 4 seals to transport the printer over long distances in the future. 8. Place the cartridge onto a flat surface. Grip the handle on both ...sides and remove it . Pull the seals straight out. ✏ Note Keep the print head cartridge polystyrene packing, aluminum package, and box in ...
Users Manual - English
Page 155
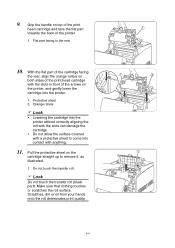
...cartridge facing the rear, align the orange rollers on both sides of the print head cartridge with the slots in front of the printer. 1. Pull the protective sheet on the printer, and gently lower the cartridge into the printer without correctly aligning the roll with the slots can damage the cartridge. Orange ... sure that nothing touches or scratches the roll surface. Flat part facing to the rear 10. Grip the handle on top of the print head cartridge and face the flat part towards the back of the arrows on the cartridge straight up to come into contact with a protective sheet ...
...cartridge facing the rear, align the orange rollers on both sides of the print head cartridge with the slots in front of the printer. 1. Pull the protective sheet on the printer, and gently lower the cartridge into the printer without correctly aligning the roll with the slots can damage the cartridge. Orange ... sure that nothing touches or scratches the roll surface. Flat part facing to the rear 10. Grip the handle on top of the print head cartridge and face the flat part towards the back of the arrows on the cartridge straight up to come into contact with a protective sheet ...

Users Manual - English
Page 169
Hold the print head cartridge by its handle to prevent the cartridge from the rear of the printer. 1. Push the button as shown and open the front cover (2). 11. Remove the tray cover from falling. 8-23 Grip the handle on top of the print head cartridge and gently lift it out of the printer. 10. Push up button 'A' (1) and fully open the paper outlet cover. 12. Transfer roll Look Do not touch the transfer roll. 9.
Hold the print head cartridge by its handle to prevent the cartridge from the rear of the printer. 1. Push the button as shown and open the front cover (2). 11. Remove the tray cover from falling. 8-23 Grip the handle on top of the print head cartridge and gently lift it out of the printer. 10. Push up button 'A' (1) and fully open the paper outlet cover. 12. Transfer roll Look Do not touch the transfer roll. 9.

Users Manual - English
Page 170
Look After moving the printer to the new 6 location, you need to 1.1 "Adjusting Color Registration". 8-24 Close the paper outlet cover. 14. Close the front cover. 15. To protect the printer from damage, pack it in its aluminum package or thick paper to avoid exposing it . For details about this operation, refer to readjust the color registration. ✏ Note Wrap the print head cartridge in a box before transporting it to direct sunlight or other strong light. 13.
Look After moving the printer to the new 6 location, you need to 1.1 "Adjusting Color Registration". 8-24 Close the paper outlet cover. 14. Close the front cover. 15. To protect the printer from damage, pack it in its aluminum package or thick paper to avoid exposing it . For details about this operation, refer to readjust the color registration. ✏ Note Wrap the print head cartridge in a box before transporting it to direct sunlight or other strong light. 13.

Users Manual - English
Page 173
For the installation procedure, refer to 8.3.2 "Replacing the Transfer Roll Cartridge". Transfer Roll Cartridge The transfer roll cartridge consists of the light-sensitive drum, the developer and the transfer roll. For the installation procedure, refer to 8.1.2 "Replacing Toner Cartridges". A-2 For the installation procedure, refer to 8.2.2 "Replacing the Print Head Cartridge". A.1.2 Consumable Items Toner Cartridges The printer uses four toner cartridges: black, yellow magenta, and cyan. Print Head Cartridge Consists of a transfer roll and a waste toner collection box.
For the installation procedure, refer to 8.3.2 "Replacing the Transfer Roll Cartridge". Transfer Roll Cartridge The transfer roll cartridge consists of the light-sensitive drum, the developer and the transfer roll. For the installation procedure, refer to 8.1.2 "Replacing Toner Cartridges". A-2 For the installation procedure, refer to 8.2.2 "Replacing the Print Head Cartridge". A.1.2 Consumable Items Toner Cartridges The printer uses four toner cartridges: black, yellow magenta, and cyan. Print Head Cartridge Consists of a transfer roll and a waste toner collection box.

Quick Setup Guide - English
Page 1
Color Laser Printer HL-4000CN Quick Setup Guide Read the "REGULATIONS" sheet first to ensure that all the paper is under the tabs. 5 Align the side paper guides with the label side 4 Turn the levers by Install Software.) Maintenance Tutorial Instructional movie for printer maintenance. If you ... tips, or learn about special print solutions. ©2002 Brother Industries, Ltd. ©1998-2002 TROY XCD Inc. and other brand and product names mentioned in Japan Printer CD-ROM (including User's Guide) Print head cartridge For Windows® For Macintosh® AC power cord...
Color Laser Printer HL-4000CN Quick Setup Guide Read the "REGULATIONS" sheet first to ensure that all the paper is under the tabs. 5 Align the side paper guides with the label side 4 Turn the levers by Install Software.) Maintenance Tutorial Instructional movie for printer maintenance. If you ... tips, or learn about special print solutions. ©2002 Brother Industries, Ltd. ©1998-2002 TROY XCD Inc. and other brand and product names mentioned in Japan Printer CD-ROM (including User's Guide) Print head cartridge For Windows® For Macintosh® AC power cord...

Service Manual
Page 259
...Feed/Set button to print the parameters. Select [CE Maintenance Parameter] with the ® and ® buttons. 5. HL-4000CN MCU Parameter List Serial No. 00000 Registration Adjust Slow Scan Paper from Black : 0 Registration Adjust Slow Scan, 600dpi, ...Black Toner Dispense Time : 648 TRANSFER ROLL CARTRIDGE1 Sheets : TRANSFER ROLL CARTRIDGE2 Dispense Time 3041 Printer Sheets : 373 Printer Head Sheets : 369 Printer Head Time : 8183 Printer Head Yellow Dispense : 645 Printer Head Magenta Dispense : 782 V-54 Select [Parameter Print] with the 0 and 0 buttons. 3. ...
...Feed/Set button to print the parameters. Select [CE Maintenance Parameter] with the ® and ® buttons. 5. HL-4000CN MCU Parameter List Serial No. 00000 Registration Adjust Slow Scan Paper from Black : 0 Registration Adjust Slow Scan, 600dpi, ...Black Toner Dispense Time : 648 TRANSFER ROLL CARTRIDGE1 Sheets : TRANSFER ROLL CARTRIDGE2 Dispense Time 3041 Printer Sheets : 373 Printer Head Sheets : 369 Printer Head Time : 8183 Printer Head Yellow Dispense : 645 Printer Head Magenta Dispense : 782 V-54 Select [Parameter Print] with the 0 and 0 buttons. 3. ...


