
Users Manual - English
Page 9
button ...76 Back...77 OK ...77 LEDs ...77 LCD ...77 Back light (HL-3070CW only) ...78 LCD messages ...78 Reprinting documents...Maintenance 102 Replacing the consumable items...102 Toner cartridges ...104 Drum units ...112 Belt unit...118 Waste toner box ...122 Cleaning ...128 Cleaning the outside of the printer 128 Cleaning the LED head ...130 Cleaning the corona wires ...131... tray 148 Jam Rear (Paper jam behind the back cover 149 Jam Inside (Paper jam inside the printer 151 Improving the print quality...154 Solving print problems ...161 viii 3 Control Panel 75 Control panel ...75...
button ...76 Back...77 OK ...77 LEDs ...77 LCD ...77 Back light (HL-3070CW only) ...78 LCD messages ...78 Reprinting documents...Maintenance 102 Replacing the consumable items...102 Toner cartridges ...104 Drum units ...112 Belt unit...118 Waste toner box ...122 Cleaning ...128 Cleaning the outside of the printer 128 Cleaning the LED head ...130 Cleaning the corona wires ...131... tray 148 Jam Rear (Paper jam behind the back cover 149 Jam Inside (Paper jam inside the printer 151 Improving the print quality...154 Solving print problems ...161 viii 3 Control Panel 75 Control panel ...75...
Users Manual - English
Page 95
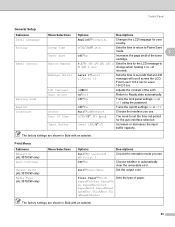
...From Level 1=0.2 sec to automatically clear the removable error. LCD Contrast -nnonn+ Adjusts the contrast of the toner cartridge. Input Buffer Level 1/2/3/4*.../7 Increases or decreases the input buffer capacity. Choose whether to Level 10=2.0 sec. Changes ... settings On or Off. at intervals. Set the output color. Print Menu Submenu Emulation (HL-3070CW only) Auto Continue Output Color (HL-3070CW only) Media Type (HL-3070CW only) Menu Selections Options Auto*/HP LaserJet/ BR-Script 3 Off*/On Auto*/Color/Mono Descriptions Choose the emulation mode you use . Select ...
...From Level 1=0.2 sec to automatically clear the removable error. LCD Contrast -nnonn+ Adjusts the contrast of the toner cartridge. Input Buffer Level 1/2/3/4*.../7 Increases or decreases the input buffer capacity. Choose whether to Level 10=2.0 sec. Changes ... settings On or Off. at intervals. Set the output color. Print Menu Submenu Emulation (HL-3070CW only) Auto Continue Output Color (HL-3070CW only) Media Type (HL-3070CW only) Menu Selections Options Auto*/HP LaserJet/ BR-Script 3 Off*/On Auto*/Color/Mono Descriptions Choose the emulation mode you use . Select ...
Users Manual - English
Page 112
...000 pages 1 See page 122 WT-200CL 1 A4 or Letter size single-sided pages. 2 Approx. Black Drum Unit. 7 Contains 1 pc. cartridge yield is approximate and may want to buy spare consumable items before they reach the end of use. 5 Contains 4 pc. To avoid any inconvenience..., you may vary by type of their life. Color Drum Unit. 102 LCD messages Consumable Approximate life item to replace How to replace the consumable items before the printer stops printing. Drum Set. 6 Contains 1 pc. These messages provide advanced warnings to ...
...000 pages 1 See page 122 WT-200CL 1 A4 or Letter size single-sided pages. 2 Approx. Black Drum Unit. 7 Contains 1 pc. cartridge yield is approximate and may want to buy spare consumable items before they reach the end of use. 5 Contains 4 pc. To avoid any inconvenience..., you may vary by type of their life. Color Drum Unit. 102 LCD messages Consumable Approximate life item to replace How to replace the consumable items before the printer stops printing. Drum Set. 6 Contains 1 pc. These messages provide advanced warnings to ...
Users Manual - English
Page 113
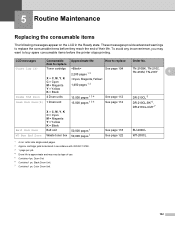
...K C = Cyan M = Magenta Y = Yellow K = Black Drum Error 8 Drum unit Replace the Drum Unit. cartridge yield is declared in accordance with ISO/IEC 19798. 3 1 page per job. 4 Drum life is approximate and may ...kit1 Paper feeding kit 50,000 pages 1 Call your dealer or Brother Customer Service for a replacement paper feeding kit 1. 1 A4 or... corona wires. (See Cleaning the corona wires on Drum Unit. Color Drum Unit. 8 The Drum Error message has two cases: If...Maintenance You will need to replace certain parts and clean the printer regularly. Replace Belt Belt unit 15,000 pages 1 3 4...
...K C = Cyan M = Magenta Y = Yellow K = Black Drum Error 8 Drum unit Replace the Drum Unit. cartridge yield is declared in accordance with ISO/IEC 19798. 3 1 page per job. 4 Drum life is approximate and may ...kit1 Paper feeding kit 50,000 pages 1 Call your dealer or Brother Customer Service for a replacement paper feeding kit 1. 1 A4 or... corona wires. (See Cleaning the corona wires on Drum Unit. Color Drum Unit. 8 The Drum Error message has two cases: If...Maintenance You will need to replace certain parts and clean the printer regularly. Replace Belt Belt unit 15,000 pages 1 3 4...
Users Manual - English
Page 114
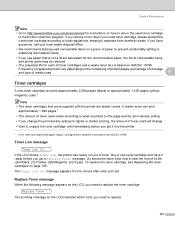
...used toner cartridge, please discard the used toner cartridge according to local regulations, keeping it into the printer. 1 A4 or Letter size single-sided pages. To replace the toner cartridge, see Replacing the toner cartridges on page 105. Routine Maintenance Note • Go to http://www.brother-usa.... ready before you put it separate from domestic waste. If you need to replace the toner cartridge: Replace Toner The scrolling message on the LCD indicates which color you choose not to return your local waste disposal office. • We recommend placing used consumable...
...used toner cartridge, please discard the used toner cartridge according to local regulations, keeping it into the printer. 1 A4 or Letter size single-sided pages. To replace the toner cartridge, see Replacing the toner cartridges on page 105. Routine Maintenance Note • Go to http://www.brother-usa.... ready before you put it separate from domestic waste. If you need to replace the toner cartridge: Replace Toner The scrolling message on the LCD indicates which color you choose not to return your local waste disposal office. • We recommend placing used consumable...
Users Manual - English
Page 115
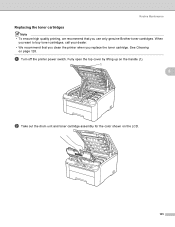
Fully open the top cover by lifting up on the handle (1). 1 5 b Take out the drum unit and toner cartridge assembly for the color shown on page 128. When you want to buy toner cartridges, call your dealer. • We recommend that you replace the toner cartridge. Routine Maintenance Replacing the toner cartridges 5 Note • To ensure high quality printing, we recommend that you clean the printer when you use only genuine Brother toner cartridges. See Cleaning on the LCD. 105 a Turn off the printer power switch.
Fully open the top cover by lifting up on the handle (1). 1 5 b Take out the drum unit and toner cartridge assembly for the color shown on page 128. When you want to buy toner cartridges, call your dealer. • We recommend that you replace the toner cartridge. Routine Maintenance Replacing the toner cartridges 5 Note • To ensure high quality printing, we recommend that you clean the printer when you use only genuine Brother toner cartridges. See Cleaning on the LCD. 105 a Turn off the printer power switch.
Users Manual - English
Page 116
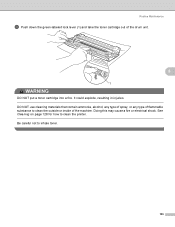
Routine Maintenance c Push down the green-labeled lock lever (1) and take the toner cartridge out of the machine. See Cleaning on page 128 for how to inhale toner. 106 Doing this may cause a fire or electrical shock. It could explode, resulting in injuries. Be careful not to clean the printer. DO NOT use cleaning materials that contain ammonia, alcohol, any type of spray, or any type of flammable substance to clean the outside or inside of the drum unit. 5 1 WARNING DO NOT put a toner cartridge into a fire.
Routine Maintenance c Push down the green-labeled lock lever (1) and take the toner cartridge out of the machine. See Cleaning on page 128 for how to inhale toner. 106 Doing this may cause a fire or electrical shock. It could explode, resulting in injuries. Be careful not to clean the printer. DO NOT use cleaning materials that contain ammonia, alcohol, any type of spray, or any type of flammable substance to clean the outside or inside of the drum unit. 5 1 WARNING DO NOT put a toner cartridge into a fire.

Users Manual - English
Page 117
...of the cartridge. • Go to the brother collection ...program. Routine Maintenance IMPORTANT • We recommend that toner powder does not spill out of disposable paper or cloth underneath it in case you accidentally spill or scatter toner. • To prevent damage to seal up the toner cartridge tightly in the illustration. 5 • Handle the toner cartridge... carefully. If toner scatters on how to return the used toner cartridge... drum unit and toner cartridge assembly on a clean,...
...of the cartridge. • Go to the brother collection ...program. Routine Maintenance IMPORTANT • We recommend that toner powder does not spill out of disposable paper or cloth underneath it in case you accidentally spill or scatter toner. • To prevent damage to seal up the toner cartridge tightly in the illustration. 5 • Handle the toner cartridge... carefully. If toner scatters on how to return the used toner cartridge... drum unit and toner cartridge assembly on a clean,...
Users Manual - English
Page 118
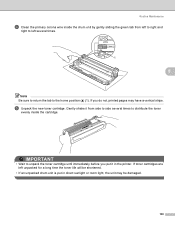
e Unpack the new toner cartridge. If you put in the printer. If toner cartridges are left several times to distribute the toner evenly inside the drum unit by gently sliding the green tab from side to side several times. 1 5 ... in direct sunlight or room light, the unit may have a vertical stripe. Routine Maintenance d Clean the primary corona wire inside the cartridge. IMPORTANT • Wait to unpack the toner cartridge until immediately before you do not, printed pages may be shortened. • If an unpacked drum unit is put it from left...
e Unpack the new toner cartridge. If you put in the printer. If toner cartridges are left several times to distribute the toner evenly inside the drum unit by gently sliding the green tab from side to side several times. 1 5 ... in direct sunlight or room light, the unit may have a vertical stripe. Routine Maintenance d Clean the primary corona wire inside the cartridge. IMPORTANT • Wait to unpack the toner cartridge until immediately before you do not, printed pages may be shortened. • If an unpacked drum unit is put it from left...

Users Manual - English
Page 119
... you continue to a level of optimum performance when used . To protect your printer. CAUTION Routine Maintenance Put the toner cartridge in unsatisfactory print quality. Brother cannot guarantee this machine, any repairs required as a result of unauthorized third party toner and/or cartridges. If damage is caused by the warranty. 109 To prevent any problem...
... you continue to a level of optimum performance when used . To protect your printer. CAUTION Routine Maintenance Put the toner cartridge in unsatisfactory print quality. Brother cannot guarantee this machine, any repairs required as a result of unauthorized third party toner and/or cartridges. If damage is caused by the warranty. 109 To prevent any problem...
Users Manual - English
Page 120
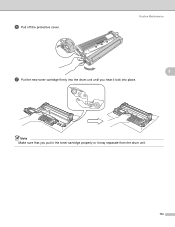
Routine Maintenance 5 g Put the new toner cartridge firmly into place. Note Make sure that you hear it lock into the drum unit until you put in the toner cartridge properly or it may separate from the drum unit. 110 f Pull off the protective cover.
Routine Maintenance 5 g Put the new toner cartridge firmly into place. Note Make sure that you hear it lock into the drum unit until you put in the toner cartridge properly or it may separate from the drum unit. 110 f Pull off the protective cover.

Users Manual - English
Page 121
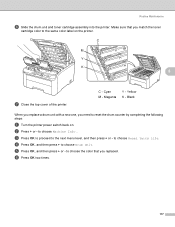
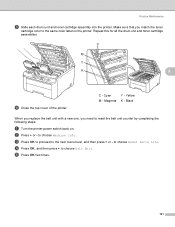
C M Y K 5 i Close the top cover of the printer. Magenta Y - Routine Maintenance h Slide the drum unit and toner cartridge assembly into the printer. Cyan M - Black j Turn the printer power switch back on the printer. Make sure that you match the toner cartridge color to the same color label on . C - Yellow K - Note DO NOT turn off the printer power switch or open the top cover until the LCD shows Ready. 111
C M Y K 5 i Close the top cover of the printer. Magenta Y - Routine Maintenance h Slide the drum unit and toner cartridge assembly into the printer. Cyan M - Black j Turn the printer power switch back on the printer. Make sure that you match the toner cartridge color to the same color label on . C - Yellow K - Note DO NOT turn off the printer power switch or open the top cover until the LCD shows Ready. 111

Users Manual - English
Page 124
...any type of spray, or any type of flammable substance to clean the outside or inside of the drum unit. 1 WARNING DO NOT put a toner cartridge into a fire. Doing this may cause a fire or electrical shock. It could explode, resulting in injuries. Be careful not to inhale toner. 114 ...Routine Maintenance b Take out the drum unit and toner cartridge assembly for the color shown on page 128 for how to clean the printer. See Cleaning on the LCD. 5 c Push down the green-labeled lock lever (1) and take the toner...
...any type of spray, or any type of flammable substance to clean the outside or inside of the drum unit. 1 WARNING DO NOT put a toner cartridge into a fire. Doing this may cause a fire or electrical shock. It could explode, resulting in injuries. Be careful not to inhale toner. 114 ...Routine Maintenance b Take out the drum unit and toner cartridge assembly for the color shown on page 128 for how to clean the printer. See Cleaning on the LCD. 5 c Push down the green-labeled lock lever (1) and take the toner...

Users Manual - English
Page 125
...case you accidentally spill or scatter toner. • To prevent damage to the printer from domestic waste. If you have questions, call your used toner cartridge, please discard the used toner cartridge to the brother collection program. If you choose not to return your local waste disposal office.... tightly in the illustrations. Routine Maintenance IMPORTANT • We recommend that toner powder does not spill out of the cartridge. • Go to http://www.brother-usa.com/environment/ for instructions on a clean, flat surface with a sheet of disposable paper or cloth underneath it...
...case you accidentally spill or scatter toner. • To prevent damage to the printer from domestic waste. If you have questions, call your used toner cartridge, please discard the used toner cartridge to the brother collection program. If you choose not to return your local waste disposal office.... tightly in the illustrations. Routine Maintenance IMPORTANT • We recommend that toner powder does not spill out of the cartridge. • Go to http://www.brother-usa.com/environment/ for instructions on a clean, flat surface with a sheet of disposable paper or cloth underneath it...
Users Manual - English
Page 126
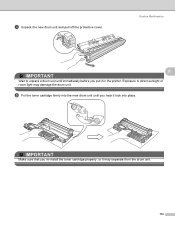
Routine Maintenance 5 IMPORTANT Wait to direct sunlight or room light may separate from the drum unit. 116 Exposure to unpack a drum unit until you re-install the toner cartridge properly, or it lock into place. IMPORTANT Make sure that you hear it may damage the drum unit. e Put the toner cartridge firmly into the new drum unit until immediately before you put it in the printer. d Unpack the new drum unit and pull off the protective cover.
Routine Maintenance 5 IMPORTANT Wait to direct sunlight or room light may separate from the drum unit. 116 Exposure to unpack a drum unit until you re-install the toner cartridge properly, or it lock into place. IMPORTANT Make sure that you hear it may damage the drum unit. e Put the toner cartridge firmly into the new drum unit until immediately before you put it in the printer. d Unpack the new drum unit and pull off the protective cover.
Users Manual - English
Page 127
... new one, you need to choose the color that you replaced. to reset the drum counter by completing the following steps: a Turn the printer power switch back on the printer. Make sure that you match the toner cartridge color to choose Machine Info.. Routine Maintenance f... Slide the drum unit and toner cartridge assembly into the printer. Yellow K - to the same color label on . C - to...
... new one, you need to choose the color that you replaced. to reset the drum counter by completing the following steps: a Turn the printer power switch back on the printer. Make sure that you match the toner cartridge color to choose Machine Info.. Routine Maintenance f... Slide the drum unit and toner cartridge assembly into the printer. Yellow K - to the same color label on . C - to...
Users Manual - English
Page 129
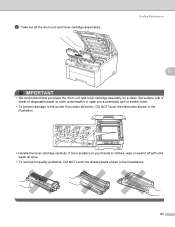
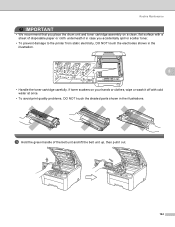
...that you place the drum unit and toner cartridge assembly on your hands or clothes, wipe or wash it off with a sheet of disposable paper or cloth underneath it in case you accidentally spill or scatter toner. • To prevent damage to the printer from static electricity, DO NOT touch the ...electrodes shown in the illustrations. 119 b Take out all the drum unit and toner cartridge assemblies.
...that you place the drum unit and toner cartridge assembly on your hands or clothes, wipe or wash it off with a sheet of disposable paper or cloth underneath it in case you accidentally spill or scatter toner. • To prevent damage to the printer from static electricity, DO NOT touch the ...electrodes shown in the illustrations. 119 b Take out all the drum unit and toner cartridge assemblies.
Users Manual - English
Page 131
.... C - Black When you replace the belt unit with a new one, you match the toner cartridge color to reset the belt unit counter by completing the following steps: a Turn the printer power switch back on the printer. b Press + or - to choose Belt Unit. Yellow M - to the next menu level, and then... to proceed to choose Reset Parts Life. Magenta K - e Press OK two times. 121 Routine Maintenance e Slide each drum unit and toner cartridge assembly into the printer. C M Y K 5 f Close the top cover of the printer. Make sure that you need to the same color label on .
.... C - Black When you replace the belt unit with a new one, you match the toner cartridge color to reset the belt unit counter by completing the following steps: a Turn the printer power switch back on the printer. b Press + or - to choose Belt Unit. Yellow M - to the next menu level, and then... to proceed to choose Reset Parts Life. Magenta K - e Press OK two times. 121 Routine Maintenance e Slide each drum unit and toner cartridge assembly into the printer. C M Y K 5 f Close the top cover of the printer. Make sure that you need to the same color label on .
Users Manual - English
Page 133
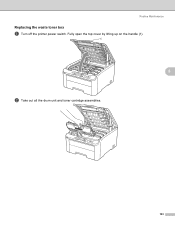
Fully open the top cover by lifting up on the handle (1). 1 5 b Take out all the drum unit and toner cartridge assemblies. 123 Routine Maintenance Replacing the waste toner box 5 a Turn off the printer power switch.
Fully open the top cover by lifting up on the handle (1). 1 5 b Take out all the drum unit and toner cartridge assemblies. 123 Routine Maintenance Replacing the waste toner box 5 a Turn off the printer power switch.
Users Manual - English
Page 134
c Hold the green handle of disposable paper or cloth underneath it in case you place the drum unit and toner cartridge assembly on your hands or clothes, wipe or wash it off with a sheet of the belt unit and lift the belt unit up, then pull ...it out. 124 Routine Maintenance IMPORTANT • We recommend that you accidentally spill or scatter toner. • To prevent damage to the printer from static electricity, DO NOT touch the electrodes shown in the illustrations. If toner scatters on a clean, flat surface with cold water at once. •...
c Hold the green handle of disposable paper or cloth underneath it in case you place the drum unit and toner cartridge assembly on your hands or clothes, wipe or wash it off with a sheet of the belt unit and lift the belt unit up, then pull ...it out. 124 Routine Maintenance IMPORTANT • We recommend that you accidentally spill or scatter toner. • To prevent damage to the printer from static electricity, DO NOT touch the electrodes shown in the illustrations. If toner scatters on a clean, flat surface with cold water at once. •...


